Content Authoring
Please note that Storyblok's documentation is currently undergoing major restructuring. Most resources can now be found on the dedicated documentation platform. This resource and others will be updated and moved shortly.
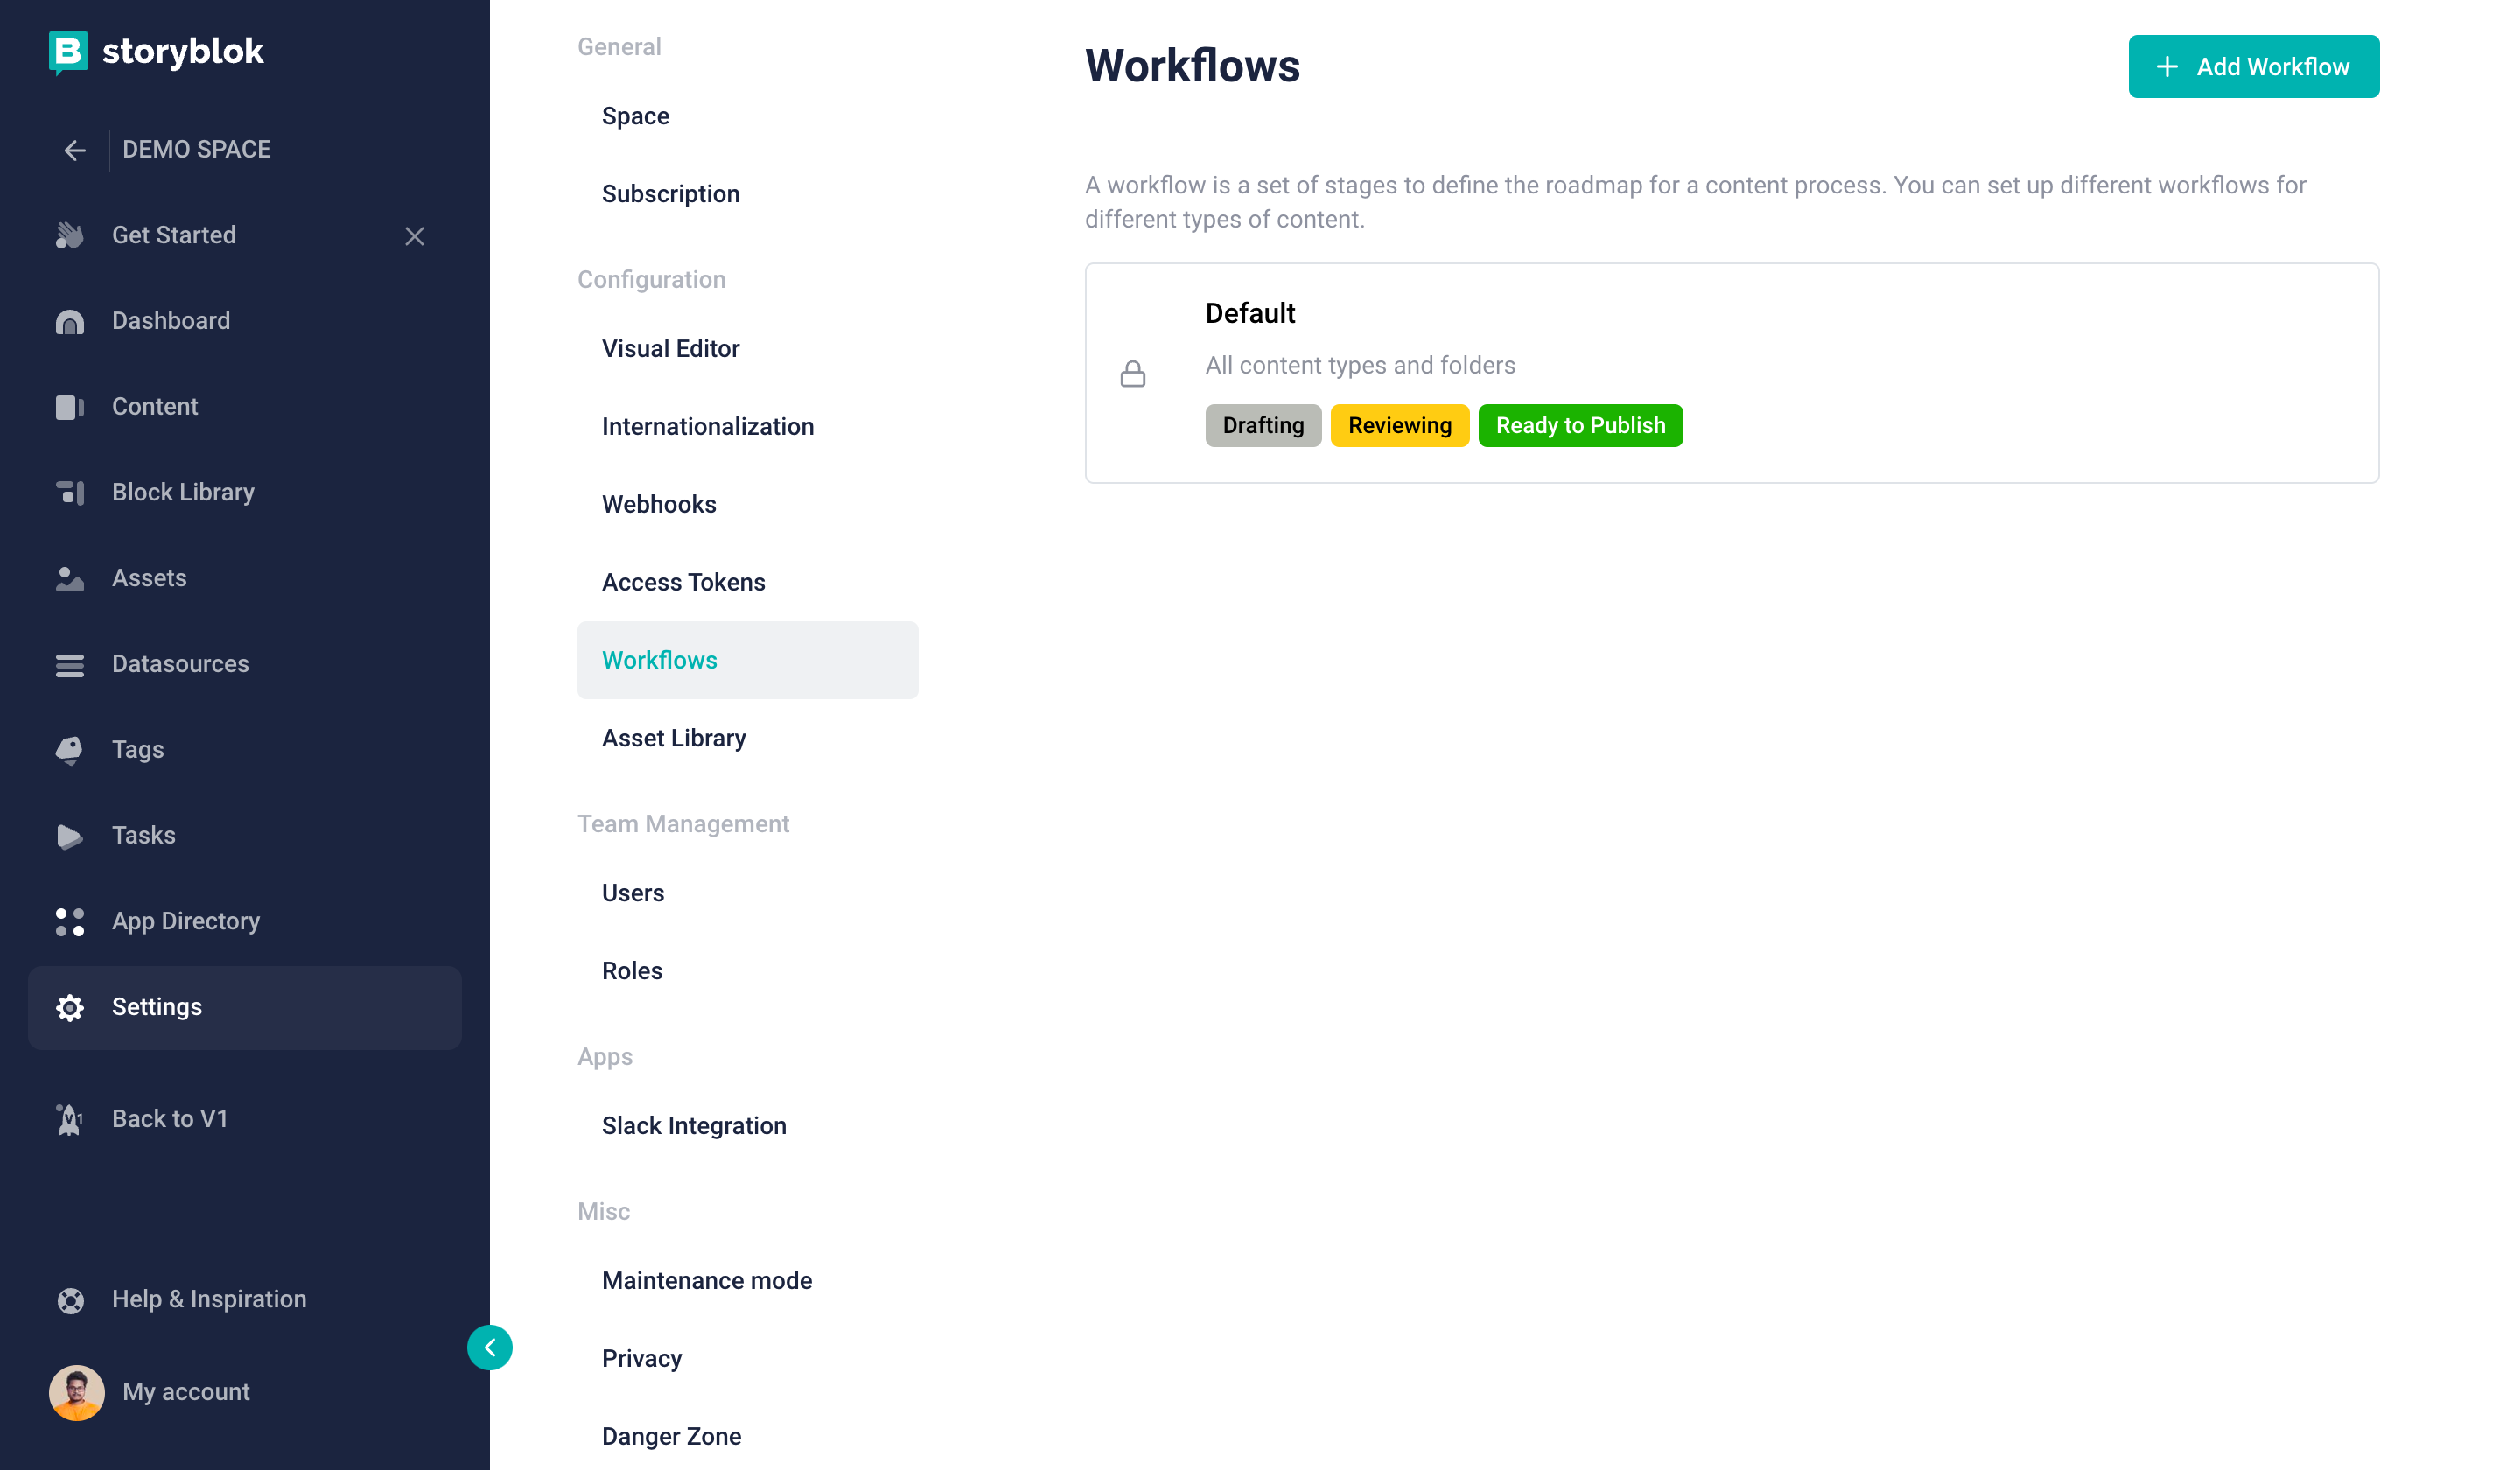
Content production in general requires workflows to make sure that every team member gets involved in the process of creating the story. Storyblok allows you to define your own custom workflows and rules to control the flow of this process.
Basic Workflows
Storyblok Workflows
This level of content authoring is available in the Free Plan and offers three basic stages with predefined settings. By default all stories will be set to the Undefined workflow stage after their creation. You have to manually change the workflow stage to Drafting if you want to use the benefits of the workflows. Next, you will be forced to follow the process through the Reviewing stage to the final Ready to publish stage, in which you can publish your Story.
Default workflow for all content types
The settings of all stages in the Basic Workflows are already predefined and can be changed in higher plans, where you can create your own custom workflows and custom workflow stages and define your own set of rules/settings.
| Workflow Stage | Description |
|---|---|
| Not Defined / Undefined | In the case of the Free Plan, or deletion of the used workflow stage, the stage of the story will be changed to an undefined stage. |
| Drafting | Initial state of the story if the content authoring is enabled. At this stage, users are working on the draft version of the story and are not allowed to publish. |
| Reviewing | Story is sent to review to one or multiple reviewers (users of the space). |
| Ready to publish | Story is ready to be published and any user of the space may publish it. |
You are able to use a webhook, which will always be triggered as the stage of the story is changed. The body of the request sent to the webhook URL will look like the following JSON object:
{
  "text": "The workflow stage of story Test has been changed to Reviewing.",
  "action": "stage.changed",
  "space_id": 123,
  "story_id": 1234,
  "workflow_name": "Default",
  "workflow_stage_name": "Reviewing"
}
If you are using legacy webhook you will get the following JSON payload.
{
  "text": "The workflow stage of story Test has been changed to Reviewing.",
  "action": "workflow_stage_changed",
  "space_id": 123,
  "story_id": 1234,
  "workflow_name": "Default",
  "workflow_stage_name": "Reviewing"
}You can easily inspect the body of the request sent to the URL of the webhook by using RequestBin.com service. Read more about it in this article.
How to Change the Stage of the Story
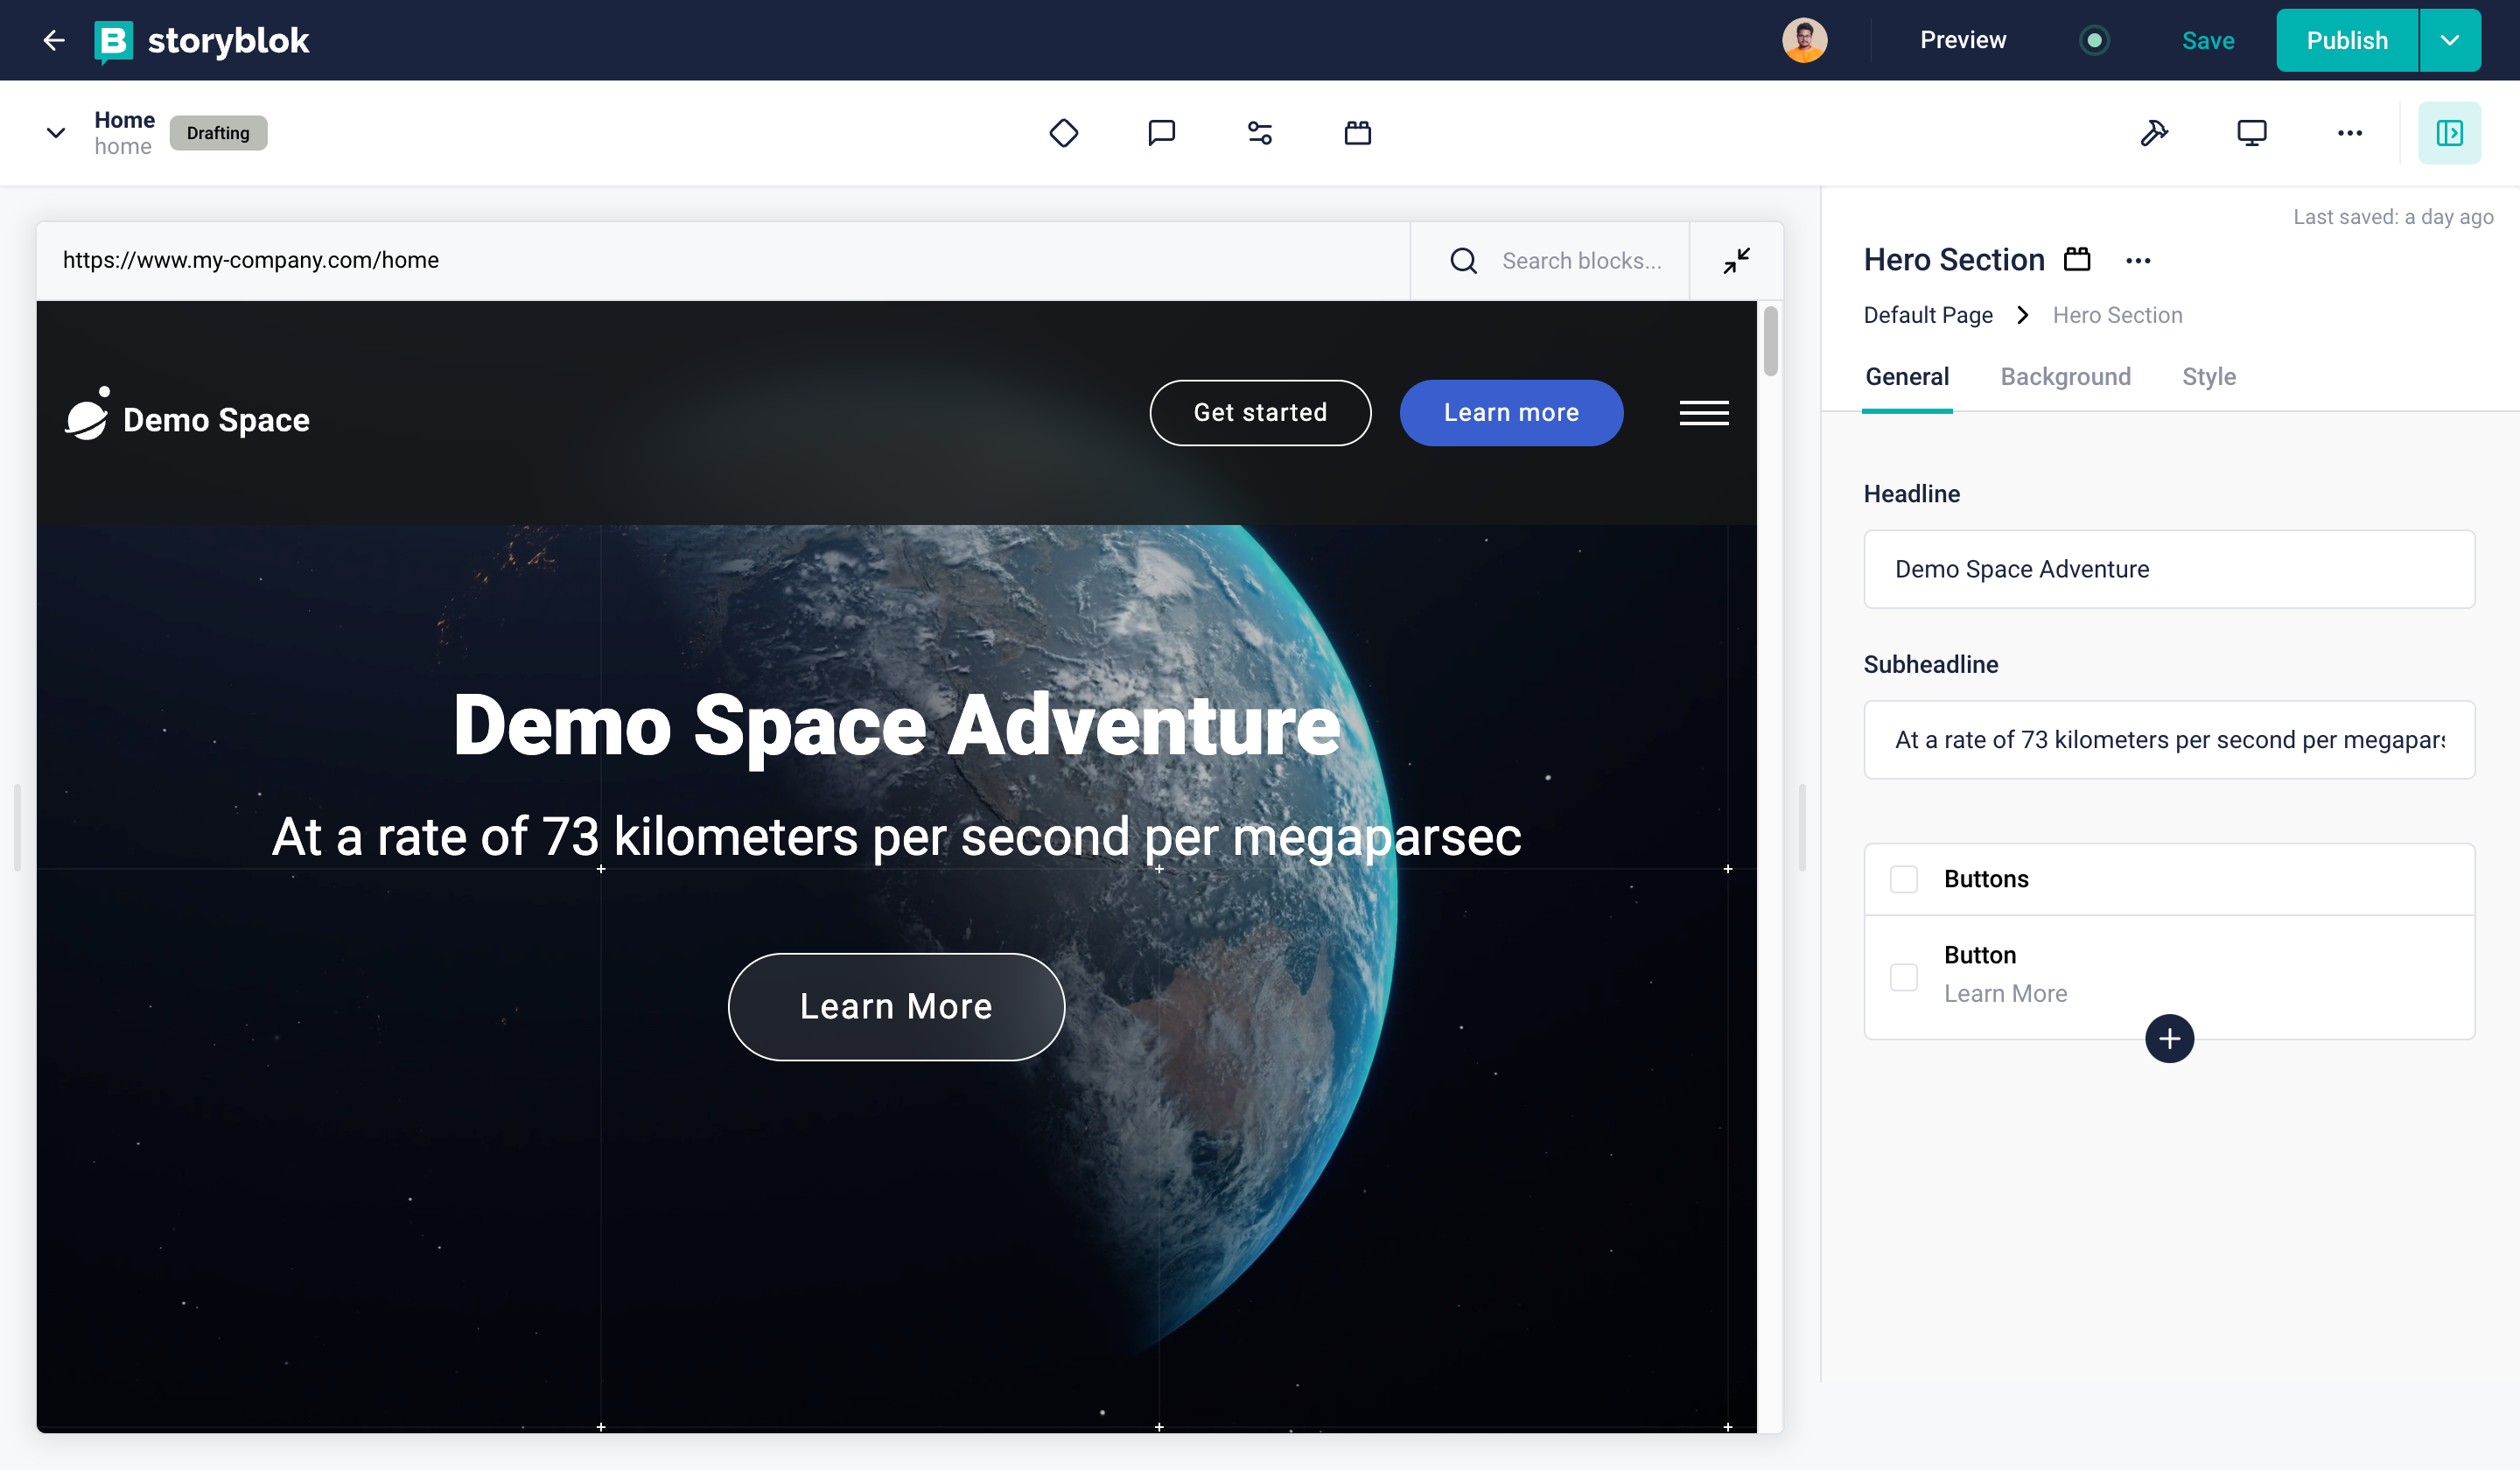
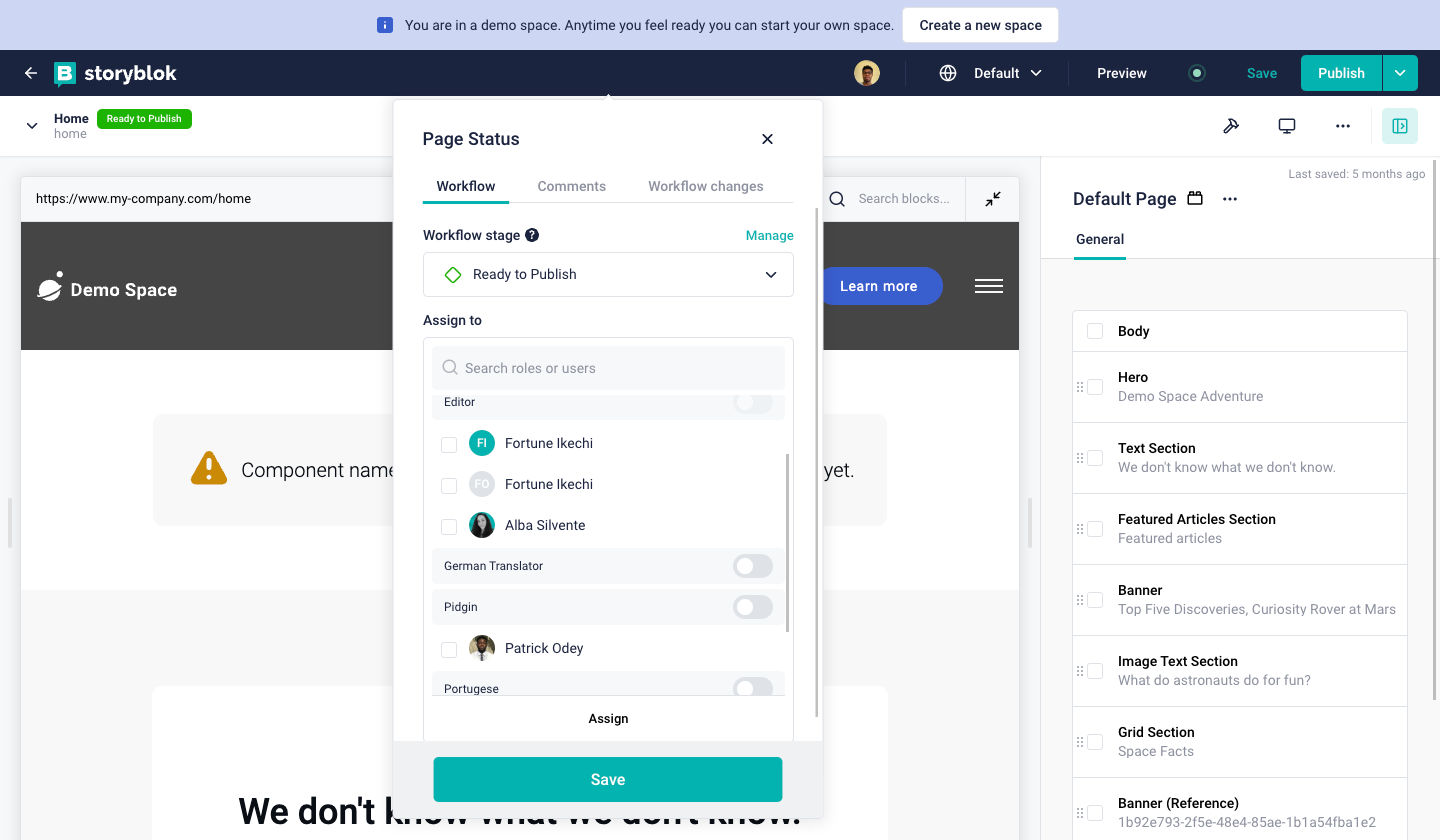
You can change the stage of the story in the Visual Editor of the Storyblok app with these steps:
- Open the Story in the Visual Editor
- Click on the Workflow stages {1} link.
- Select the desired stage from the list {2}.
- You can assign this new stage to a particular user or role {3}.
- Click on the Save button {5}.
You can leave a comment when changing the stage{6}, and also notify users about this action through email{7}.
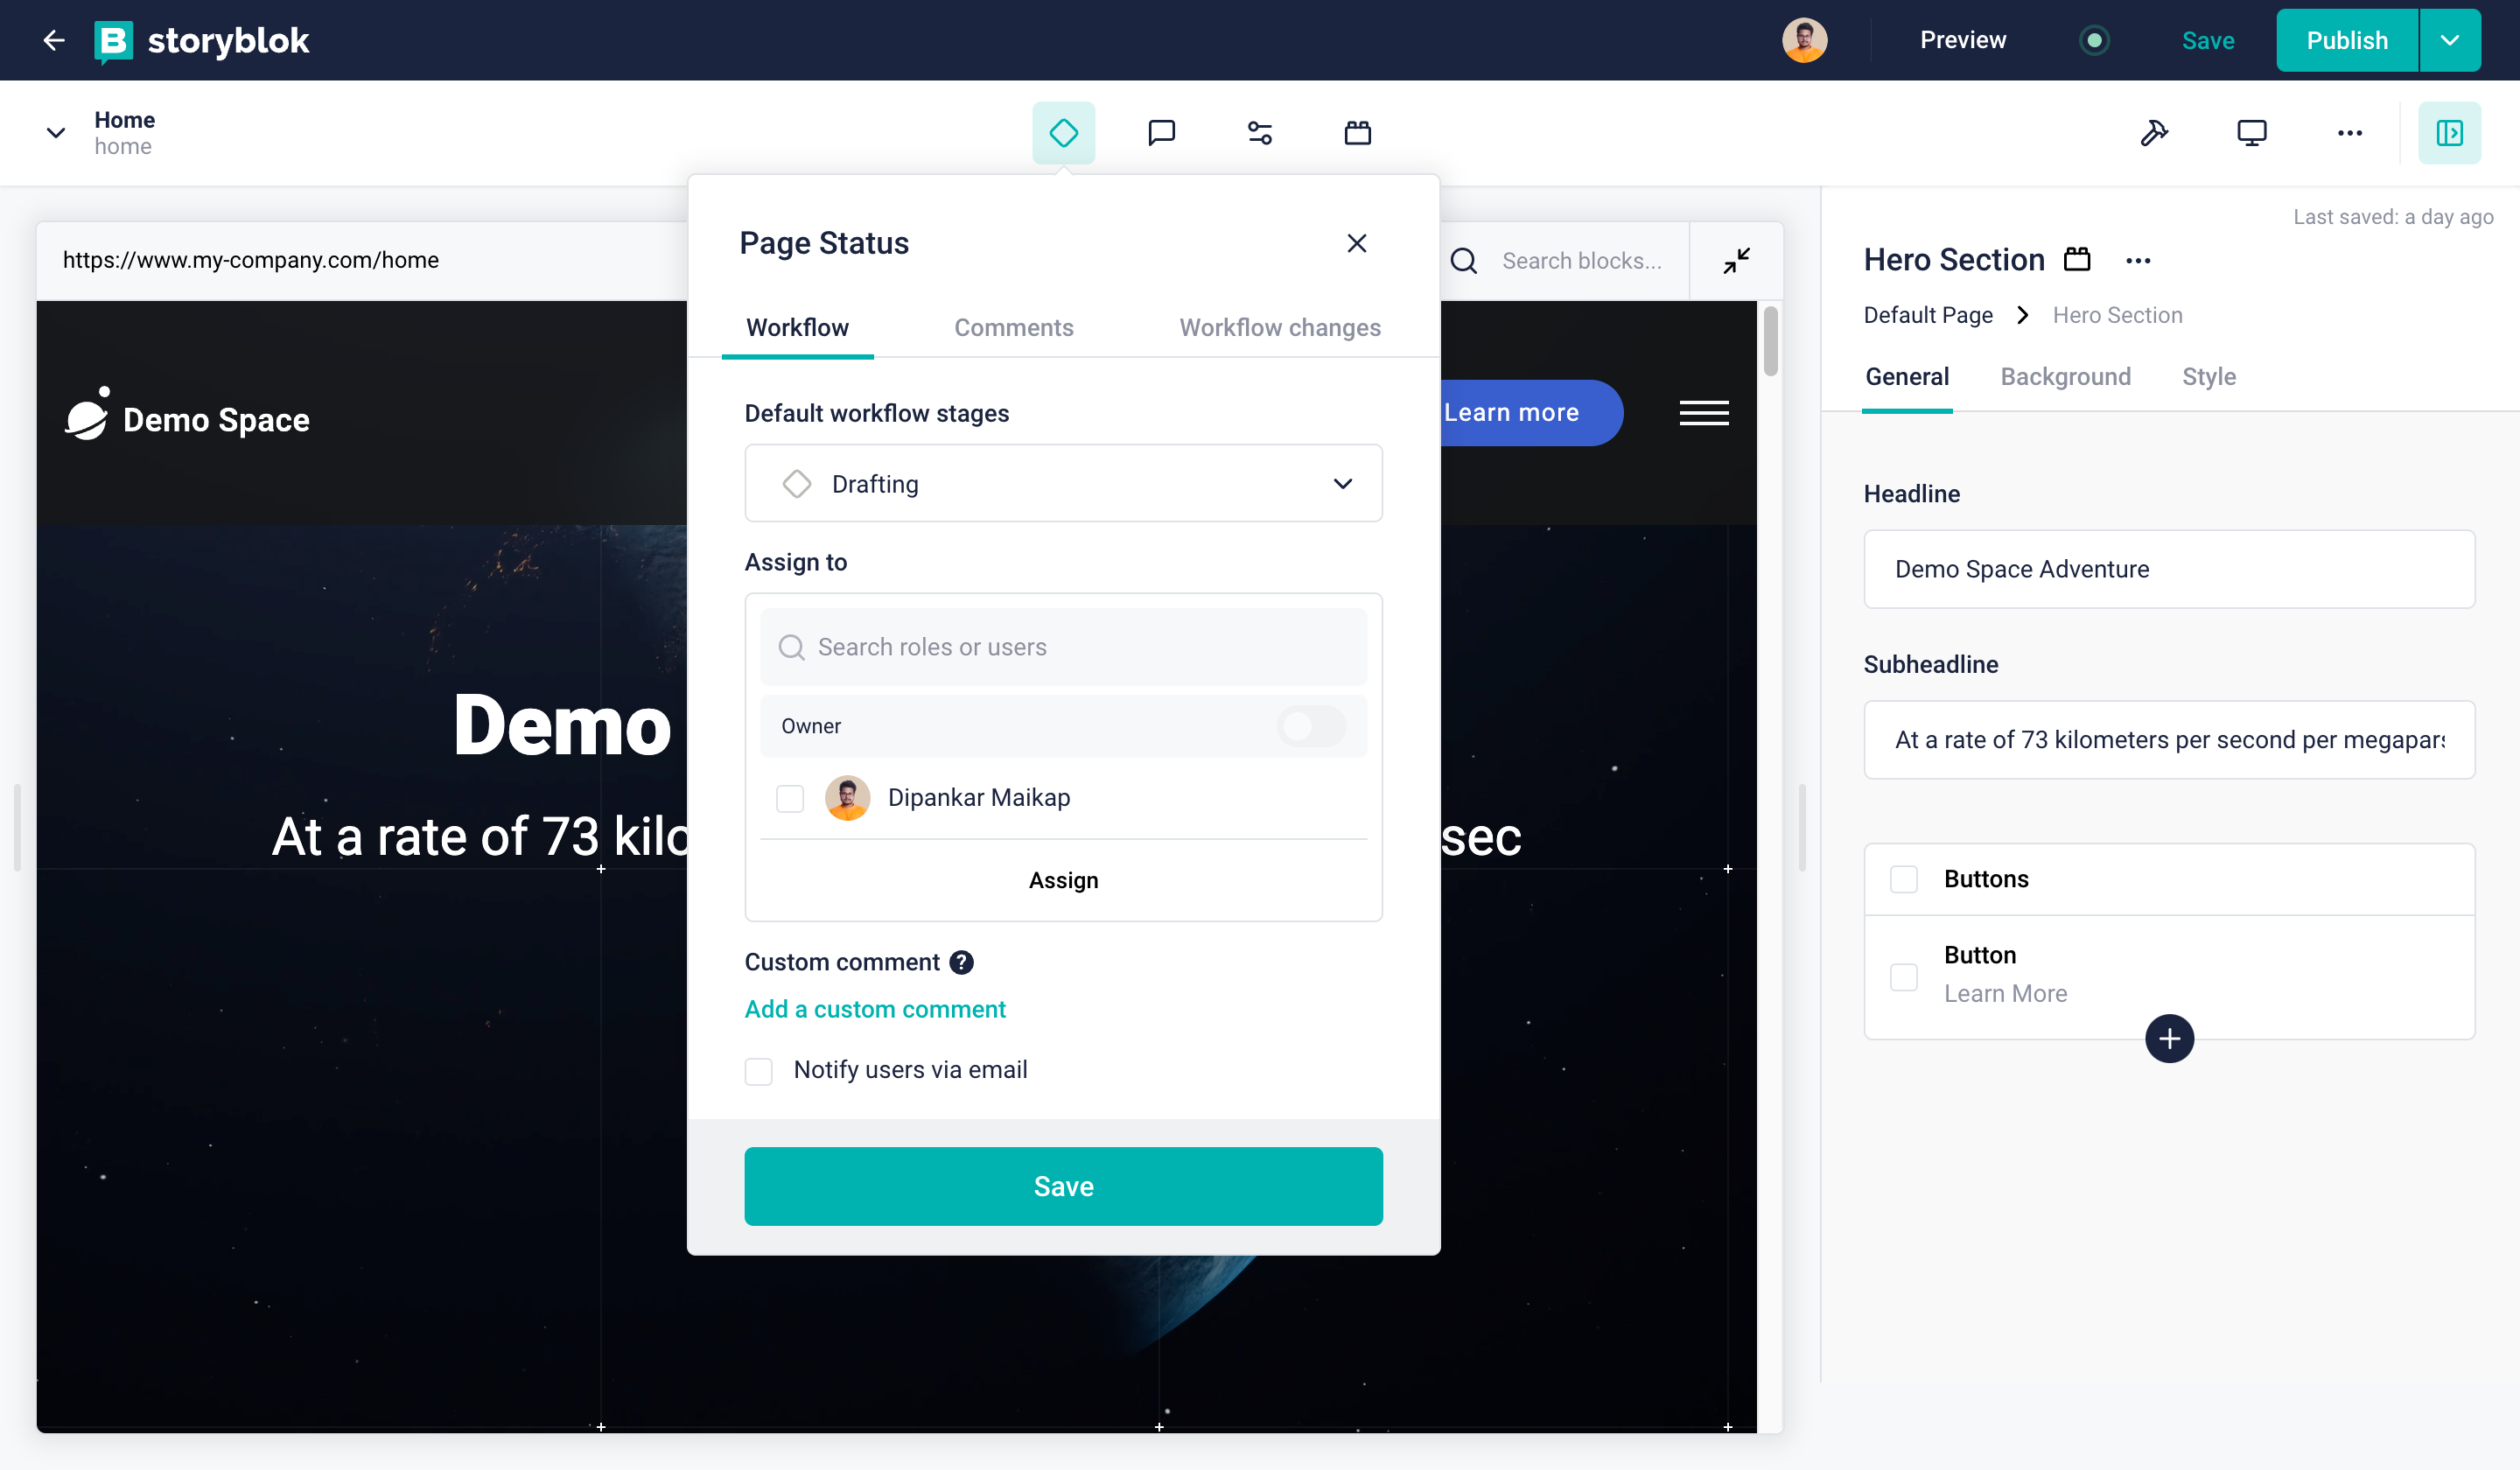
Change the workflow stage of a story
You can also change the stage of the Story by using the Management API. Read more in the documentation of MAPI - Workflow Stage Changes.
How to Inspect the Stage of the Story
You see the current stage of a Story in the "Workflow Stages" menu inside the Visual Editor{1}.
Inspect current workflow stage
You can also filter all stories of a selected stage using the filter in the Content section.
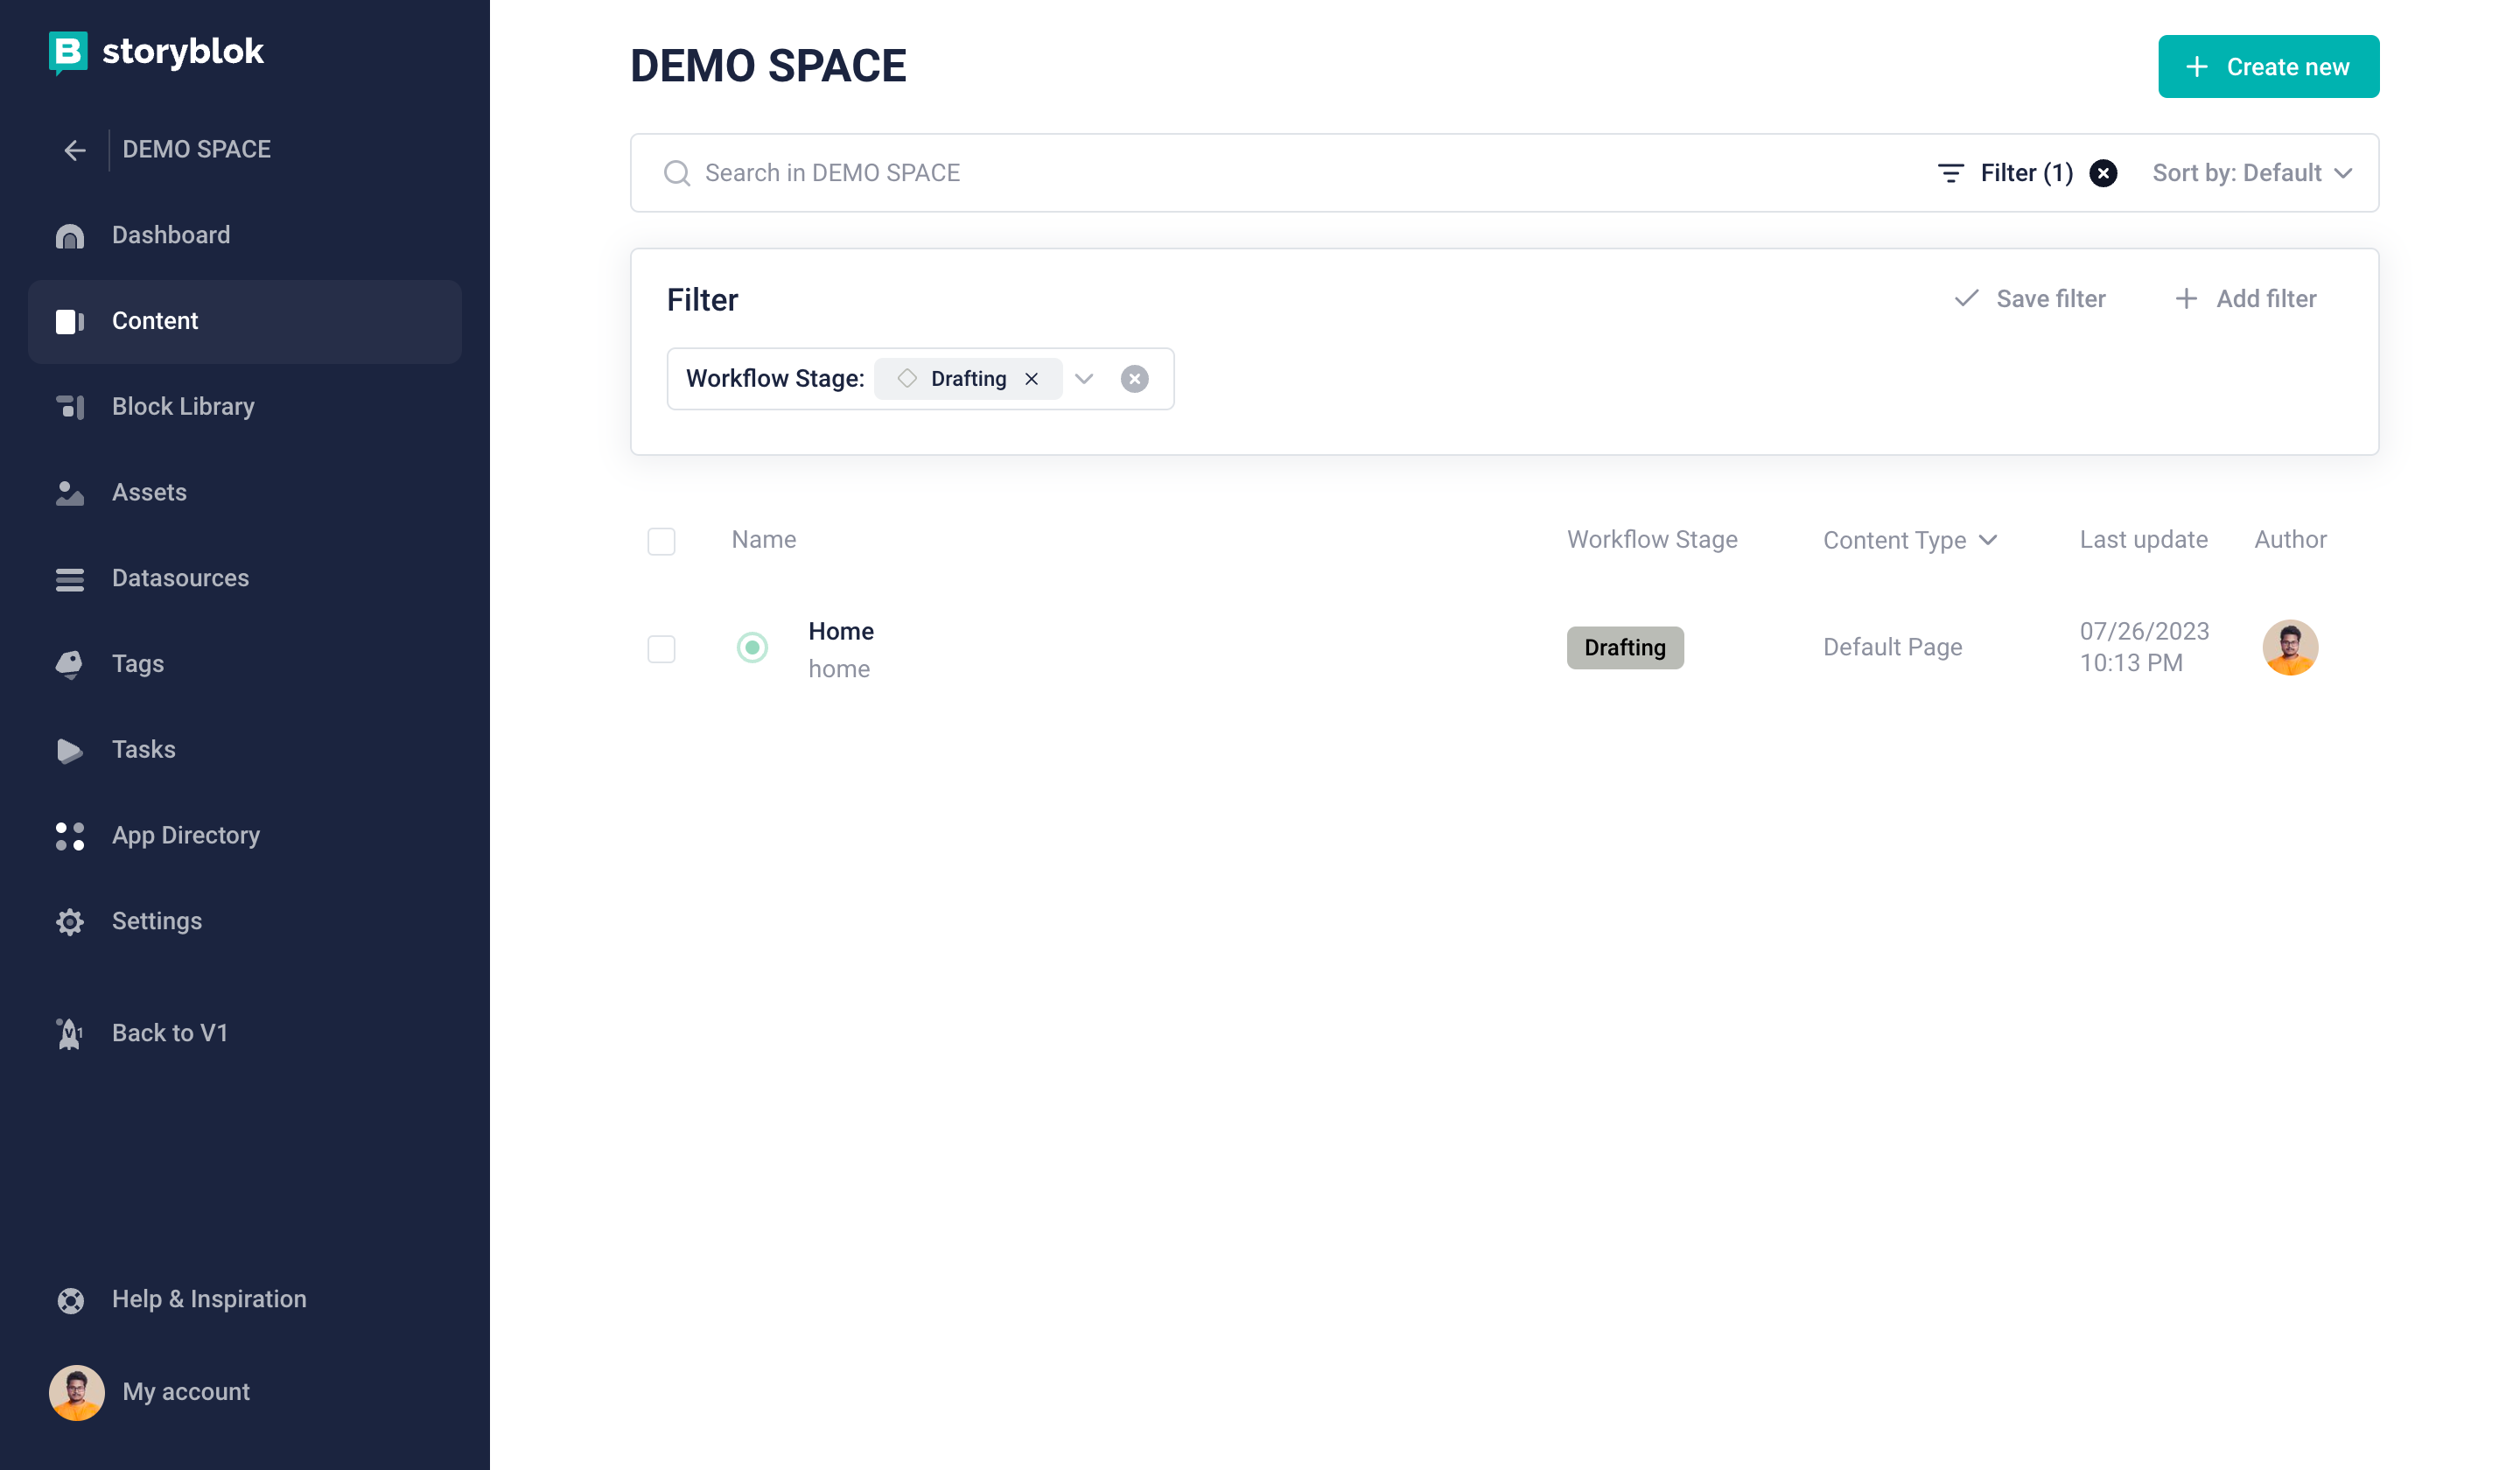
Filter content via workflow stage
Custom Workflows are only available in higher-tier plans. Please refer to the pricing page to learn more.
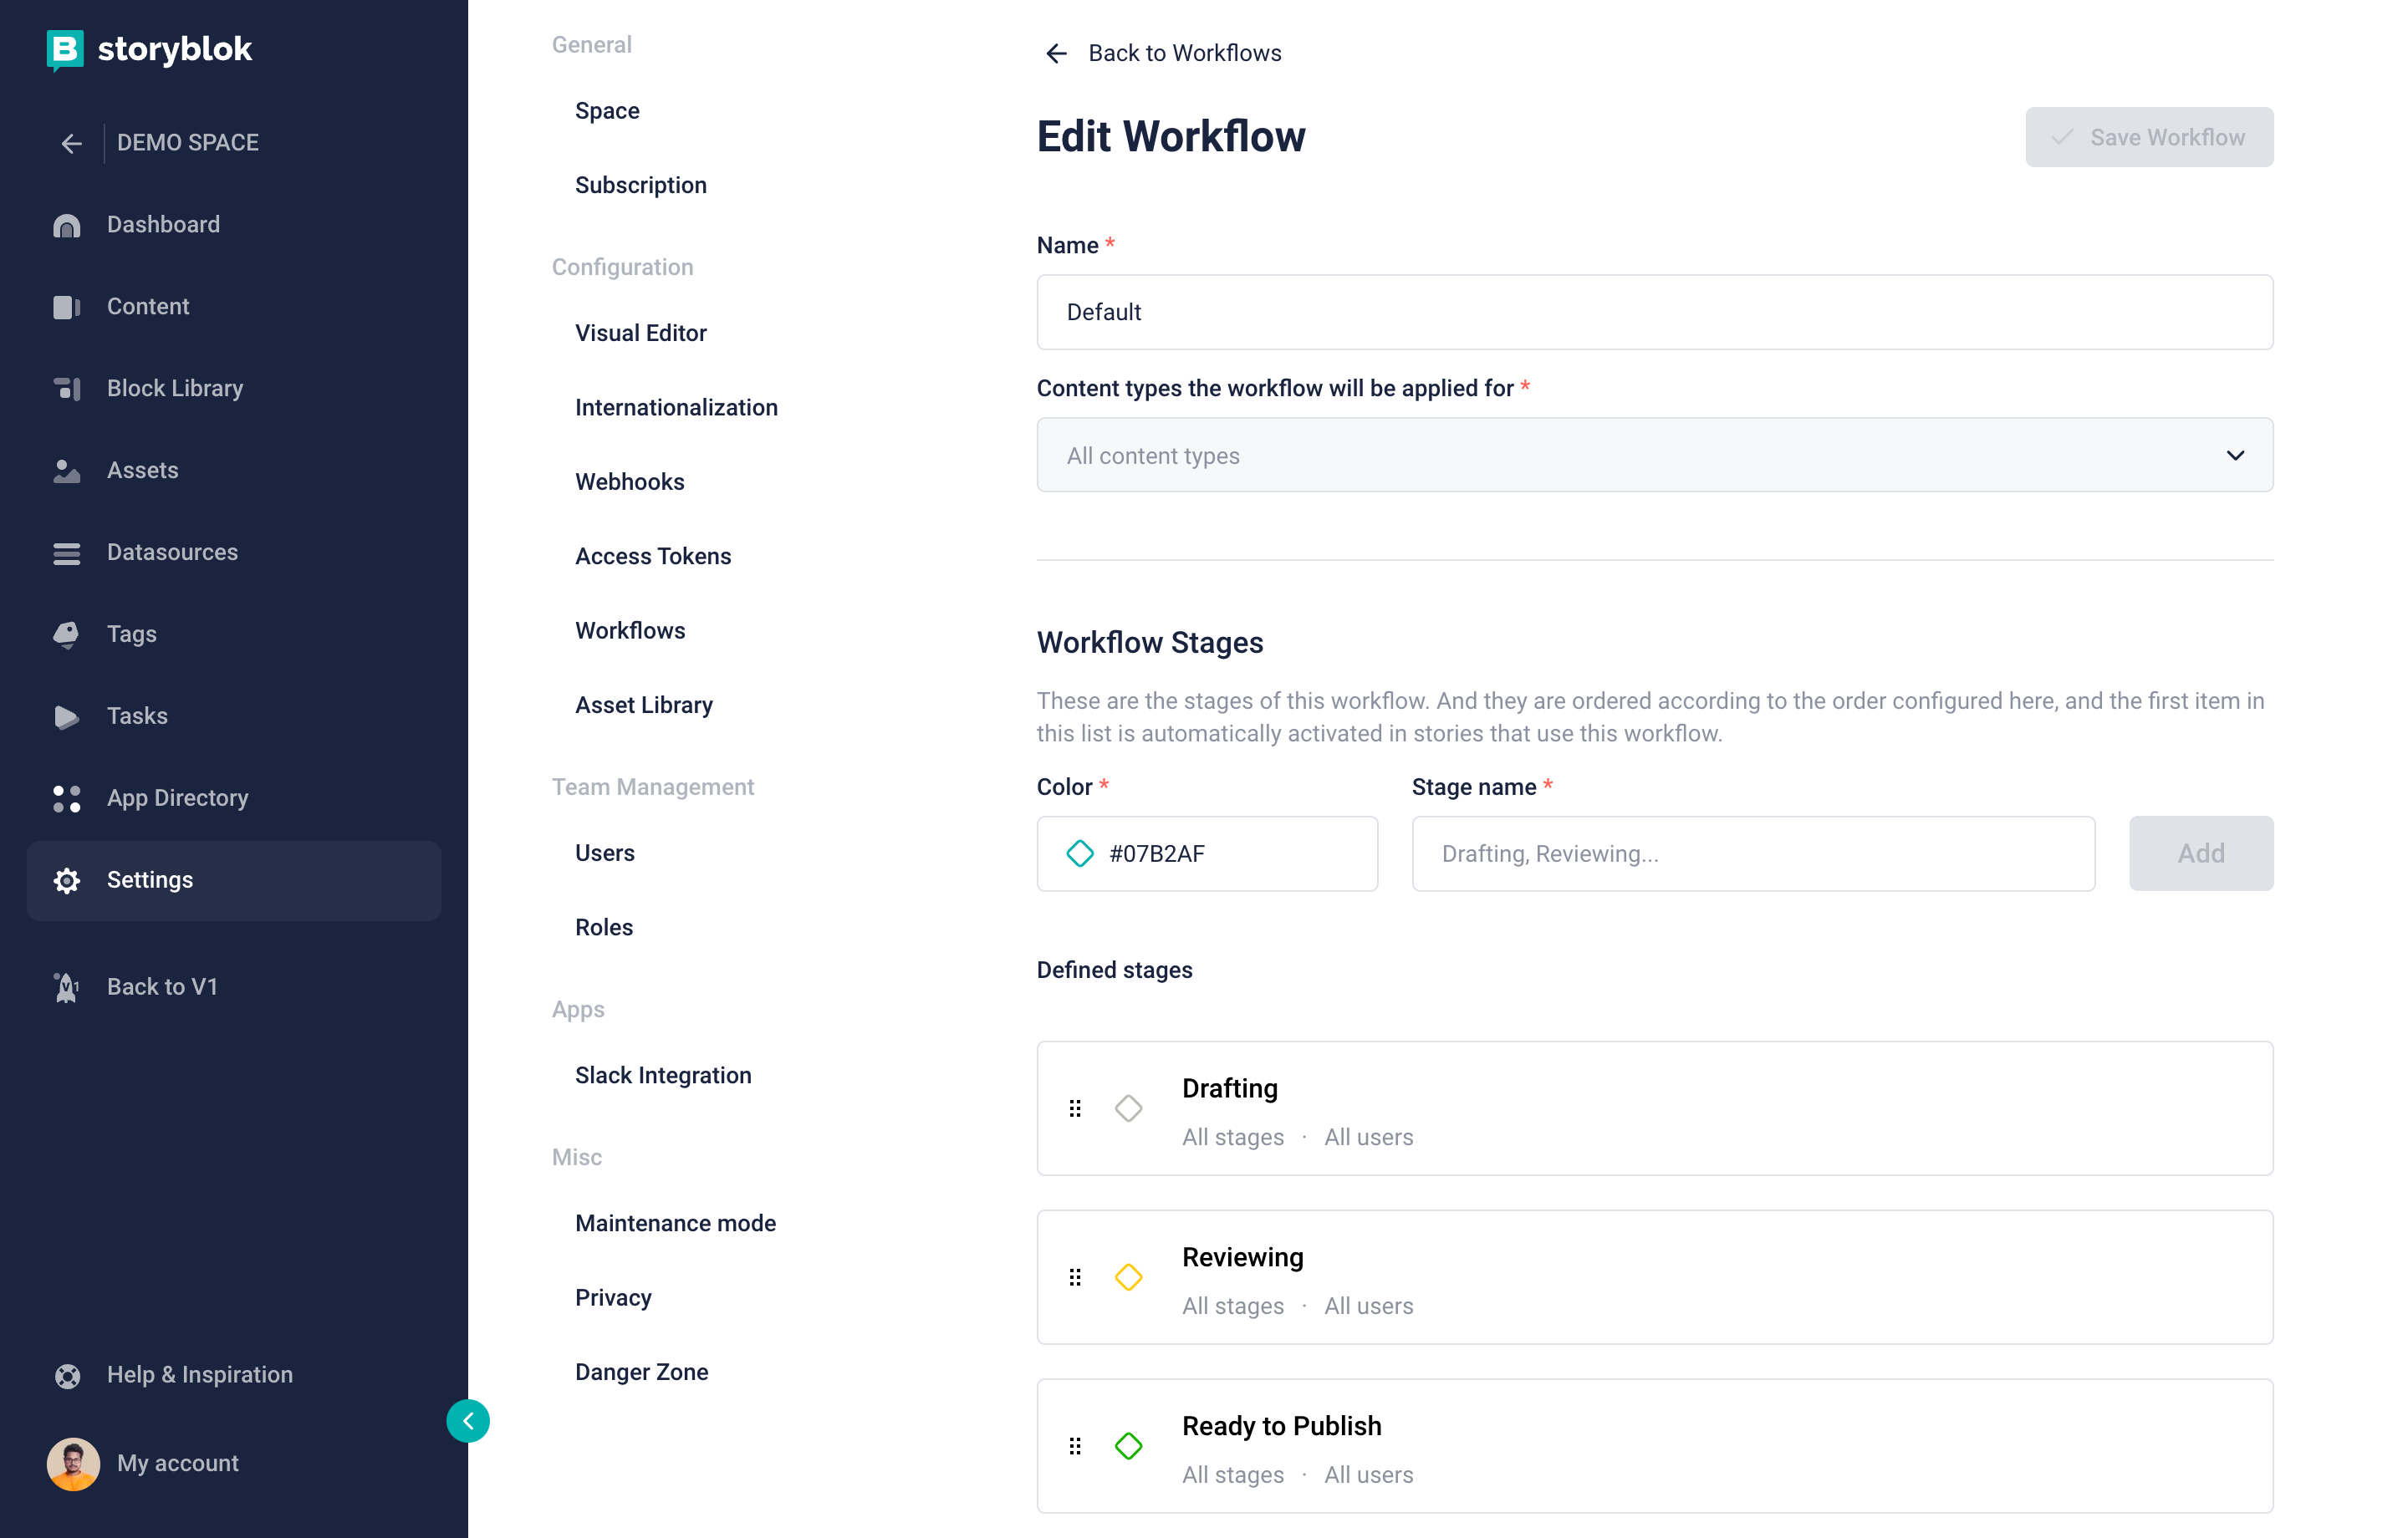
Using the Custom Workflows functionality you are able to define your own content authoring process for a specific content type.
Create new Workflow
You can create a new Workflow in the Settings section, in the Workflow tab.
Create new workflow
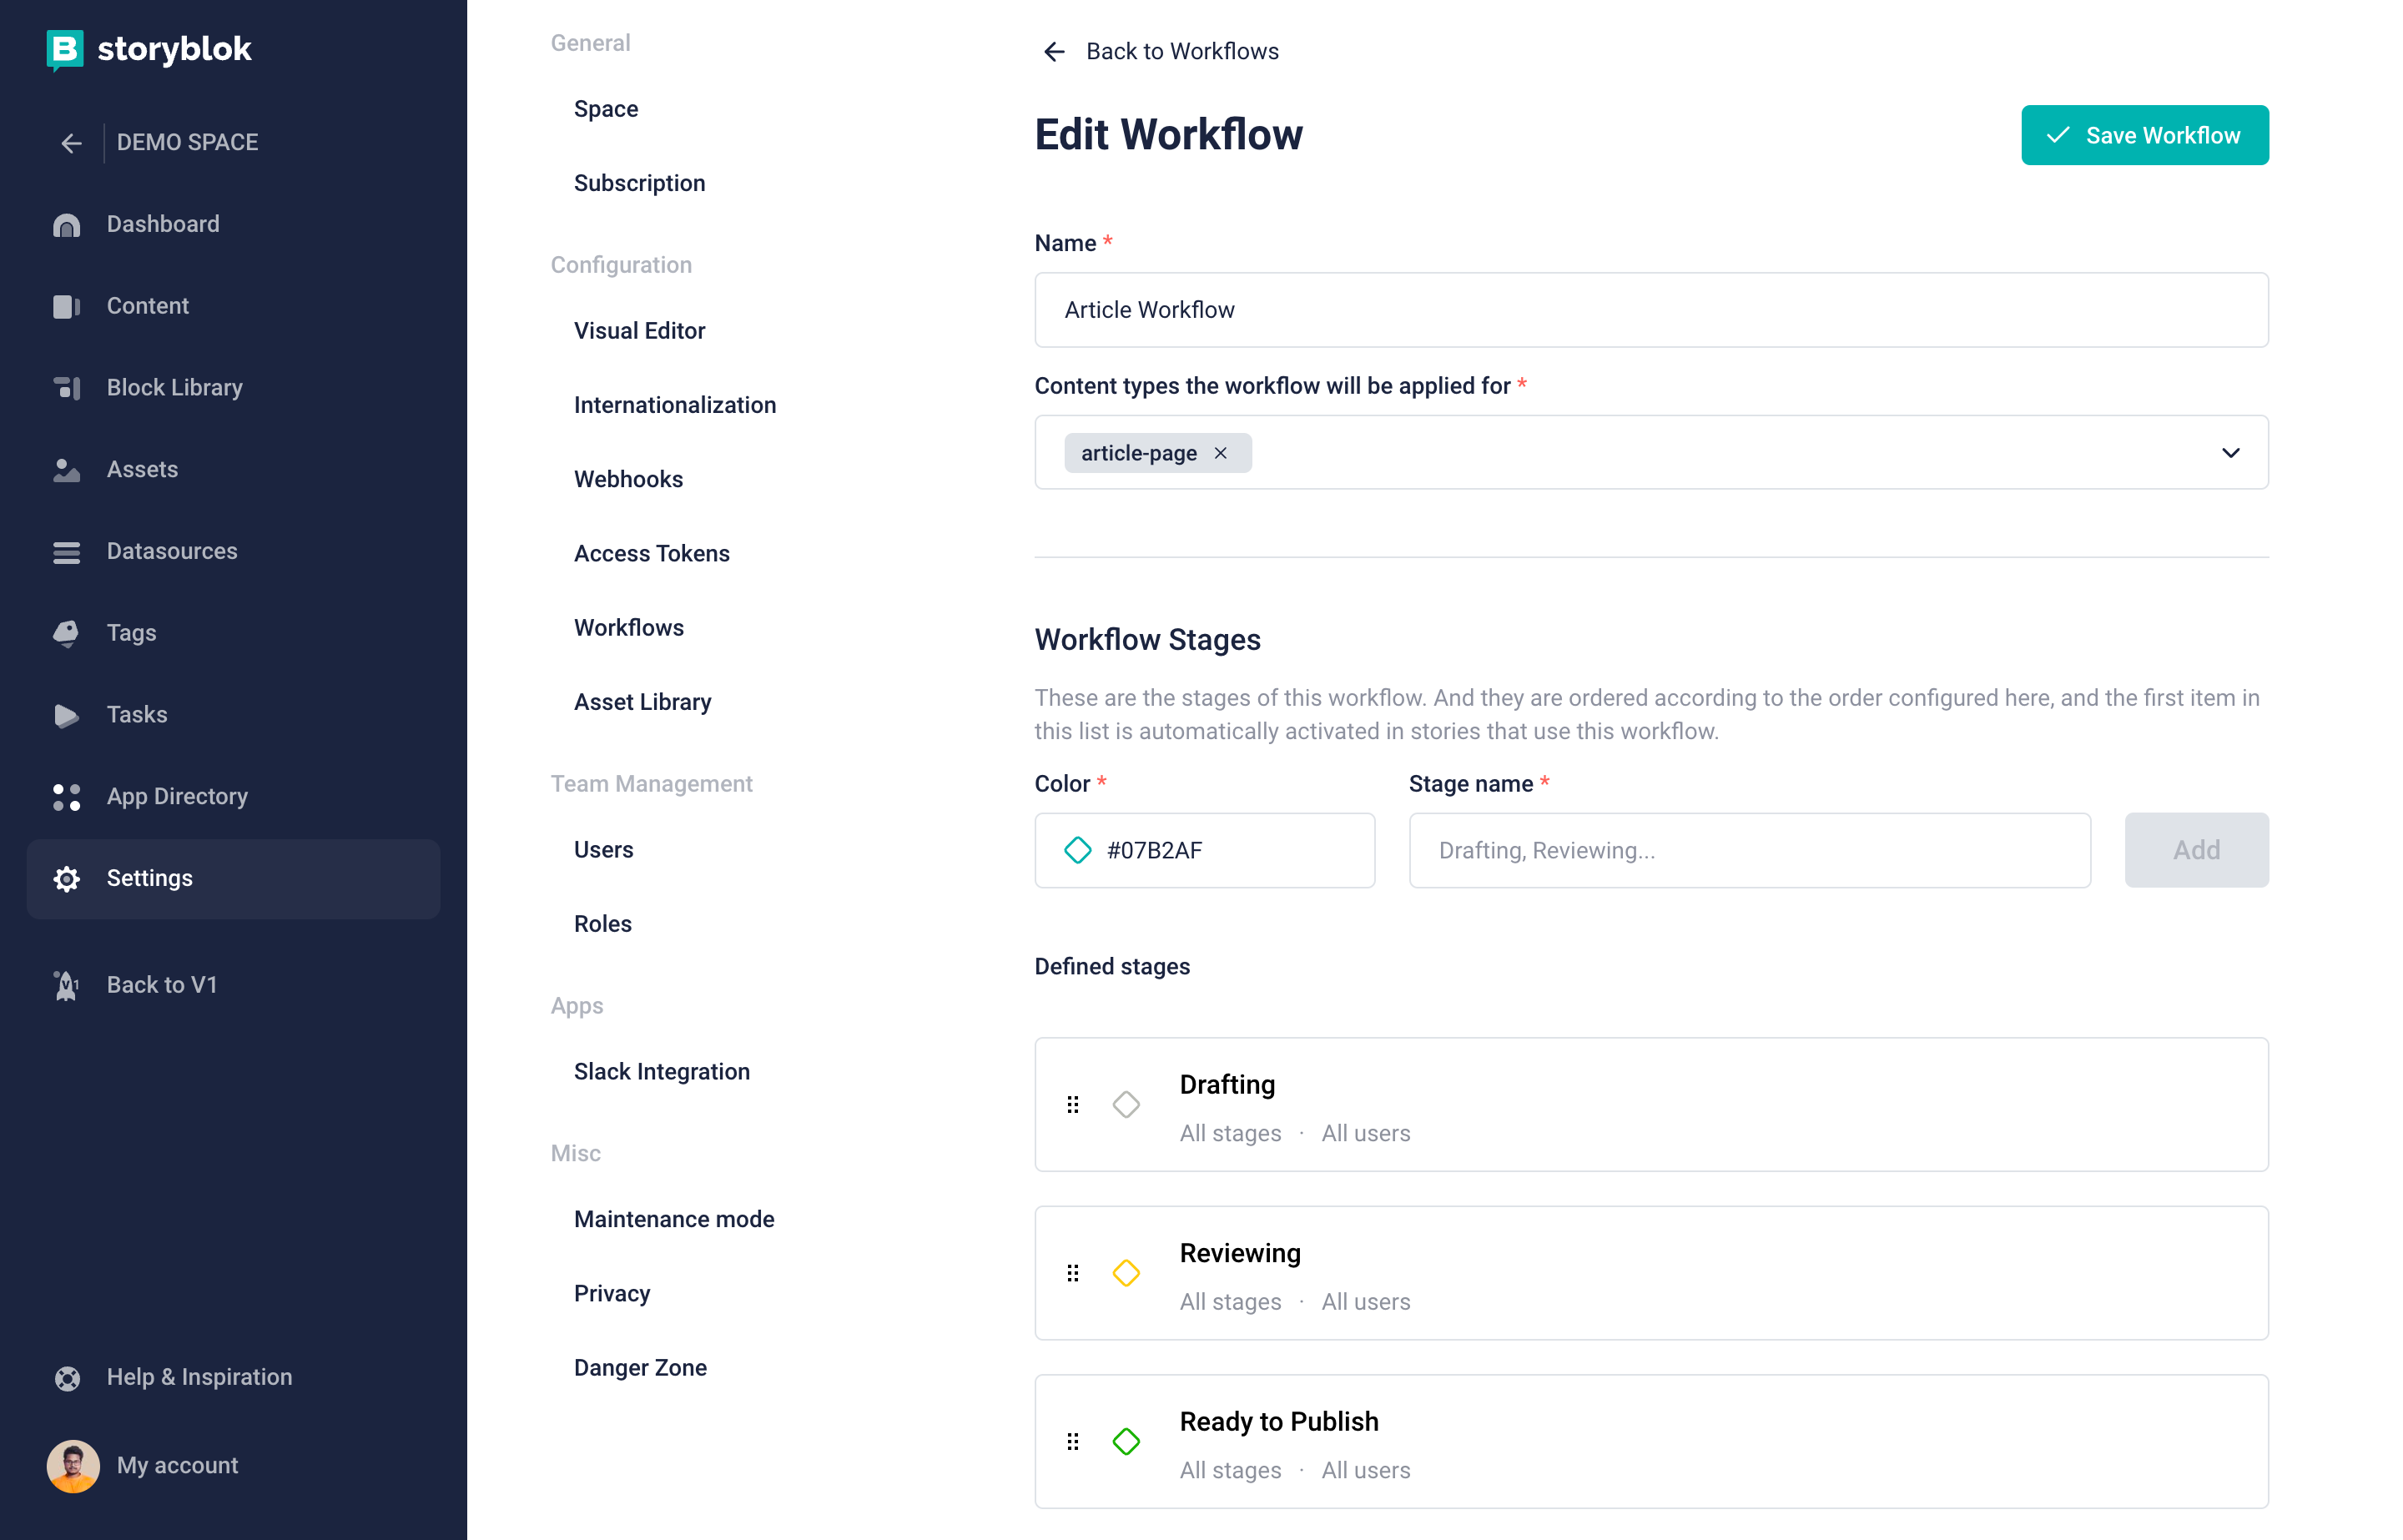
In order to create a workflow you have to fill in two required fields. Follow the below image steps.
- Name{1}
- Content types the workflow will be applied for{2}
- Save Workflow{3}
Configure a Workflow
Custom Workflows Stages are only available in higher-tier plans. Please refer to the pricing page to learn more.
Create new stage
You are able to create multiple workflow stages for each workflow. You can also define their rules and order of them.
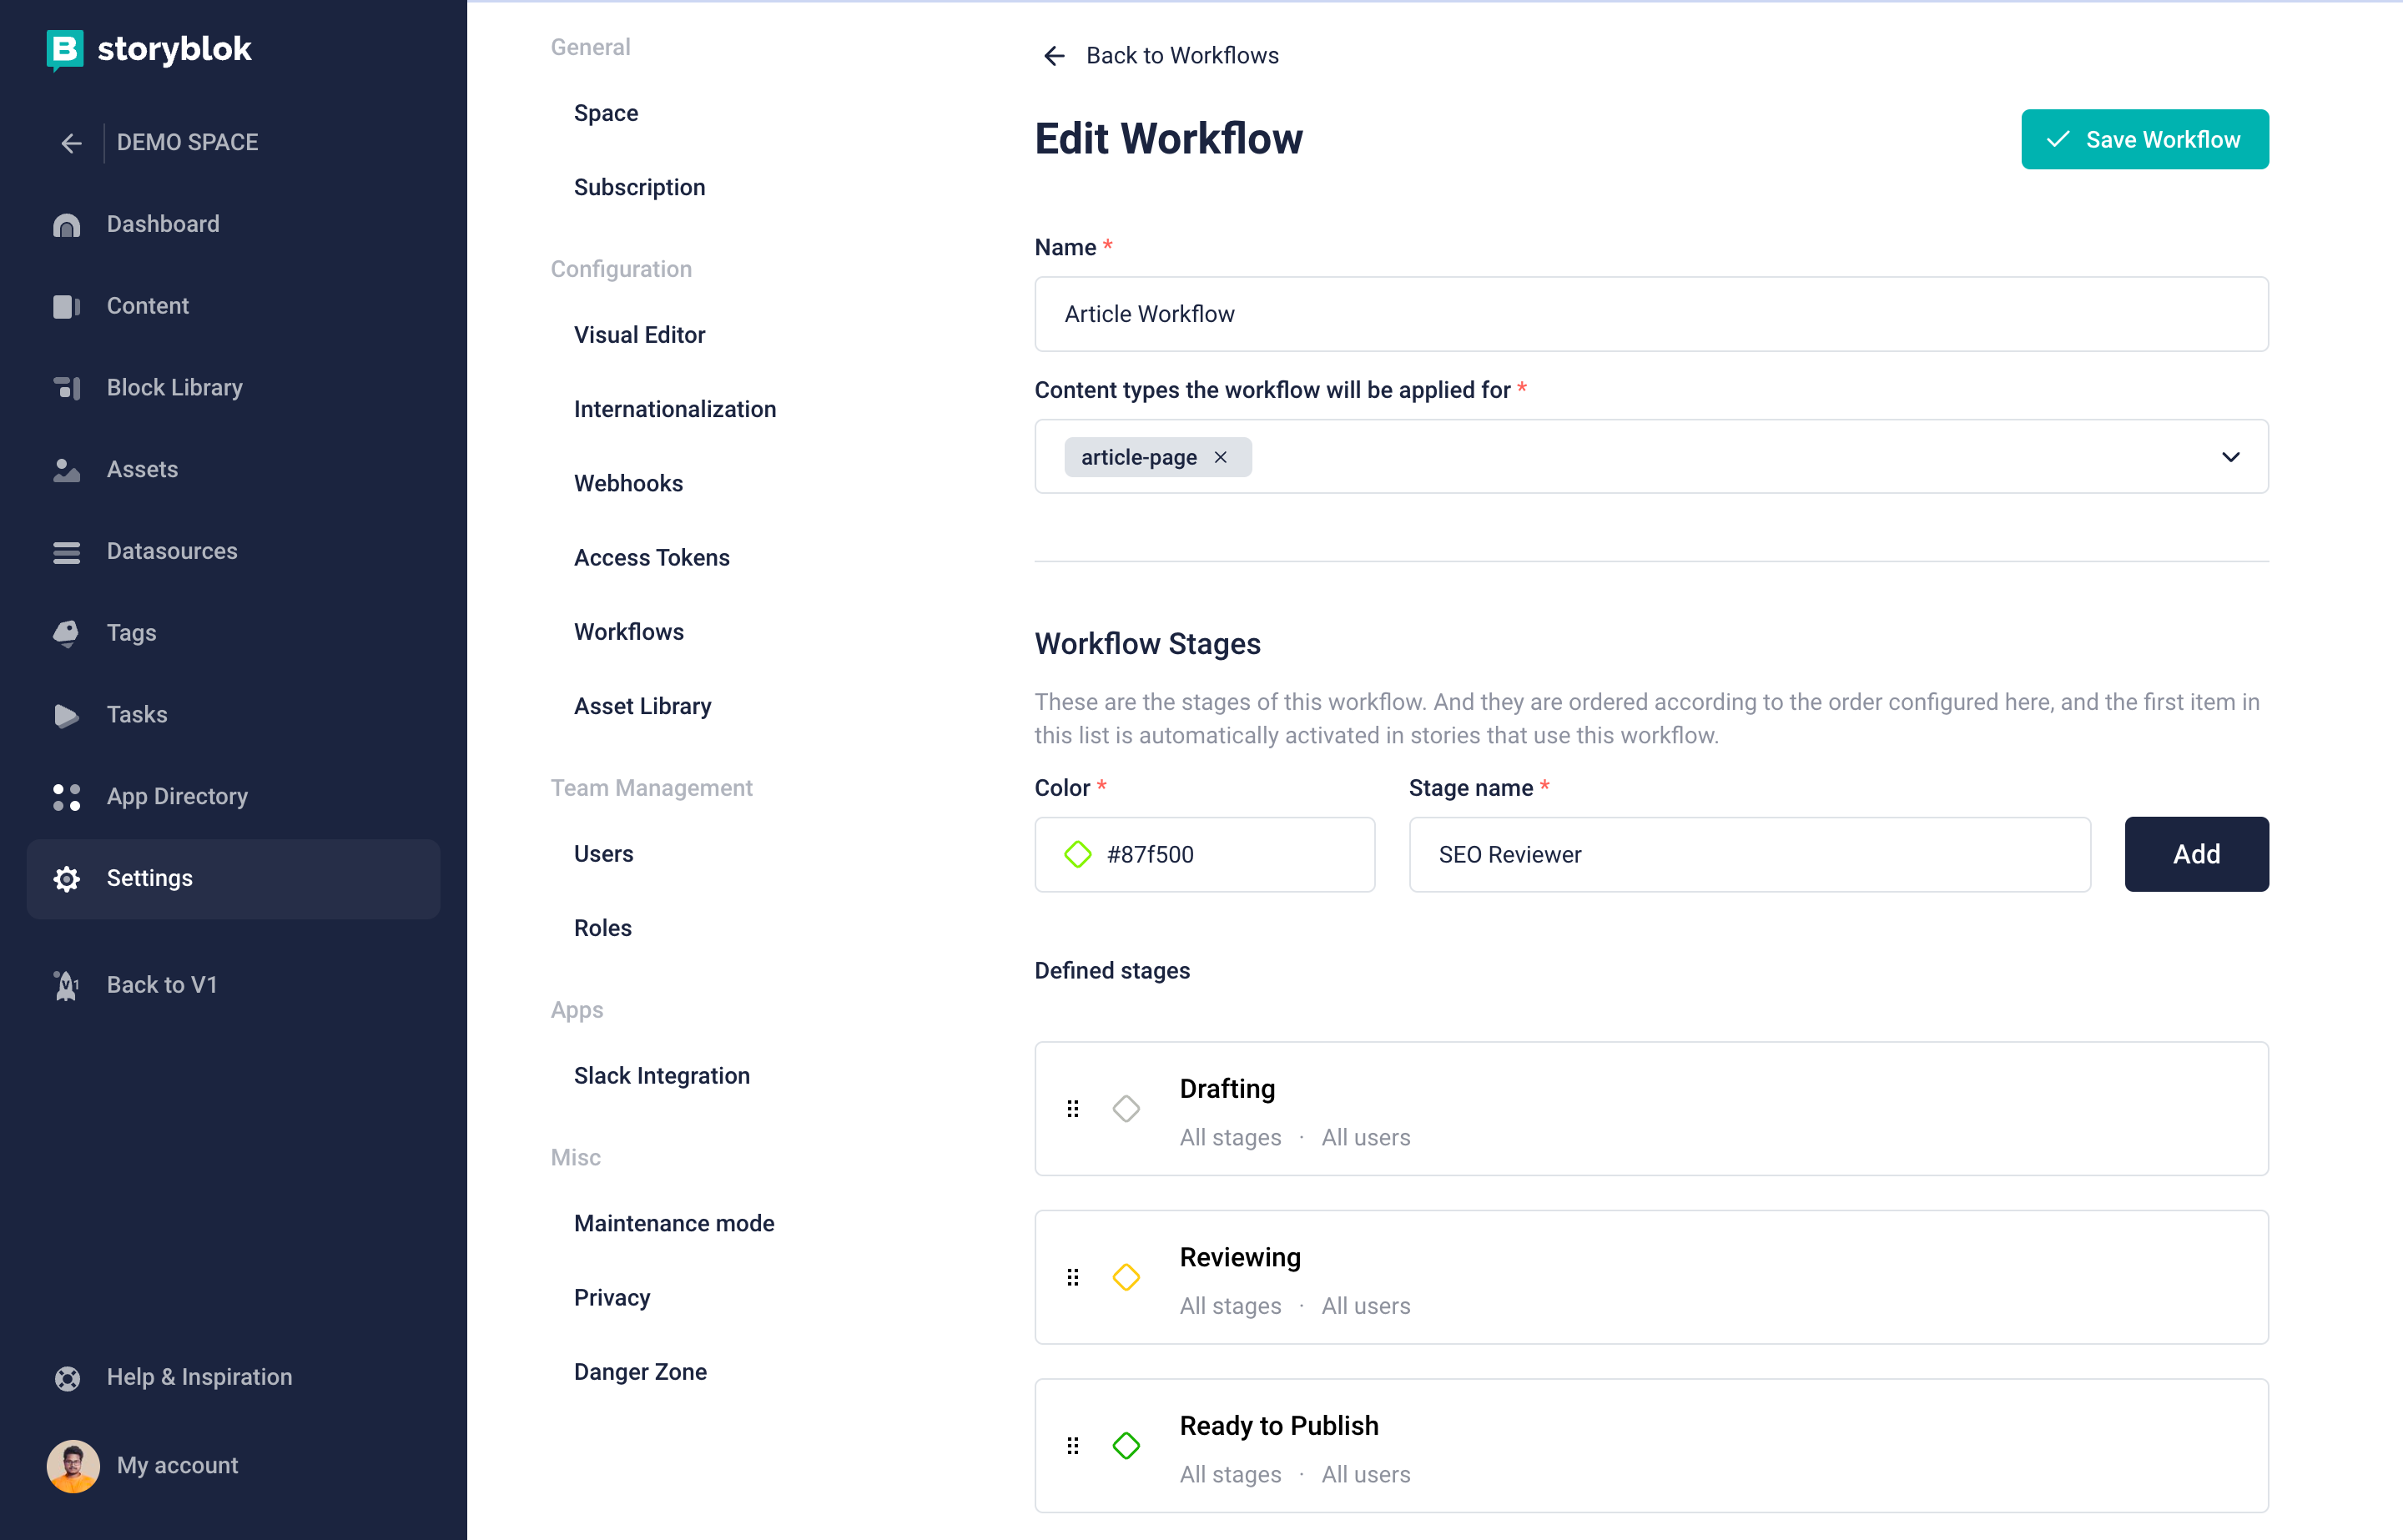
Create a new workflow stage
You can create and manage your custom workflow stage using the Managment API. Read more in the documentation of the Management API.
Customization of Workflow stages
The setup of the stage is reached by clicking on the cog icon in the same row as the name of the stage.
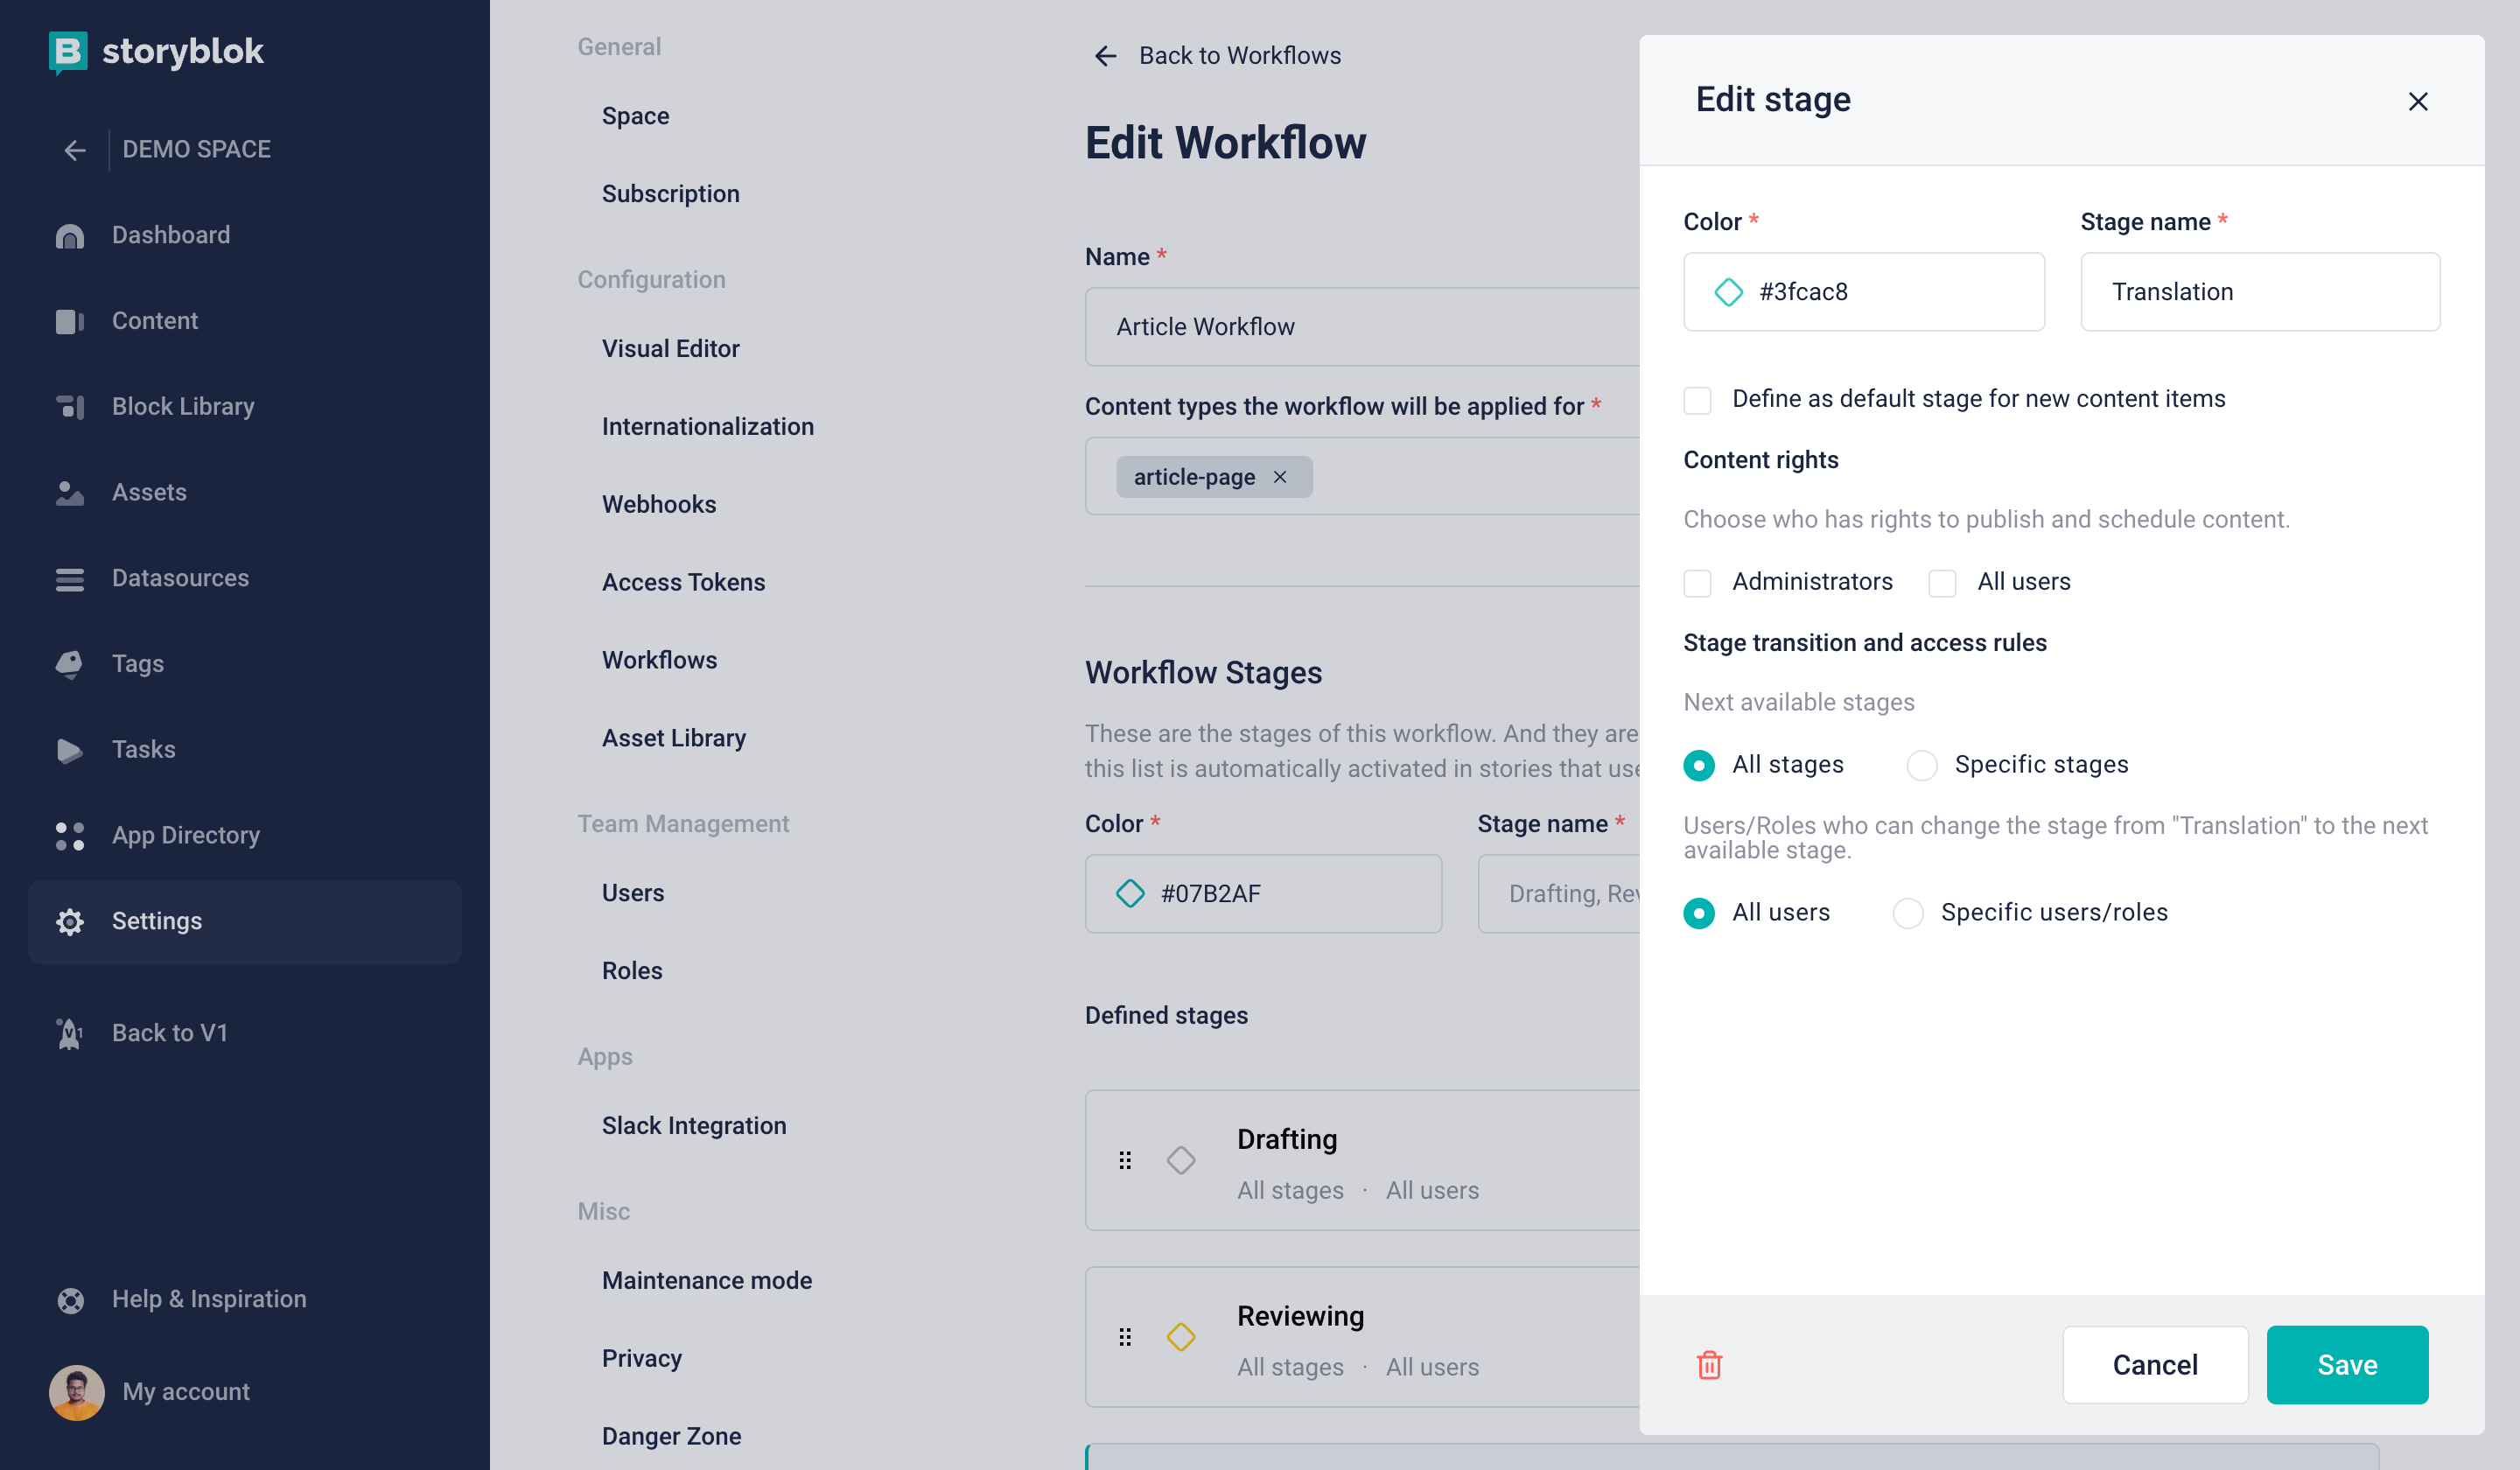
You can set up the following properties of the workflow stage:
| Property | Description |
|---|---|
| Stage Name | A label used to identify the stage. |
| Color | A RGB code of the color representing the stage. |
| Define as default stage for new items | If active, all new Stories will be created within this stage. |
| Content Rights | If active, choose who has the right to publish and schedule content. |
| Next available stages | If active, you may specify the list of stages that are available as next stages, from the current stage. |
| User(s)/Role(s) who can change a stage to the next available stage | Specified list of users or roles, they are allowed to change the stage from the current stage to one of the next allowed stages. |
You can remove the workflow stage by clicking on the trash icon at the end of the workflow stage row. In this case, the stage of all stories, with deleted stage, will be moved to Not Defined stage.
Approval
As you are changing the workflow stage of the story, you may assign users, roles, and multi-role users to approve the changes and move the story into the next stage. Do this by selecting user/role in changing the stage in the "Workflow Stages" option in the Visual Editor.
Storyblok will notify the user(s) assigned to the Story by email if you activate the checkbox Notify users via email. Otherwise, the assigned user(s) will find the notification in the Assigned to me section of the Dashboard only. Learn more about the Dashboard in the Understanding the UI chapter of this guide.
You can assign multiple users/roles in the approval process.
You may restrict the list of users who have permission to change each stage in the settings of the stage. Read more in the chapter Customization of Workflow stages.
Commenting and Discussions
Storyblok offers the possibility of commenting on each story. You can leave notes for later, or start discussions with your co-editors.
You can leave a new comment at any time, related to any block or field of a story, by clicking on the Start a discussion {1} button inside the Visual Editor. You can also tag another user of the space by typing "@" + their name. Multiple comments can be added to the same discussion, in order to collaborate with other people during the content creation process. When an editor is tagged in a discussion or comment, they receive an email notification with a link to the comment page and space.
If you want to review all the discussions related to a particular story, you can click on the Discussions {2} link at the top of the Visual Editor.

It's important to note that you can view your mentions and discussions on your Storyblok dashboard {1}, as shown below.
discussions in the dashboard
Schedule Content
Content planning is considered one of the main features of any CMS. Because of this, Storyblok offers multiple ways to schedule the content on multiple levels. The basic approach is to define a special Date/Time field for this purpose, and the more complex way is to use the Releases App, where you can schedule a group of content.
Scheduling a Single Story
With Storyblok, you can schedule the publishing of a single story directly within the Visual Editor.
This feature is excellent when you need to schedule the publishing of stories in a granular way. Instead, if you need to manage a campaign (a release with a set of stories), you may want to use the Releases App. Ensure your user has permission to edit and publish stories in the Storyblok Visual Editor.
Single Story Scheduling is only available in higher-tier plans. Please refer to the pricing page to learn more.
For scheduling the publishing of a story, in the Content section, select and open the story you want to schedule in the Visual Editor.
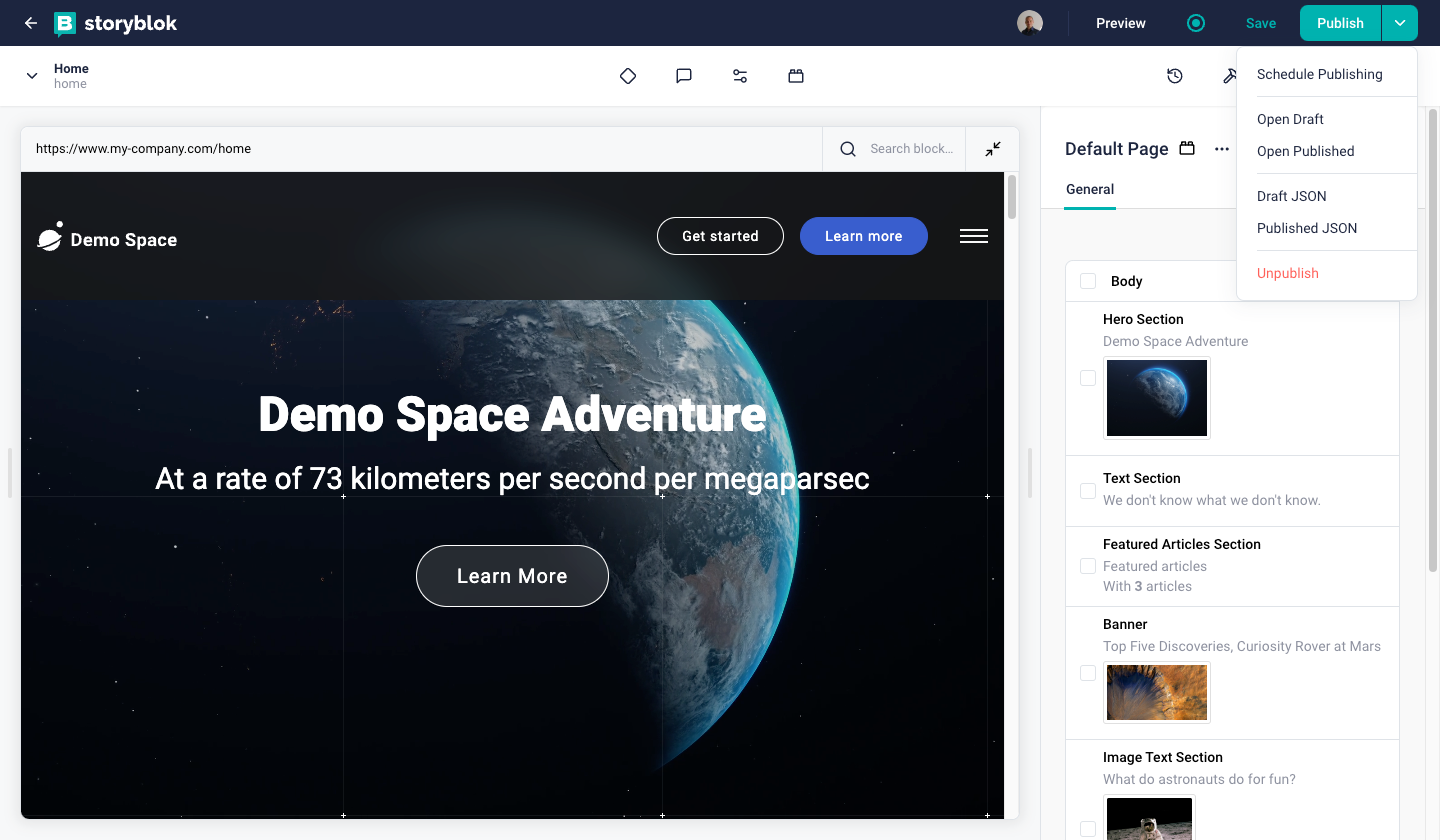
In the Publish button drop-down {1} you can select the Schedule Publishing option {2}. A new popup window, Schedule Publishing will appear.
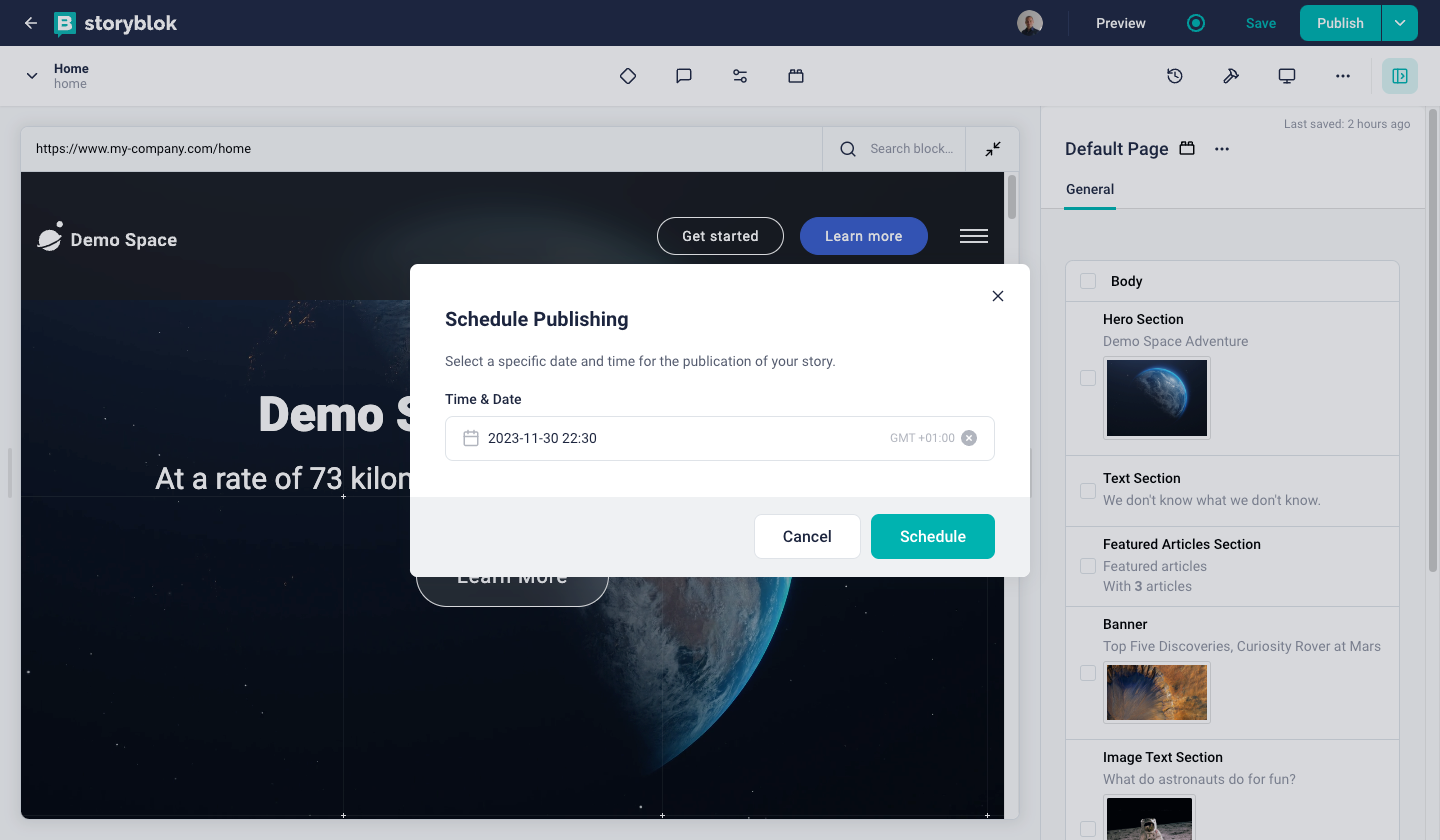
In the Schedule Publishing window, select the publishing date in the Time & Date field {1} . The field type is a calendar and time picker to make your selection easier. Set the desired date and time for the scheduled publish and click the Schedule button {2}.
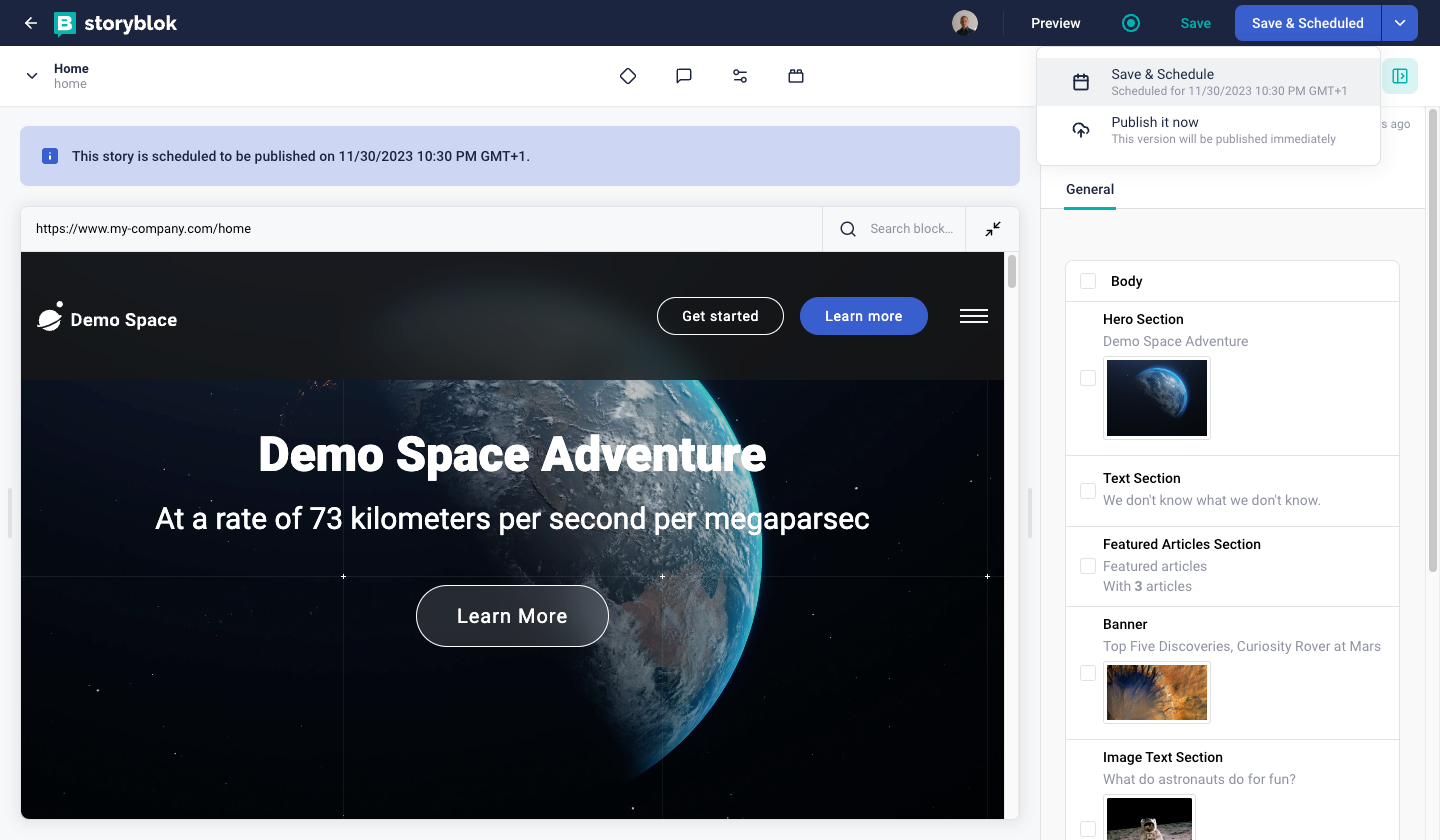
The story is now scheduled for publishing. If you want to apply some changes to the current story, you can do it via the Save button. If you want to publish the changes, you can click on the Save & Scheduled button {1}, and then you can click the Publish it now option {2} to publish the story right away or click the Save & Schedule option {3} to publish the story according to the scheduled date automatically.
If you need an overview of the scheduled stories, in the Content section, where you can access the stories and the folders, you have an icon {1} for the stories planned to be released.
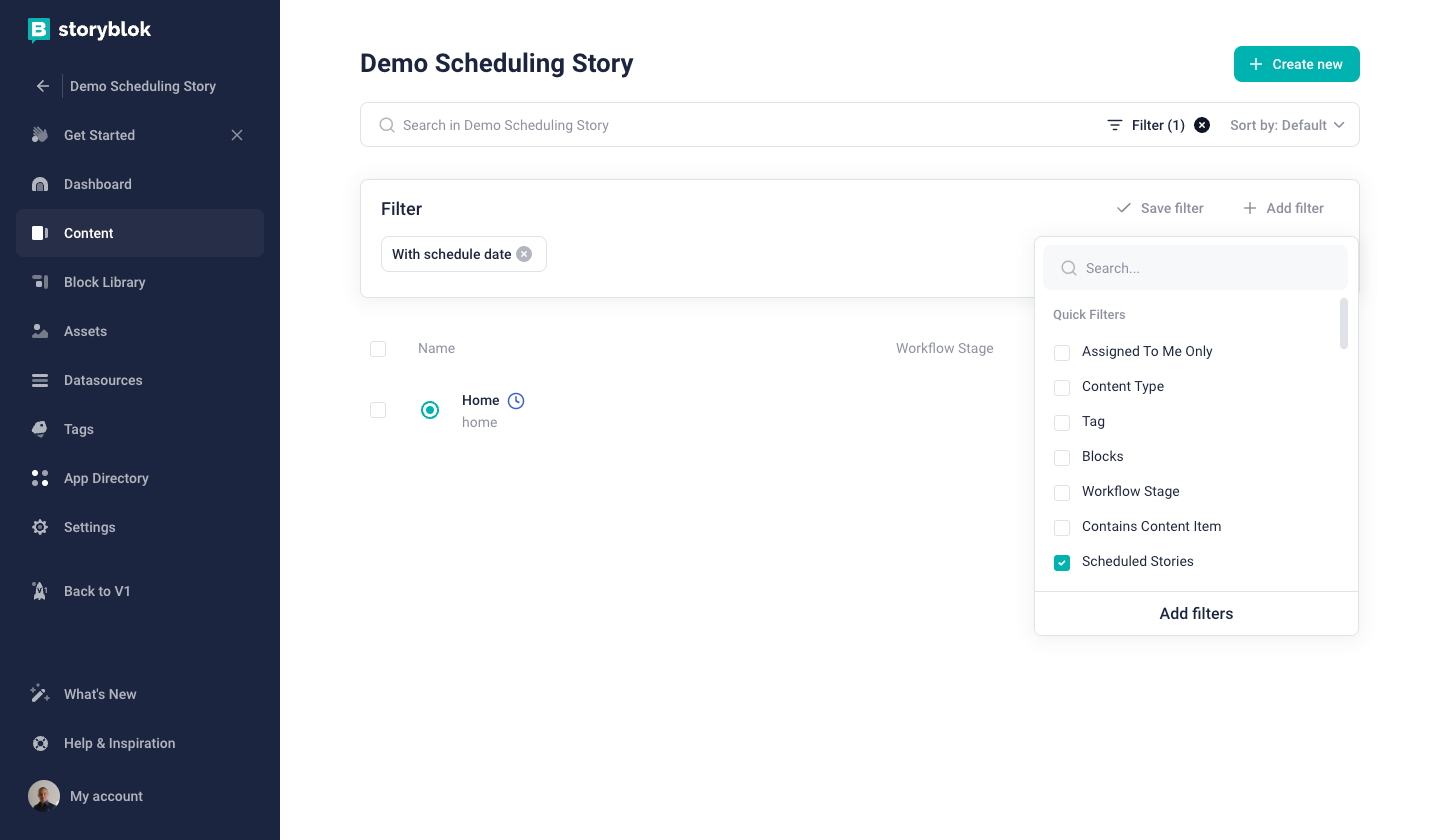
For filtering the scheduled stories, you can apply the filter Scheduled Stories {2}.
Scheduling Content Using the Date/Time Field
In this approach you will define a field which you will use to filter the result of the API in the time of generating your website/app. To achieve this, you need to define a field called Scheduled of type Date/Time in the schema of the content type you want to schedule. Then this field can be used to filter the list of your Stories in the API request. Use the filter queries lt-date and gt-date of Storyblok Delivery API to get the published Stories. You will find an example of this approach in our Delivery API documentation.
This approach is not dependent on any pricing plan and its complexity depends on solution you need to cover.
Releases App
The Releases app is meant to be used for more advanced workflows and allows you to create/plan a release containing a bundle of content changes, which then can go through different approval stages.
Imagine you want to prepare a group of specific changes in your Stories and release them in three weeks. To do this you can create a release where your changes will live. You can specify a date-time when the release will be published or you are able to trigger the release manually.
The Releases App is only available in higher-tier plans. Please refer to the pricing page to learn more.
How to Create the Release
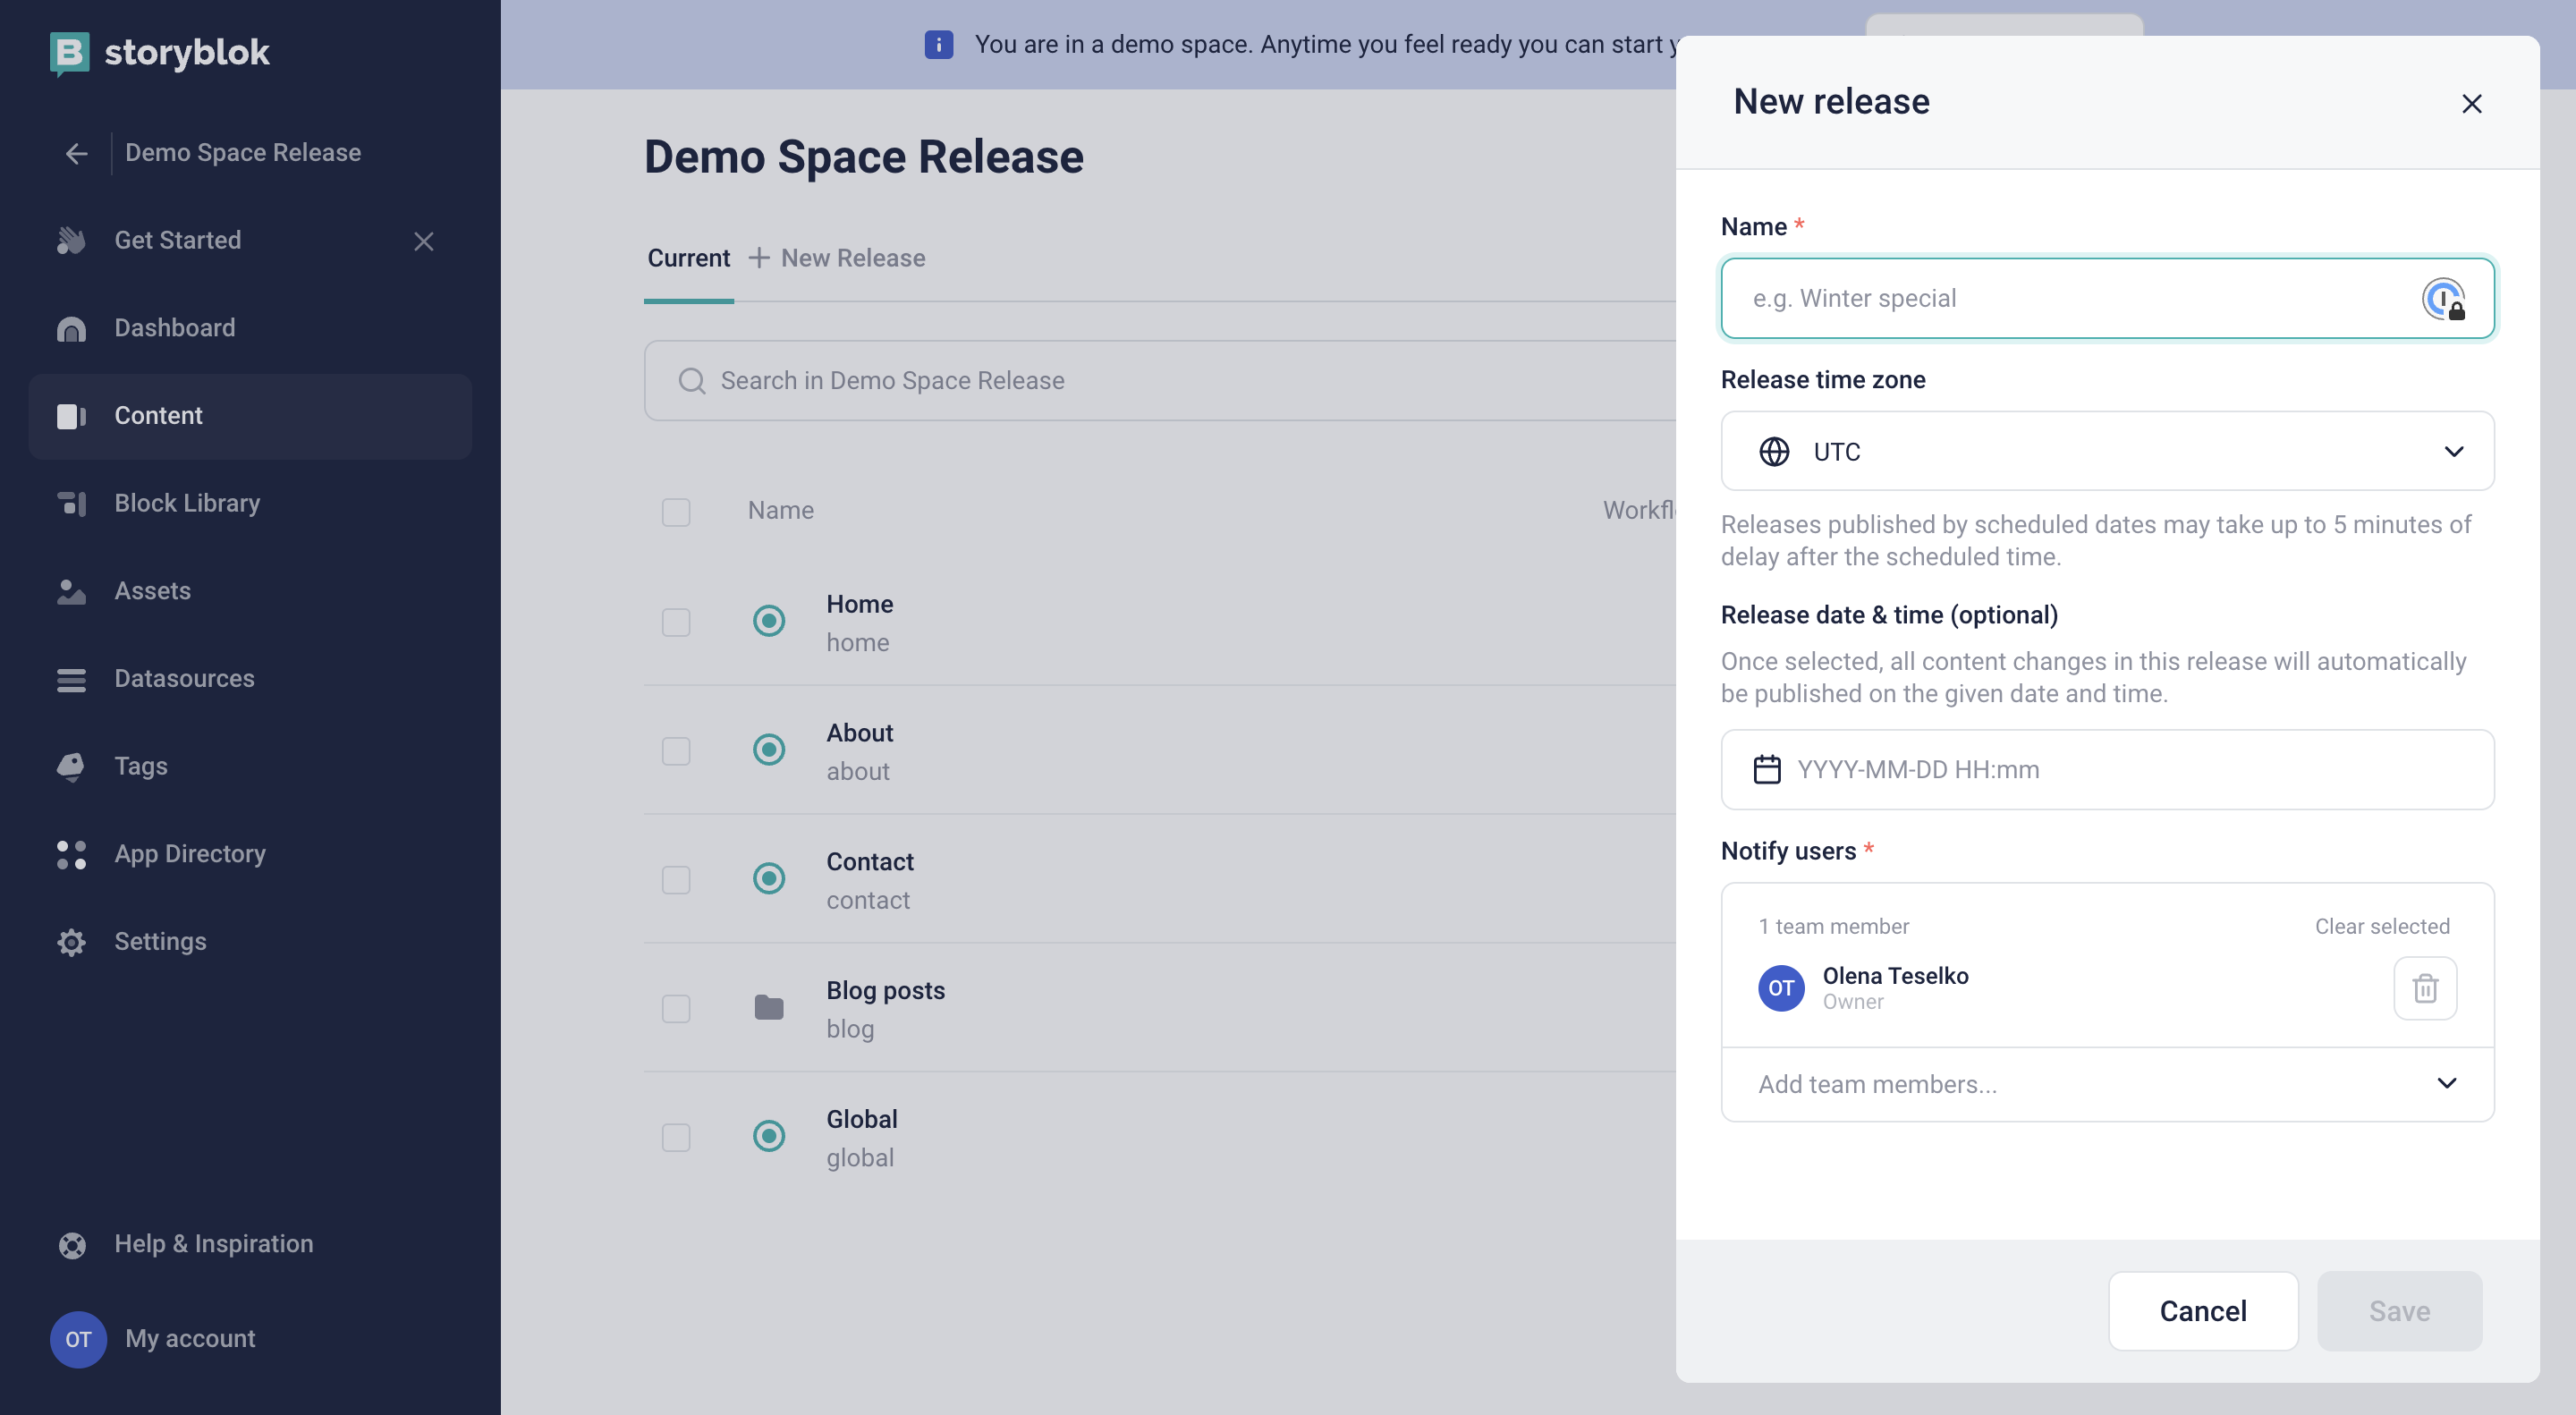
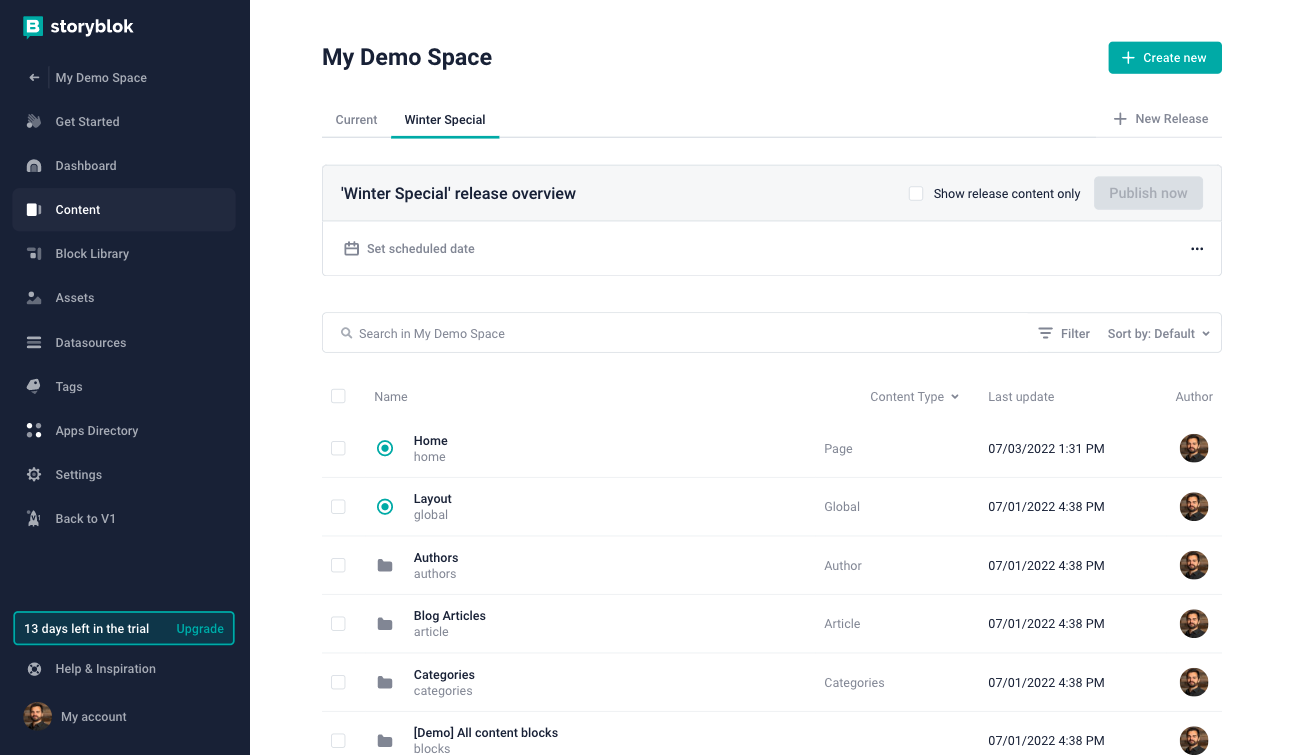
In the Content section of the Storyblok UI click on the + New release {1} button. In the following overlay window fill in the name of the release {2} and an optional release date and time {3}. You can always change these details later.
A new tab with the name of the release is shown on the top of the content tree after clicking on the Save {4} button. Inside this tab, you will see all the changes made and content created for this release.
If you want to change the name, release date or any other settings of the release, click on the three dots button next to the name of the release inside the tab.
How to Edit Content in the Release
In the Content section of the Storyblok UI, switch to the tab representing the release you want to add changes in. By default, you will see all stories - not only the ones changed in this release. You can check the Show release content only option If you want to see only the stories created or edited in this release.
To edit any story in this release, open it in the Visual Editor and apply your changes. After you are done with editing, you can save the changes with the Save & Schedule button.

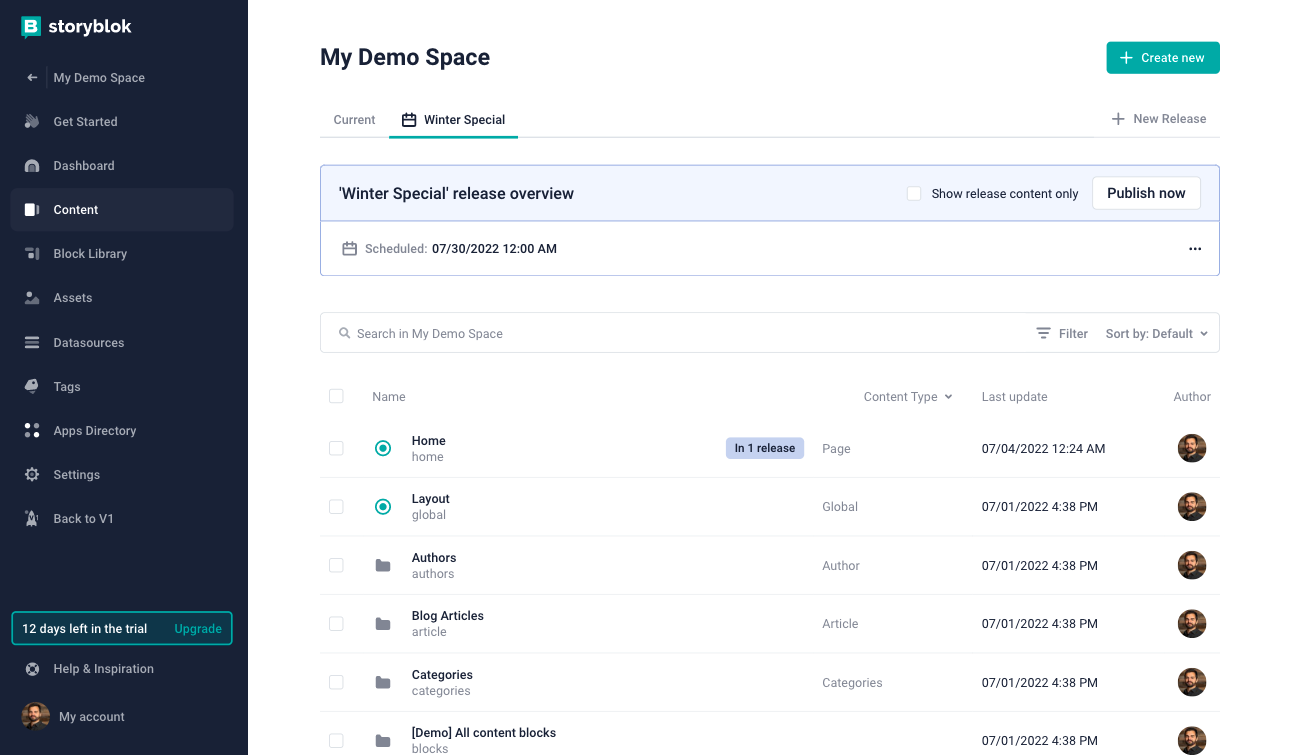
How to Merge the Changes of the Release
You can publish the scheduled changes with the master (current) content automatically by planning the release time, or manually by clicking the Publish now button. If any release date-time is planned, you will see it in the box above your content in the release tab.
How to Setup a Preview for the Release
The content of a release can be accessed from the Content Delivery API using the draft token and appending the parameter from_release with the release id. In the following example you can see how to get the Story of Home with id 29 in the draft version.
curl -X GET \
'https://api.storyblok.com/v1/cdn/stories/home?from_release=29version=draft&token=miQeEopSce7bklQFVbBozQtt'
We recommend previewing the content of the release using the Storyblok UI and the Preview Tab Functionality in the Visual Editor. If you need to cover a special case that requires a programmatic approach, you can get the full list of all releases from your space using the Management API.
Check this FAQ answer, for how to access the edited version of a story from a release.
Scheduling Part of the Story
If you want to release only a part of the Story, for a short time, consider creating a wrapper component with a date-time field that defines the period when this content is publicly available. You can read more about this approach in the article Render dynamic component depending on dates in Vue.js.
Pipeline
With Storyblok’s pipeline, stages define a strict content staging workflow in your space. This is crucial if you want to create a reliable production environment. You can define multiple stages, each with its own API access token for your content, to preview and test before it goes live.

Don't confuse the Pipeline stages with Git Branches functionality. This is a very misleading comparison!
Definition of the terms
To better understand the pipeline and the pipeline stages functionality, you should first understand the terms of this section. Please check out the following definition table:
| Term | Definition |
|---|---|
| Pipeline | Each space can have only one pipeline and every pipeline consist of at least 2 stages. Only the first one, called “Preview” stage, is editable. |
| Pipeline Stage | Pipeline stage contains a frozen content and with the exception of the “Preview” stage, the content of the stage is NOT EDITABLE. The main function of the Pipeline Stage is to preview that frozen content. |
| “Preview” stage | This is the default Pipeline Stage. The content of this stage can be edited and deployed to one or multiple pipeline stages. |
Installation
You will find the Pipeline app in the Apps Directory and can install it by clicking the Install button. After the installation is completed, you will notice changes in the Content Area of the Storyblok UI and additional options in the Settings of your Storyblok space.
Definition of the New Pipeline Stage
The setup of the pipeline stages is found in the Settings of your space under the Pipelines {1} tab. You can create, edit and delete all custom pipeline stages except for the Preview Stage. A new pipeline stage can be created by defining the name {2} of the stage and hitting the Add {3} button.
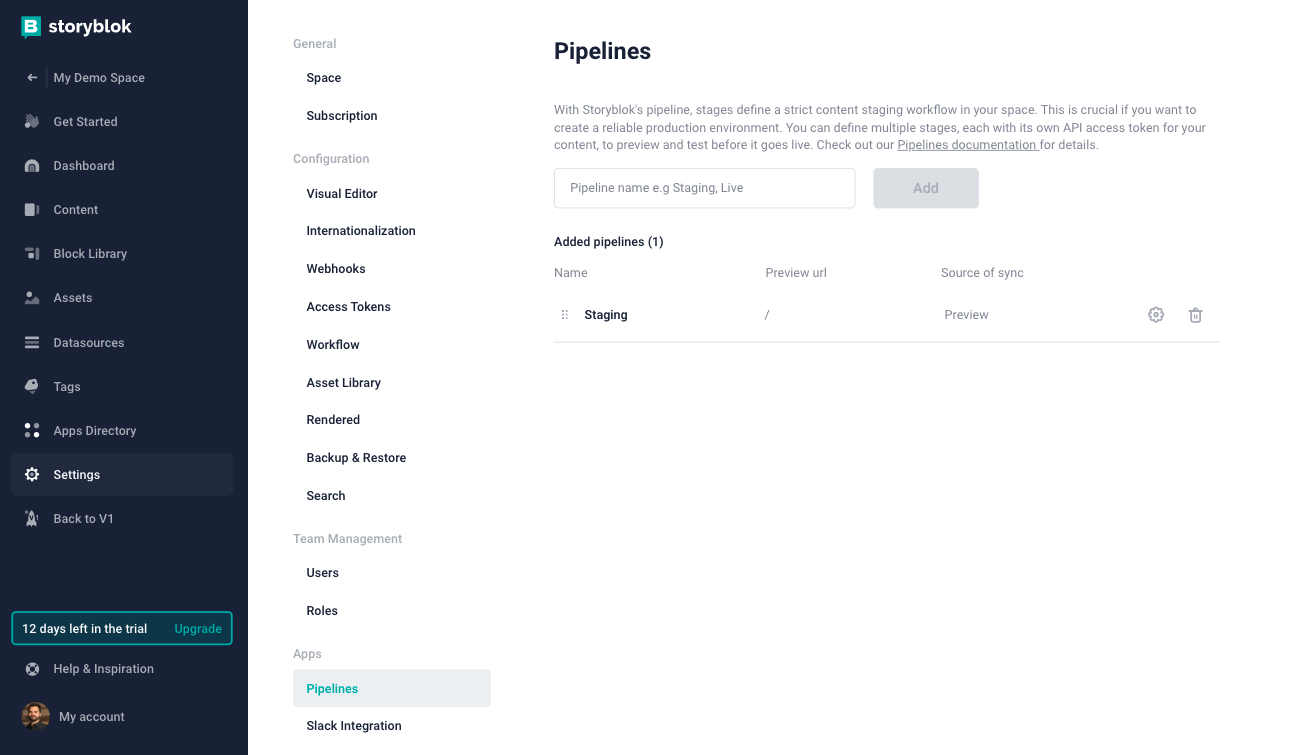
To permanently delete the pipeline stage, click the trash {4} icon. To edit the following settings of the stage, click the cog {5} icon:
| Option | Description |
|---|---|
| Name | Enables you to edit the name of the pipeline |
| Preview URL | Overrides the URL used in the Visual Editor, if the content from that stage is open in it. |
| Source of Sync | Defines the source pipeline stage, the stage from which (copied) content will be deployed to the stage. |
Deploying the Content Between the Stages
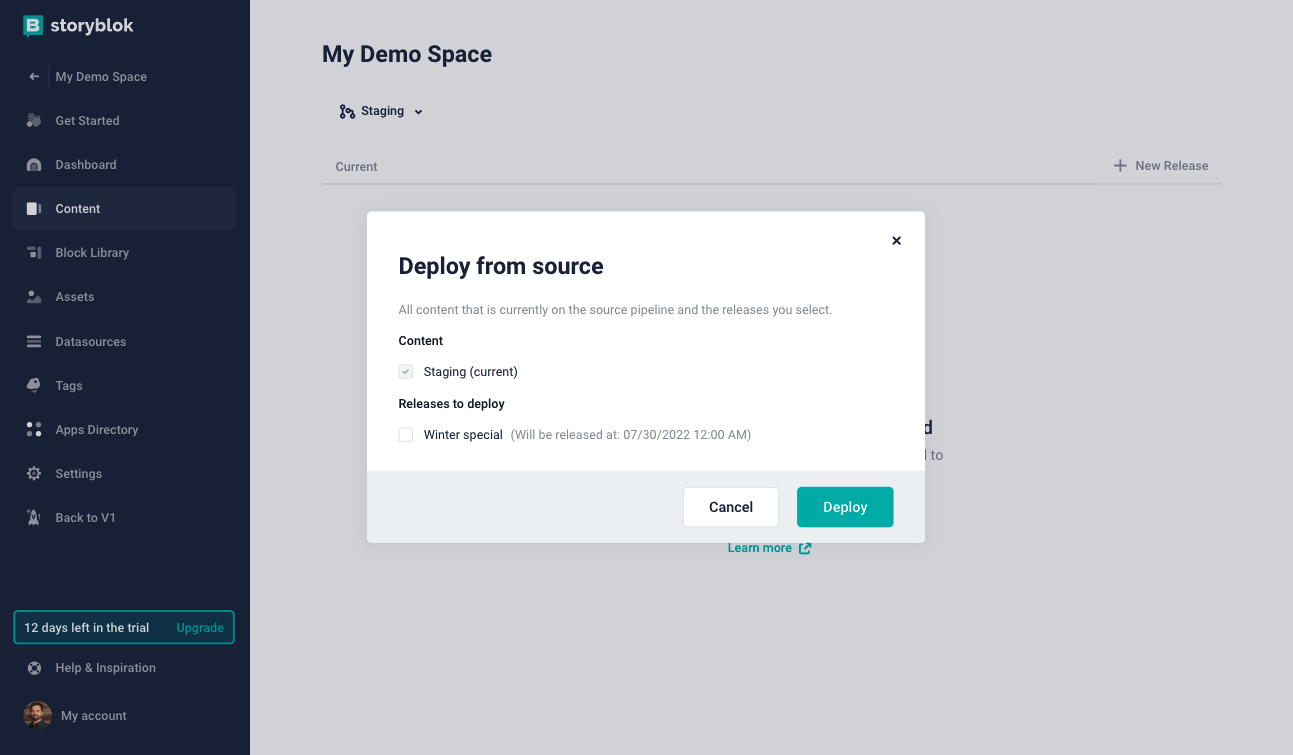
It is important to understand that the Pipeline is, from its definition, one way to process the content. Each stage has defined the source stage or, we could say, the point of origin. If you want to deploy content to the next stage, select the stage where you want to deploy it {1}. Next, hit the Deploy from source {2} button and the system starts deploying the content
The id of the stories will change between the different pipeline stages. If you want to track the story between the pipeline stage, use uuid instead. To learn the difference between the uuid, id and _uid read this FAQ.
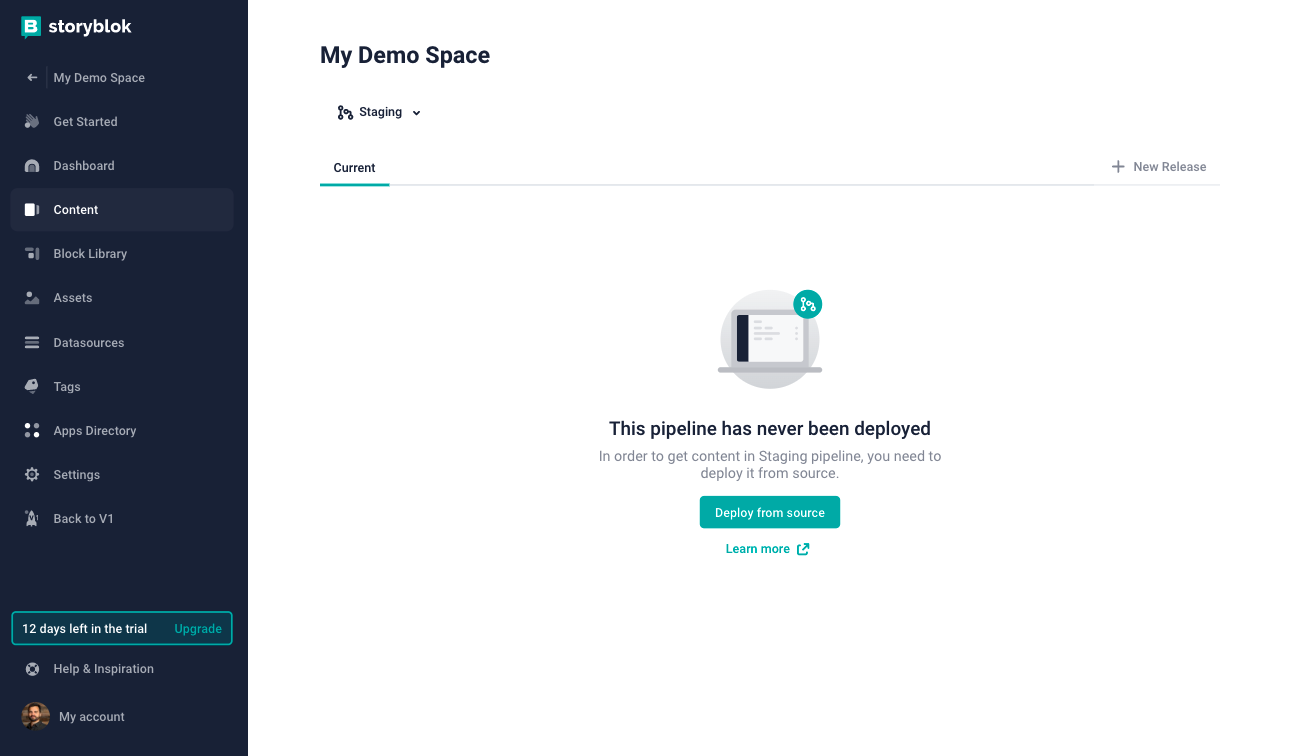
Pipeline is a one-way process where content is editable only in the Preview stage and frozen in all other stages.
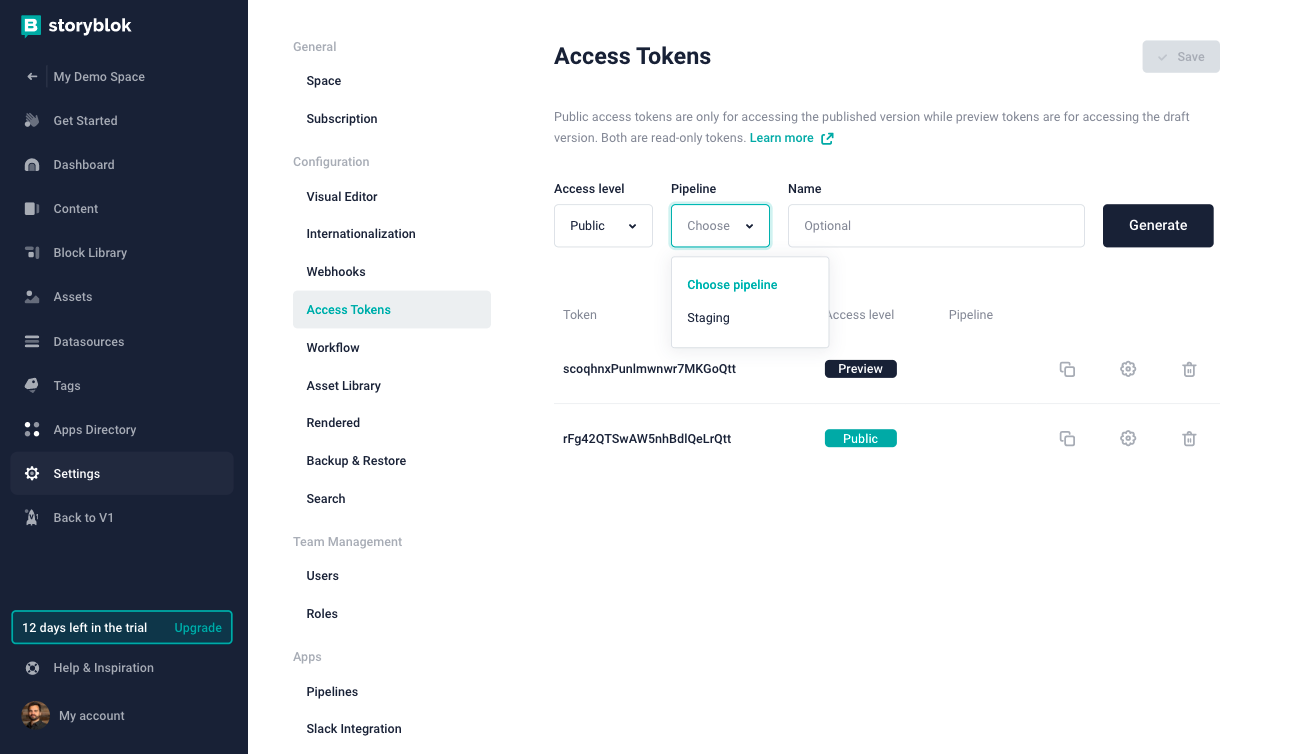
How to Get an Access Token for the Pipeline Stage
The Pipeline app introduces a new level of specification to the access tokens. With it, you can define the Access level of the key, as well as the Pipeline you want to access. This way you can create an API-key for each Pipeline Stage and be sure that you are not changing or viewing unwanted content.
A Real World Scenario
If you want to define a strict multi-stage deployment workflow for your content, use the Pipeline app. The process you are trying to design should be similar to this: Your editors and reviewers are creating the content in the Preview stage. As soon as they are finished with it, the responsible person will deploy the content from the Preview to the Staging stage. This process will freeze the content on Staging and trigger the deployment of the preview app/website. After that, you can share the preview link with the people in your company who do the final decision.
If the final decision is positive, the content can be deployed from Staging to the Live stage. This will make it publicly accessible and the production app/website will be rebuilt/redeployed with new content.
If the final decision is negative, the whole process will return back to the Preview stage, where the editors and reviewers rework the content. The process basically starts from the beginning again.

The Pipeline app is not meant to be used to test different versions of the content. You may use the Releases app for that.
Combining Pipeline with Releases App
The Pipeline app was developed with the Releases app in mind. You can select which release should be deployed to the stage in the deployment process of the content. This way you can keep unfinished releases in the Preview stage and also present future release on different pipeline stages.

You can learn more about the Releases App in this chapter of documentation.
Combining Pipeline Stages with Workflow Stages
The workflow stage of a story is set to the initial value on the new pipeline stage when deploying the content to it. This generally means that if the workflow stage of the story in Preview is Ready to publish, then we deploy this story to the Staging stage. The workflow stage of the story in Staging will now be set as the initial value of the workflow.
Content locking
Storyblok's content locking feature provides a seamless way to collaborate with co-editors while ensuring control and protection of your content.
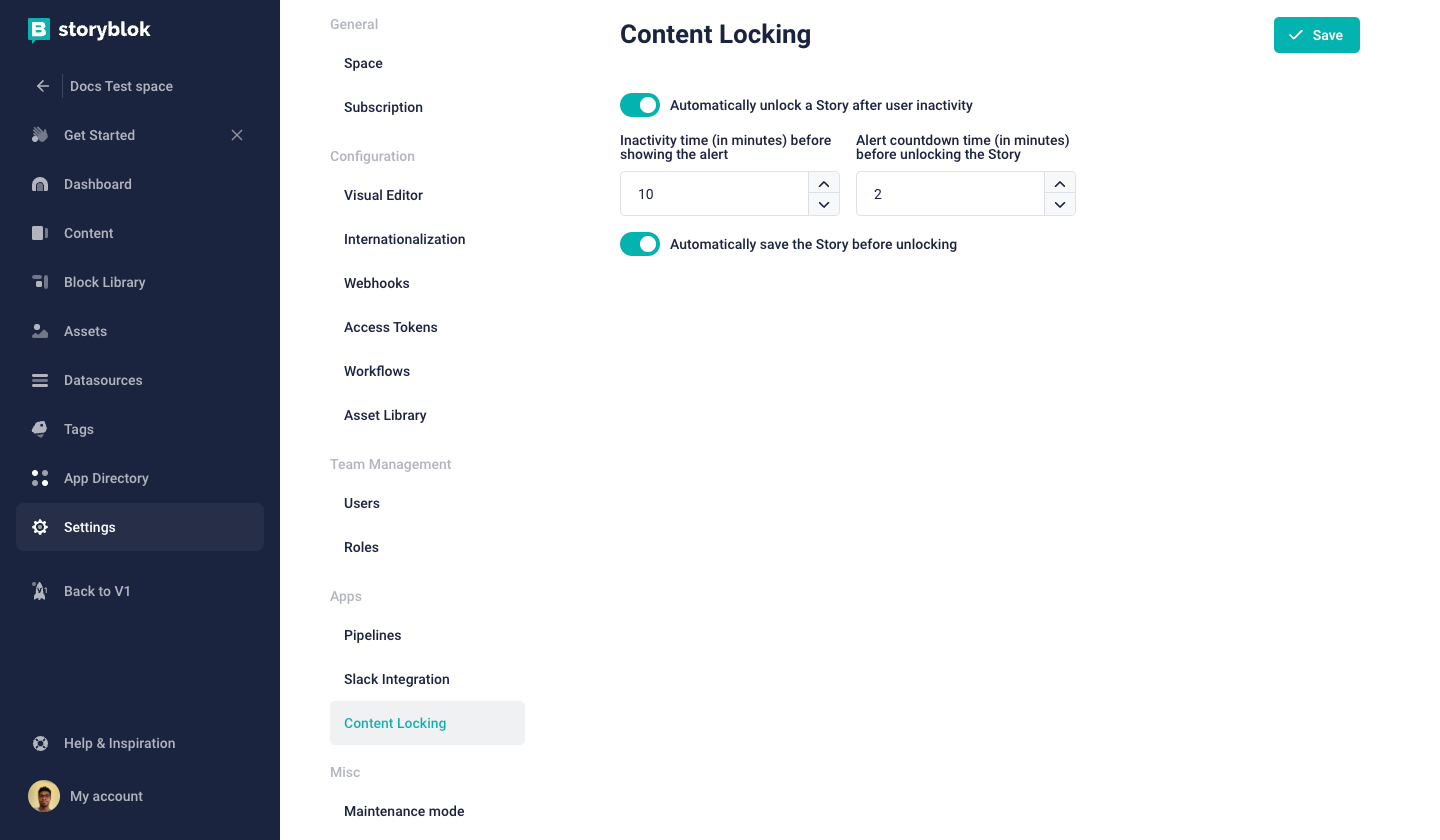
When a Space has the Content Locking App installed, to prevent simultaneous edition and conflicts, it locks a Story when someone else starts to edit it. You can specify an inactivity time and countdown for the story to unlock for other editors.
Enabling and Configuring Content Locking
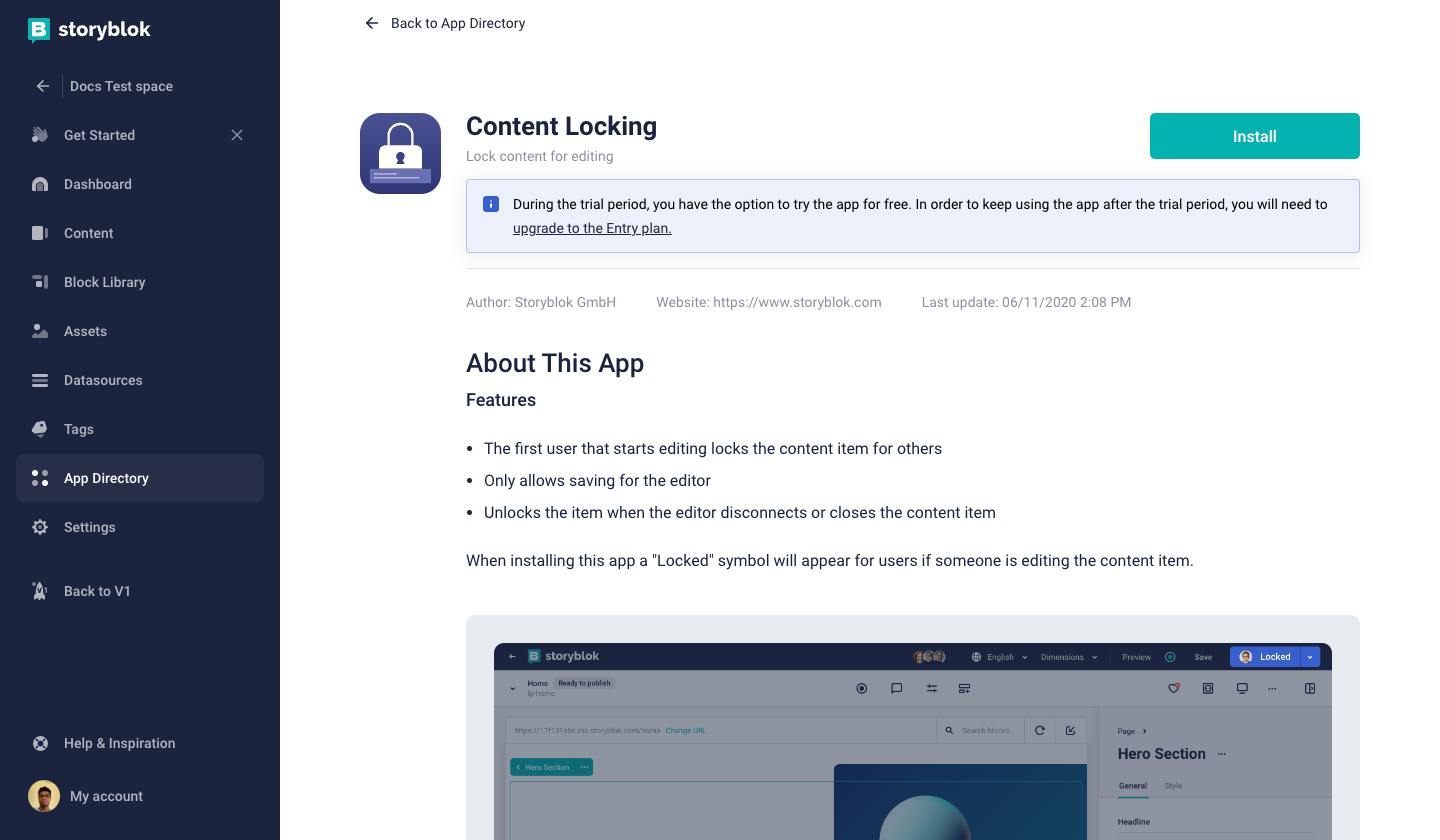
Navigate to the App directory {1} section of your Storyblok space, scroll down to find the "Content Locking" app, and install {2}.
To set up content locking for your space, click on the Apps {1} tab on your settings {2} page. Specify the inactivity time before displaying the alert {3}. This determines the duration of user inactivity that triggers the content locking alert.
Set the alert countdown time before unlocking the Story {4}. This countdown timer gives users an opportunity to take action before the content is locked. Optimize the workflow by enabling the "Automatically save the Story on unlocking" {5} feature. Any changes users make after unlocking the content will be automatically saved when activated.