Deploy a Storyblok static site to S3 and CloudFront with OpenTofu
Storyblok is the first headless CMS that works for developers & marketers alike.
Today we’re going to walk through deploying a Storyblok-powered Astro static site to AWS using a stack you fully own: a private S3 bucket as the origin, CloudFront as the CDN, OpenTofu for infrastructure-as-code, and GitHub Actions with OIDC so you never store a single AWS key.
The full pipeline we will build will look like this:
Storyblok (headless CMS) → Astro (static site generator) → S3 (private, encrypted artifact store) → CloudFront (global CDN) → end user
The full implementation is at github.com/storyblok/s3-webinar-demo. Code examples in this article match the repository but are trimmed for readability. Refer to the repo for validation blocks, full IAM policies, and additional outputs.
The control spectrum
Now, you might be thinking: why not just use Vercel, Netlify, or AWS Amplify? Honestly, those are great choices, especially when getting live fast is the main goal.
When we talk about different deployment architectures, the choices generally fall on two ends of a spectrum.
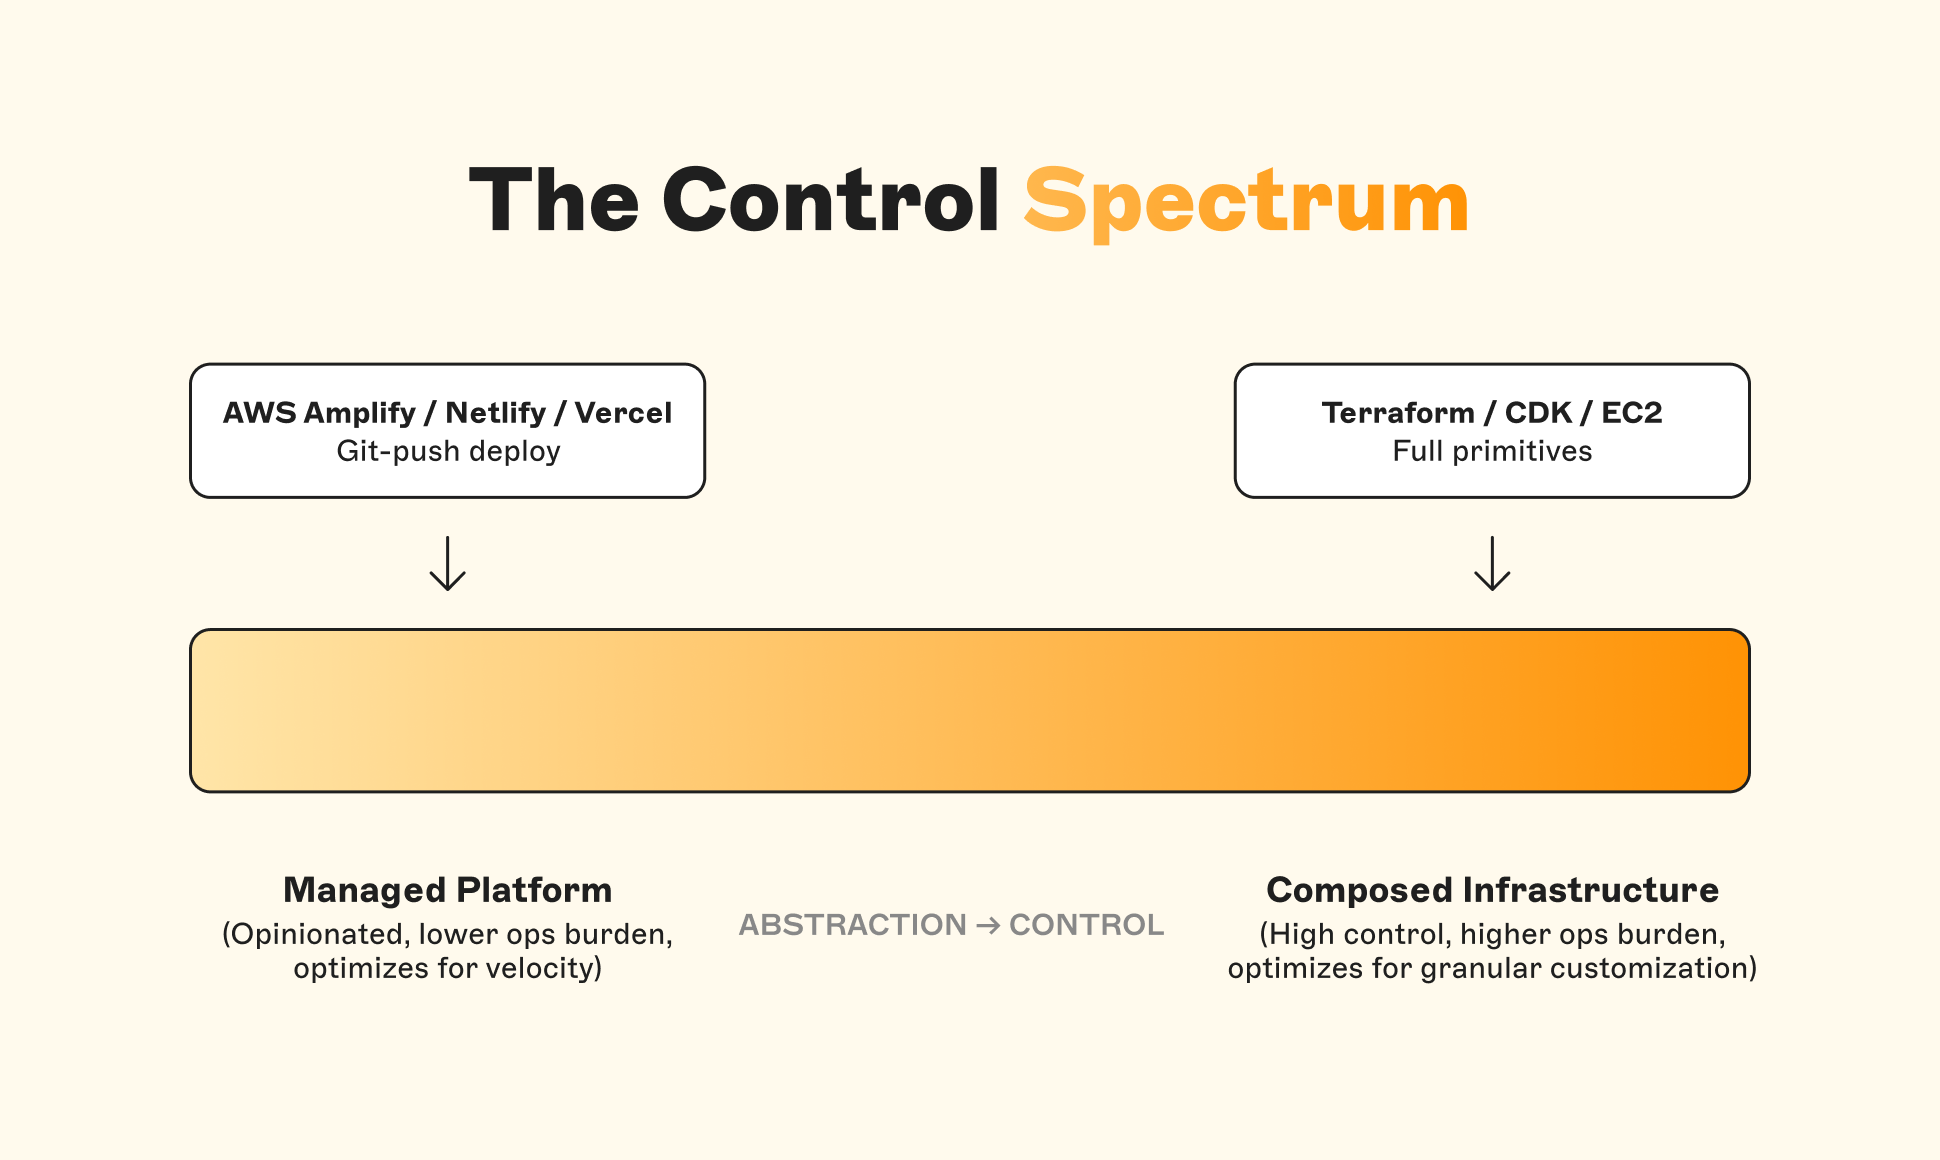
On one side, you have options that specialize in speed and getting live fast by abstracting away all of the tools in a managed platform that enables your app to be deployed and hosted. These are options like Amplify, Vercel, or Netlify.
On the other end are options where your team needs more control over the exact tools you are using. A lot of times they’re built with the same primitives (e.g S3, a CDN, serverless functions) that these other services are built on, but in this case you own the exact configuration of how those pieces are working together and the knobs that configure them.
This is great for when your team needs:
- Geographic and compliance control: you decide exactly where content is served and cached. AWS also has many certifications that are needed for regulated industries.
- Audit-grade security: no stored cloud credentials, instead every permission you use is codified and reviewable.
- IaC standardization: every environment (preview, staging, production) reproducable and deployed in the same manner
- A decoupled build/deploy model: CI artifacts promoted independently across environments, and your architecture deployed and updated from these same environments
- AWS consolidation: your organization is already on AWS, so hosting rolls into existing billing, discounts, and vendor approvals with nothing new to procure
- Predictable costs at scale: linear pay-per-use pricing with no per-seat fees and no bandwidth overage cliffs when traffic spikes
- Full control of the delivery pipeline: security headers, redirects, error pages, and cache policies configured directly at the CDN instead of through a platform’s config abstraction, so you’re never waiting on a feature the platform hasn’t exposed
If none of that applies to you, a managed platform is probably the better move. And that’s fine! Infrastructure ownership is a tool, not a badge.
Prerequisites
Before we dive in, make sure you have:
- A Storyblok Space with at least one published story, and a Preview Token
- Node.js 20+
- An AWS account with admin-level access (for initial setup only — the OIDC roles we create later replace this with least-privilege access for day-to-day operations)
- OpenTofu 1.8+
- A GitHub repository for the project
Part 1: The static site layer with Astro + Storyblok
Let’s start with the application itself. We’re using Astro as a pure static site generator (output: 'static'), which means the build spits out a dist/ folder of plain HTML, CSS, JS, and other assets. There is no server runtime at all. This matters because it means the output is a completely portable artifact. It doesn’t care where it’s hosted. The CMS and hosting strategy are fully decoupled, which is exactly what we want. The great news is that the Storyblok CLI can get us up and running with a space and project in no time:
Scaffold the project
npx storyblok create storyblok-astro-s3 --template astro
cd storyblok-astro-s3
npm install
Astro config
One quick thing to confirm: make sure Astro is set to static output. This is actually the default, but being explicit makes it clear in case there are questions down the road:
import { defineConfig } from "astro/config";

export default defineConfig({
  output: "static",
});
Run the build:
npm run buildYou should see a dist/ folder containing one index.html per route in your Storyblok space, plus your static assets. This folder is your artifact meaning it’s the only thing the hosting infrastructure needs to know about. Everything from here on is about getting this folder to users as fast and securely as possible.
Part 2: The hosting infrastructure, private S3 + CloudFront via OpenTofu
Now for the fun part. Let’s define the AWS resources that will serve our artifacts globally. The architecture has three components:
- A private S3 bucket that stores the build artifacts
- A CloudFront distribution that reads from that bucket and serves content at the edge
- A CloudFront Function that rewrites clean URLs to
index.htmlpaths
Everything lives in an infra/ directory at the project root and is defined using OpenTofu.
Why a private bucket?
Your first instinct might be to enable S3 Static Website Hosting and make the bucket public. That works, but it creates a risk surface: the bucket is directly addressable on the internet, and any misconfiguration in the bucket policy exposes your content (or worse, allows writes). By keeping the bucket completely private and granting read access only to CloudFront via Origin Access Control (OAC), you eliminate that entire class of misconfiguration. The only way anyone reaches your content is through the CDN, which is great because then it ensures that your users will always get the fastest delivery of that content.
OpenTofu setup
This article assumes a working knowledge of OpenTofu (or Terraform). We won’t cover every implementation detail, but the code examples include enough context for you to follow the architecture and understand how the pieces connect.
OpenTofu is an open-source infrastructure-as-code tool and a fork of Terraform. The HCL syntax and provider ecosystem are fully compatible, so if you’re already using Terraform, the concepts and code in this article transfer directly. You write declarative .tf files describing the resources you want, and OpenTofu creates, updates, or destroys them to match. Install it from the official releases page and verify with tofu version.
Project layout
We’ll keep infrastructure isolated so application changes do not accidentally trigger infra changes:
infra/: OpenTofu files (.tf).github/workflows/: separatedeploy.ymlandinfra.yml
Core workflow
Every infrastructure change follows the same loop: init → plan → apply. This keeps changes predictable and reviewable, so you can see what will happen before AWS is modified.
cd infra

# Download provider plugins and initialize the backend
tofu init

# Preview what will change (always review before applying)
tofu plan -out=tfplan

# Apply the exact plan you just reviewed
tofu apply tfplan

#### Other helpful commands ####

# Auto-format files for consistency
tofu fmt -recursive

# Catch syntax errors early
tofu validate

# When you're done experimenting, tear everything down
tofu destroy
How OpenTofu (Terraform) works
If you have not used Terraform or OpenTofu much, it helps to understand what is happening under the hood.
OpenTofu reads your .tf files and builds a dependency graph of resources. It then compares the desired state in code to the saved state in terraform.tfstate and computes a plan.
tofu initdownloads providers and configures the backend where state will live.tofu planshows the exact changes OpenTofu would make.tofu applyexecutes that plan by calling AWS APIs through the provider.
Before any of this can work, your configuration needs to answer three questions for OpenTofu:
- Which APIs am I calling? Provider configuration: the cloud, the region, and how OpenTofu authenticates.
- What makes this deployment different from any other? Input variables: the knobs that keep resource names and settings consistent across environments.
- What already exists, and what needs to change? The state backend: where state lives and who can read or write it.
The easiest way to understand the configuration is to follow the lifecycle from a blank folder to a deployed CDN.
First, tell OpenTofu what it can talk to
Provider configuration answers the first question OpenTofu asks: which APIs am I calling? Declaring the AWS provider in providers.tf teaches OpenTofu the vocabulary for resources like aws_s3_bucket and aws_cloudfront_distribution. Configuring it mostly means picking a default region. CloudFront is global and S3 feels global, but the AWS API still routes many operations through a regional endpoint, so choosing a region early avoids confusing drift later.
provider "aws" {
  region = var.aws_region

  default_tags {
    tags = local.default_tags
  }
}
Notice what this file does not include: credentials. OpenTofu has no idea how to log in. The AWS provider reads credentials from the same places the AWS CLI does. Locally that means profiles, environment variables, or SSO. In CI it means an IAM role assumed through OIDC. Keeping authentication out of the .tf files entirely is what lets the exact same code run on your laptop and in GitHub Actions without changing a line. (Hold onto that default_tags block, it pays off in the next section.)
Next, define the inputs that shape each environment
Variables answer the second question: what makes this deployment different from any other? A short project_name prefix flows through every resource name, an environment variable separates dev from staging from production, and a tags map labels every resource for cost allocation and inventory.
variable "project_name" {
  type        = string
  description = "Short project identifier used for resource names and tags."
}

variable "environment" {
  type        = string
  description = "Environment name (dev, staging, prod)."
}

variable "tags" {
  type        = map(string)
  default     = {}
  description = "Extra tags to apply to all resources."
}

locals {
  name_prefix = "${var.project_name}-${var.environment}"

  default_tags = merge({
    Project     = var.project_name
    Environment = var.environment
    ManagedBy   = "opentofu"
  }, var.tags)
}
So with project_name = "acme" and environment = "prod", a bucket defined as:
resource "aws_s3_bucket" "site" {
  bucket = "${local.name_prefix}-site"
}
comes out named acme-prod-site, and the default_tags block from the previous section stamps it with Project = acme and Environment = prod automatically. No tags argument on the resource at all. Spin up staging by changing one variable and you get acme-staging-site with matching tags. None of this changes what gets built. It changes how you find it, bill it, and reproduce it.
Then, decide where state lives
State answers the third question: what already exists, and what needs to change? If you are one person running OpenTofu locally, local state works for a while. The moment CI or a second human enters the picture, you want a remote backend, and the standard AWS pattern is an S3 bucket for the state file plus a DynamoDB table that locks it so two applies can’t race each other.
State becomes the contract between our two workflows. The infra workflow writes state when it creates resources. The deploy workflow reads outputs from it to discover the bucket name and distribution ID it needs. We’ll set up the backend itself, and the access boundaries around it, later in this article.
That’s the whole mental model: a provider so OpenTofu can talk to AWS, variables to shape each environment, and state to remember what was built. Now let’s write it.
If you ever add values like API tokens, mark them sensitive = true and prefer passing them via environment variables. Treat the state bucket as highly sensitive data.
Now that the strategy is clear, let’s run through it together.
Providers and variables
First, we configure the providers we need and any variables.
terraform {
  required_version = ">= 1.8.0"
  required_providers {
    aws = {
      source  = "hashicorp/aws"
      version = "~> 5.0"
    }
  }
  backend "s3" {
    bucket         = "terraform-state"
    key            = "s3-webinar-demo/infra.tfstate"
    region         = "eu-west-1"
    dynamodb_table = "terraform-locks"
    encrypt        = true
  }
}

# infra/providers.tf
provider "aws" {
  region = var.aws_region

  default_tags {
    tags = local.default_tags
  }
}variable "github_repository" {
type = string
description = "GitHub org/repo for OIDC trust policy (e.g. my-org/s3-webinar-demo)."
}
variable "project_name" {
type = string
description = "Short project identifier used for resource names and tags."
default = "s3-webinar-demo"
}
variable "environment" {
type = string
description = "Deployment environment name used for tagging."
default = "production"
}
variable "aws_region" {
type = string
description = "AWS region for all resources."
default = "eu-west-1"
}
variable "s3_force_destroy" {
type = bool
description = "Allow OpenTofu to delete the site bucket even if it contains objects."
default = false
}
variable "cloudfront_price_class" {
type = string
description = "CloudFront price class for distribution."
default = "PriceClass_100"
}
variable "tags" {
type = map(string)
default = {}
description = "Extra tags to apply to all resources."
}
# infra/locals.tf
locals {
name_prefix = "${var.project_name}-${var.environment}"
site_bucket = "${local.name_prefix}-site"
s3_origin_id = "${local.name_prefix}-s3-origin"
default_tags = merge({
Project = var.project_name
Environment = var.environment
ManagedBy = "opentofu"
}, var.tags)
}A few variables and locals are worth calling out before we move on.
cloudfront_price_class controls which edge locations serve your traffic, and each tier has a different cost profile. PriceClass_100 restricts distribution to North America and Europe (the cheapest tier). PriceClass_200 adds Asia, Africa, and the Middle East. PriceClass_All gives you everywhere, including South America and Australia. If your users are all in Europe, there is no reason to pay for edge locations in São Paulo. Making it a variable means each environment can tune this independently. For example, perhaps for dev you just need your content in North America or Europe and for production you want worldwide distribution.
locals block defines a consistent naming convention (project_name-environment-site) and the default_tags map that flows into every AWS resource via the provider’s default_tags block. The s3_origin_id local is reused in the CloudFront distribution. This pattern keeps resource names predictable and unique across environments.
s3_force_destroy defaults to false as a safety net. S et it to true only in dev environments where you want OpenTofu to tear down the bucket even with objects in it.
A variable is an input, set from outside the configuration through -var flags, a .tfvars file, or TF_VAR_* environment variables. A local is a value computed inside the configuration, typically derived from variables, and can’t be overridden from outside. If someone decides the value per environment it should be a variable, and if the value follows from those decisions (like name_prefix) it should be a local.
The S3 bucket
Now that we have our backend, variables, and providers configured let’s setup the bucket that we will upload all of our build assets to.
resource "aws_s3_bucket" "site" {
  bucket        = local.site_bucket
  force_destroy = var.s3_force_destroy
}

resource "aws_s3_bucket_server_side_encryption_configuration" "site" {
  bucket = aws_s3_bucket.site.id
  rule {
    apply_server_side_encryption_by_default {
      sse_algorithm = "AES256"
    }
  }
}

resource "aws_s3_bucket_public_access_block" "site" {
  bucket                  = aws_s3_bucket.site.id
  block_public_acls       = true
  block_public_policy     = true
  ignore_public_acls      = true
  restrict_public_buckets = true
}
A few things to note:
- All four public access blocks are set to
true: Even if someone accidentally attaches a public bucket policy, these blocks prevent it from doing anything. - Server-side encryption: AES256 (SSE-S3) encrypts objects at rest at zero additional cost. Swap the algorithm for SSE-KMS if compliance requires customer-managed keys.
Notice what’s not here: there’s no aws_s3_bucket_website_configuration resource. We’re deliberately skipping S3’s built-in static website hosting. That means S3 won’t resolve /about to /about/index.html on its own, but it also means the bucket has no public HTTP endpoint at all. We’ll solve the URL rewriting problem at the CDN layer instead.
The CloudFront Function, solving clean URLs
This is where most people hit their first “wait, why is everything 403?” moment with private S3 origins. When S3 Website Hosting is disabled, S3 behaves like a plain key-value store. A request for /about looks for an object literally named about in the bucket. But our build process generates /about/index.html, so S3 can’t find it and returns a 403 (access-denied rather than 404, because the bucket is private).
The fix is a CloudFront Function that intercepts every viewer request and rewrites the URI before it hits the origin:
resource "aws_cloudfront_function" "rewrite_uri" {
  name    = "${local.name_prefix}-rewrite-uri"
  runtime = "cloudfront-js-2.0"
  publish = true
  code    = <<-EOF
    function handler(event) {
      var request = event.request;
      var uri = request.uri;
      if (uri.endsWith('/')) {
        request.uri += 'index.html';
      } else if (!uri.includes('.')) {
        request.uri += '/index.html';
      }
      return request;
    }
  EOF
}
Why a CloudFront Function and not Lambda@Edge? CloudFront Functions run at every edge location (not just regional edge caches), execute in under 1ms, and cost roughly 1/6th the price of Lambda@Edge invocations. The tradeoff is a more constrained runtime. You get no network calls, no filesystem access, a 10KB code size limit, and the cloudfront-js-2.0 runtime (a subset of ECMAScript). For URL rewriting, though, that’s more than enough.
The rewrite logic uses uri.includes(".") to decide whether a path is a file or a route. This works well for typical static sites, but will break if you have routes that contain dots (e.g., /api/v2.0/docs). If your site has paths like that, use a more specific check like testing for known extensions (/\.(html|css|js|png|jpg|svg|ico|woff2?)$/).
The CloudFront distribution
This is the biggest single resource in our stack. Let’s walk through the key decisions piece by piece.
resource "aws_cloudfront_origin_access_control" "site" {
  name                              = "${local.name_prefix}-oac"
  origin_access_control_origin_type = "s3"
  signing_behavior                  = "always"
  signing_protocol                  = "sigv4"
}

resource "aws_cloudfront_distribution" "site" {
  enabled             = true
  is_ipv6_enabled     = true
  comment             = "Managed by OpenTofu"
  default_root_object = "index.html"
  price_class         = var.cloudfront_price_class

  origin {
    domain_name              = aws_s3_bucket.site.bucket_regional_domain_name
    origin_access_control_id = aws_cloudfront_origin_access_control.site.id
    origin_id                = local.s3_origin_id
  }

  default_cache_behavior {
    allowed_methods  = ["GET", "HEAD", "OPTIONS"]
    cached_methods   = ["GET", "HEAD"]
    target_origin_id = local.s3_origin_id
    viewer_protocol_policy = "redirect-to-https"
    compress               = true
    cache_policy_id        = "658327ea-f89d-4fab-a63d-7e88639e58f6" # Managed-CachingOptimized

    function_association {
      event_type   = "viewer-request"
      function_arn = aws_cloudfront_function.rewrite_uri.arn
    }
  }

  restrictions {
    geo_restriction {
      restriction_type = "none"
    }
  }

  viewer_certificate {
    cloudfront_default_certificate = true
  }
}
A few things to note here:
Origin Access Control (OAC) is the modern replacement for the older Origin Access Identity (OAI). OAI still works, but AWS recommends OAC for new distributions.
bucket_regional_domain_name: Use this instead of bucket_domain_name. The regional variant avoids some annoying temporary redirect issues that can pop up during the first few hours after bucket creation in certain regions. Trust me on this one.
Managed-CachingOptimized: This is an AWS-managed cache policy that sets a default TTL of 86400 seconds (24 hours), respects Cache-Control and Expires headers from the origin, and enables Gzip and Brotli compression.
Geo-restriction is set to none: This is our starting point. If you need to block or allow specific countries for regulatory or contractual reasons, change restriction_type to "whitelist" or "blacklist" and provide a list of ISO 3166-1 alpha-2 country codes. This is exactly the kind of decision that justifies owning the distribution.
The bucket policy, scoped to exactly one distribution
Our private bucket needs a policy that essentially says: “CloudFront can read objects, but only when the request comes from this specific distribution.” We can control this with aws:SourceArn.
data "aws_iam_policy_document" "site_bucket_policy" {
  statement {
    sid     = "AllowCloudFrontRead"
    effect  = "Allow"
    actions = ["s3:GetObject"]
    resources = ["${aws_s3_bucket.site.arn}/*"]

    principals {
      type        = "Service"
      identifiers = ["cloudfront.amazonaws.com"]
    }

    condition {
      test     = "StringEquals"
      variable = "aws:SourceArn"
      values   = [aws_cloudfront_distribution.site.arn]
    }
  }
}

resource "aws_s3_bucket_policy" "site" {
  bucket = aws_s3_bucket.site.id
  policy = data.aws_iam_policy_document.site_bucket_policy.json

  depends_on = [aws_s3_bucket_public_access_block.site]
}
Without that SourceArn condition, any CloudFront distribution in any AWS account could be configured to read from your bucket (as long as it uses the cloudfront.amazonaws.com service principal). The condition locks it down to your single distribution ARN.
The depends_on on the policy resource is also worth noting. It ensures the public access block is fully applied before the bucket policy attaches. Without that ordering, a race condition could briefly leave the bucket with a policy but no public access protection.
Outputs
Our CI/CD pipeline is going to need to know the bucket name and distribution ID. Rather than hardcoding these (please don’t), we export them as OpenTofu outputs. The deploy workflows in GitHub Actions will then be able to read them dynamically and use them, and if you need to make any changes in the future it will automatically pick them up the next deploy.
output "site_bucket_name" {
  description = "S3 bucket name for the static site."
  value       = aws_s3_bucket.site.id
}

output "cloudfront_distribution_id" {
  description = "CloudFront distribution ID."
  value       = aws_cloudfront_distribution.site.id
}

output "cloudfront_domain_name" {
  description = "CloudFront distribution domain name."
  value       = aws_cloudfront_distribution.site.domain_name
}

output "deploy_role_arn" {
  description = "ARN of the GitHub Actions deploy role (OIDC, least-privilege)."
  value       = aws_iam_role.github_deploy.arn
}

output "infra_role_arn" {
  description = "ARN of the GitHub Actions infra role (OIDC, Terraform apply)."
  value       = aws_iam_role.github_infra.arn
}
Apply the infrastructure
Now it’s time for everything to come together. Let’s deploy the infrastructure to our account with the CLI.
cd infra
tofu init
tofu plan -out=tfplan
tofu apply tfplan
Before running plan, make sure all the variables we defined earlier are set. Variables with defaults (project_name, environment, aws_region, s3_force_destroy, cloudfront_price_class) will use their default values if you don’t override them. Variables without defaults (github_repository) must be provided if they’re required. You can pass them directly with -var flags, through a terraform.tfvars file, or as environment variables prefixed with TF_VAR_:
# Option 1: -var flags
tofu plan -var "github_repository=my-org/s3-webinar-demo" -out=tfplan

# Option 2: terraform.tfvars (auto-loaded)
github_repository = "my-org/s3-webinar-demo"
project_name      = "storyblok-astro"

# Option 3: environment variables
export TF_VAR_github_repository="my-org/s3-webinar-demo"
tofu plan -out=tfplan
Once apply completes, grab the cloudfront_domain_name output. You can test the distribution by visiting https://<cloudfront_domain_name> in a browser — it’ll return a 403 for now because the bucket is empty, but that’s expected. We’ll fix that next.
A new CloudFront distribution takes 5–15 minutes to propagate globally. If you deploy content immediately and get 403 errors, wait for the distribution status to change from “InProgress” to “Deployed” in the AWS console.
Part 3: Deploying content with S3 sync and cache invalidation
With the infrastructure in place, deploying is straightforward: upload the build artifact to S3, then tell CloudFront to drop its cached copies.
Manual deploy (for testing)
npm run build

aws s3 sync ./dist s3://YOUR_BUCKET_NAME \
  --delete \
  --cache-control "public, max-age=300"

aws cloudfront create-invalidation \
  --distribution-id YOUR_DISTRIBUTION_ID \
  --paths "/*"
Let’s unpack what each flag is doing:
--deleteremoves objects from the bucket that no longer exist indist/. Without it, stale pages or assets from previous builds persist and are still served.--cache-control "public, max-age=300"tells CloudFront (and browsers) to cache every object for 5 minutes. This is a conservative starting point for HTML. In a production setup, you would apply different headers per file type:max-age=31536000, immutablefor hashed assets (JS/CSS bundles with content hashes in the filename), and a shorter TTL for HTML. More on this later.--paths "/*"is a wildcard invalidation. It is the simplest approach but comes with a cost tradeoff: AWS gives you 1,000 free invalidation paths per month, and a wildcard counts as one path. Beyond that, each additional path costs $0.005. For most sites with regular deploys, the free tier is sufficient.
During the upload window, the bucket is in a mixed state: some objects are from the new build, some from the old. For a static site with no cross-page dependencies, this is usually fine. If you need atomic deploys (e.g., your JS bundles reference specific CSS hashes), consider deploying to a versioned prefix and swapping the CloudFront origin path, or using S3 object versioning.
Now after we deploy and go to the Cloudfront distribution url we can see our page!
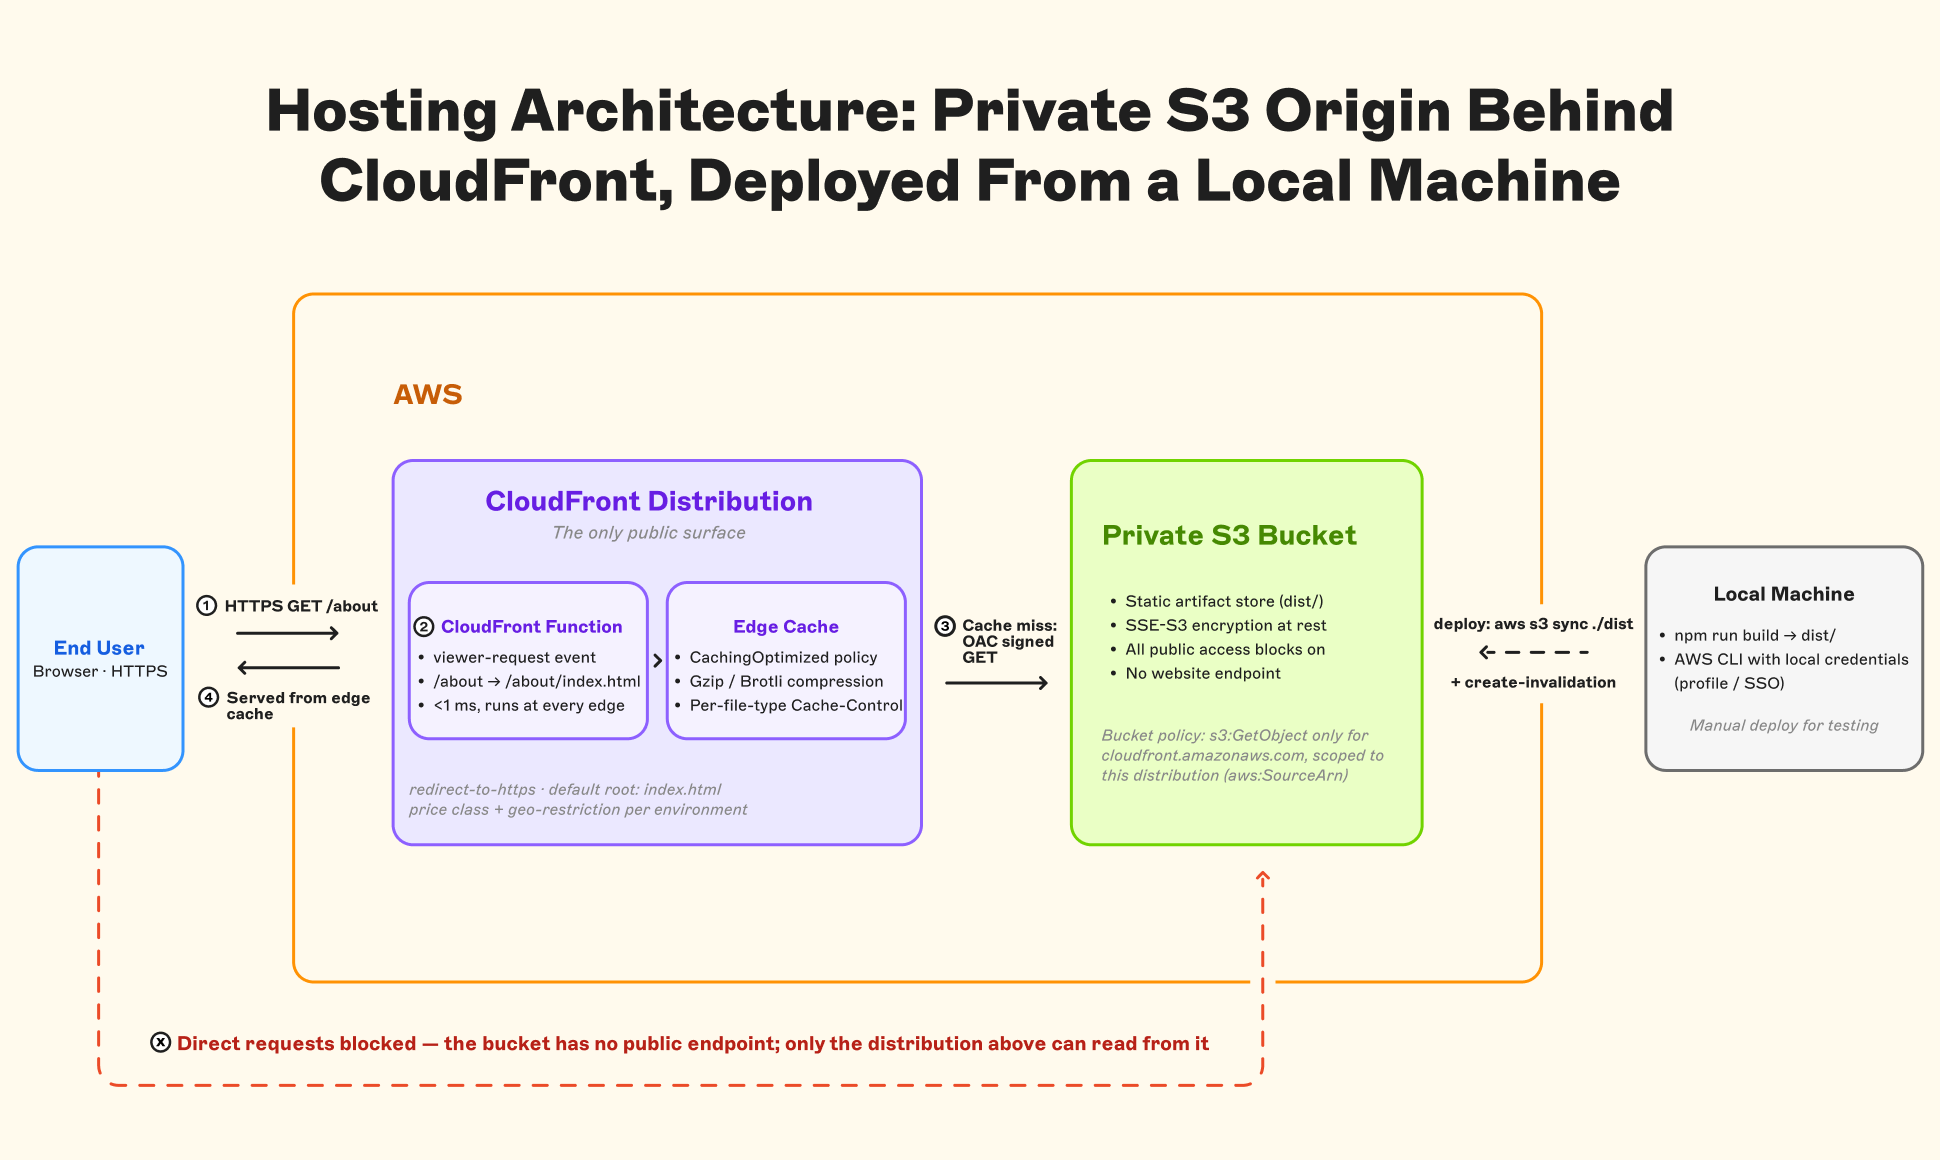
At this point, we have a complete end-to-end pipeline working: we built a portable dist/ artifact, provisioned a private S3 origin and a CloudFront distribution with clean-URL rewriting, then deployed content with s3 sync and confirmed it is being served through the CDN instead of a public bucket endpoint. The diagram below visualizes the flow a user will experience on the hosting and delivery side of that setup (build artifact → S3 → CloudFront → end user).
This process is working great, but it will be a pain to have to build and deploy from your local machine every time there are changes you want pushed out to production. Now let’s take what we’ve built and automate the deployment with GitHub Actions so we don’t need to always deploy from our local machines. We’ll cover this in our next post: Automate Storyblok deploys to S3 and CloudFront with GitHub Actions.
Questions or Feedback?
Join our Discord (opens in a new window)Author