Add Dynamic Content to Storyblok Pages with Astro Server Islands
Storyblok is the first headless CMS that works for developers & marketers alike.
Dynamic content changes independently of the content in Storyblok. On a product page, for example, the copy may rarely change while the price and availability come from a commerce API.
You can render the whole page for every request to keep frequently changing data current. However, the initial response must then wait for the unchanged Storyblok content and the external data.
Astro uses an islands architecture, where most of a page renders as static HTML and isolated components handle dynamic behavior. A client island runs interactive JavaScript in the browser, while a server island renders dynamic content separately on the server.
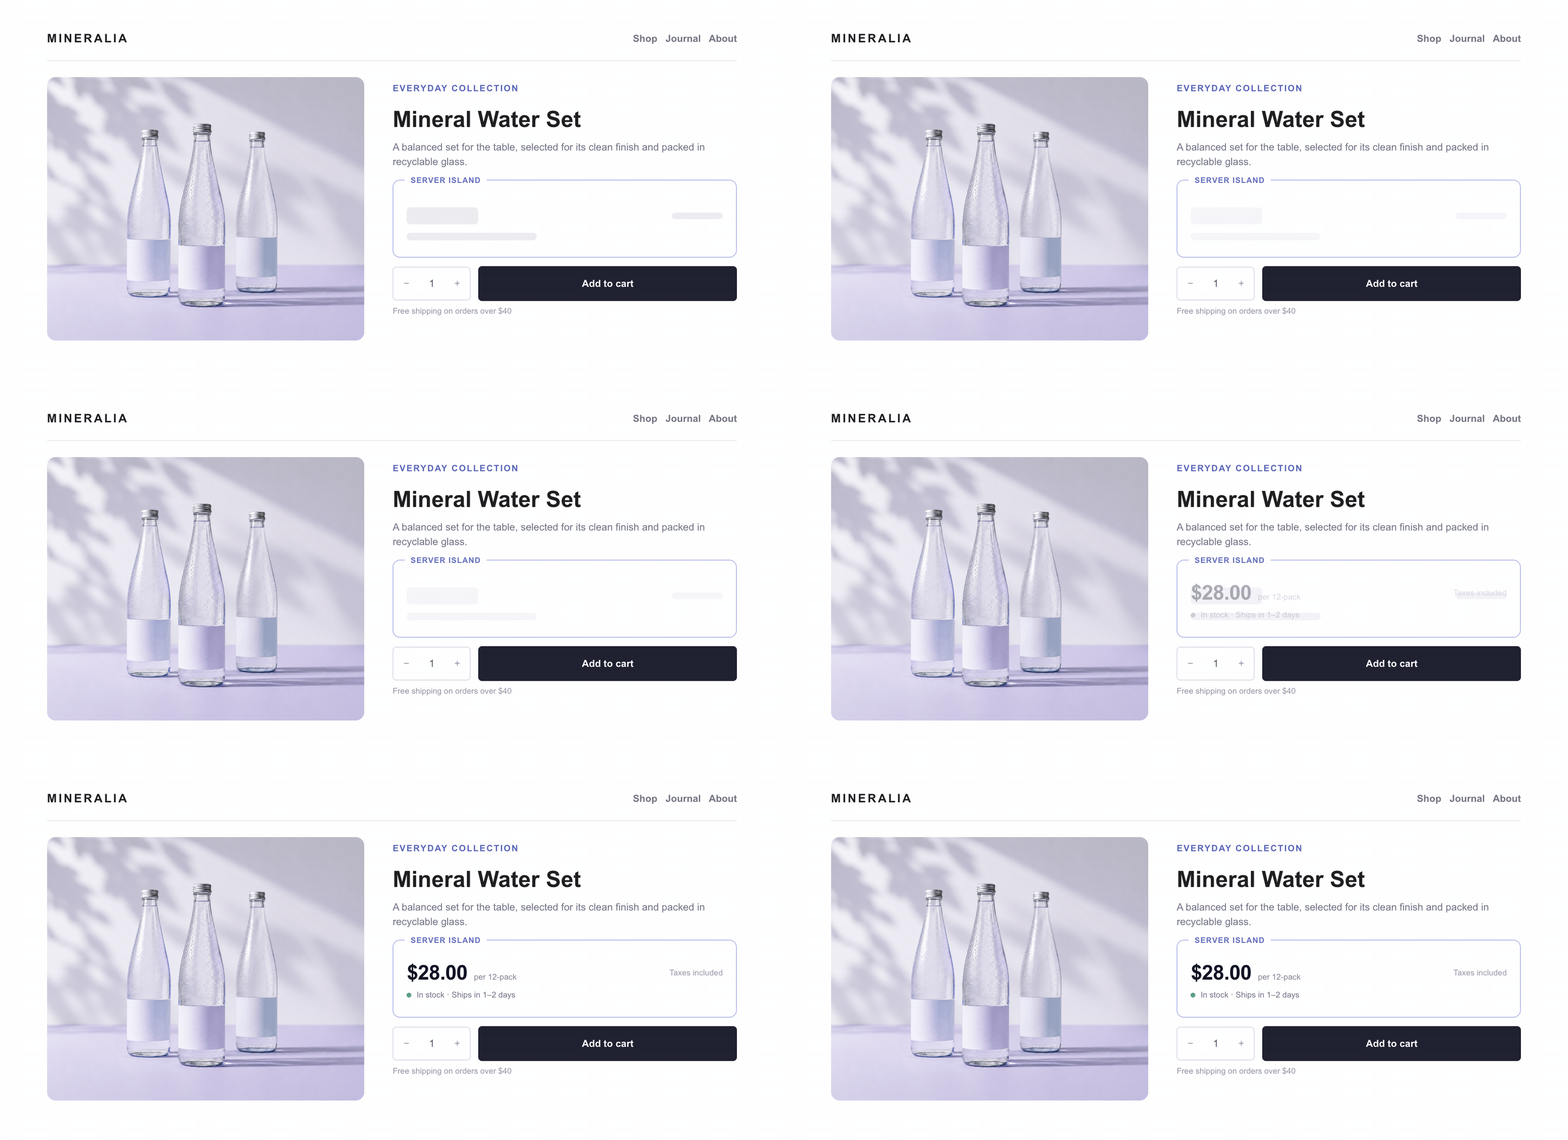
In the example below, Storyblok provides the product page content, and the highlighted server island retrieves the current price and availability when the page opens.
Prerequisites
To follow the implementation, you need:
- Astro 7
- Storyblok Astro SDK 10
- Node.js
- A Storyblok space
If you have not connected Astro to your Storyblok space yet, follow the Storyblok Astro guide.
Quickstart with a coding agent
If you already have an Astro project connected to Storyblok, fill in the placeholders below and copy the completed prompt into your coding agent. The agent will add the requested dynamic content to that project using its existing structure and conventions. To implement the pattern yourself, continue with the sections that follow.
Add [dynamic content, e.g. product availability] to [Storyblok page or component, e.g. the product page] in this Astro project using an Astro server island.

Keep the surrounding page prerendered. Fetch [data, e.g. price and stock] from [source, e.g. the commerce API] on the server, render it with server:defer, and show [fallback, e.g. a skeleton placeholder] while it loads. Follow the project's existing conventions and verify the build.
Replace the bracketed placeholders in the prompt below, then paste the completed prompt into your coding agent.
Your codebase may not include Storyblok’s content model. You can give the coding agent read access to the components endpoint through Storyblok’s Model Context Protocol (MCP) server so it can inspect the existing content model. If your project defines the model with @storyblok/schema, the agent can inspect that instead. You can also use MCP to create or edit components in a development space or a new Environment. Review those changes before applying them elsewhere.
Choose where the data comes from
Each value comes from the system best suited to manage it:
Data | Source |
|---|---|
Headline, introduction, placement, product copy, and imagery | Storyblok |
Selected product reference | Storyblok |
Current price and active promotions | Commerce or operational service |
Inventory status and dispatch estimate | Commerce or operational service |
Choose how to render request-time data
Choose from four common approaches when part of a page needs data at request time:
Approach | Result |
|---|---|
Prerender the whole page | Serves quickly, but updates current data only after another build |
Render the route on demand | Provides current data with each request, but waits for the entire page to render on the server |
Fetch from a client island | Keeps the page static, but requires the browser to load JavaScript and request the data |
Use a server island | Keeps the page prerendered while the server returns only the component that needs current data |
A server island fits when most of the page can be prerendered and one section needs data at request time. Product availability is one example; the same applies to delivery estimates, booking capacity, location-specific information, and account summaries. Render the route on demand when most of the page depends on the request, or use a client island when the component needs browser state.
Add the server:defer directive to render a component as a server island. Astro’s small browser loader then retrieves the server-rendered HTML and inserts it into the page. It does not hydrate a framework component the way client:* directives do. Refer to the Astro server islands documentation for details.
Astro creates an endpoint for the server island, and the hosting platform must keep it available after deployment. This requires an Astro adapter even though the surrounding pages remain prerendered. The Astro on-demand rendering guide explains how to configure the available adapters.
During the build, Astro leaves the deferred component out of the prerendered HTML, creates a server endpoint for it, and includes the supplied fallback in its place. The initial response can then return the prerendered page HTML without waiting for the external service.
Once the page reaches the browser:
- Astro’s loader requests the server island endpoint with the component’s serialized props.
- The island retrieves the current data from the external service.
- Astro renders the component on the server.
- The loader replaces the fallback with the returned HTML.
Server island props must be serializable. In this example, the component passes only the SKU string, while the commerce client and its response remain inside the server-side service.
Set the island’s cache policy according to the data it returns. You might cache a standard price for several minutes and use a much shorter lifetime for limited inventory. Astro does not choose this policy automatically. Configure it in the data service, with standard HTTP cache headers, at the edge, or on the deployment platform. See Astro’s server island caching guidance for the request behavior and its effect on caching.
Astro normally requests a server island with GET and switches to POST if its encrypted props make the URL too long. A string SKU keeps this request compact and compatible with ordinary HTTP caching.
Add product availability to the page
The steps below build on the Storyblok Astro guide, so your project should already fetch Storyblok stories, render them with StoryblokComponent, and register its existing components. From that baseline, you’ll add a product availability block backed by a server island.
Configure Astro and Storyblok
Install the adapter for your host, such as @astrojs/vercel, @astrojs/netlify, @astrojs/cloudflare, or @astrojs/node. This example uses the Node adapter because it runs locally without a platform account:
npx astro add nodeThe command adds the Node adapter to astro.config.mjs. The complete configuration below also defines the external service variables and registers the Storyblok block. If Storyblok is already configured, merge these additions into the existing configuration.
import node from '@astrojs/node';
import { storyblok } from '@storyblok/astro';
import { defineConfig, envField } from 'astro/config';
import { loadEnv } from 'vite';

const env = loadEnv(import.meta.env.MODE, process.cwd(), 'STORYBLOK_');

export default defineConfig({
  adapter: node({ mode: 'standalone' }),
  env: {
    schema: {
      COMMERCE_API_URL: envField.string({ context: 'server', access: 'public' }),
      COMMERCE_API_TOKEN: envField.string({ context: 'server', access: 'secret' }),
    },
  },
  integrations: [
    storyblok({
      accessToken: env.STORYBLOK_DELIVERY_API_TOKEN,
      apiOptions: {
        region: env.STORYBLOK_REGION || 'eu',
      },
      components: {
        product_availability: 'storyblok/ProductAvailabilityBlock',
      },
    }),
  ],
});
Pages remain prerendered by default after you add the adapter. On-demand rendering is opt-in.
loadEnv() is needed because Storyblok credentials are read while Astro evaluates astro.config.mjs, while the commerce service reads its validated runtime variables from astro:env/server.
Model the Storyblok block
With Astro configured, create product_availability as a nestable block in Storyblok with these fields:
Field | Type | Purpose |
|---|---|---|
| Text | Heading displayed above the availability component |
| Textarea | Optional context written by the editor |
| Text | Product identifier sent to the commerce service |
Allow the block in the Blocks field used to compose the page. An editor can then add it where the availability should appear, write the headline and introduction, and enter the product SKU.
Here, product_sku is the stable reference that connects the Storyblok block to a record in the external service. A plain text field is enough for this example, although the same reference could come from an option, datasource, or custom field when editors need to select from a larger set of records. The mapping in astro.config.mjs tells the Storyblok Astro SDK which Astro component should render the block.
Create the commerce service
Next, move the commerce request out of the Astro template and into a small service that returns the price, stock status, and dispatch estimate used by the component.
import {
  COMMERCE_API_TOKEN,
  COMMERCE_API_URL,
} from 'astro:env/server';

export interface Availability {
  price: string;
  inStock: boolean;
  dispatchEstimate: string;
}

export async function getProductAvailability(
  sku: string,
): Promise<Availability> {
  const response = await fetch(
    `${COMMERCE_API_URL}/products/${encodeURIComponent(sku)}/availability`,
    {
      headers: {
        Authorization: `Bearer ${COMMERCE_API_TOKEN}`,
      },
    },
  );

  if (!response.ok) {
    throw new Error(`Availability request failed: ${response.status}`);
  }

  return response.json();
}
The server island calls this function when it renders. The function imports credentials from astro:env/server, so Astro keeps the token out of the browser bundle. Replace the sample URL with your service’s endpoint and map its response to the Availability interface.
Create the Server Island
Call the service from ProductAvailability.astro with the SKU selected in Storyblok. If the request fails, the component displays an availability error while the rest of the page remains available.
---
import { getProductAvailability } from '../lib/commerce';

interface Props {
  sku: string;
}

const { sku } = Astro.props;
const availability = await getProductAvailability(sku).catch(() => null);
---

<div class="product-availability-shell product-availability">
  {availability ? (
    <>
      <strong>{availability.price}</strong>
      <p>{availability.inStock ? 'In stock' : 'Currently unavailable'}</p>
      <small>{availability.dispatchEstimate}</small>
    </>
  ) : (
    <p>Current availability could not be loaded.</p>
  )}
</div>
Astro renders the component on the server, then its small island loader fetches and inserts the resulting HTML into the page. Any purchase controls that need browser state can stay outside the server island or run as a separate client island.
Add a matching fallback
The initial page displays the fallback until the island responds. Give it the same minimum height and outer spacing as the finished component to prevent the content below it from moving.
<div class="product-availability-shell product-fallback" aria-label="Loading current availability">
  <span></span>
  <span></span>
</div>
Add the styles for both components:
.product-availability-shell {
  min-height: 6rem;
  padding: 1.25rem;
  border: 1px solid #dfe1e8;
  border-radius: 0.5rem;
}

.product-availability strong,
.product-availability p,
.product-availability small {
  display: block;
  margin: 0 0 0.4rem;
}

.product-fallback span {
  width: 8rem;
  height: 0.75rem;
  margin-bottom: 0.75rem;
  display: block;
  border-radius: 999px;
  background: #eceef3;
}

.product-fallback span:first-child {
  width: 5rem;
  height: 1.5rem;
}
The fallback is HTML in Astro’s named fallback slot, so it renders without browser JavaScript.
Assemble the Storyblok wrapper
Finally, connect the island to Storyblok through a wrapper that renders the editor-managed fields and passes the SKU into the deferred component.
---
import { storyblokEditable } from '@storyblok/astro';
import ProductAvailability from '../components/ProductAvailability.astro';
import ProductAvailabilityFallback from '../components/ProductAvailabilityFallback.astro';
import '../components/product-availability.css';

interface ProductAvailabilityBlok {
  _uid: string;
  component: 'product_availability';
  headline: string;
  intro?: string;
  product_sku: string;
  _editable?: string;
}

interface Props {
  blok: ProductAvailabilityBlok;
}

const { blok } = Astro.props;
---

<section {...storyblokEditable(blok)}>
  <h2>{blok.headline}</h2>
  {blok.intro && <p>{blok.intro}</p>}

  <ProductAvailability server:defer sku={blok.product_sku}>
    <ProductAvailabilityFallback slot="fallback" />
  </ProductAvailability>
</section>
The storyblokEditable(blok) attribute keeps the wrapper selectable in the Visual Editor. Editors can update the headline, introduction, and SKU in Storyblok, while the deferred child retrieves and renders the external product data. The returned price and availability are not Storyblok fields, so they are not edited directly in the Visual Editor.
This assumes the project already has Storyblok’s preview and Bridge integration configured. See Visual Preview in Astro for the Astro setup and the Visual Editor concept for how storyblokEditable connects rendered elements to their Storyblok blocks.
Request-time data without client-side rendering
With server:defer, Astro keeps the Storyblok page prerendered while retrieving request-time data only for the component that needs it. The external request and its API token remain on the server, the browser receives rendered HTML without a framework runtime or a second client-side data request, and the rest of the page does not wait for the external service.
Server islands are a good fit whenever one part of a Storyblok page needs to stay current independently of its editorial content, regardless of which server-side service supplies the data.
Questions or Feedback?
Join our Discord (opens in a new window)Author