How to Add an Email Newsletter to Your Next.js and Storyblok-Powered Blog
Storyblok is the first headless CMS that works for developers & marketers alike.
Are you looking to expand your blog's reach and establish a solid online presence? Integrating an email newsletter may be the strategic step you need. In this article, we'll discuss how to seamlessly add email newsletter functionality to your Next.js and Storyblok-Powered blog for a more engaged readership.
Prerequisites
To ensure you get the most out of this guide you’ll need the following:
- Node.js installation on your machine
- Basic knowledge of React and Next.js
- Storyblok account (opens in a new window) for managing the blog content
- Active domain for setting up the newsletter email
- Mailgun account (opens in a new window) for sending emails and managing the mailing list
- Ngrok (opens in a new window) account and installation to test the app online without actually deploying it.
Overview
Let's take a big-picture look at how the newsletter system we’ll build works.
Firstly, users should be presented with a form for subscribing to the blog’s newsletter. After successful form submission, the user’s email is sent as a request to the Next.js API route (opens in a new window) set up for adding the email address to the newsletter’s mailing list.
Next, a confirmation link that contains the unique confirmation code which was generated when the email was added to the mailing list and the user’s email address is sent as an email to the user to activate their subscription. Upon clicking the activation link the user will be redirected to the application to confirm their subscription by verifying the confirmation code and email passed in the URL parameters.
For users who don’t want to receive the newsletter emails, a link to unsubscribe will be included at the bottom of every email. The procedure for unsubscribing will be very similar to how users can confirm their newsletter subscription.
To send the newsletter our application needs to be aware of when a new blog post is published, which is where Storyblok’s webhooks (opens in a new window) come into play. A webhook is set up to send a POST request to a specific endpoint URL which in our case will be an API route in the Next.js application to handle sending the newsletter emails to subscribed users on the mailing list.
With all this put together, we’ll have a custom newsletter solution for our blog. In the next section, we’ll dive into the process of building the newsletter.
Project Setup
Let’s get started by setting up the codebase. We’ll build on top of the Next.js + Storyblok blog example from this article (opens in a new window). Instructions for setting up the necessary content blocks for the stories are there so we don’t repeat the same information twice and to keep this article focused on the solution we’re building.
Clone the repo storyblok-nextjs-newsletter (opens in a new window) to get the starter code and install the initial project dependencies.
git clone https://github.com/josephden16/storyblok-nextjs-newsletter.git
cd ./storyblok-nextjs-newsletter
yarn install
Create a .env.local file at the root of your project and add the following code snippet:
# .env.local
NEXT_PUBLIC_STORYBLOK_ACCESS_TOKEN= #your storyblok public access token
It’s essential that the NEXT_PUBLIC_STORYBLOK_ACCESS_TOKEN should store the public API access token (opens in a new window) for your account, without it your content won’t show on the webpage. If you’ve set up everything correctly when you run the application and navigate to the home page, what’s on your screen should be similar to the image below.
 Although, the layout will be identical the content shown will be based on what’s stored on your Storyblok account.
Build the newsletter subscription form
We’ll need to create a form to get users’ email before sending it to our API route to handle adding it to our newsletter mailing list.
Create a new file named SubscribeNewsletter.js in the components folder and add the following code:
import React, { useState } from "react";

function SubscribeNewsletter() {
  const [email, setEmail] = useState("");
  const handleSubscribe = async (evt) => {
    evt.preventDefault();
    const res = await fetch("/api/signup", {
      method: "POST",
      body: JSON.stringify({ email }),
      "Content-Type": "application/json",
    });
    const payload = await res.json();
    if (payload.success) {
      alert(payload.message);
    } else {
      alert("Failed to subscribe to newsletter");
    }
  };
  return (
    <div className="flex flex-col items-center mb-10">
      <form
        onSubmit={handleSubscribe}
        className="flex flex-col items-center gap-2 w-full max-w-[500px] py-2"
      >
        <h2 className="text-2xl font-bold">Subsribe to our Newsletter!</h2>
        <p className="text-gray-500">
          Subscribe to our newsletter and stay updated.
        </p>
        <input
          type="email"
          placeholder="Your email"
          required
          onChange={(evt) => setEmail(evt.target.value)}
          className="border w-3/4 p-2 focus-within:outline-blue-200"
        />
        <button
          role="submit"
          className="bg-blue-400 p-2 w-3/4 text-white focus:outline-blue-200 outline-offset-2"
        >
          Subscribe
        </button>
      </form>
    </div>
  );
}
export default SubscribeNewsletter;
The SubscribeNewsletter component displays a form where users can subscribe to the newsletter by submitting their email. The form then sends the email to the newsletter subscription API endpoint and provides feedback based on the server’s response.
Next, we’ll need to include it on the home page for users to be able to subscribe to our newsletter.
Open the file for the homepage located at pages/index.js and include the SubscribeNewsletter component.
// pages/index.js

...
import SubscribeNewsletter from "../components/SubscribeNewsletter";
...

...
<main className="w-full">
    <StoryblokComponent blok={story.content} />
    <SubscribeNewsletter />
</main>
...
After following the steps we've taken so far, the newsletter form should look like the one in the image below.
 At the moment the form won’t do anything because you haven’t set up the API route for handling newsletter subscriptions. Still, before we get into building the API route we’ll have to set up Mailgun for sending emails and managing the mailing list.
Setup Mailgun
Mailgun (opens in a new window) is a cloud-based email service that provides tools and APIs for sending, receiving, and managing email communications. It’s designed to simplify the process of integrating email functionality into applications, websites, and other systems. There are several email services out there that offer similar functionality, but the choice of Mailgun for this tutorial is due to its developer-first approach and the plethora of resources available to help navigate it.
After setting up your Mailgun account the next step is to add a domain (opens in a new window) and follow the instructions for entering the appropriate DNS records for your DNS provider. Usually, the changes to the DNS records propagate across the internet in a couple of minutes and the worst case scenario about 48 hours later, so ensure you properly follow the instructions on how to add a domain on Mailgun for your DNS provider.
If you’ve added the domain you’ll find it among the list of domains in the domains (opens in a new window) page of the Mailgun dashboard.
 Create the newsletter mailing list
Mailgun provides a mailing list feature to store and manage your recipients in lists without setting up a database. These lists can be used to send emails to a group of recipients without needing to individually specify each email address.
Let’s create a new list to store subscribers of the newsletter.
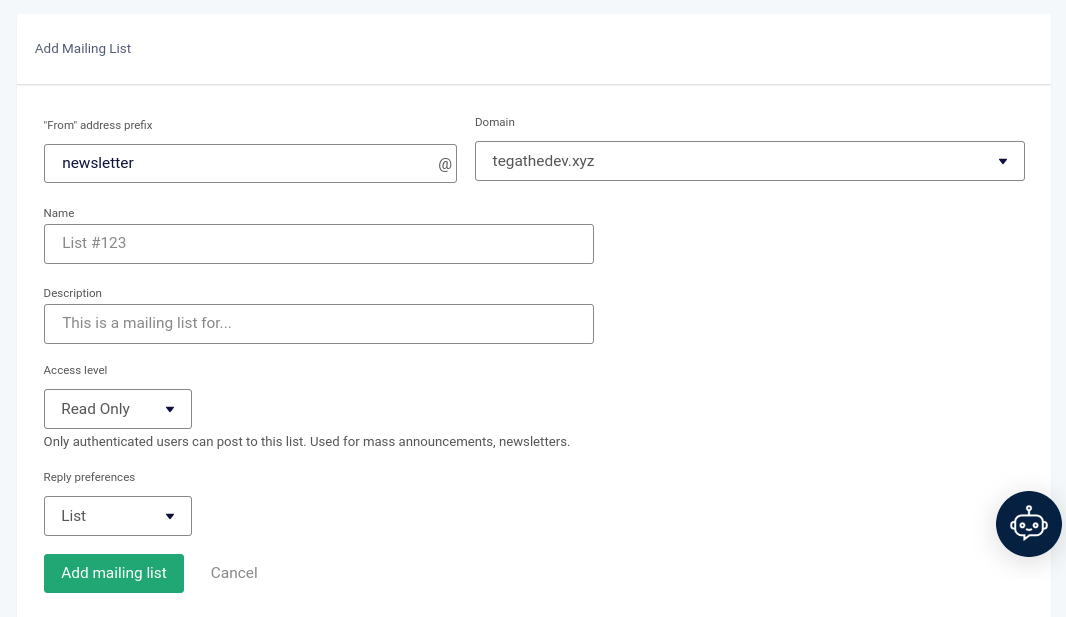
Navigate to the mailing list (opens in a new window) section of your Mailgun dashboard and click the “Create mailing list” button.
 You’ll be presented with a form to create the mailing list, fill the form with the information that’s necessary to create your newsletter mailing list and click the “Add mailing list” button, then you’ll be redirected to a page where you can manage your new mailing list.
 We’re almost done with what‘s needed from the Mailgun dashboard, what’s left now is to create the newsletter template that’ll contain placeholders we’ll populate with data before sending it to subscribed users.
Create the newsletter template
Mailgun templates streamline email creation and allow dynamic content insertion, making it easy to send personalized and visually appealing emails to recipients.
We’ll need to create a reusable template for the newsletter email that we can populate with information about the newly published article like its title, description, and image, as well as a personalized link to unsubscribe from the newsletter emails.
Navigate to the templates section of the Mailgun dashboard and ensure the selected domain is the one you’re using for this project.
Click the “Create message template” button.
 A modal will pop up with instructions on what method you want to use for creating the message template. Select the second tab “by Coding it in HTML” and choose the “Blank” option.
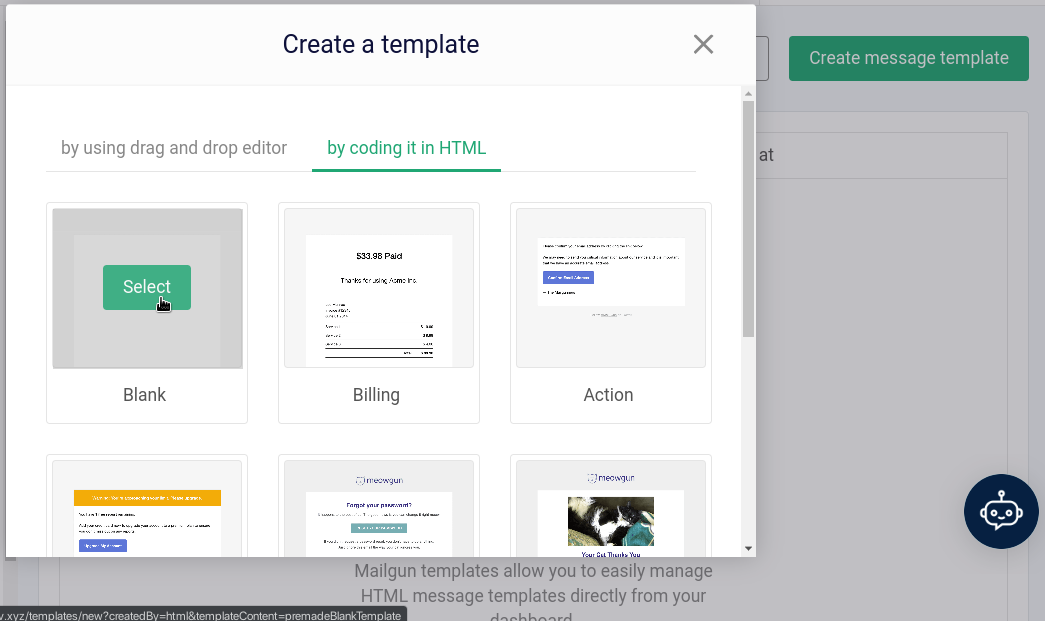 By choosing the “Blank” option we can create a new template for the newsletter from scratch with our custom HTML and CSS.
You’ll be redirected to a new page where you can fill in the information to create the message template.
 There’s a code editor at the bottom to enter the HTML code for the template. Insert the following code to generate the newsletter template:
<!DOCTYPE html>
<html lang="en">
<head>
    <meta charset="UTF-8">
    <meta name="viewport" content="width=device-width, initial-scale=1.0">
    <title>Your Newsletter Title</title>
    <style>
        body, p, h1, h2, h3, h4, h5, h6 {
            margin: 0;
            padding: 0;
        }
        body {
            font-family: Arial, sans-serif;
            line-height: 1.6;
            color: #333333;
        }
        .container {
            max-width: 600px;
            margin: 0 auto;
            padding: 20px;
            background-color: #f7f7f7;
            text-align: center;
        }
        .header {
            text-align: center;
            padding: 10px;
            background-color: #eaeaea;
        }
        .content {
            padding: 20px;
            background-color: #ffffff;
        }
        .footer {
            text-align: center;
            padding: 10px;
            background-color: #eaeaea;
        }
        @media (max-width: 600px) {
            .container {
                width: 100% !important;
            }
        }
    </style>
</head>
<body>
    <div class="container">
        <div class="header">
            <h1>{{postTitle}}</h1>
        </div>
        <div class="content">
            <img src="{{postImage}}" alt="Blog Image" style="max-width: 100%; height: auto;">
            <p>{{postTeaser}} Click the link below to read the full article.</p>
            <p><a href="{{postLink}}">Read more</a></p>
        </div>
        <div class="footer">
            <p>Want to unsubscribe? <a href="http://localhost:3000/unsubscribe?confirmationCode={{confirmationCode}}&email={{email}}">Click here</a>.</p>
        </div>
    </div>
</body>
</html>
Mailgun message templates use handlebars (opens in a new window) under the hood for templating which gives us the flexibility of rendering the template with dynamic data from our code, as shown with the variables enclosed in double curly brace {{ }} expression.
Now that we’re done with building the newsletter template, let’s head back to the blog codebase and continue where we left off.
Build the newsletter subscription API route
Before we get into building the API route for the newsletter subscription we’ll have to set up the Mailgun JavaScript client for the project.
Install the Mailgun JavaScript client by entering the command below:
yarn add mailgun.js
Go to your .env.local file and add the following environment variables:
# .env.local
MAILGUN_API_KEY= # your mailgun api key
MAILGUN_SENDER_EMAIL= # the email you created for your mailing list
MAILGUN_SENDER_DOMAIN= # the domain you added on mailgun
HOST=http://localhost:3000 # base URL of your app assuming it's running on port 3000
To get the api key for your account navigate to the API Security page (opens in a new window) on the Mailgun dashboard and click the “Add new key” button to generate a new API key.
Create a new file named mailgun.js within the helpers folder, and add the following code to the file:
// helpers/mailgun.js
import formData from "form-data";
import Mailgun from "mailgun.js";

const mailgun = new Mailgun(formData);

export const mg = mailgun.client({
  username: "api",
  key: process.env.MAILGUN_API_KEY,
});
In the code above we’re initializing the mailgun instance that’ll be used for interacting with the Mailgun API to send emails, and access and manage mailing list recipients.
When we created the newsletter subscription form it didn’t do anything because the API route that it sent the user’s email to wasn’t available yet. Let’s create the API route for handling newsletter subscriptions.
Within the pages/api folder create a new file called signup.js with the following code:
// pages/api/signup.js
import {
  addToSubscribersList,
  getSubscriptionListMember,
  sendSubscriptionConfirmationMail,
  getConfirmationURL,
} from "../../helpers";
import crypto from "crypto";
export default async function signupHandler(req, res) {
  if (req.method !== "POST") {
    // Return an error response for unsupported HTTP methods
    return res
      .status(405)
      .json({ success: false, message: "Method Not Allowed" });
  }
  try {
    const data = JSON.parse(req.body);
    const { email } = data;
    if (!email) {
      throw new Error("Enter a valid email address");
    }
    const subscriptionListMember = await getSubscriptionListMember(email);
    if (subscriptionListMember) {
      const { subscribed, vars } = subscriptionListMember;
      if (subscribed) {
        return res.status(200).json({
          success: true,
          message: "You've already subscribed to the newsletter",
        });
      } else {
        const { confirmationCode } = vars;
        const confirmationURL = getConfirmationURL(email, confirmationCode);
        await sendSubscriptionConfirmationMail(email, confirmationURL);
        return res.status(200).json({
          success: true,
          message: "Go to your mailbox to confirm your newsletter subscription",
        });
      }
    } else {
      const confirmationCode = crypto.randomBytes(32).toString("hex");
      await addToSubscribersList(email, confirmationCode);
      const confirmationURL = getConfirmationURL(email, confirmationCode);
      await sendSubscriptionConfirmationMail(email, confirmationURL);
      return res.status(200).json({
        success: true,
        message: "Go to your mailbox to confirm your newsletter subscription",
      });
    }
  } catch (error) {
    res.status(400).json({
      success: false,
      message:
        error.message || "Failed to send subscription confirmation email",
    });
  }
}
In the code above, we define a function that takes in requests to the /api/signup route, which in turn handles the newsletter subscription. It imports helper functions for managing subscribers, email confirmation, and confirmation URL generation. When receiving a POST request, it checks if the email is already subscribed. If subscribed, it alerts the user; if not, it generates a confirmation code, sends an email with a confirmation link, and responds accordingly. If the request is invalid, it responds with an error message.
We’ll need to create the helper functions we used in the newsletter subscription handler.
Within the helpers folder create a new file named index.js and include the following code:
// helpers/index.js
import { mg } from "./mailgun";

export async function addToSubscribersList(email, confirmationCode = "") {
  try {
    const varsOption = confirmationCode ? { vars: { confirmationCode } } : {};
    const data = await mg.lists.members.createMember(
      process.env.MAILGUN_SENDER_EMAIL,
      {
        address: email,
        subscribed: "no",
        upsert: "yes",
        ...varsOption,
      }
    );
    return data;
  } catch (error) {
    throw error.message || "Failed to add your email to the subscriber's list";
  }
}

export async function getSubscriptionListMember(email) {
  try {
    const data = await mg.lists.members.getMember(
      process.env.MAILGUN_SENDER_EMAIL,
      email
    );
    return data;
  } catch (error) {
    return null;
  }
}

export async function sendSubscriptionConfirmationMail(email, confirmationURL) {
  try {
    const data = await mg.messages.create(process.env.MAILGUN_SENDER_DOMAIN, {
      from: "Newsletter <newsletter@tegathedev.xyz>",
      to: [email],
      subject: "Confirm newsletter subscription",
      html: `Greetings! <p>We are delighted to have you as a new subscriber to our newsletter.</p> <p>To finalize your subscription, kindly confirm it by clicking on the following <a href="${confirmationURL}">link</a>.</p> <p>Thank you for joining our community!</p>`,
    });
    return data;
  } catch (error) {
    throw error.message || "Failed to send confirmation email";
  }
}

export function getHostURL() {
  return process.env.HOST;
}

export function getConfirmationURL(email, confirmationCode) {
  let hostURL = getHostURL();
  const urlParams = new URLSearchParams({
    confirmationCode: confirmationCode,
    email: email,
  });
  const confirmationURL = `${hostURL}/confirm-subscription?${urlParams}`;
  return confirmationURL;
}
So, let’s break down what those helper functions in the code are all about:
- addToSubscribersList(email, confirmationCode = ""): Adds an email to the subscribers’ list with an optional confirmation code. It utilizes Mailgun’s API to create a member, allowing customization of subscription status and associated data.
- getSubscriptionListMember(email): Retrieves a subscriber’s details from the list using Mailgun’s API. Returns member data if found, or null if absent.
- sendSubscriptionConfirmationMail(email, confirmationURL): Utilizes Mailgun to send a confirmation email. Constructs a message with HTML containing the confirmation URL for activating subscriptions.
- getHostURL(): Fetches the base application URL from the environment variable.
- getConfirmationURL(email, confirmationCode): Creates a URL for confirming subscriptions. Appends email and confirmation code as query parameters, generating a link for users to confirm their subscription.
These helper functions collaborate to ensure an effortless process of adding, retrieving subscriber information and sending emails for the newsletter signup.
When you head back to the home page and attempt to subscribe to the newsletter with an active email address you should receive a confirmation email as shown in the image below: When you tap on that link to confirm your email, you’ll end up on a page with Next.js’ standard 404 error message. It’s expected because we haven’t made the page that’ll tell you about your email confirmation status.
We’ll make a page for confirming emails, and it’d perform two tasks. First, it’ll deal with confirming the email itself. Second, it’ll inform users whether the confirmation went through or not.
Create a new file named confirm-subscription.js within the pages directory and the following code:
// pages/confirm-subscription.js

import { confirmSubscription } from "../helpers";

export default function ConfirmSubscription({ emailConfirmed, message }) {
  return (
    <div className="text-center mt-10">
      {emailConfirmed ? (
        <div>
          <h1 className="font-bold text-xl my-2">
            Thank you for confirming your email!
          </h1>
          <p>{message}</p>
        </div>
      ) : (
        <div>
          <h1 className="font-bold text-xl my-2">Email confirmation failed</h1>
          <p>{message}</p>
        </div>
      )}
    </div>
  );
}

export async function getServerSideProps({ query }) {
  const { emailConfirmed, message } = await confirmSubscription(
    query.email,
    query.confirmationCode
  );
  return {
    props: {
      emailConfirmed,
      message,
    },
  };
}
This code defines a page that displays different messages based on whether an email is confirmed. It imports the confirmSubscription function, which runs on the server through getServerSideProps to confirm the user’s newsletter subscription from the URL query parameters email and confirmationCode. It then renders a message, either confirming the successful confirmation or indicating an error.
We’ll need to create the confirmSubscription helper function used in the newsletter confirmation page.
Within the helpers/index.js file add the following code:
export async function confirmSubscription(email, confirmationCodeFromRequest) {
  try {
    const user = await getSubscriptionListMember(email);
    if (!user) throw new Error("This email does not exist in our mailing list");
    const { vars } = user;
    const { confirmationCode } = vars;
    if (confirmationCode !== confirmationCodeFromRequest) {
      throw new Error("Confirmation code is invalid");
    }
    if (user.subscribed)
      return {
        emailConfirmed: true,
        message: "You're already subscribed to the newsletter!",
      };
    await mg.lists.members.updateMember(
      process.env.MAILGUN_SENDER_EMAIL,
      email,
      {
        subscribed: true,
      }
    );
    return {
      emailConfirmed: true,
      message: "You've successfully subscribed to the newsletter!",
    };
  } catch (error) {
    return {
      emailConfirmed: false,
      message: error.message || "Failed to confirm your subscription",
    };
  }
}
This code checks and confirms newsletter subscriptions. It verifies the provided email and confirmation code against stored data. If successful, it updates the subscription status and returns a confirmation message. If not, it returns an error message indicating subscription failure or issues with the confirmation data.
So, we're all set with the code for confirming newsletter subscriptions. Give that confirmation link a click, and voilà! You'll see a message just like the one in the image below:

Set up Storyblok Webhook for newly published content
We’ve been able to set up what we need for our newsletter subscription list, but users can’t receive the newsletter when new content is published on the blog. If you remember from the overview at the start of the article we mentioned we can achieve this by utilizing Storyblok’s webhook feature, which can be configured to send a POST request to a specific URL when a story is published.
Before we head over to our Storyblok dashboard to create the webhook, we’ll need to set up Ngrok for our project to put it on the internet because Storyblok’s webhook doesn’t work on localhost. Ngrok is a tool that provides secure tunnelling capabilities, allowing you to expose your locally hosted services or applications to the internet.
Ensure you have Ngrok installed on your machine before proceeding.
Go to your Ngrok dashboard and navigate to the domains (opens in a new window) page where you can access the public address that was generated for you. If you can’t find anyone just click the blue “New Domain” button to generate a new domain. Open your terminal at the root of the project and enter the command below:
ngrok http --domain=<your ngrok domain> 3000
This terminal command uses Ngrok to expose a local web server running on port 3000 to the internet using a specific Ngrok domain. It creates a tunnel, allowing external access to your local server. Replace <your ngrok domain> with your actual Ngrok domain.
After entering the command, you can access your locally running project online and make changes that will be reflected on the internet.
Go to your Storyblok dashboard and take the following steps to create the webhook:
- Navigate to the “Settings” page and click on the “Webhooks” Tab
- Click on the “New Webhook” button
- Fill in the required fields necessary for creating the webhook
- For the “Endpoint URL” field, ensure you use https://{your ngrok domain}/api/send-newsletter as the value
- For the “Triggers” field what’s needed is for only the “Story published” option to be selected
- Click on “Save”

We have set up the webhook successfully. Currently, the webhook sends a POST request to the /api/send-newsletter endpoint every time a blog post is published, which is not appropriate. To fix this, we need to make some changes to our blog content type to control how newsletters are sent.
Update article content type to control newsletters
To avoid sending unnecessary newsletters, we'll have to do the following:
- We'll add a newsletterSentAt field to keep track of the newsletter's dispatch time. If it's not empty, it signals no need for a new newsletter.
- Also, we'll add a sendNewsletter boolean field to decide if the newsletter should be sent.
When the webhook is triggered, a POST request is sent to /api/send-newsletter. The newsletter is only sent if these conditions are met: the published story is an article content type, the sendNewsletter field is true, and the newsletterSentAt field is empty.
Go to your Storyblok dashboard and navigate to the “Block Library” page. There should be an “article” content type in the block library. Click on the “article” content type and add two new fields: newsletterSentAt of type “Text” and sendNewsletter of type “Boolean” and save the changes.
 With that in place, we can head back to our code editor and work on building the API route to handle sending the newsletters.
Build the API route for sending newsletters
To complete the newsletter, an API route must be set up to send the newsletter when a published article meets the criteria.
In your .env.local add a new environment variable STORYBLOK_MANAGEMENT_TOKEN to store your personal access token (opens in a new window) for authenticating requests to Storyblok’s Management API (opens in a new window).
# .env.local
STORYBLOK_MANAGEMENT_TOKEN= # your personal access token
Within the pages/api folder, Create a new file called send-newsletter.js and add the following code:
// pages/api/send-newsletter.js
import StoryblokClient from "storyblok-js-client";
import { getHostURL, sendNewsletterMail } from "../../helpers";

const Storyblok = new StoryblokClient({
  oauthToken: process.env.STORYBLOK_MANAGEMENT_TOKEN,
});

export default async function sendNewsletter(req, res) {
  if (req.method !== "POST") {
    return res.status(405).json({ message: "Method Not Allowed" });
  }

  try {
    const { full_slug, space_id, story_id } = req.body;

    const response = await Storyblok.get(
      `spaces/${space_id}/stories/${story_id}`
    );
    const { content } = response.data.story;
    const {
      title,
      teaser,
      image,
      sendNewsletter,
      newsletterSentAt,
      component,
    } = content;

    if (component !== "article") {
      return res
        .status(400)
        .json({ message: "Only blog posts are applicable for newsletters" });
    }

    if (!sendNewsletter || newsletterSentAt) {
      console.log("Not applicable for newsletter");
      return res.status(400).json({ message: "Not applicable for newsletter" });
    }

    const newsletterData = {
      subject: `New Article - ${title}`,
      post: {
        title: title,
        teaser: teaser,
        link: getHostURL() + "/" + full_slug,
        image: image.filename,
      },
    };

    const existingStory = response.data.story;
    existingStory.content.newsletterSentAt = new Date();
    await Storyblok.put(`spaces/${space_id}/stories/${story_id}`, {
      story: existingStory,
    });
    await sendNewsletterMail(newsletterData);
    console.log("Newsletter Sent!");
    res.status(201).json({ message: "Newsletter Sent" });
  } catch (error) {
    console.error(error);
    res.status(500).json({ message: "Internal Server Error" });
  }
}
This code sets up an API endpoint to trigger sending newsletters for new blog articles. It uses Storyblok's API to fetch article details. If the article qualifies, it generates newsletter content, marks the article as sent, and emails the newsletter. If not eligible, it responds with suitable messages.
Let’s create the sendNewsletterMail helper function used in the sendNewsletter handler. Add the following code in the helpers/index.js file:
// helpers/index.js
export async function sendNewsletterMail({ subject, post }) {
  try {
    const data = await mg.messages.create(process.env.MAILGUN_SENDER_DOMAIN, {
      from: process.env.MAILGUN_SENDER_EMAIL,
      to: [process.env.MAILGUN_SENDER_EMAIL],
      subject: subject,
      template: "newsletter",
      "h:X-Mailgun-Variables": JSON.stringify({
        email: "%recipient%",
        confirmationCode: "%recipient.confirmationCode%",
        postImage: post.image,
        postLink: post.link,
        postTeaser: post.teaser,
        postTitle: post.title,
      }),
    });
    return data;
  } catch (error) {
    throw error;
  }
}
The sendNewsletterMail helper function sends newsletters via email using Mailgun's API. It injects variables such as subject, post image, link, teaser, and title into a customizable newsletter template created for each blog post.
Head back to your Stoyblok dashboard and fill in the necessary information to create a new article. You should find two new fields “Send Newsletter” and “Newsletter Sent At”. To send the newsletter ensure the “Send Newsletter” field is activated. When you publish the article an email will be sent to subscribed users like the one in the image below:
 Our newsletter setup is complete. What’s left is to ensure that every newsletter email has a functioning unsubscribe link for our subscribers to opt-out.
Implement unsubscribe functionality
Within the pages folder create a new file named unsubscribe.js and add the following code:
import { removeFromSubscribersList } from "../helpers";

export default function Unsubscribe({ unsubscribed, message }) {
  return (
    <div className="text-center mt-10">
      {unsubscribed ? (
        <div>
          <h1 className="font-bold text-xl my-2">
            You have been successfully unsubscribed.
          </h1>
          <p>
            We are sorry to see you go. You will no longer receive our
            newsletter.
          </p>
        </div>
      ) : (
        <div>
          <h1 className="font-bold text-xl my-2">Unsubscription failed.</h1>
          <p>{message}</p>
        </div>
      )}
    </div>
  );
}

export async function getServerSideProps({ query }) {
  const { unsubscribed, message } = await removeFromSubscribersList(
    query.email,
    query.confirmationCode
  );
  return {
    props: {
      unsubscribed,
      message,
    },
  };
}
This code defines a page that displays different messages based on whether a user has unsubscribed from the newsletter. It imports the removeFromSubscribersList function, which runs on the server through getServerSideProps to remove the user from the newsletter mailing list based on the URL query parameters email and confirmationCode. It then renders a message, either confirming the successful removal from the newsletter mailing list or indicating an error.
We’ll need to create the removeFromSubscribersList helper function used on the unsubscribe page.
Within the helpers/index.js file add the following code:
export async function removeFromSubscribersList(
  email,
  confirmationCodeFromRequest
) {
  try {
    const user = await getSubscriptionListMember(email);
    if (!user) throw new Error("This email does not exist in our mailing list");
    const { vars } = user;
    const { confirmationCode } = vars;
    if (confirmationCode !== confirmationCodeFromRequest) {
      throw new Error("Confirmation code is invalid");
    }
    await mg.lists.members.destroyMember(
      process.env.MAILGUN_SENDER_EMAIL,
      email
    );
    return {
      unsubscribed: true,
      message: "",
    };
  } catch (error) {
    return {
      unsubscribed: false,
      message:
        error.message ||
        "Sorry, we couldn't process your unsubscription request.",
    };
  }
}
This code defines an asynchronous function, removeFromSubscribersList, which handles unsubscription logic. It verifies the user's email and confirmation code, and then removes the user from a mailing list using Mailgun's API. It returns an object indicating successful unsubscription or an error message if any issues arise during the process.
When you click on the link to unsubscribe you should land on a page that confirms you’ve unsubscribed from the newsletter mailing list. Conclusion
In conclusion, integrating a newsletter into your Next.js and Storyblok-powered blog can significantly enhance user engagement and communication. With the comprehensive solution, we have built, including subscriptions, mailing list management, and content-triggered emails, delivering timely updates to your readers is now possible. Follow the steps outlined in this guide and check out the final solution in this GitHub repository (opens in a new window) where all the code we’ve covered is put together. Start engaging with your readers today!
