Cross-posting to Social Media using a Headless CMS, Serverless Functions, and Zapier
Storyblok is the first headless CMS that works for developers & marketers alike.
Wouldn’t it be cool if you could easily publish your fresh new piece of content and automatically promote it on different social media platforms at the same time, with a single click? That is exactly what we’ll explore in this tutorial.
In a nutshell, using Storyblok as our Headless CMS of choice, we can employ its webhooks to invoke a serverless function that processes the content entry’s data and sends it to Zapier, which can then be used to share the content on a variety of social media platforms. Let’s get started!
Requirements
In order to follow this tutorial, please make sure you meet these requirements:
- A basic understanding of JavaScript, serverless functions, and webhooks
- A Storyblok account
- A Netlify account
- A Zapier account
- Node.js 18 (LTS) installed
- Netlify CLI installed
Adapting the block schema
Essentially, you could choose to modify any kind of content type block so that it’s ready to be shared on social media, be it a landing page, an article, or something else entirely. For the sake of simplicity, we’ll just work with a newly created blank Storyblok space and apply the relevant changes to its Page content type block.
In the Block Library, let’s select it and proceed by creating a new tab called Social Media in order to keep things neat and tidy.
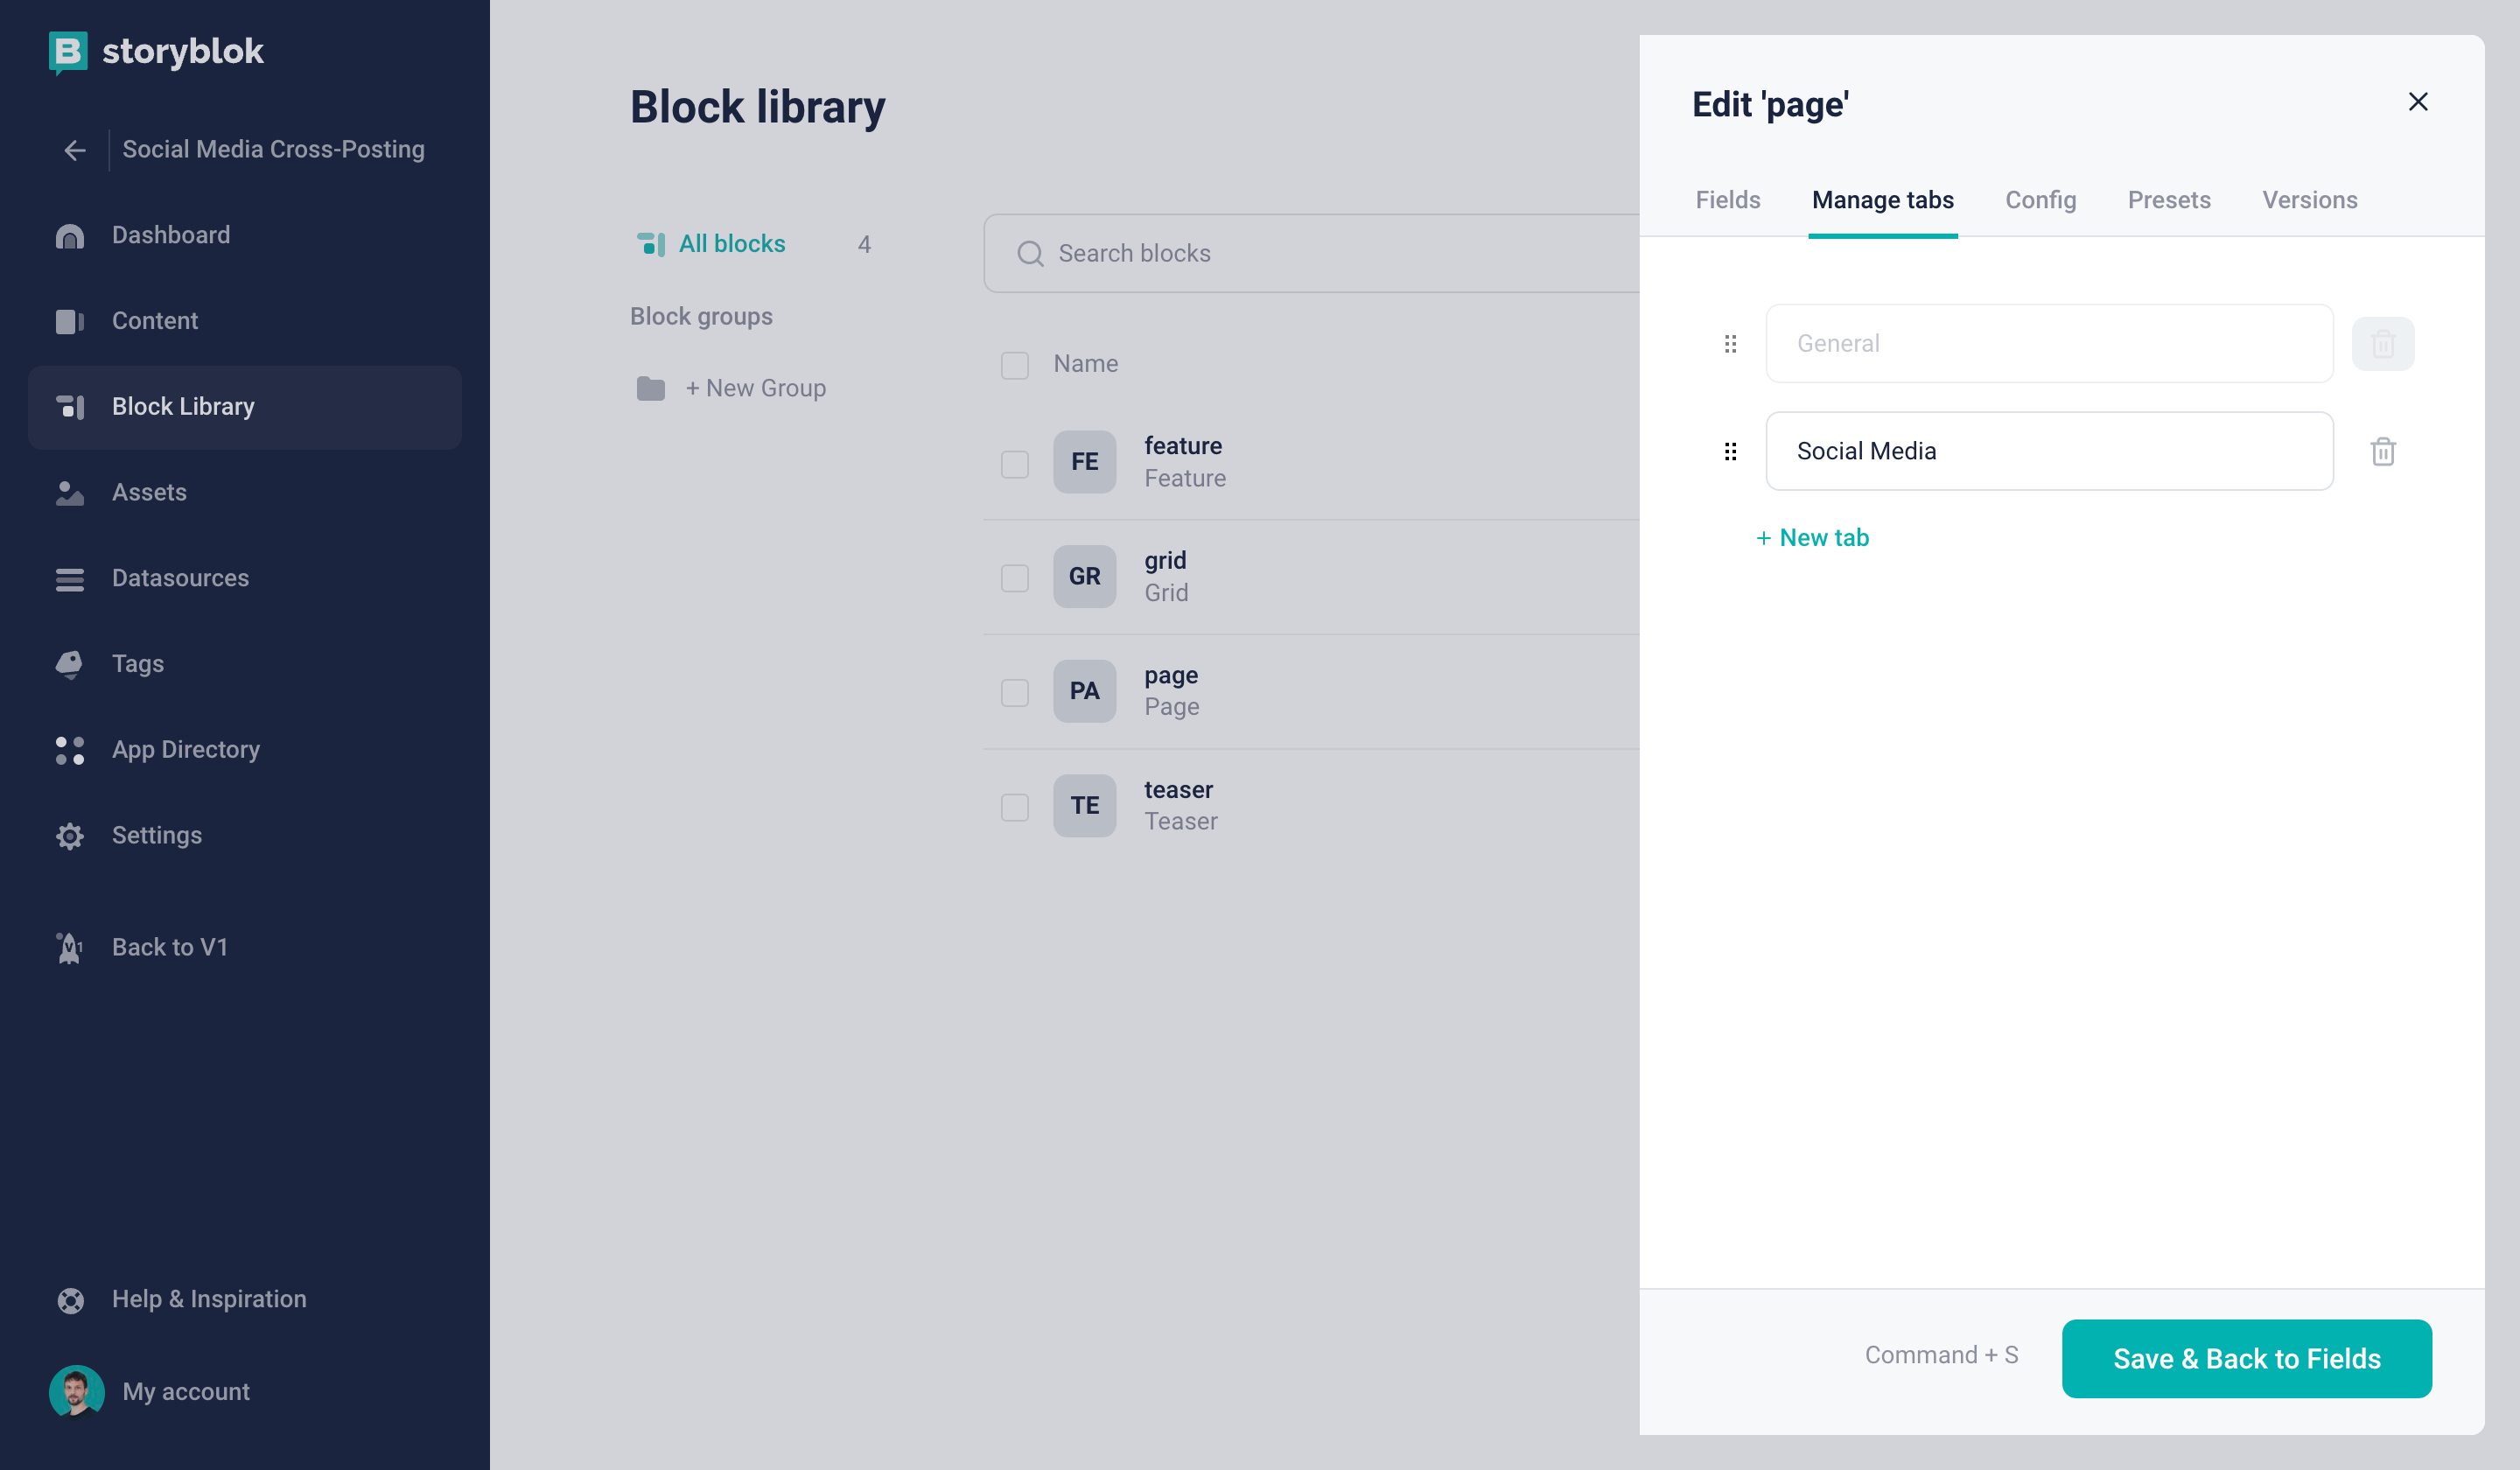
Creating a new tab "Social Media"
In this new tab, we can now create a new Boolean field with the technical name cross_post_to_linkedin. You may add several other Boolean fields here to enable sharing on other platforms, e.g. Instagram or Twitter (X). However, for simplicity’s sake, we’ll focus on LinkedIn throughout this tutorial.
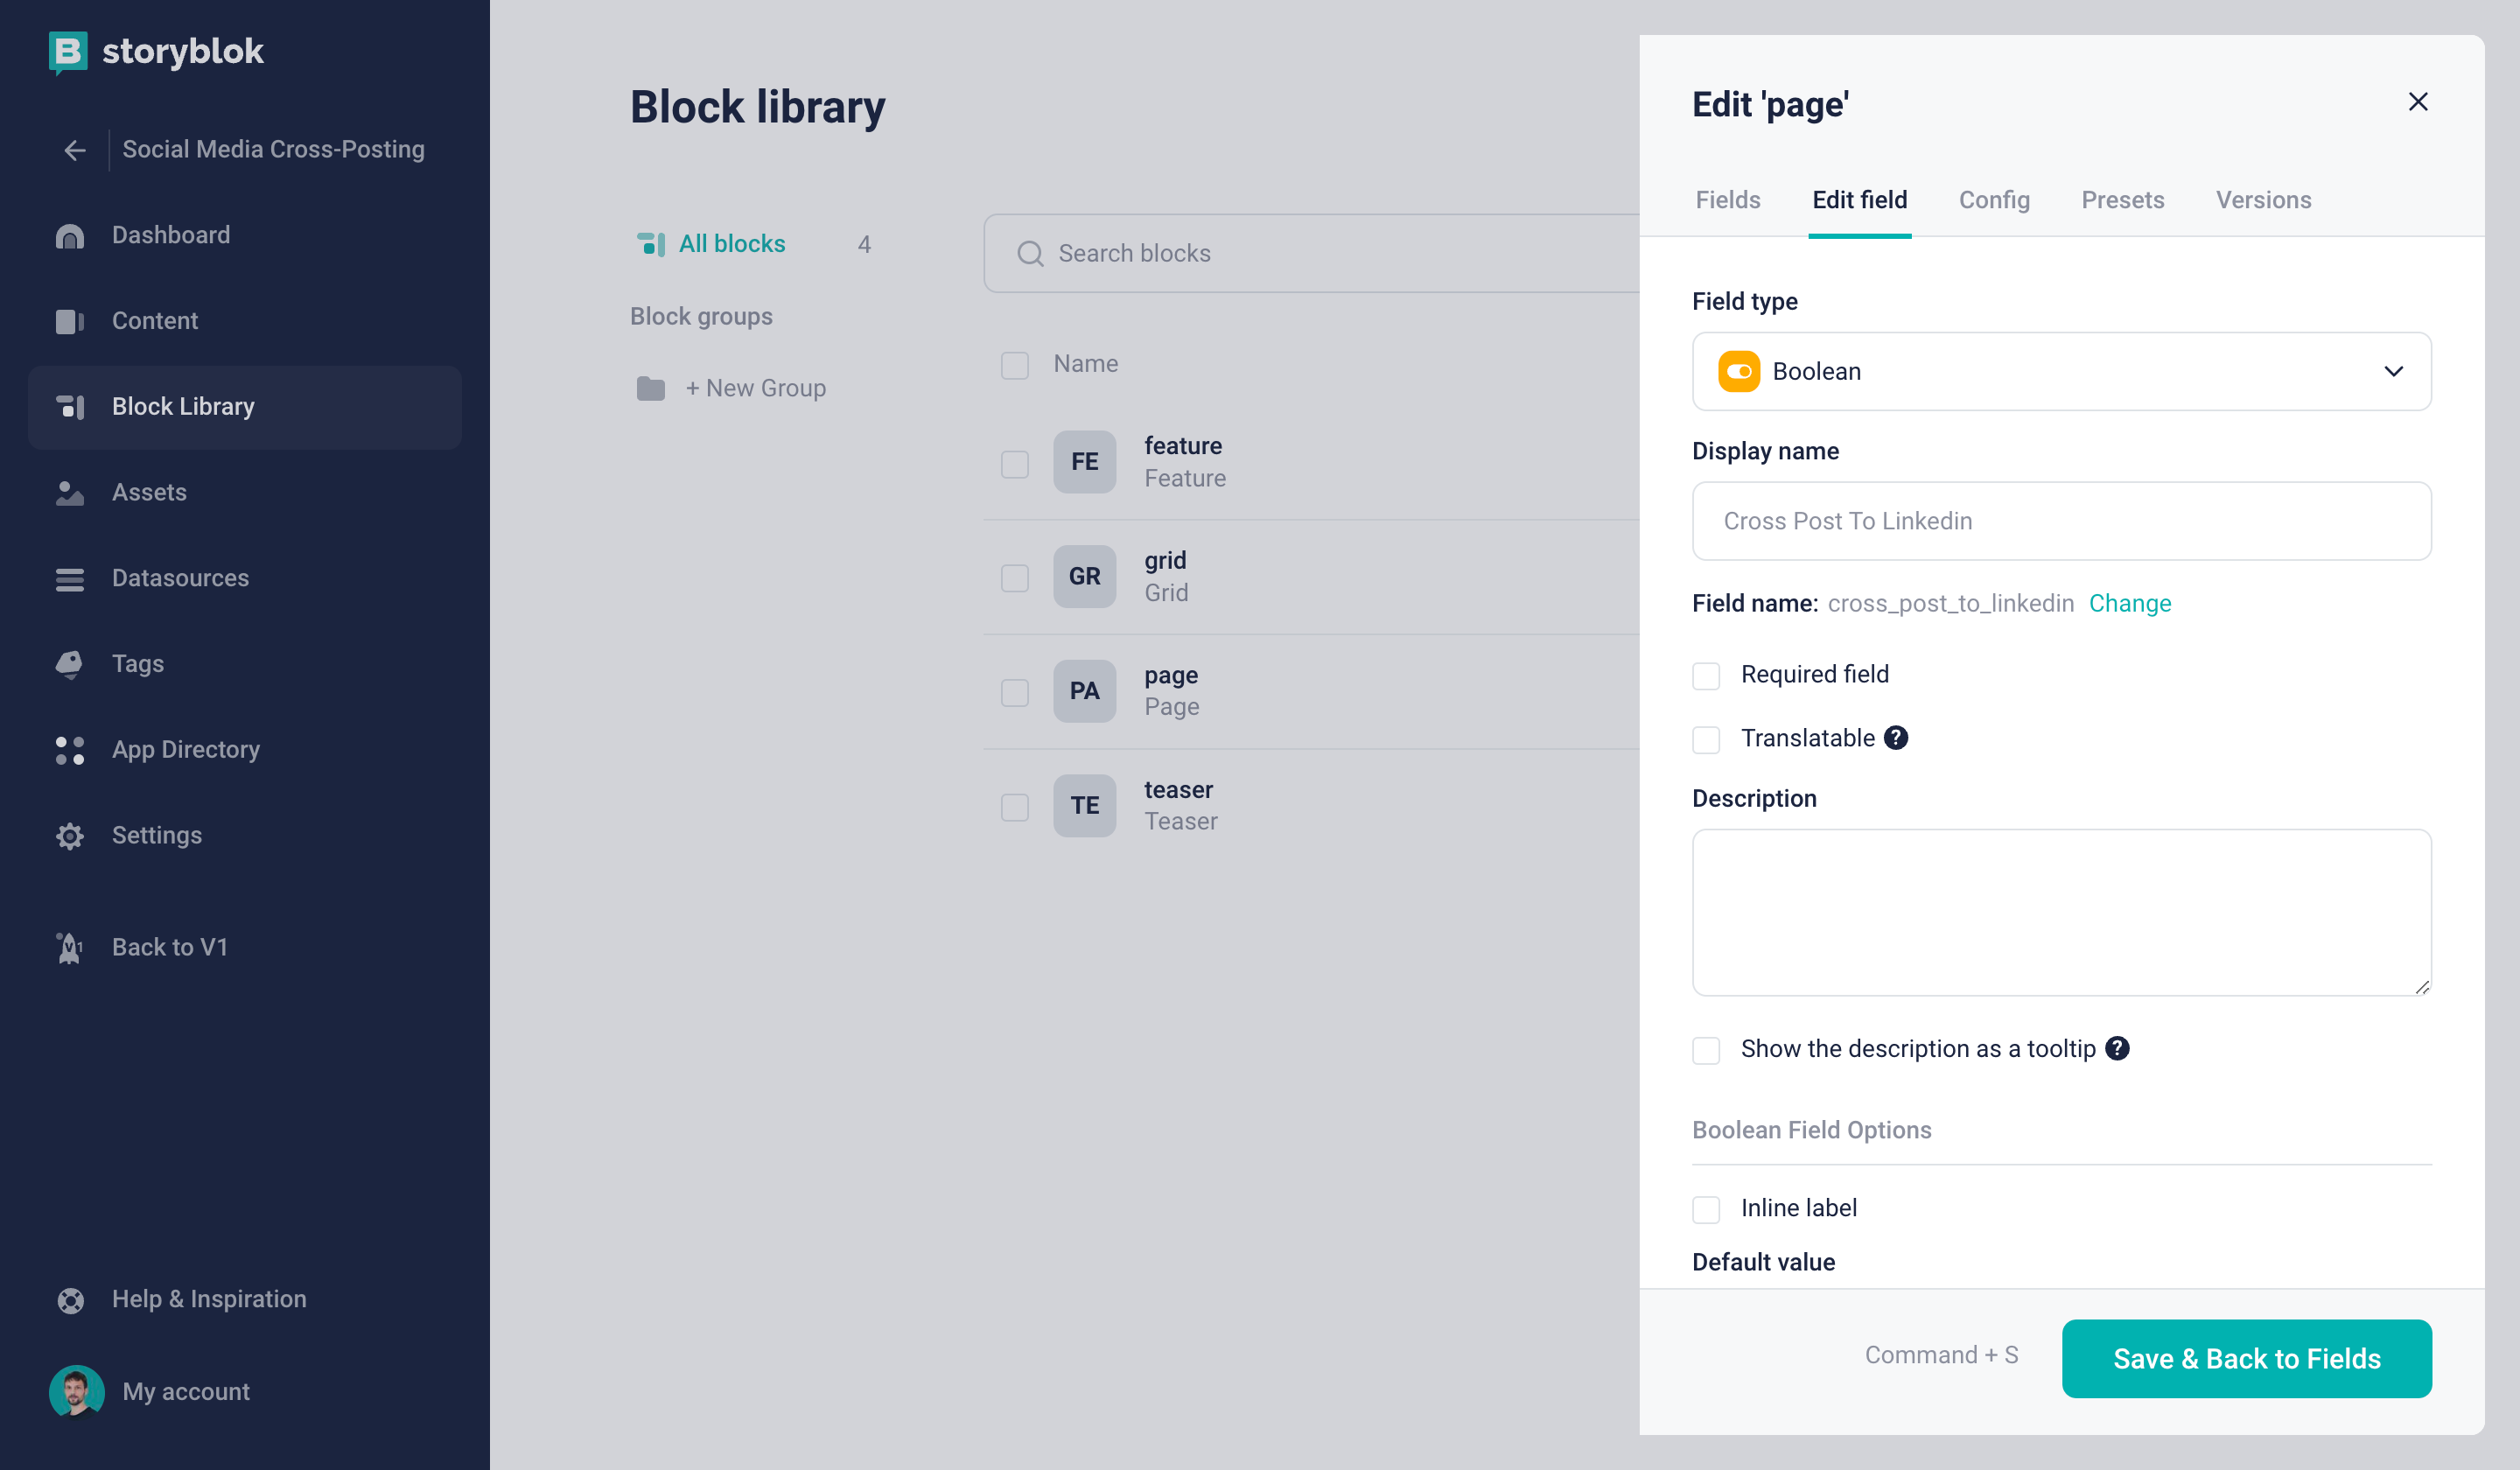
Adding a Boolean field to enable cross-posting to LinkedIn
Next, let’s add three further fields. A Text field with the technical name social_media_title, an Asset field called social_media_image, as well as a Textarea field called social_media_caption.
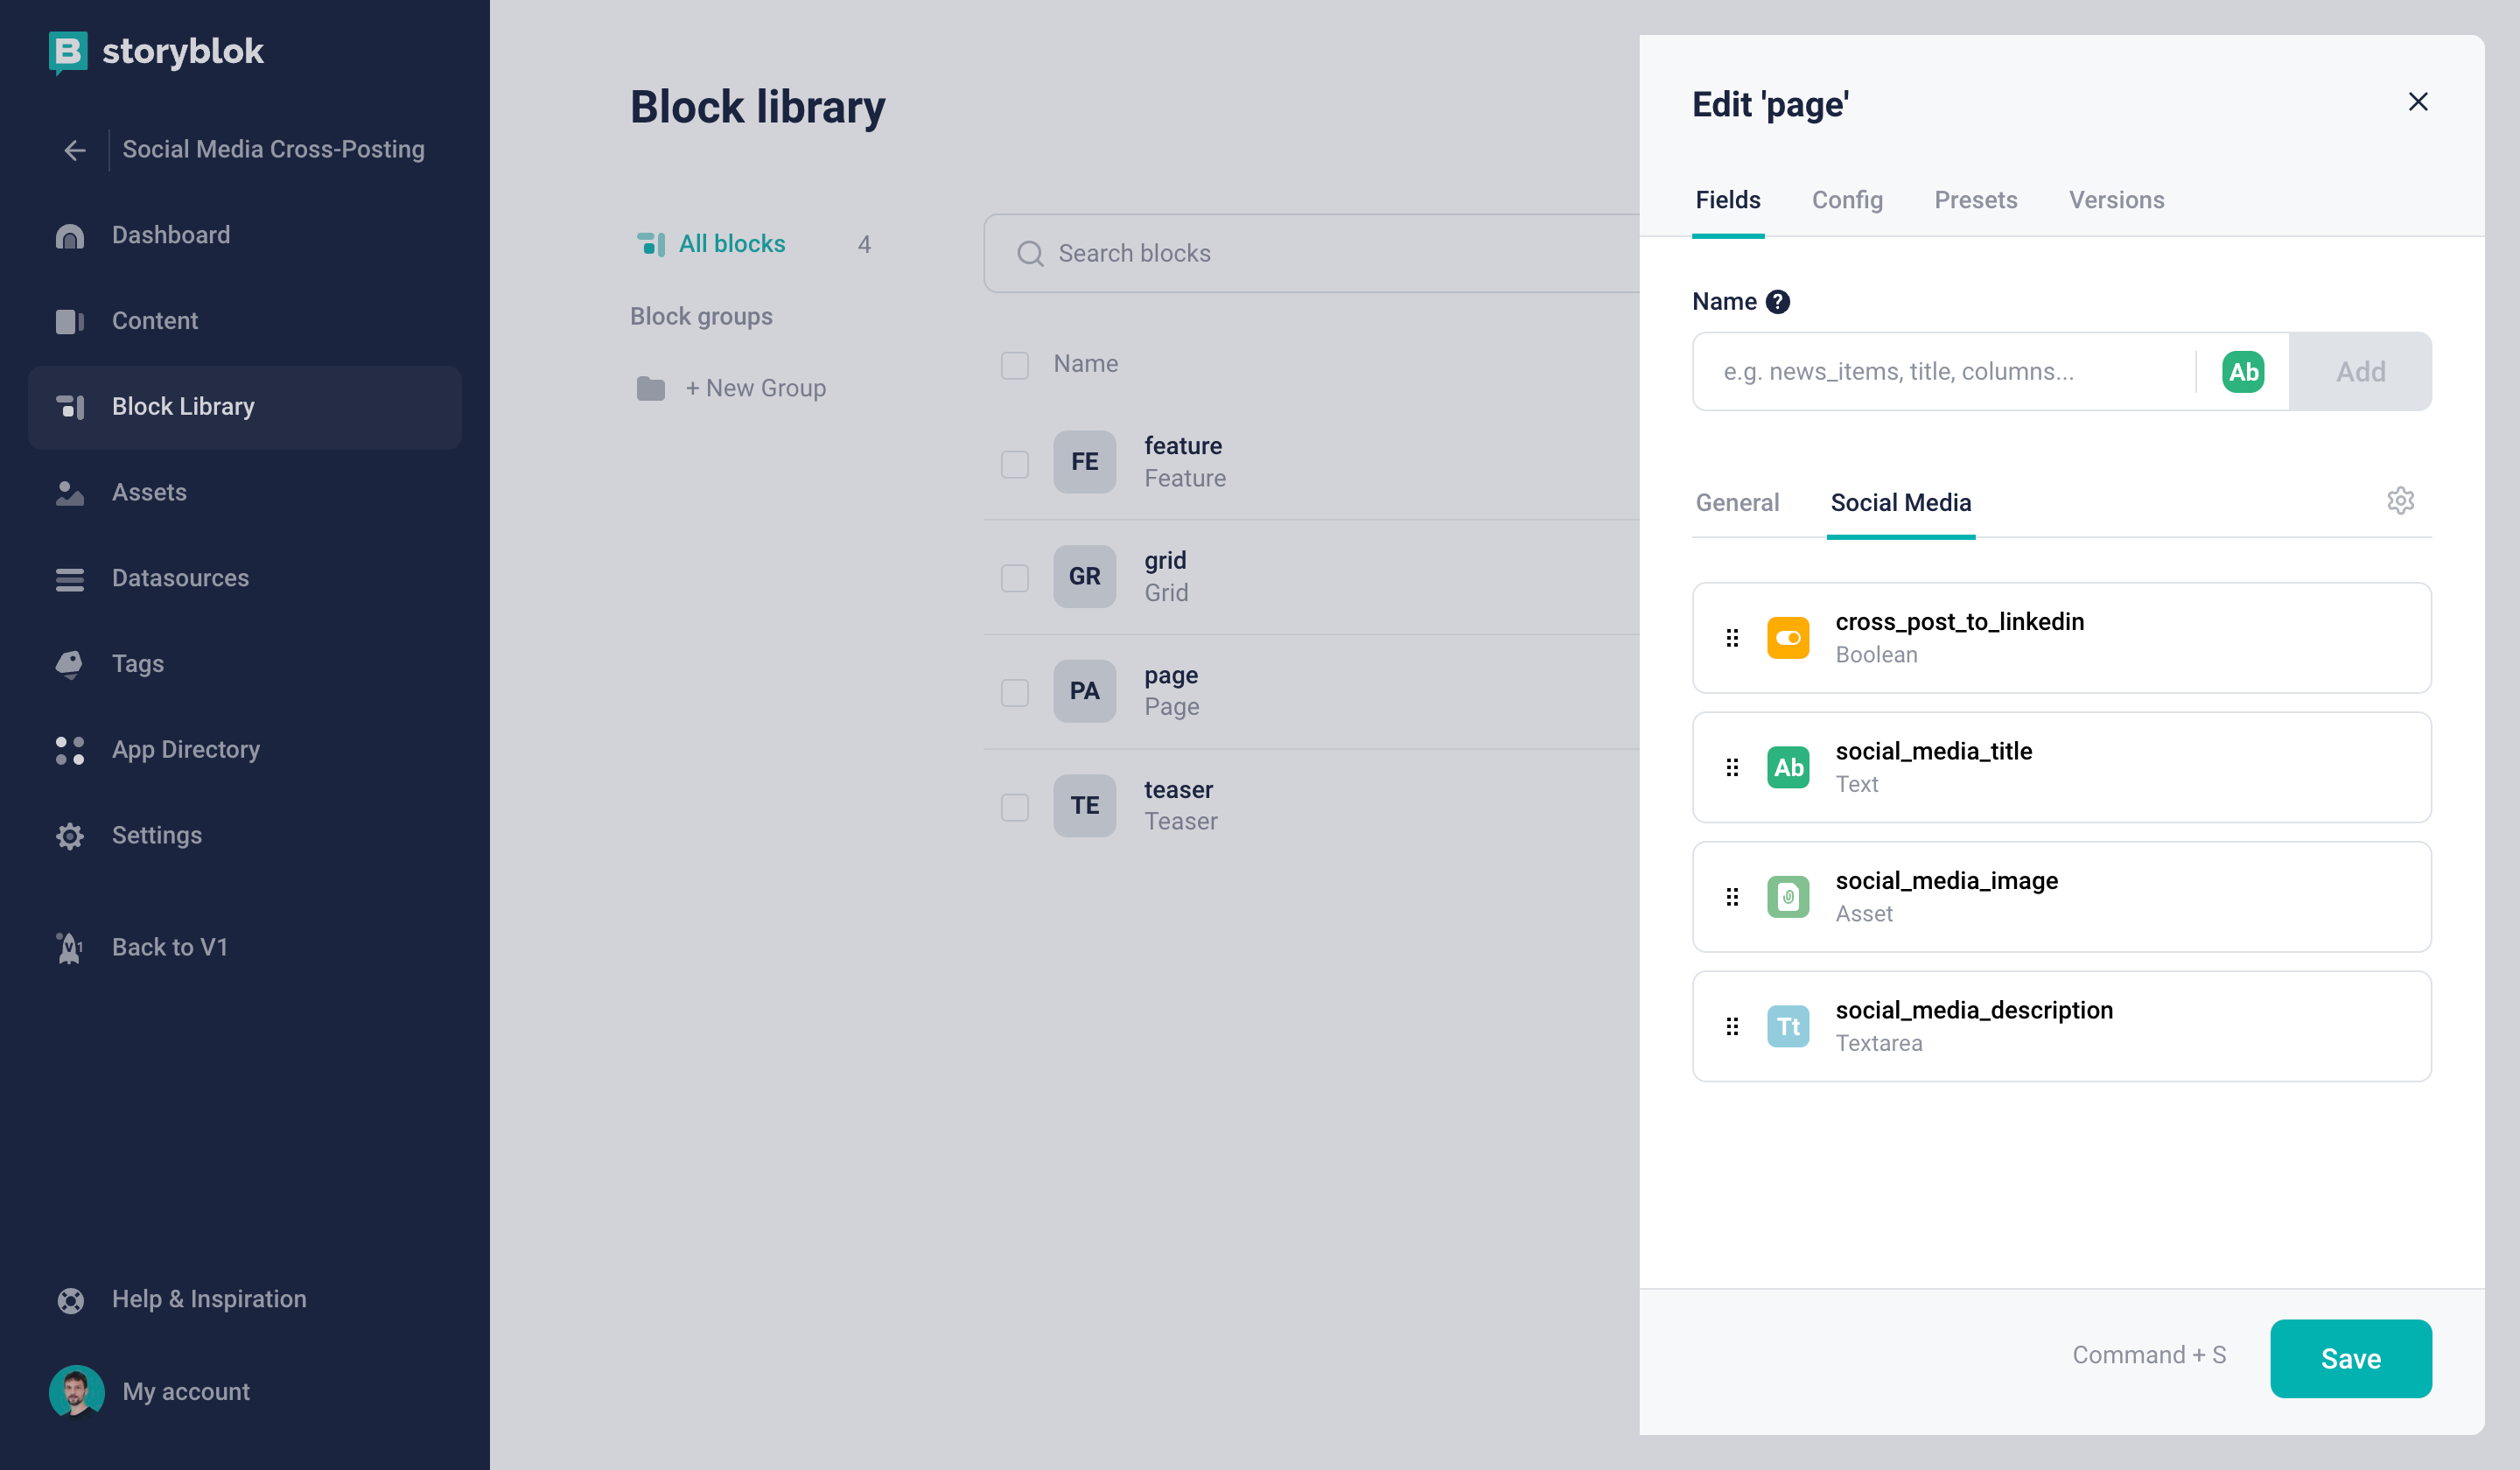
All fields that belong to the "Social Media" tab
Let’s also set these fields as Required {1} to prevent incomplete social media posts.
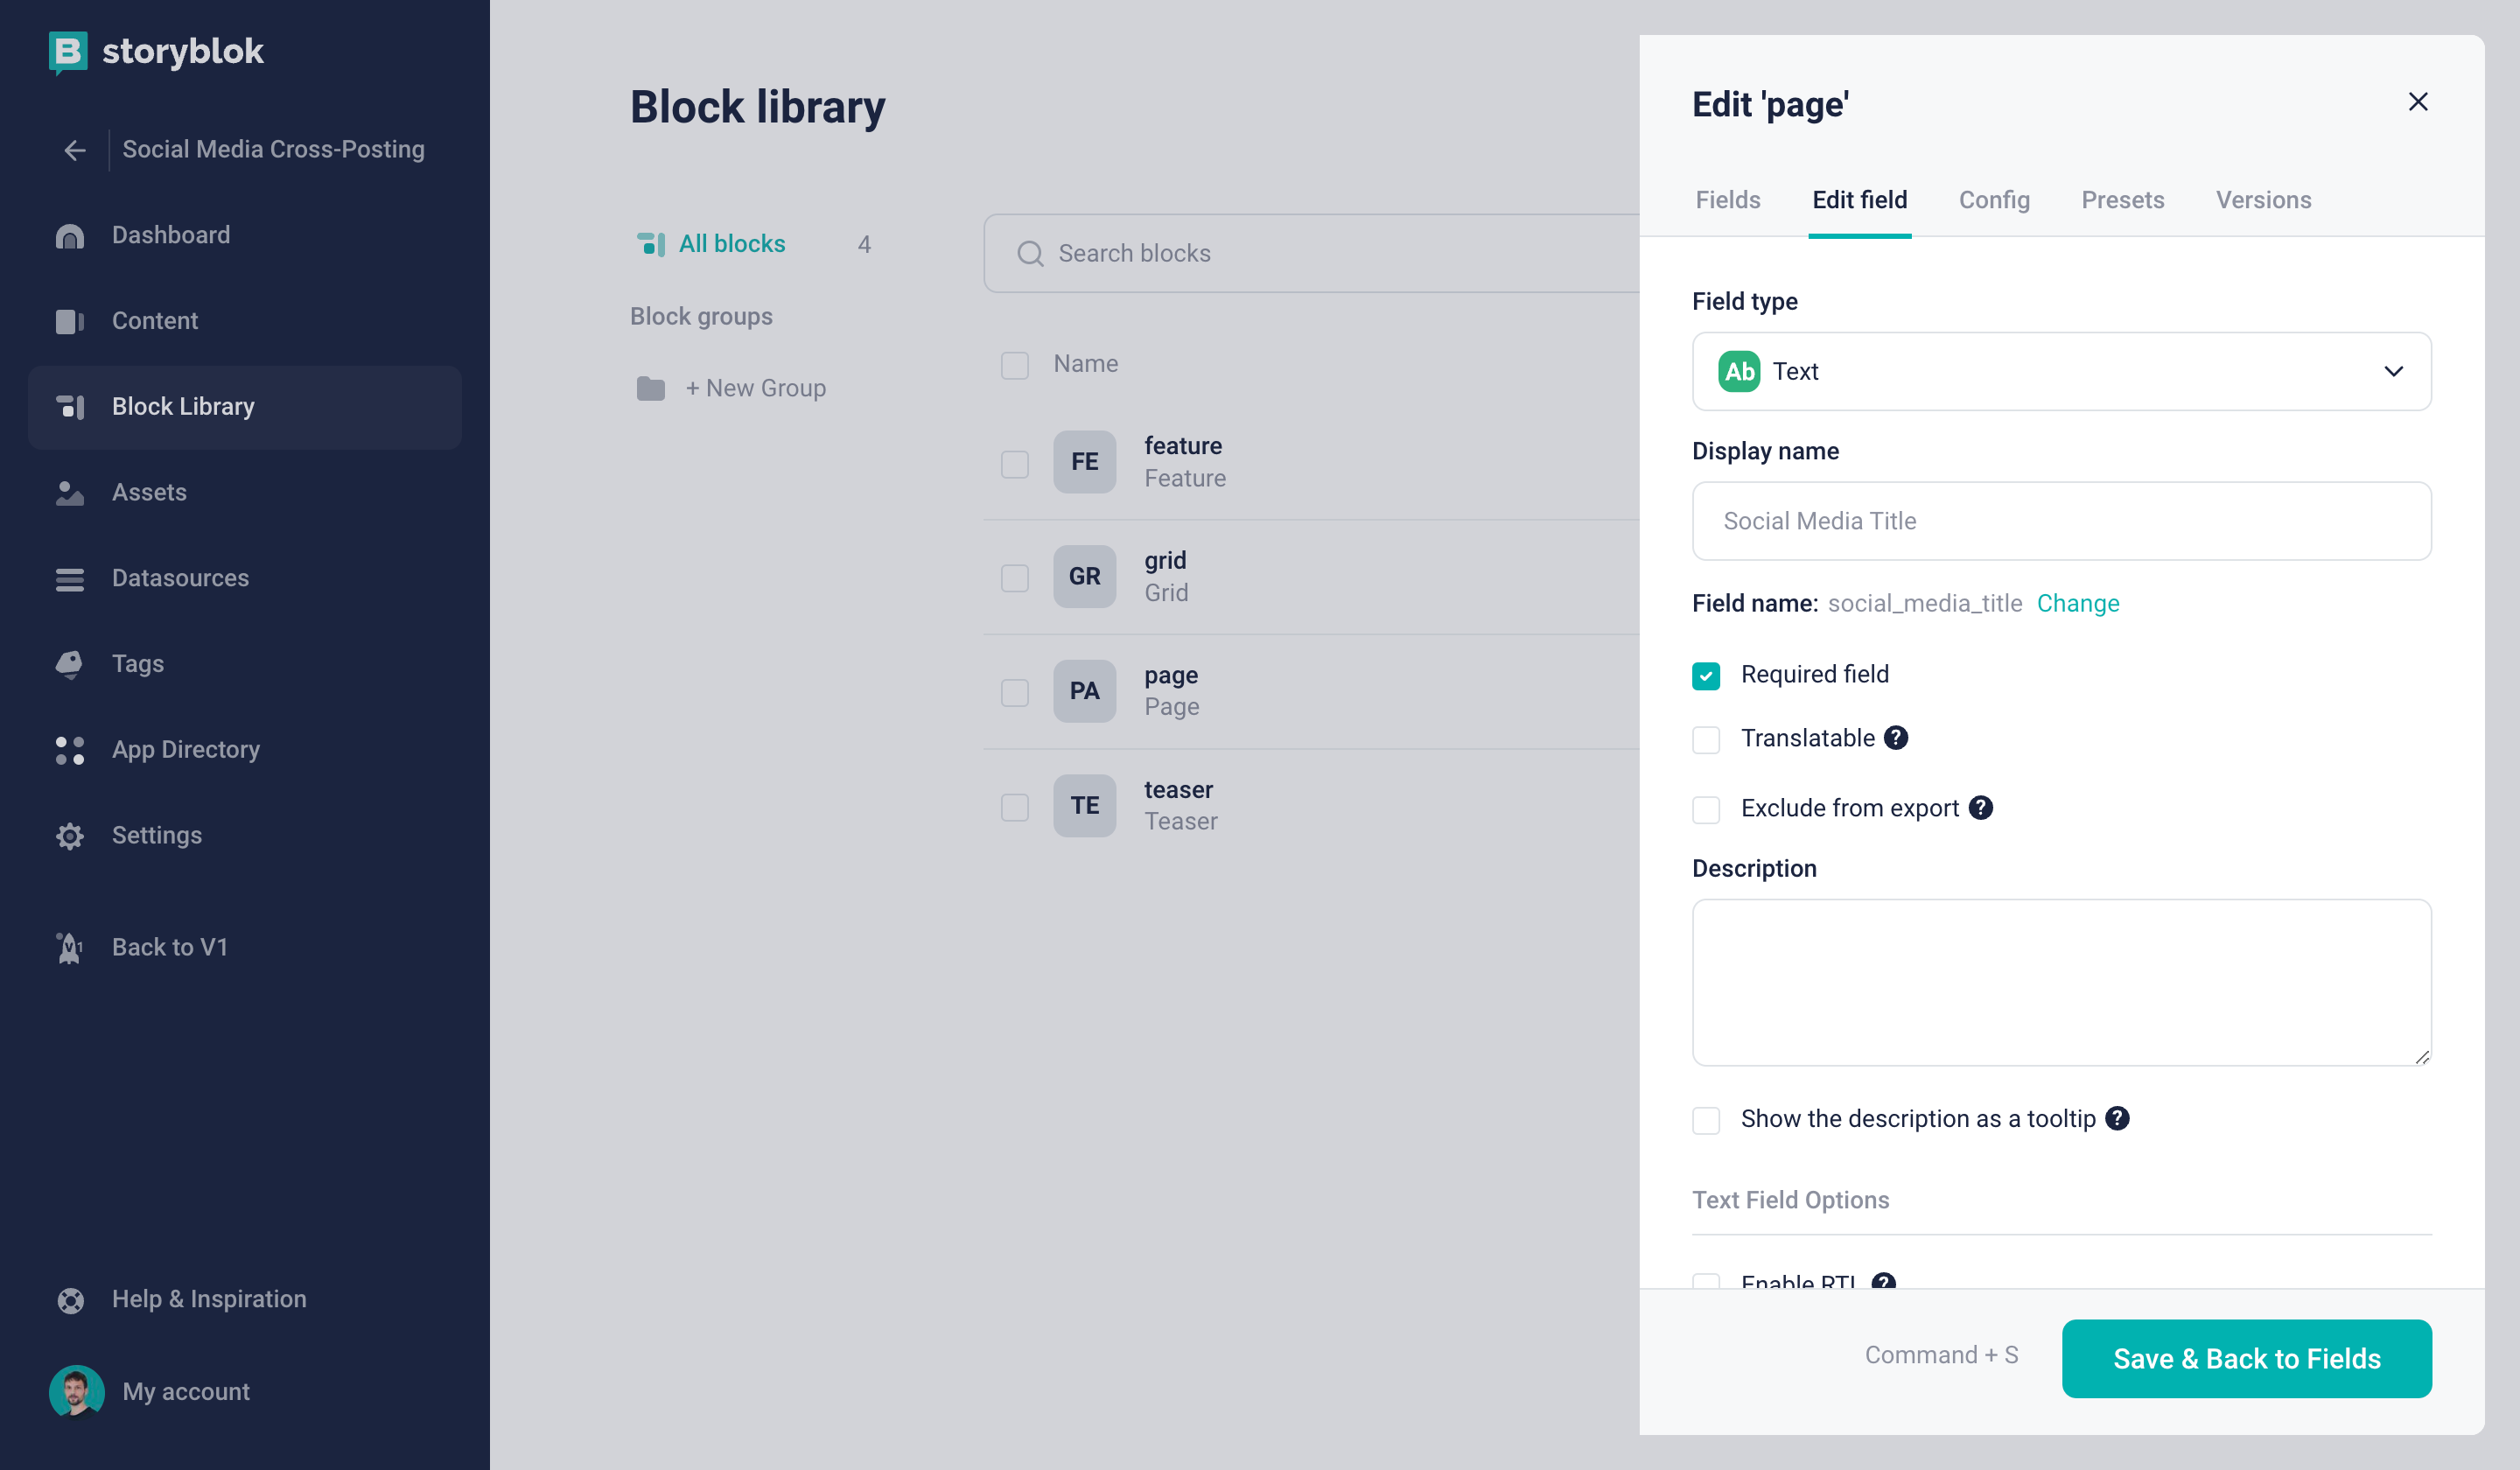
Setting a field as required
The last three fields may not be required for your individual use case. Maybe your project’s content modeling already provides fields that have to be filled out anyway and could be perfectly reused for your automated social media posts.
And with that, our block schema preparations are already complete. Let’s move on.
Creating a webhook in Storyblok
You can learn more about using webhooks in Storyblok in our Webhook Developer Guide.
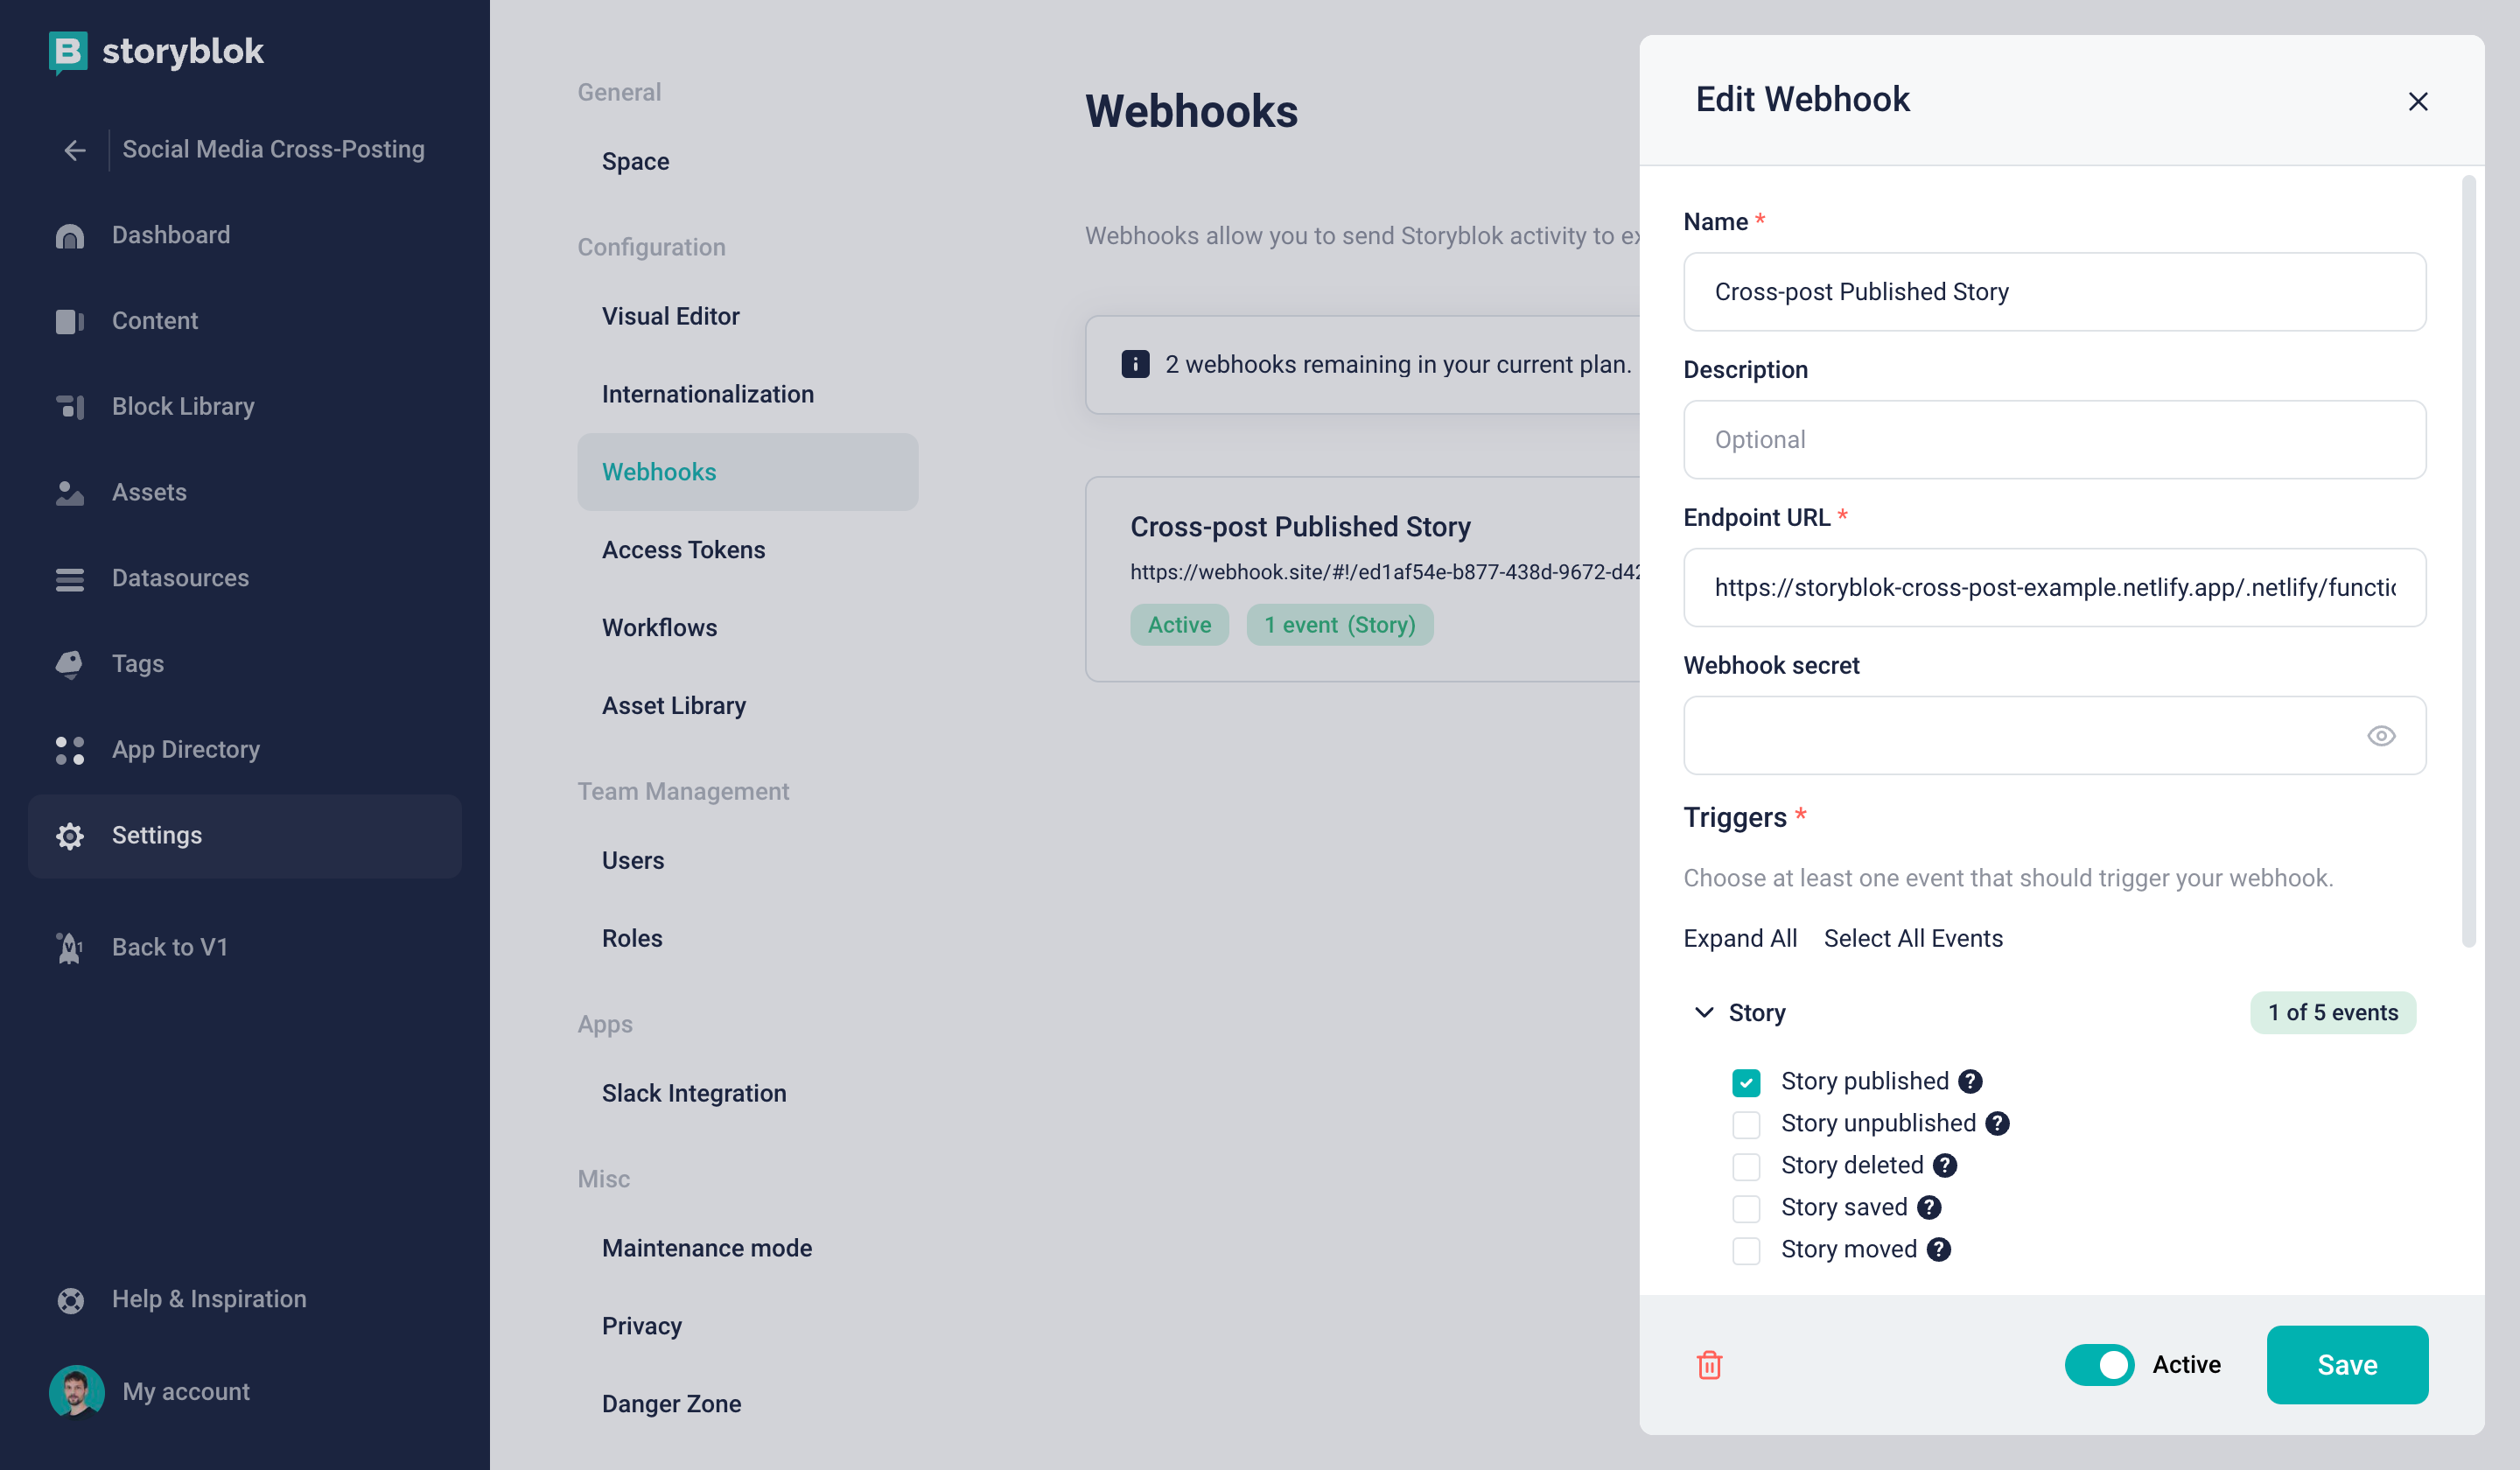
As we’d like the cross-posting on social media to occur whenever a new piece of content is published, we’ll have to configure a webhook that gets fired whenever this event occurs. Therefore, in our Storyblok space, let’s head to Settings > Webhooks and create a New Webhook {1}.
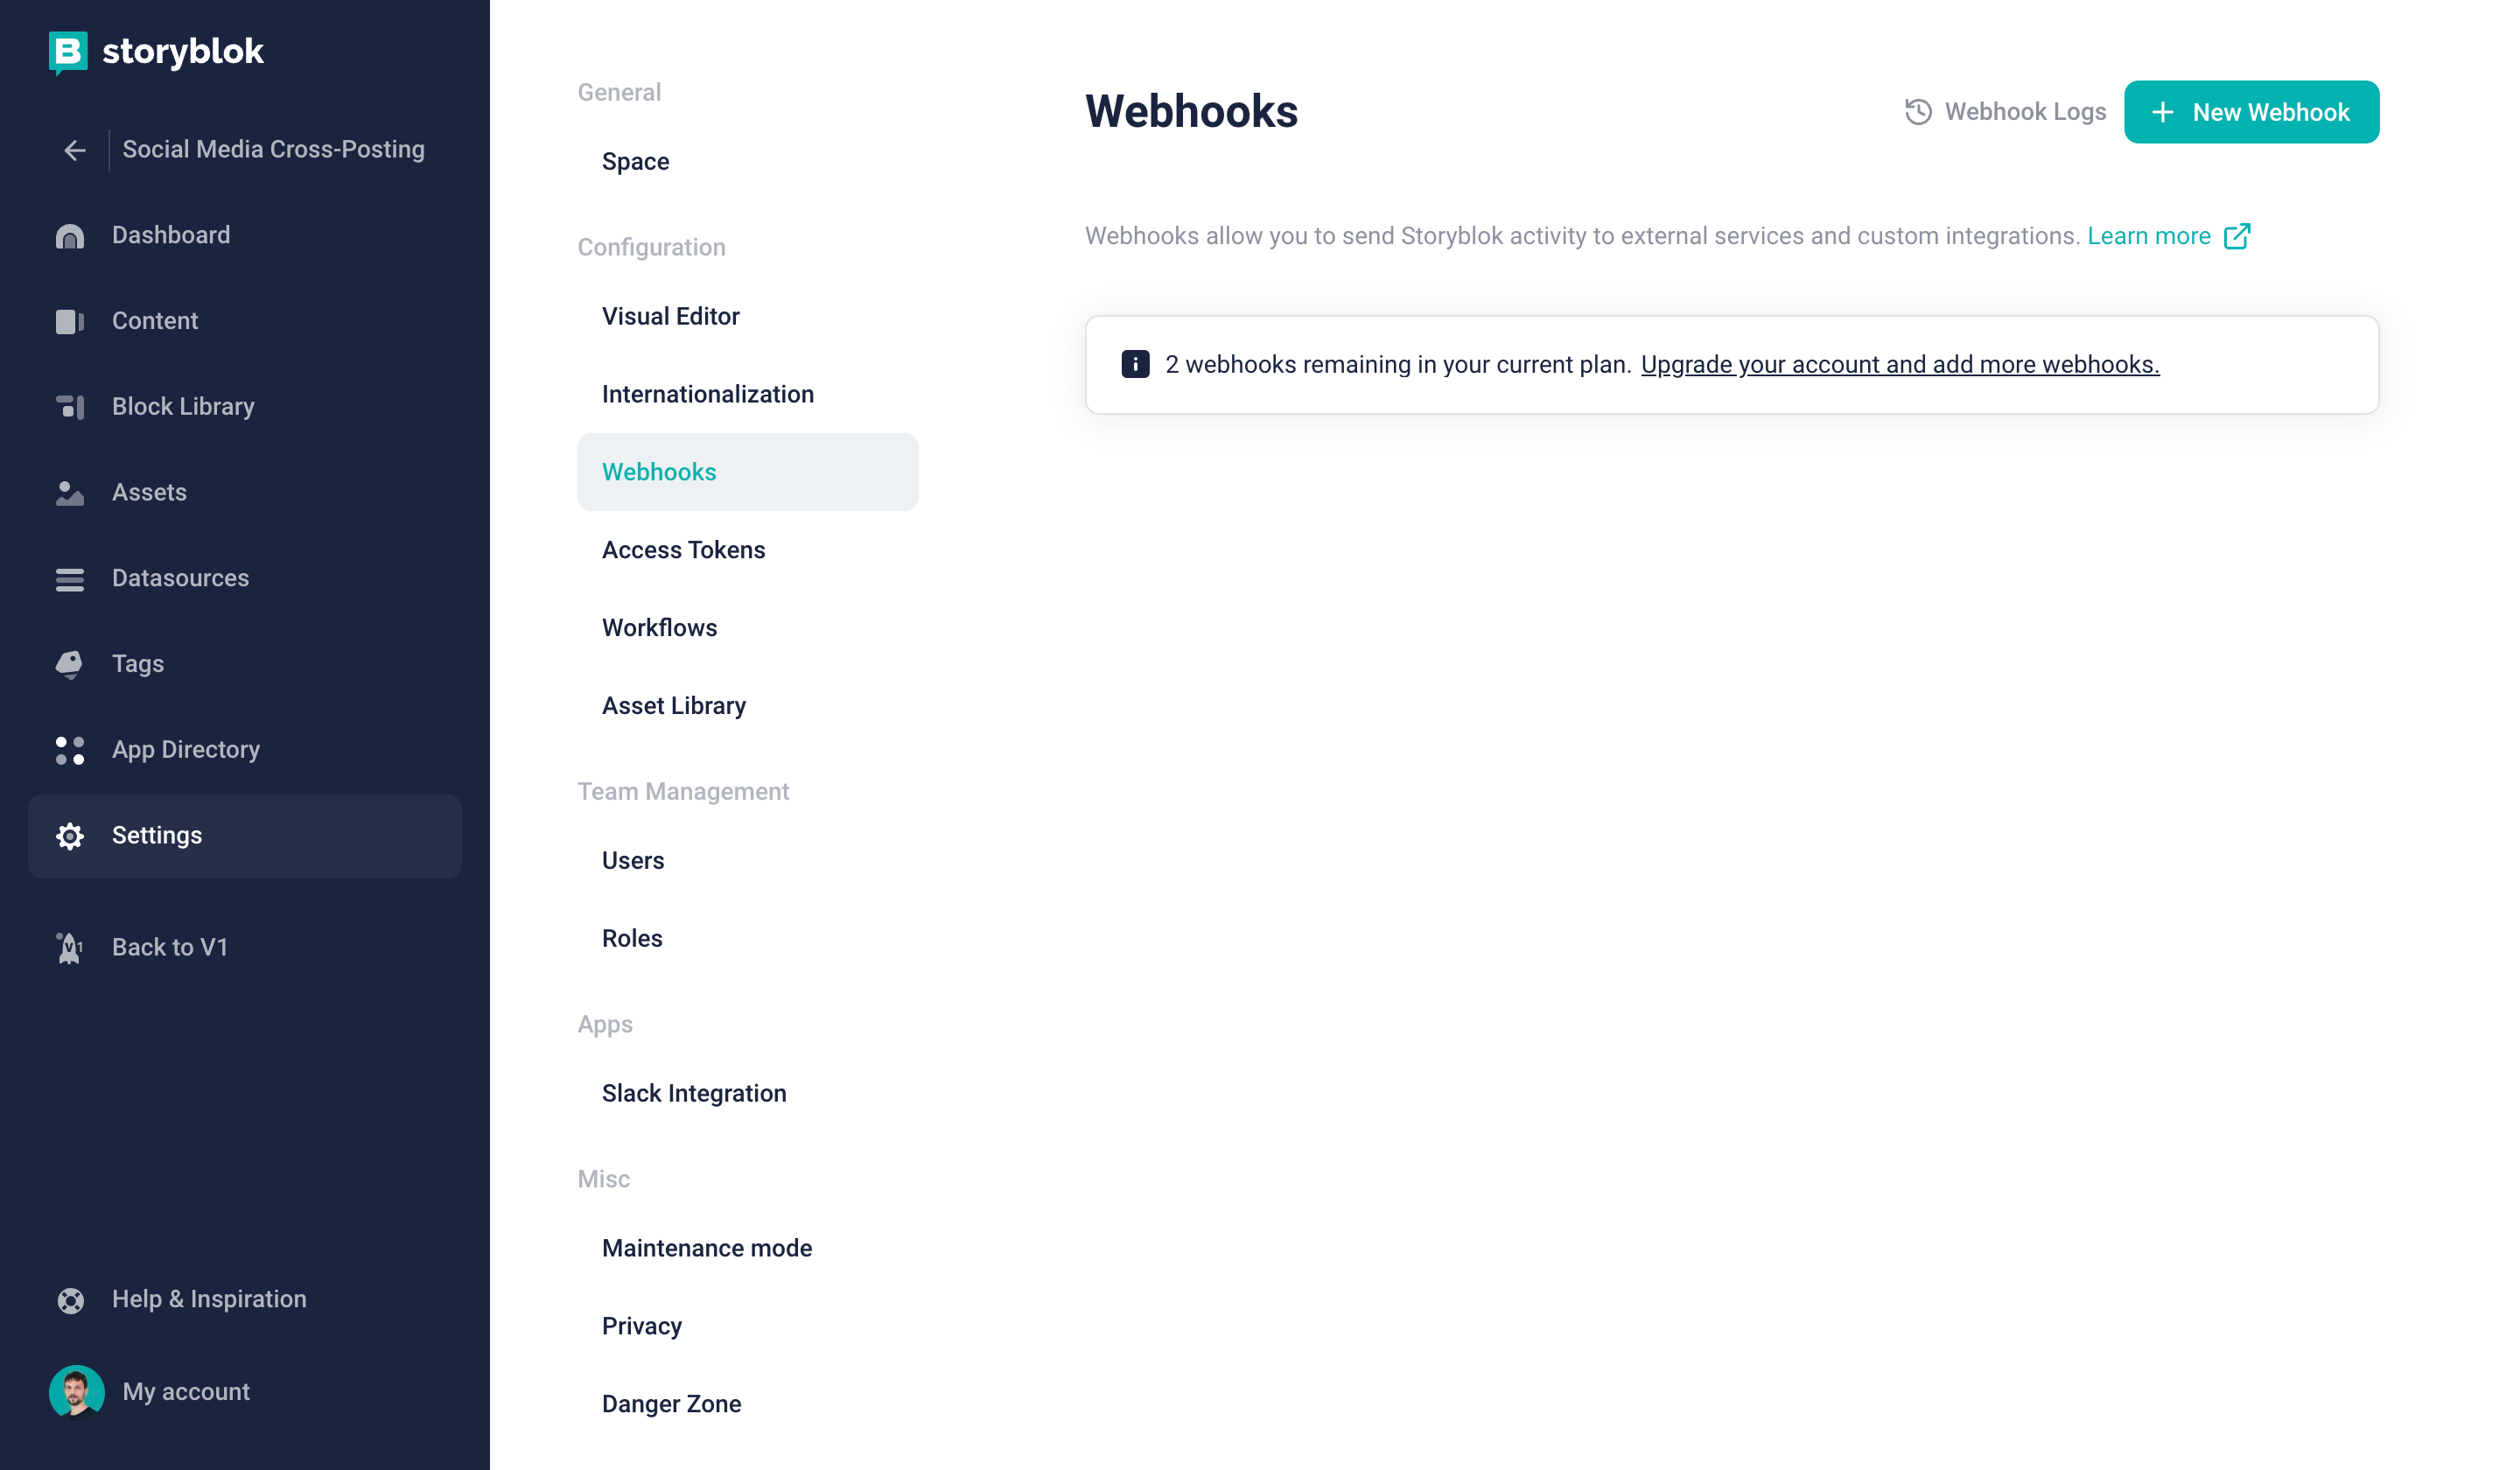
Creating a new webhook
In the dialog, let’s first of all give it a name, for example, “Cross-post Published Story” {1}. We’ll also have to pick a trigger. In this case, we just need Story published {2}. And finally, we also have to provide an endpoint - otherwise, nothing could ever happen. For this, we can temporarily use a convenient service called Webhook.site. When you visit the site, you get your own unique URL which you can copy and paste into the Endpoint URL field {3}.
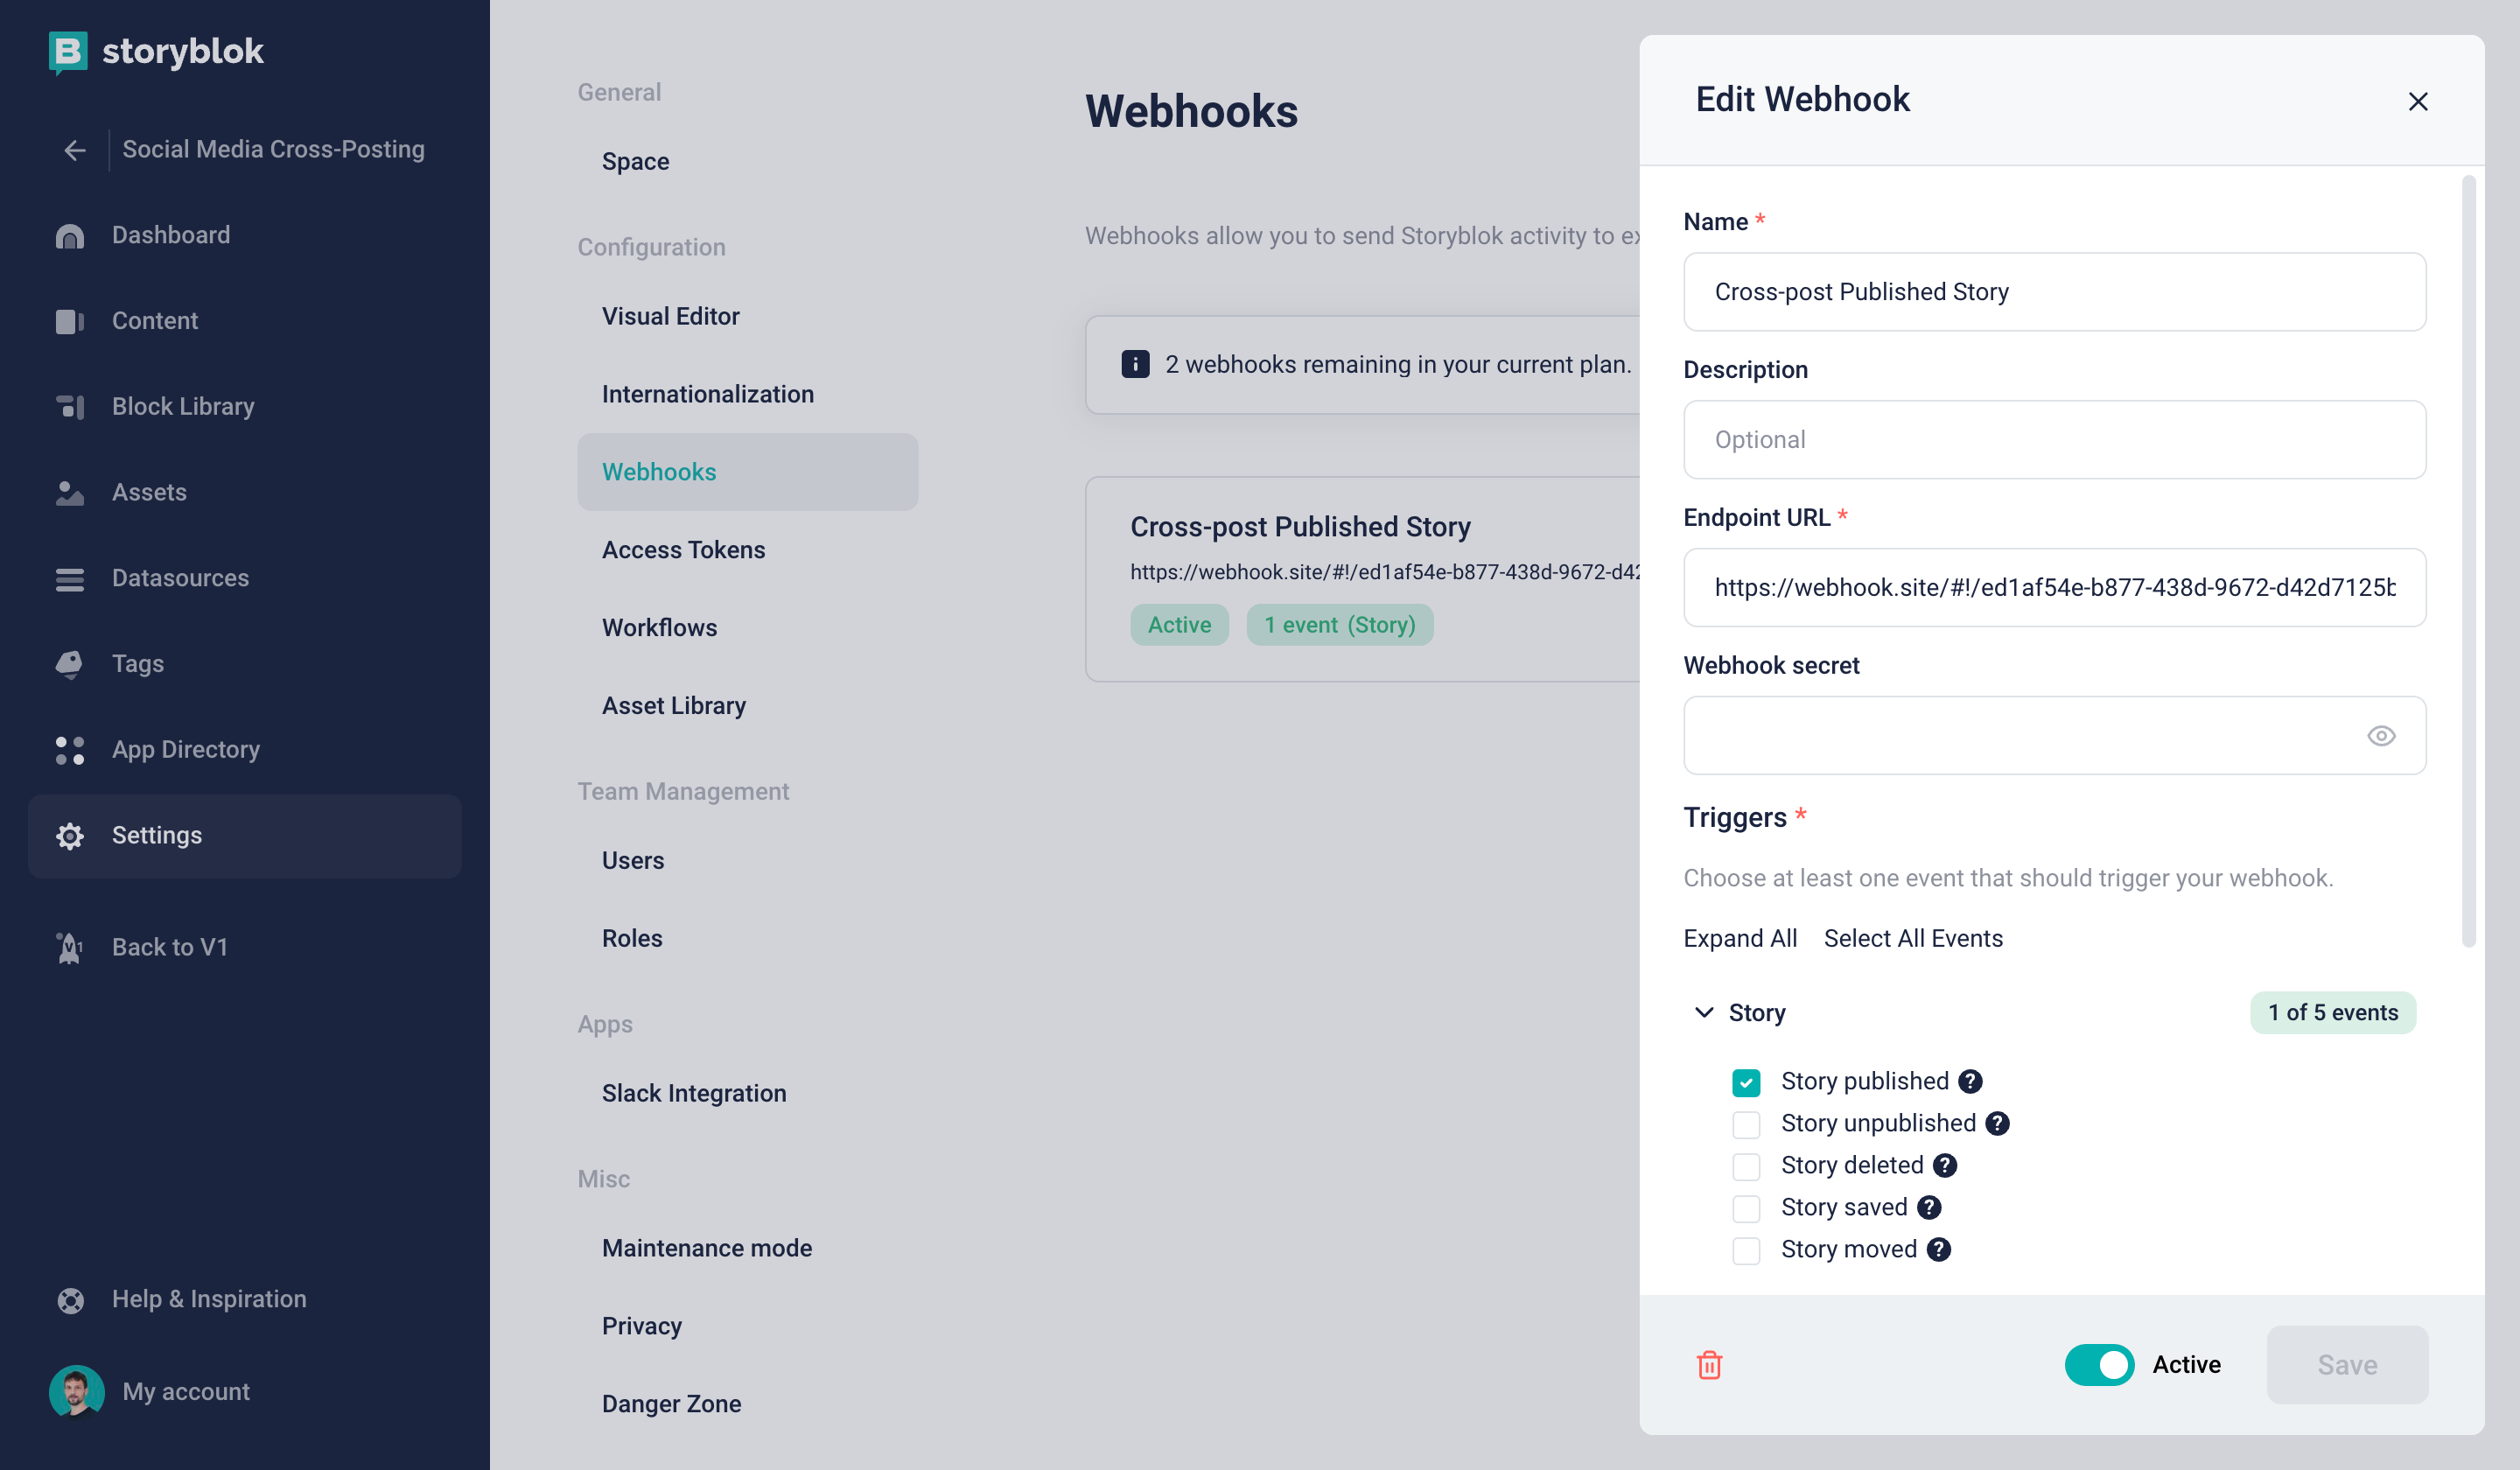
Configuring the webhook
This will allow us to see what kind of data we actually get to work with. Let’s save the new webhook and publish any story. On Webhook.site, you’ll now see a new POST Request and its content, which will look similar to this:
{
  "text": "The user manuel.schroeder@storyblok.com published the Story Home (home)\nhttps://app.storyblok.com/#/me/spaces/245975/stories/0/0/352816292",
  "action": "published",
  "space_id": 245975,
  "story_id": 352816292,
  "full_slug": "home"
}
As you can see, this data alone does not suffice to create a meaningful social media post. Therefore, let’s explore next how we can create our own API endpoint to forward this data to a serverless function that can process it further.
Connecting Storyblok and Zapier via a serverless function
In essence, what we need to achieve is to get the relevant data of our published Storyblok story (in this example, that would be the fields social_media_title, social_media_image and social_media_caption) and send it to Zapier to be posted on LinkedIn. This can be accomplished by using Storyblok’s Content Delivery API in a serverless function to retrieve the required information based on the full_slug that gets transmitted via the webhook. The serverless function can be understood as an intermediary layer between Storyblok and Zapier, further processing the data.
For this tutorial, we’ll use Netlify Functions, but any other provider allowing you to create serverless functions with dedicated API endpoints may be used alternatively. Let’s get started.
If you haven’t already, now is a good time to install the Netlify CLI:
npm i netlify-cli -gAfter the installation is complete, you need to authenticate:
netlify loginIn the root of a newly created project folder, create a new netlify.toml file with the following content:
[build]
  functions = "functions"
  publish = "dist"
Next, create an empty dist folder. Now that we’re all set up, we can create a new function using the CLI:
netlify functions:createPick Serverless function (Node/Go) and JavaScript or TypeScript from the options. We can use the basic [hello-world] example as a template. Pick a suitable name for the function, for example forward-published-story-to-zapier. After the installation has been completed, you’ll find the generated boilerplate code in function/forward-published-story-to-zapier/forward-published-story-to-zapier.js. We can keep the try…catch statement in order to send a 200 OK status in case everything works as expected or send a 500 status back to Storyblok in case something (unexpectedly) goes wrong.
Let’s first of install the Storyblok JavaScript Client in the project by running:
npm i storyblok-js-clientNow we can work on the actual function, replacing the code with the following:
import StoryblokClient from 'storyblok-js-client'

const { STORYBLOK_PUBLIC_TOKEN, ZAPIER_WEBHOOK_URL, PRODUCTION_ENVIRONMENT_URL } = process.env

exports.handler = async (event, context) => {
  try {
    const webhookData = JSON.parse(event.body)

    let Storyblok = new StoryblokClient({
      accessToken: STORYBLOK_PUBLIC_TOKEN,
      cache: {
        clear: 'auto',
        type: 'memory',
      },
    })

    const { data } = await Storyblok.get(`cdn/stories/${webhookData.full_slug}`, {
      version: 'published',
    })

    const story = data.story

    const dataForZapier = {
      title: story.content.social_media_title,
      description: story.content.social_media_description,
      image: story.content.social_media_image?.filename,
      url: PRODUCTION_ENVIRONMENT_URL + (webhookData.full_slug !== 'home' ? webhookData.full_slug : ''),
    }

    if (story.content.cross_post_to_linkedin) {
      try {
        await fetch(ZAPIER_WEBHOOK_URL, {
          method: 'POST',
          headers: {
            Accept: 'application/json',
            'Content-Type': 'application/json',
          },
          body: JSON.stringify(dataForZapier),
        })
      } catch (error) {
        console.log('There was an error attempting to send the data to Zapier.', error)
      }
    }

    return {
      statusCode: 200,
    }
  } catch (error) {
    return { statusCode: 500, body: error.toString() }
  }
}
First of all, we have to parse the webhook data sent from Storyblok. Thereafter, the Storyblok JavaScript Client needs to be initialized so that it can be employed to fetch the published version of our story, which is identified by using the full_slug property transmitted as part of the webhook. As we obtain the full story object with this request, it makes sense to restructure our data in a dataForZapier object, picking just what we need. Finally, after having verified that the option to share this story on LinkedIn has been checked, we can send that piece of information to a Zapier webhook URL (which we’ll retrieve in the next section of this tutorial).
Before deploying our serverless function, let’s head over to Zapier in order to create a new workflow.
Creating a new automation in Zapier
In your Zapier account, create a new Zap. Let’s first of all create a new Trigger {1}:
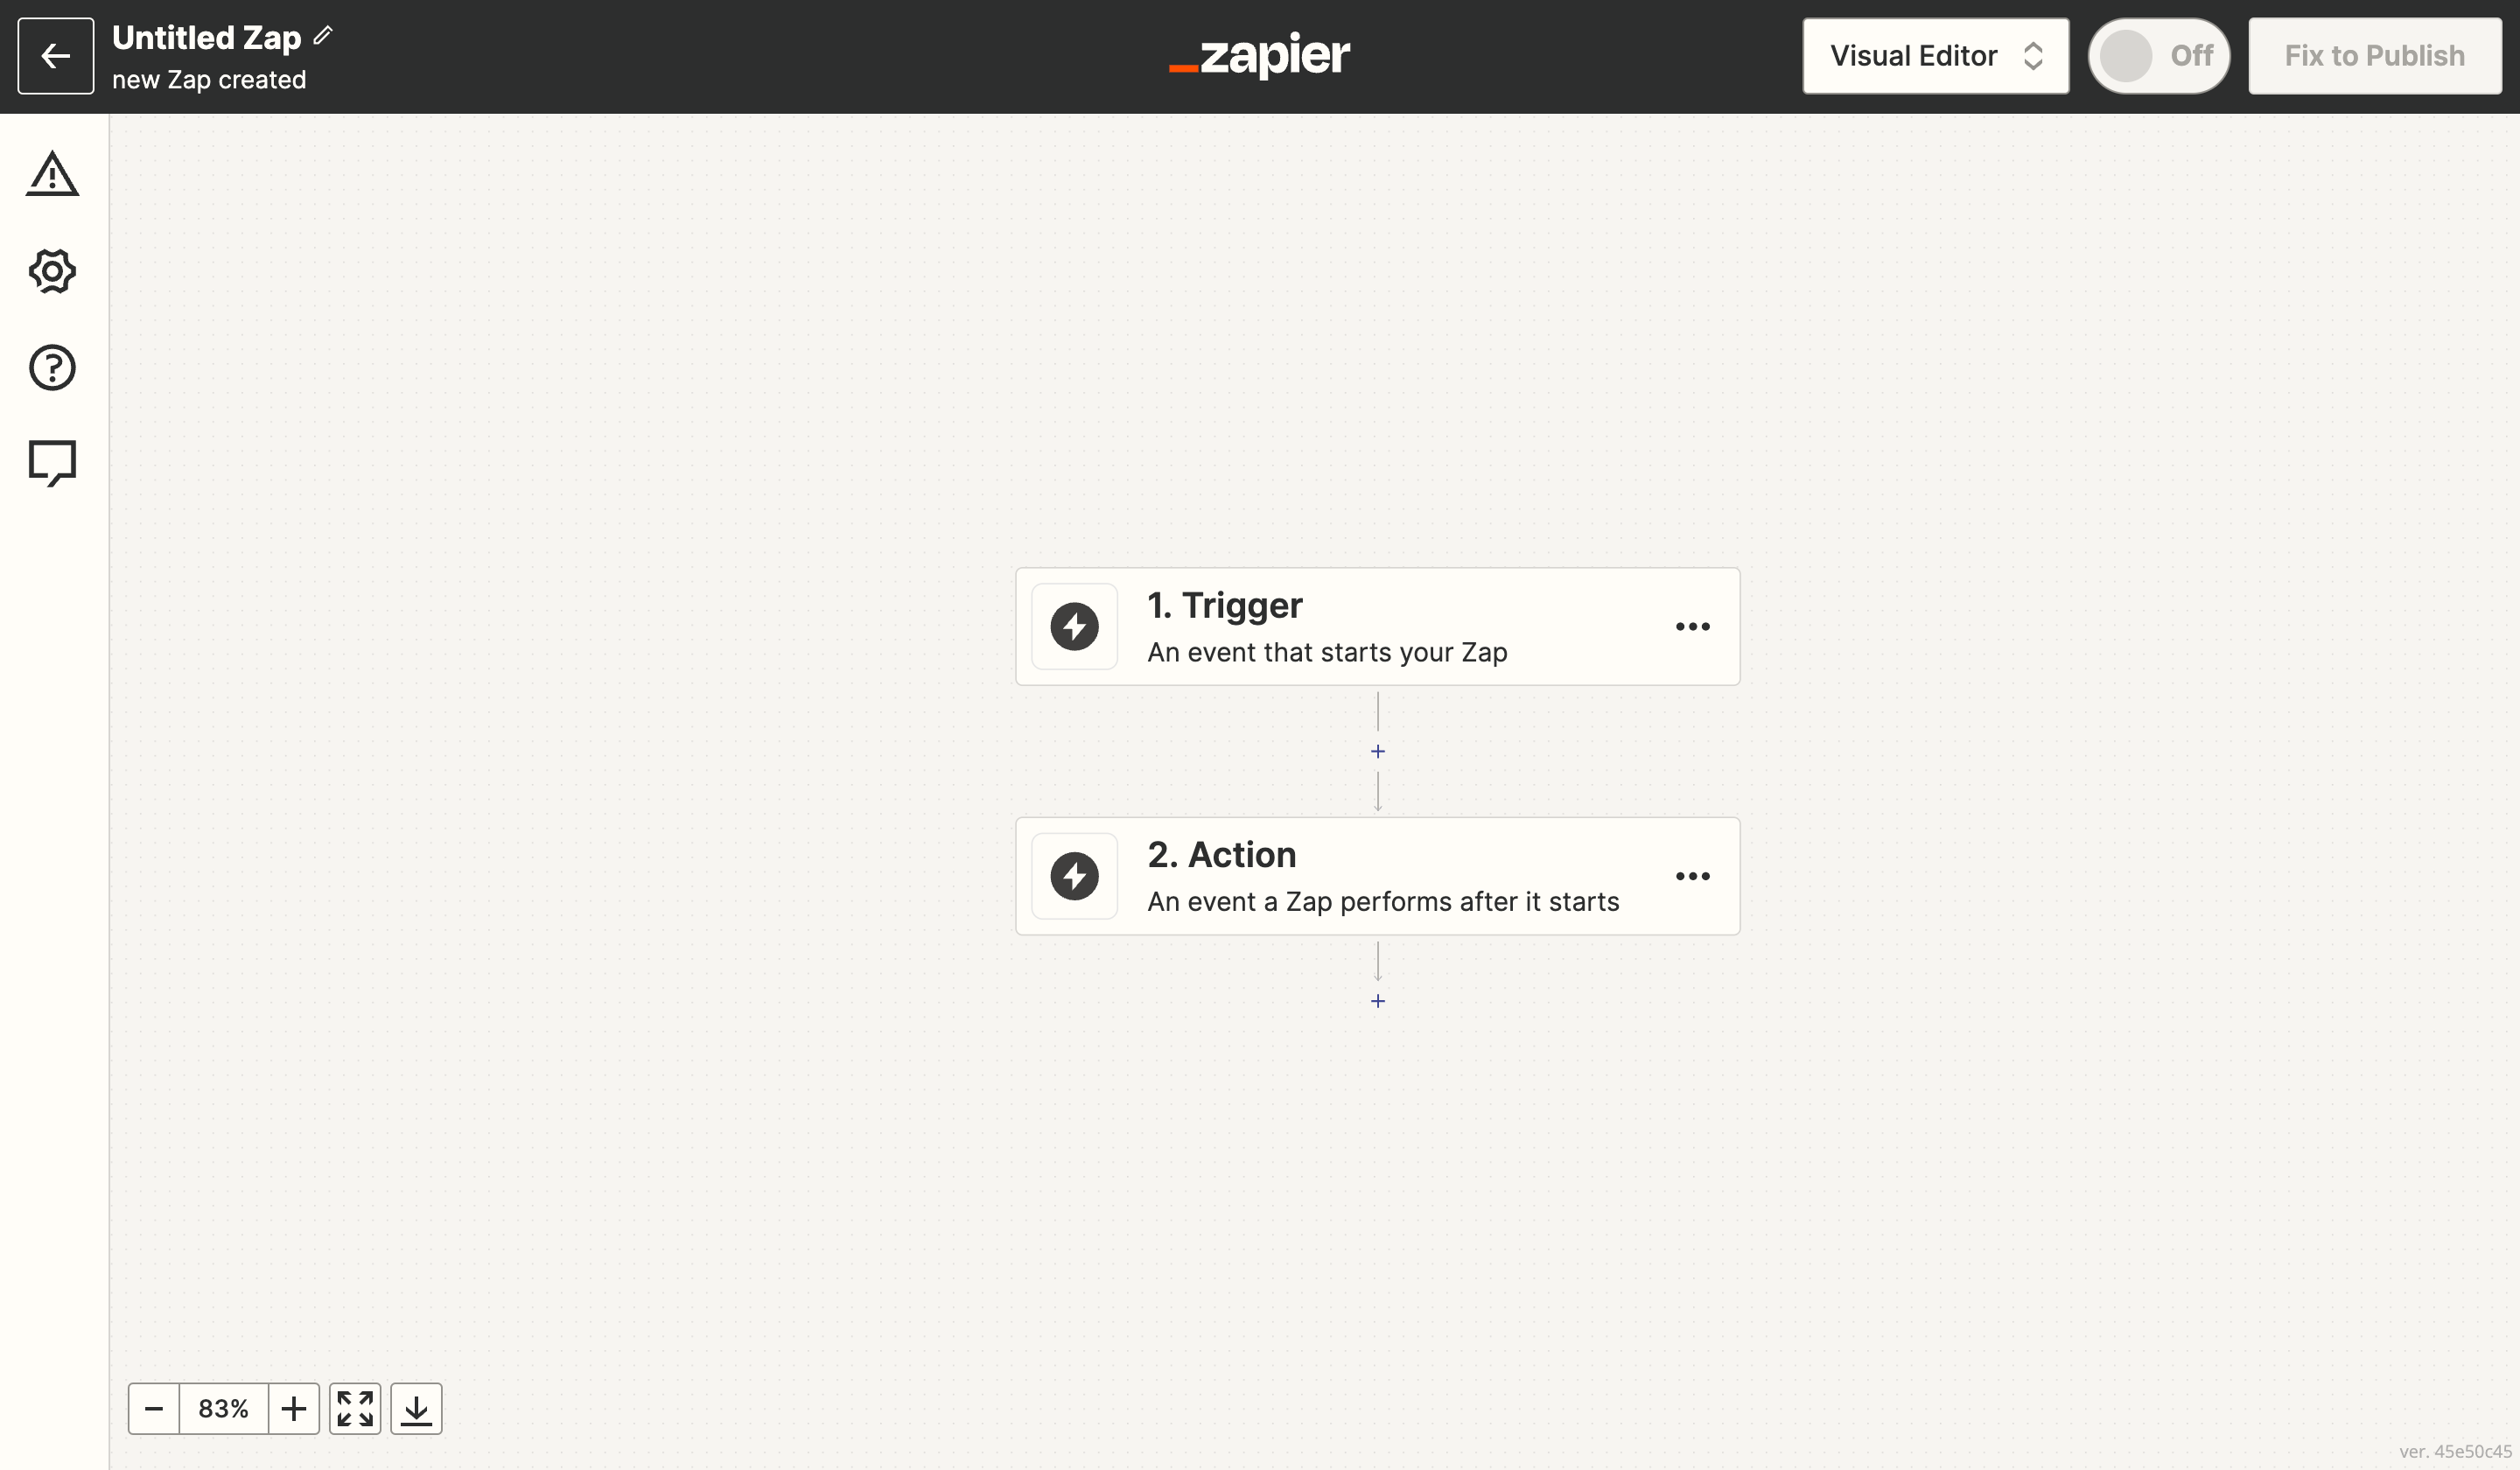
Creating a new automation in Zapier
Here, you want to select Webhooks by Zapier {1} and choose Catch Hook as the Event {2}:
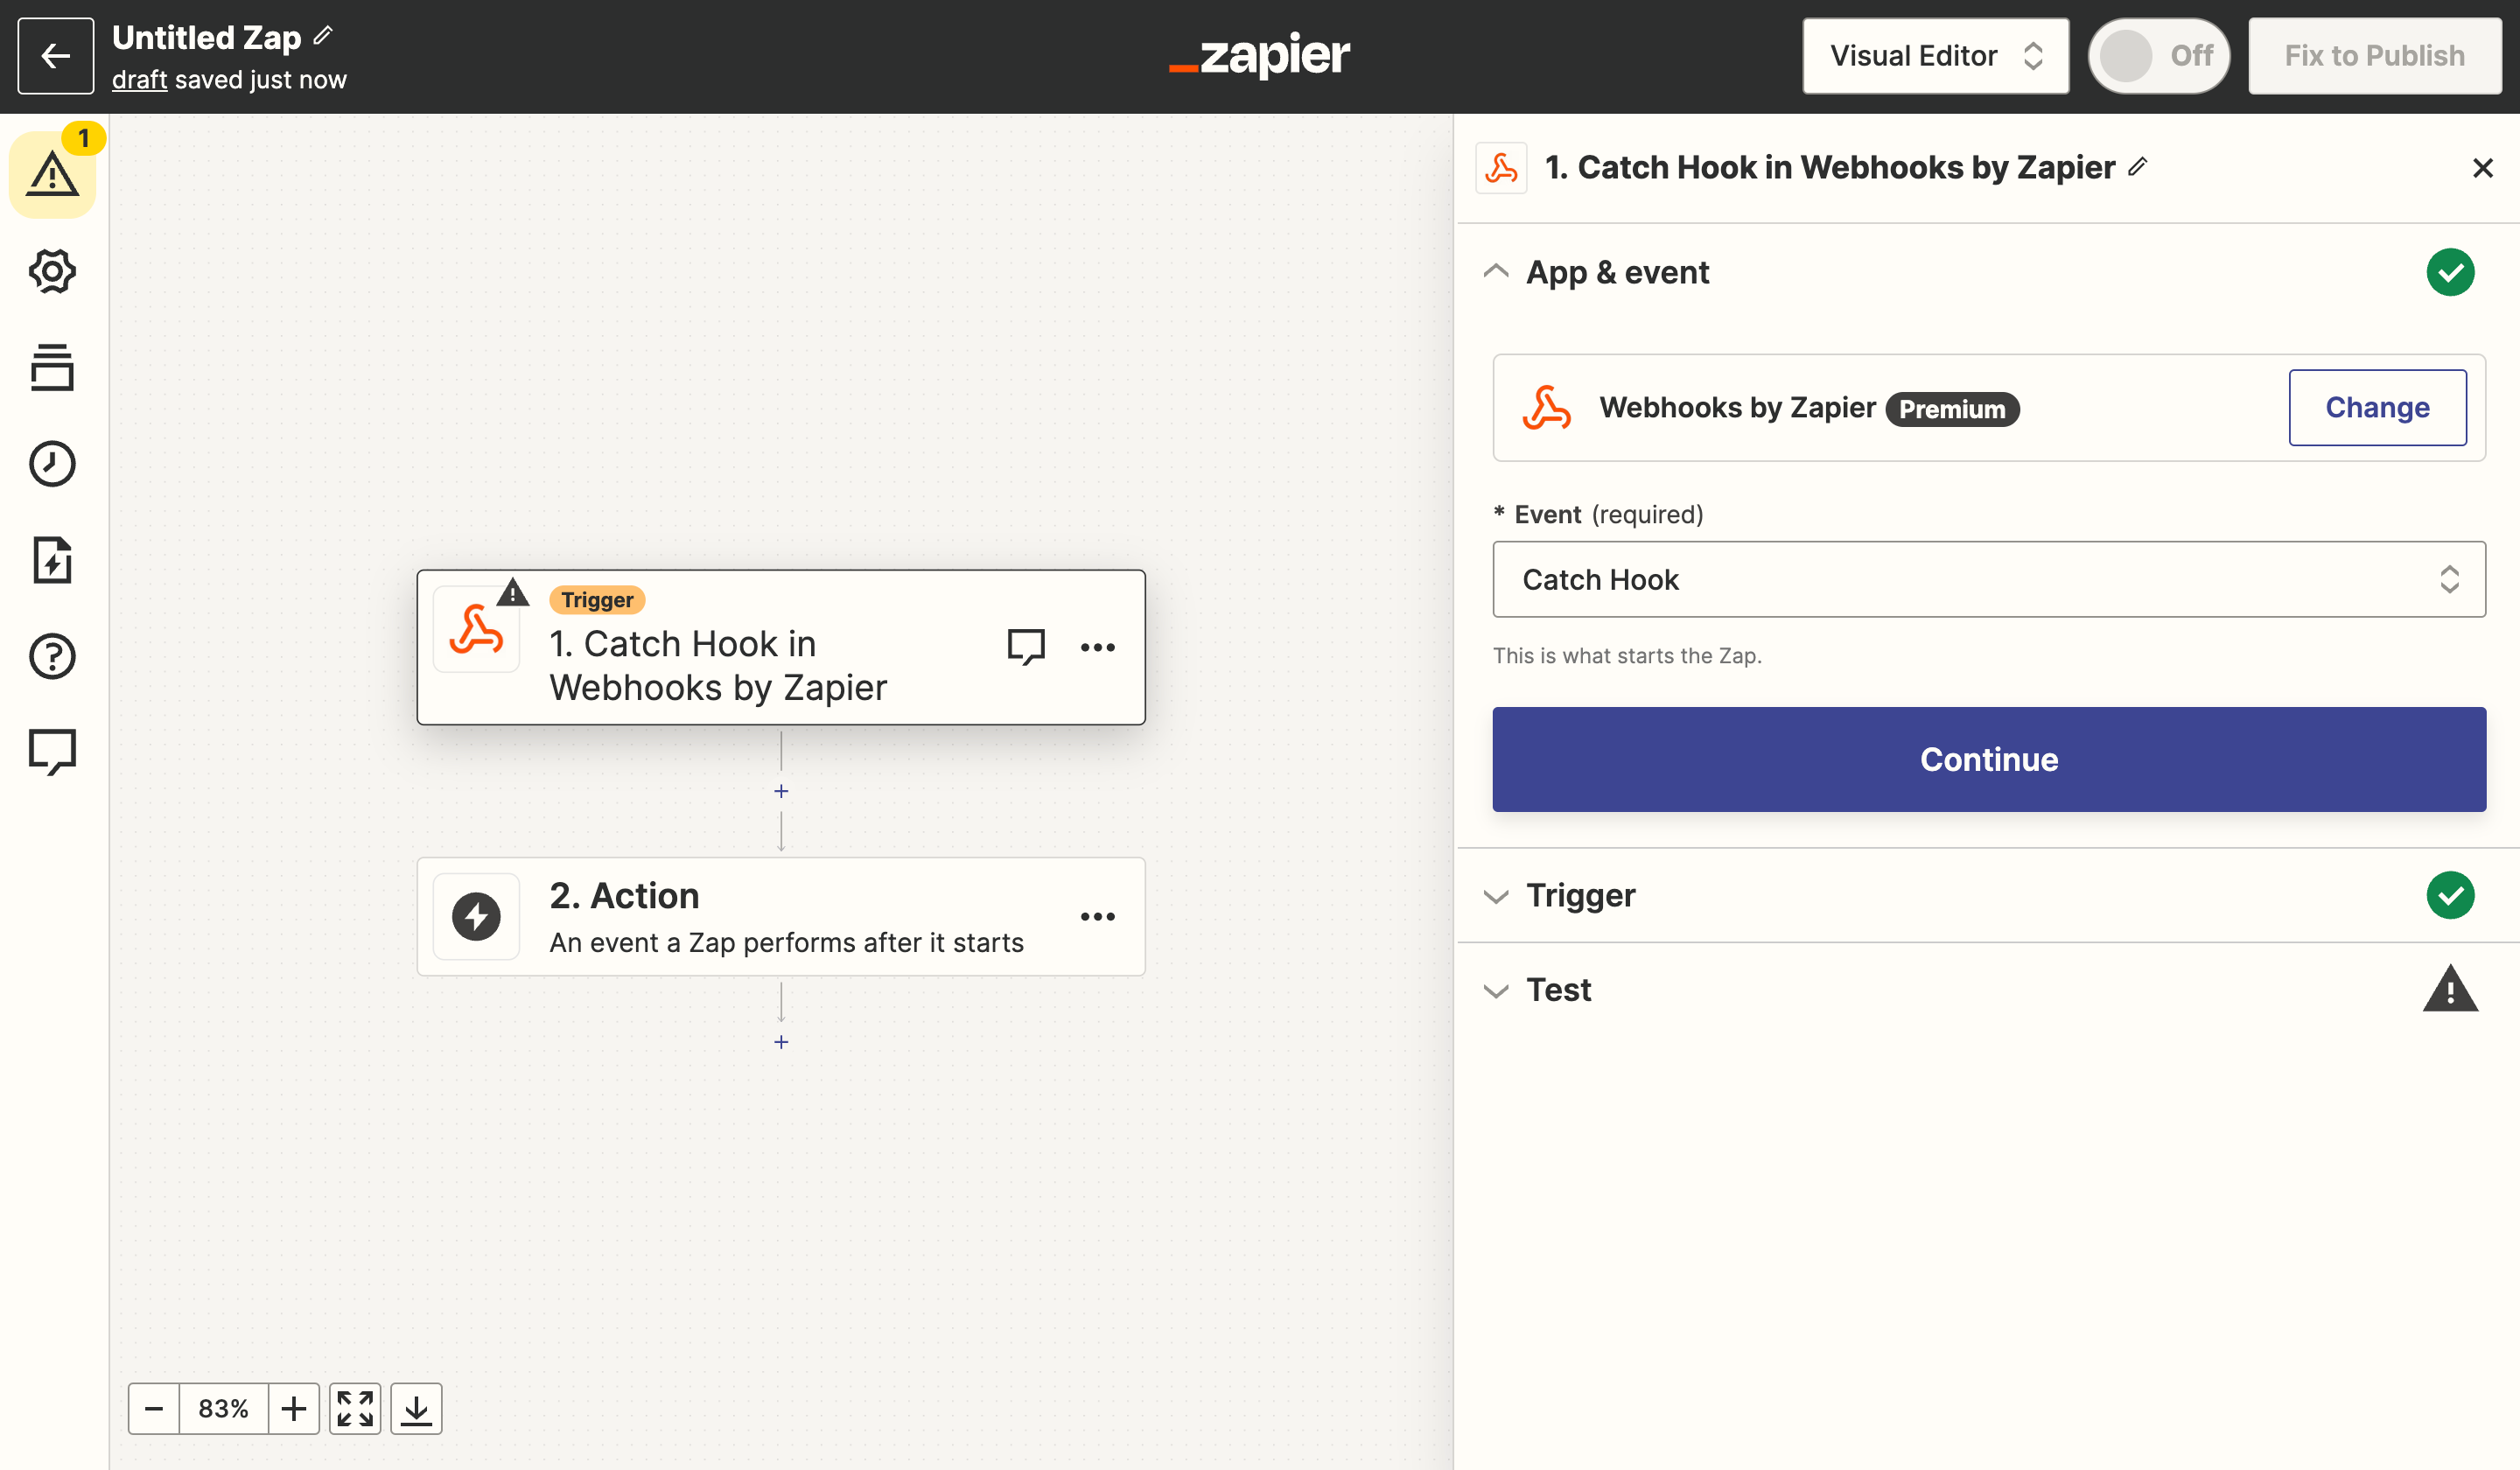
Configuring webhooks in Zapier
Click on Continue in the App & event as well as the Trigger section. In the Test section, you’ll now see your custom webhook URL {1} to initiate this workflow:
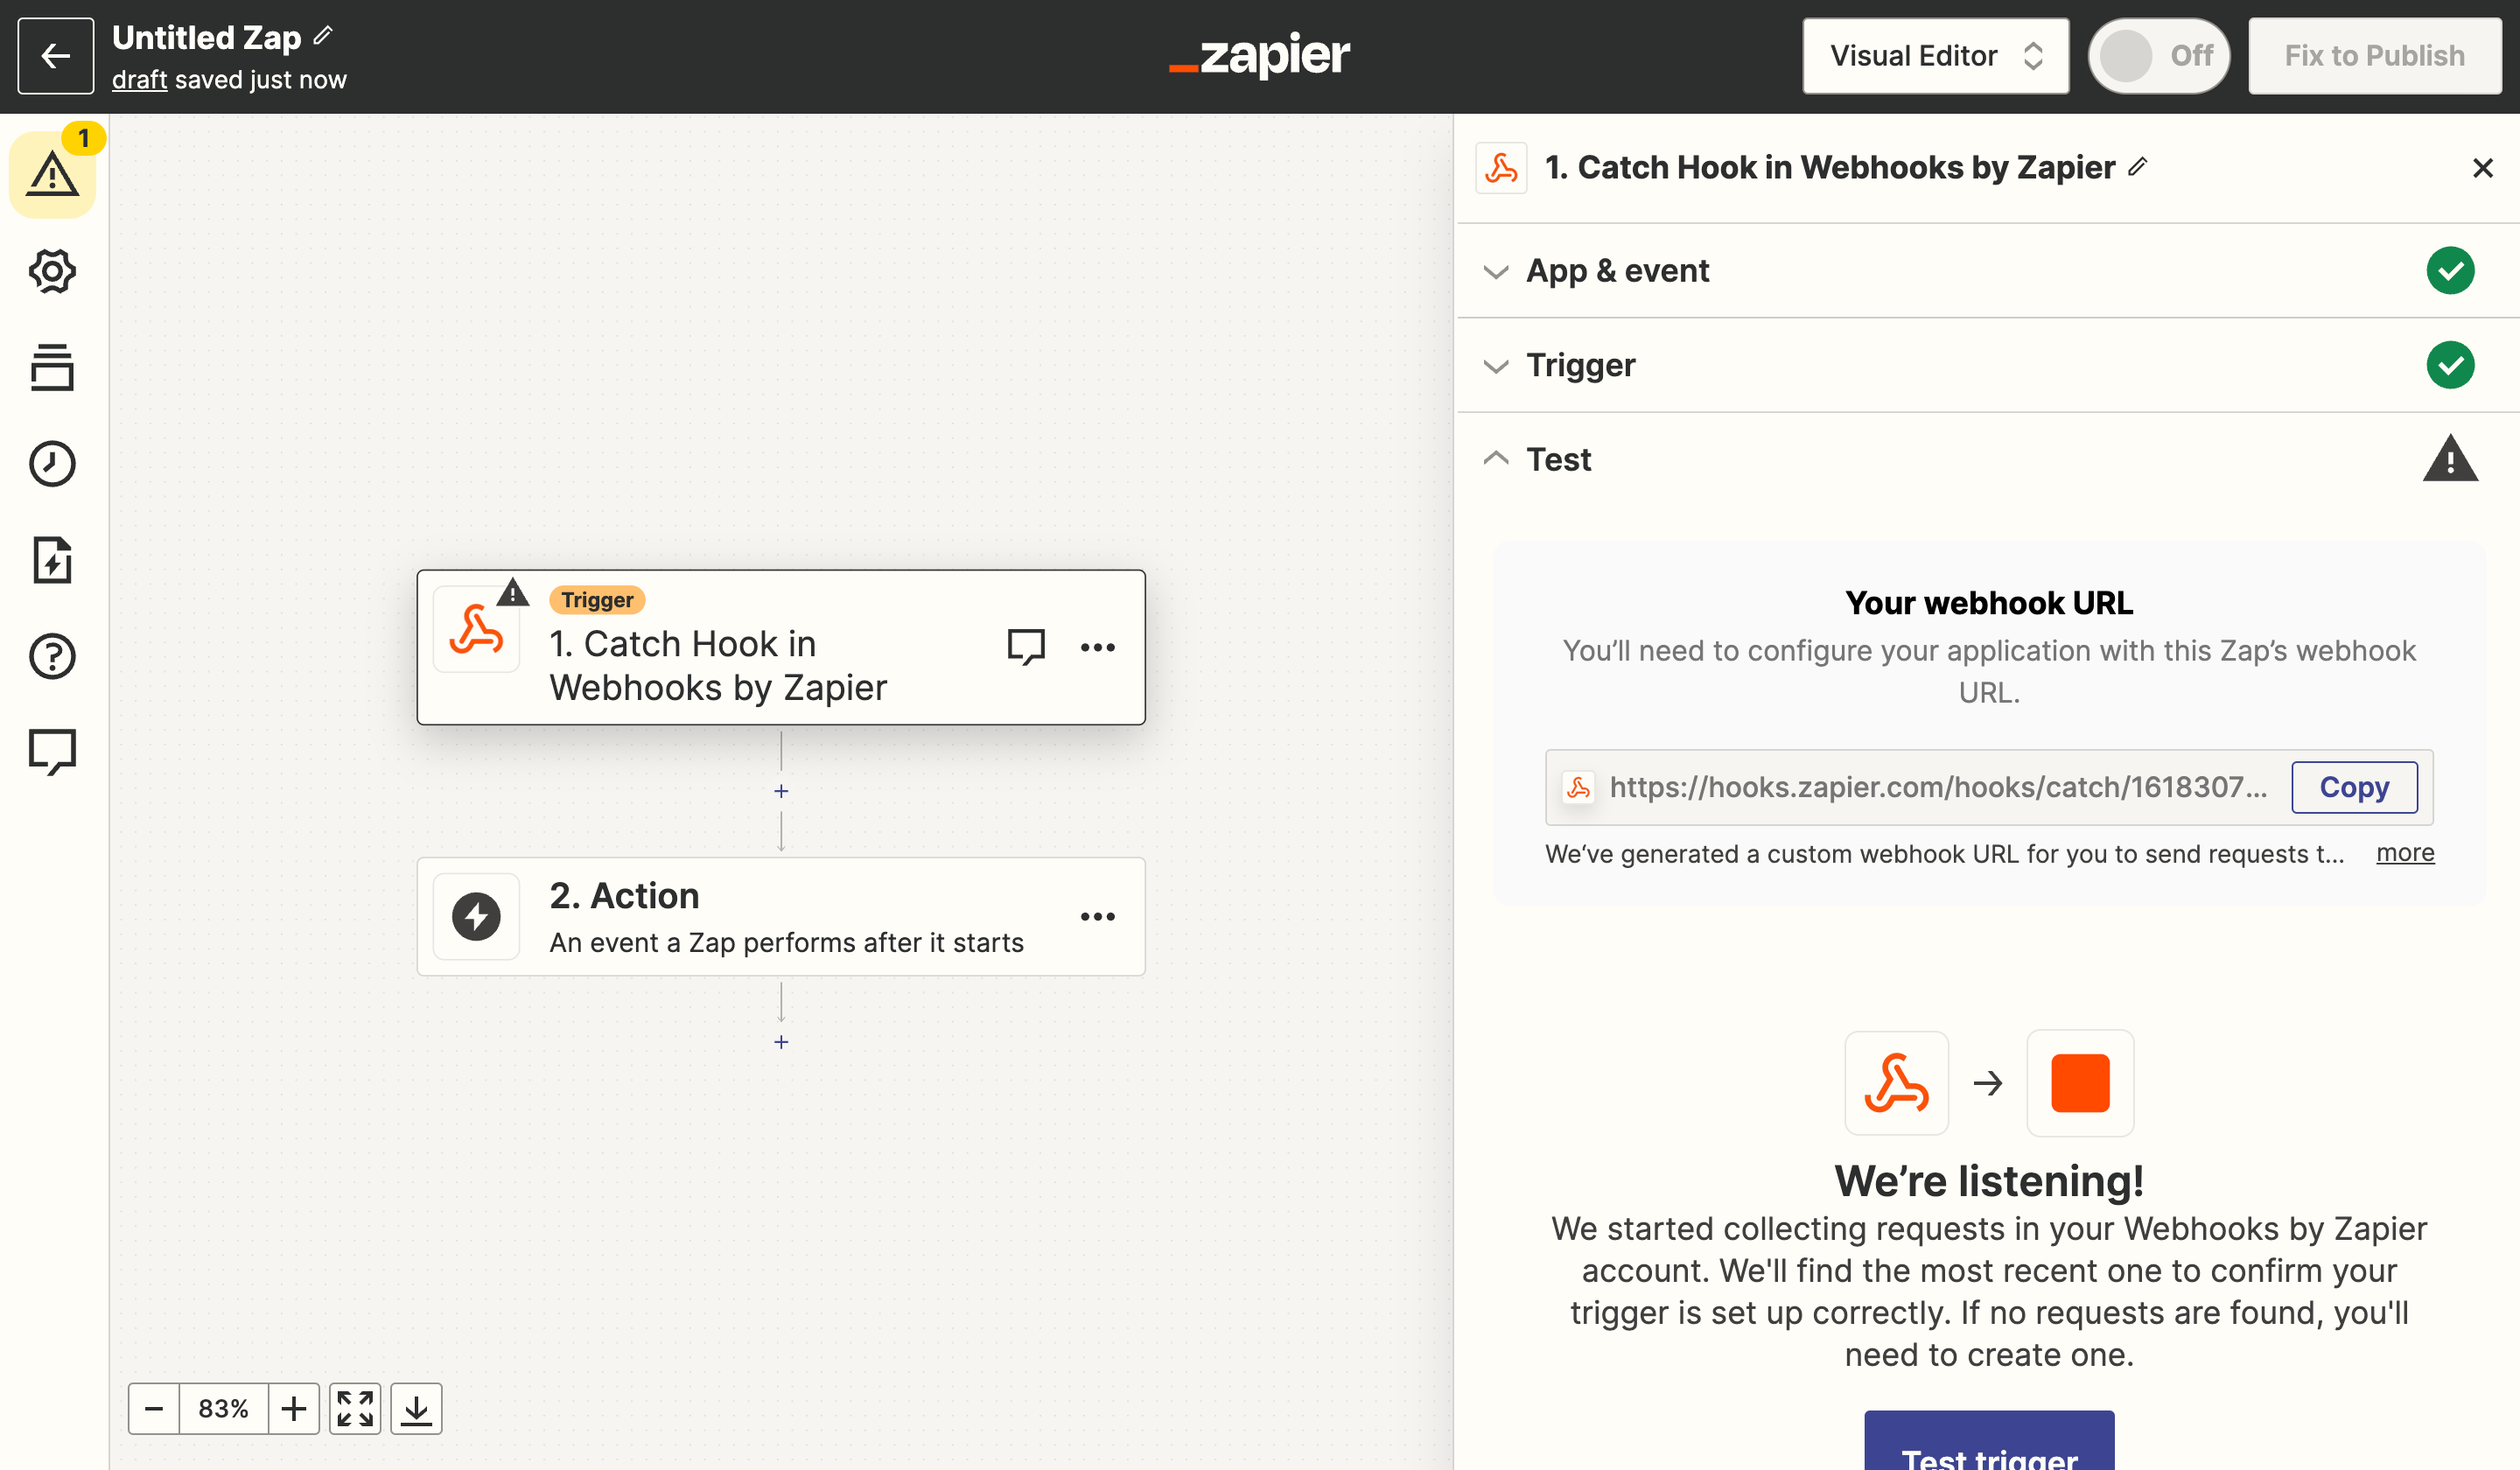
Retrieving the automation's webhook URL in Zapier
Finalizing and deploying the serverless function
Now that we know the custom webhook URL for our Zapier automation, we can finalize our Netlify function.
First, let’s create a new Netlify site. In your project folder, run the following command:
netlify sites:createThe site name you provide will be used for the domain and thus, also the endpoint for the serverless function. I went with storyblok-cross-post-example, but you could also leave the name blank to let Netlify generate a random one. Your project folder and your newly created Netlify site are now linked. Therefore, we can easily set the two environment variables that are required in the serverless function.
In order to define the Storyblok public access token, run the following command:
netlify env:set STORYBLOK_PUBLIC_TOKEN <your-public-token>Let’s also set the Zapier webhook URL as an environment variable:
netlify env:set ZAPIER_WEBHOOK_URL <your-webhook-url>Finally, let’s see the URL of your website’s production environment:
netlify env:set PRODUCTION_ENVIRONMENT_URL <your-production-environment-url>Now we can deploy the serverless function by running:
netlify deploy --prodOnce successfully deployed, the Netlify CLI will provide a bunch of URLs. For our purpose, the Function logs are particularly interesting. The format should be https://app.netlify.com/sites/your-site-name/functions. When you open it, you should see our function forward-published-story-to-zapier listed here. Clicking on it will show the function log, which can be extremely helpful for debugging, and the endpoint.
Let’s copy the endpoint and use it in the configuration of the Storyblok webhook {1}:
Implementing the serverless function's endpoint in Storyblok
For security purposes, preventing anyone from invoking our serverless function, you would want to use a webhook secret and verify the signature in a production scenario.
Now, when you go to a story, enable the cross_post_to_linkedin option, and hit Publish, you should see the function being correctly invoked in Netlify’s logs.
Completing the automation in Zapier
Back in Zapier, we can now go to the Test section of the Catch Hook Event. Here, a new request should have been found {1}, and you should be able to see the title, description, title and url fields {2} we’re transmitting using the serverless function:
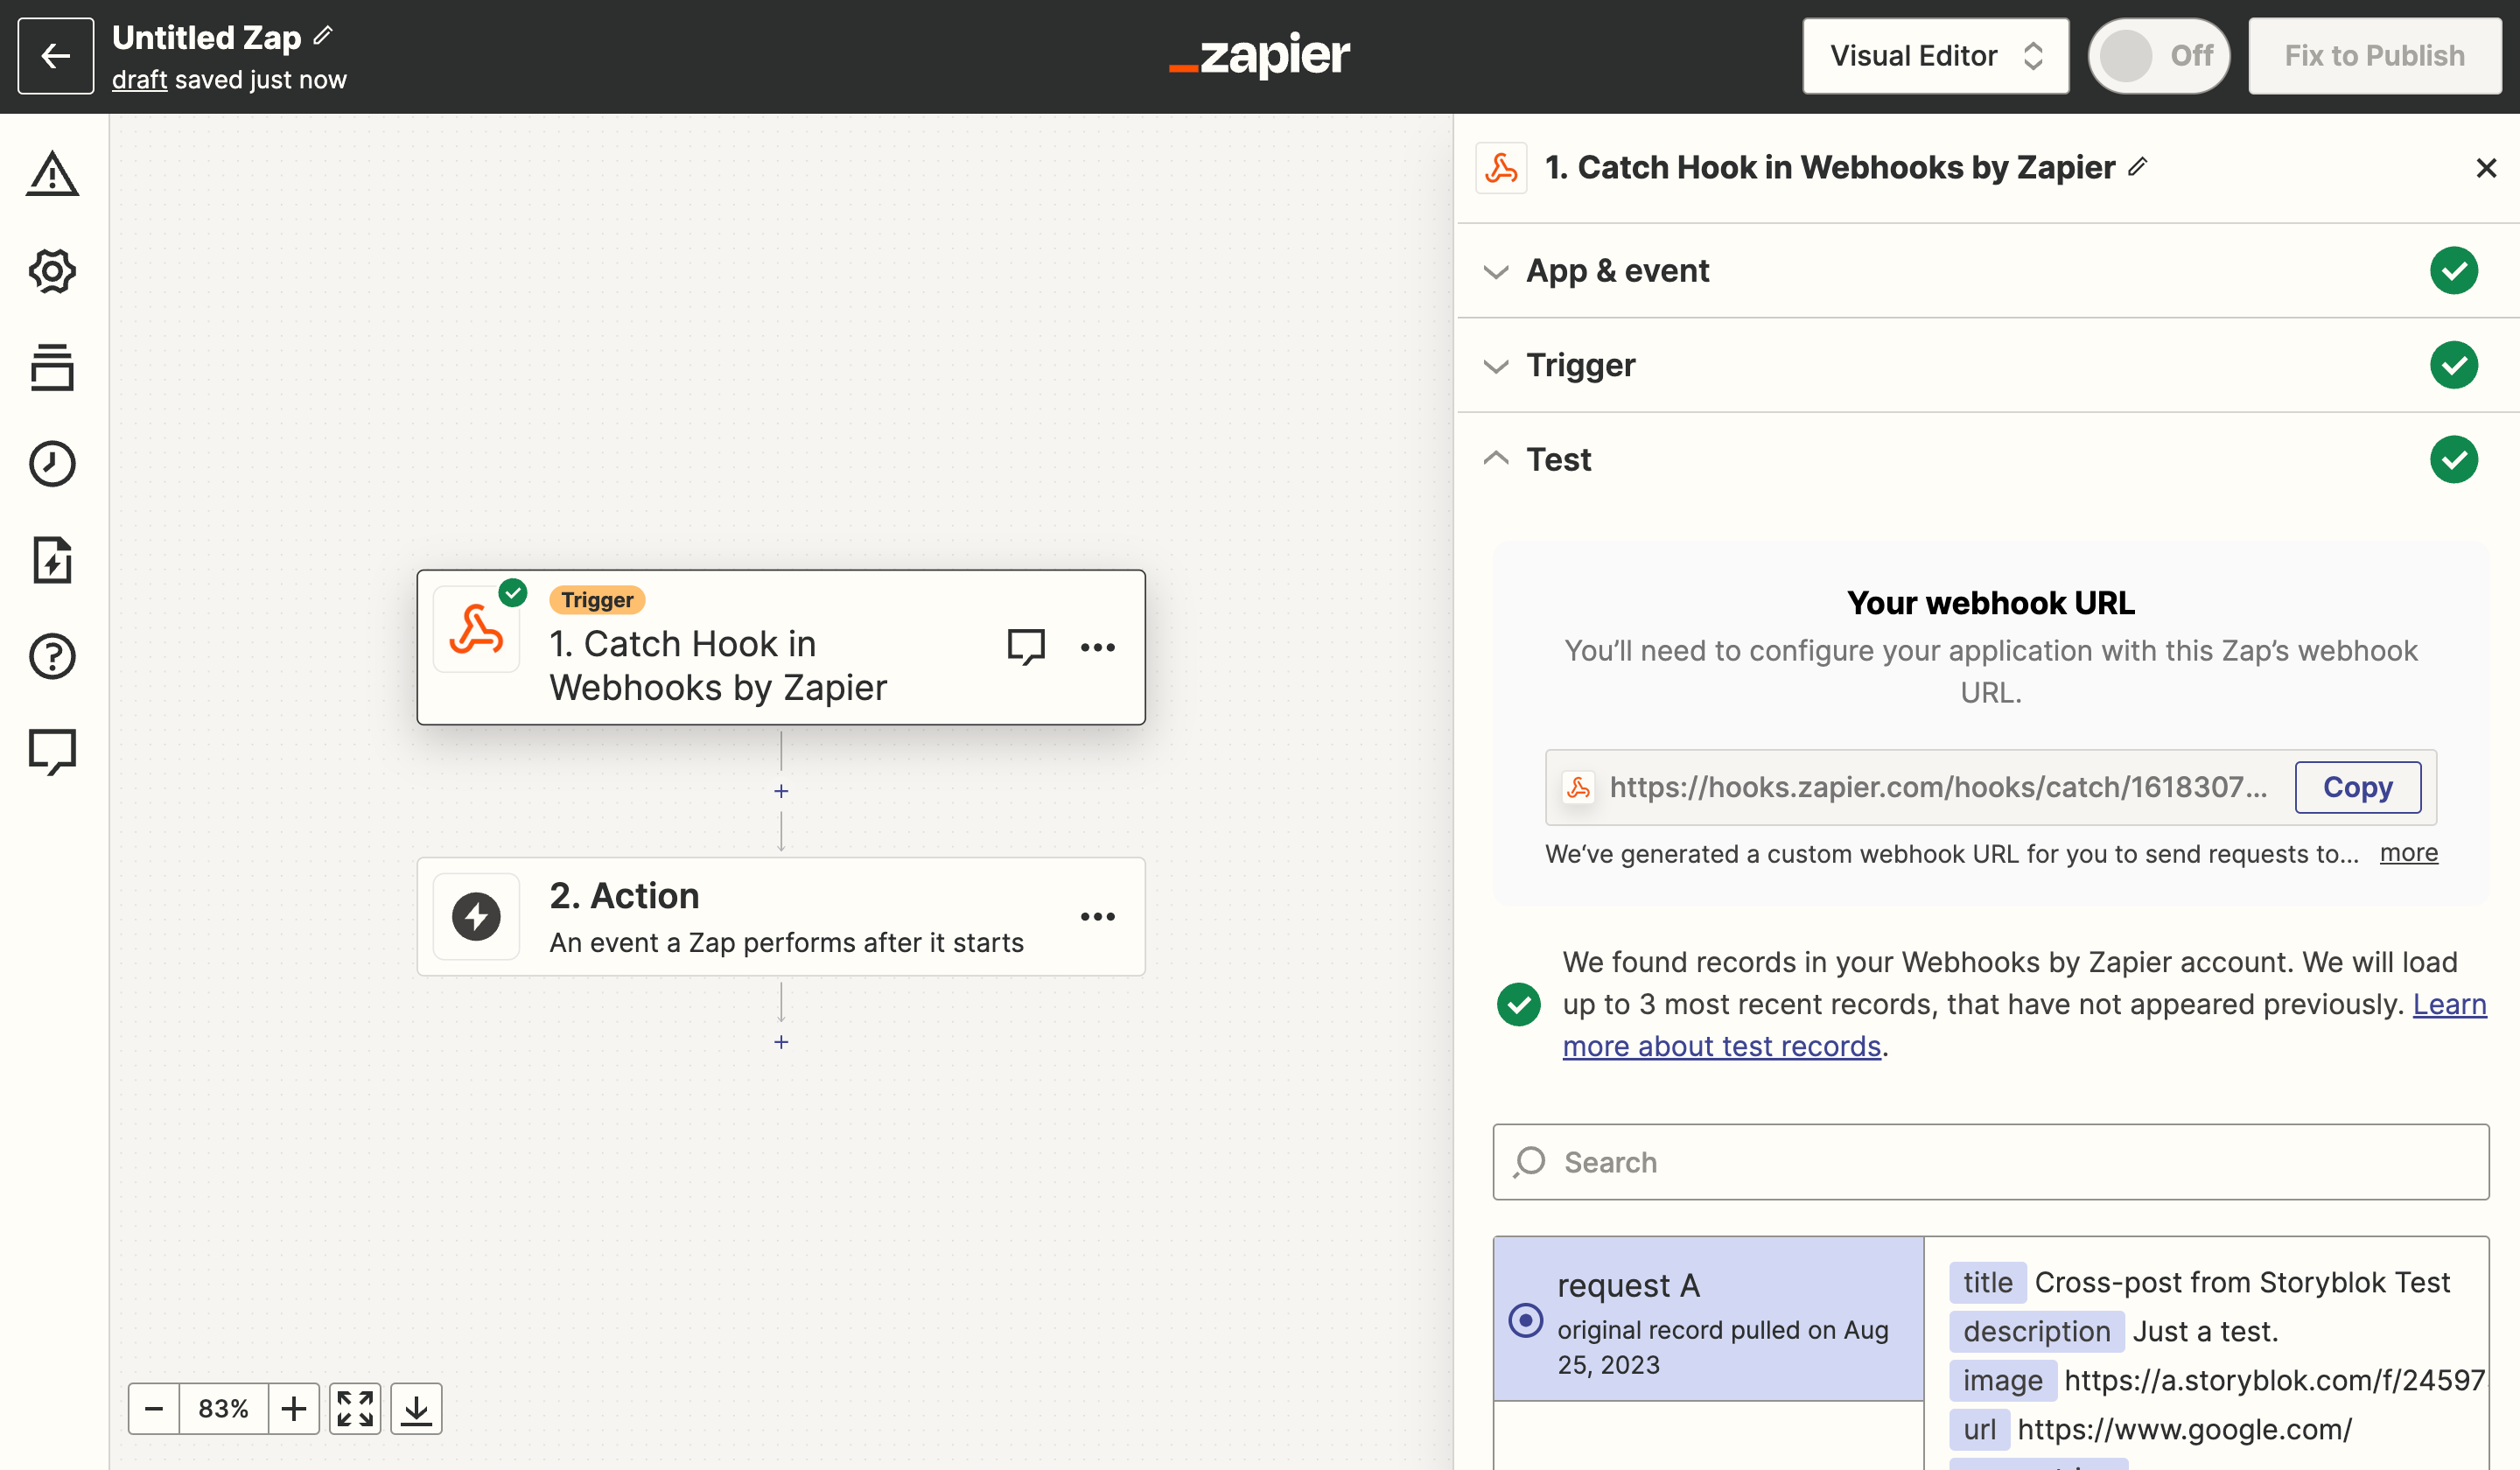
Receiving the data in Zapier
This data can be reused as variables in subsequent steps. To do that, we can now choose an action to be executed. Here, we want to pick LinkedIn {1} and Create Share Update {2} as the Event:
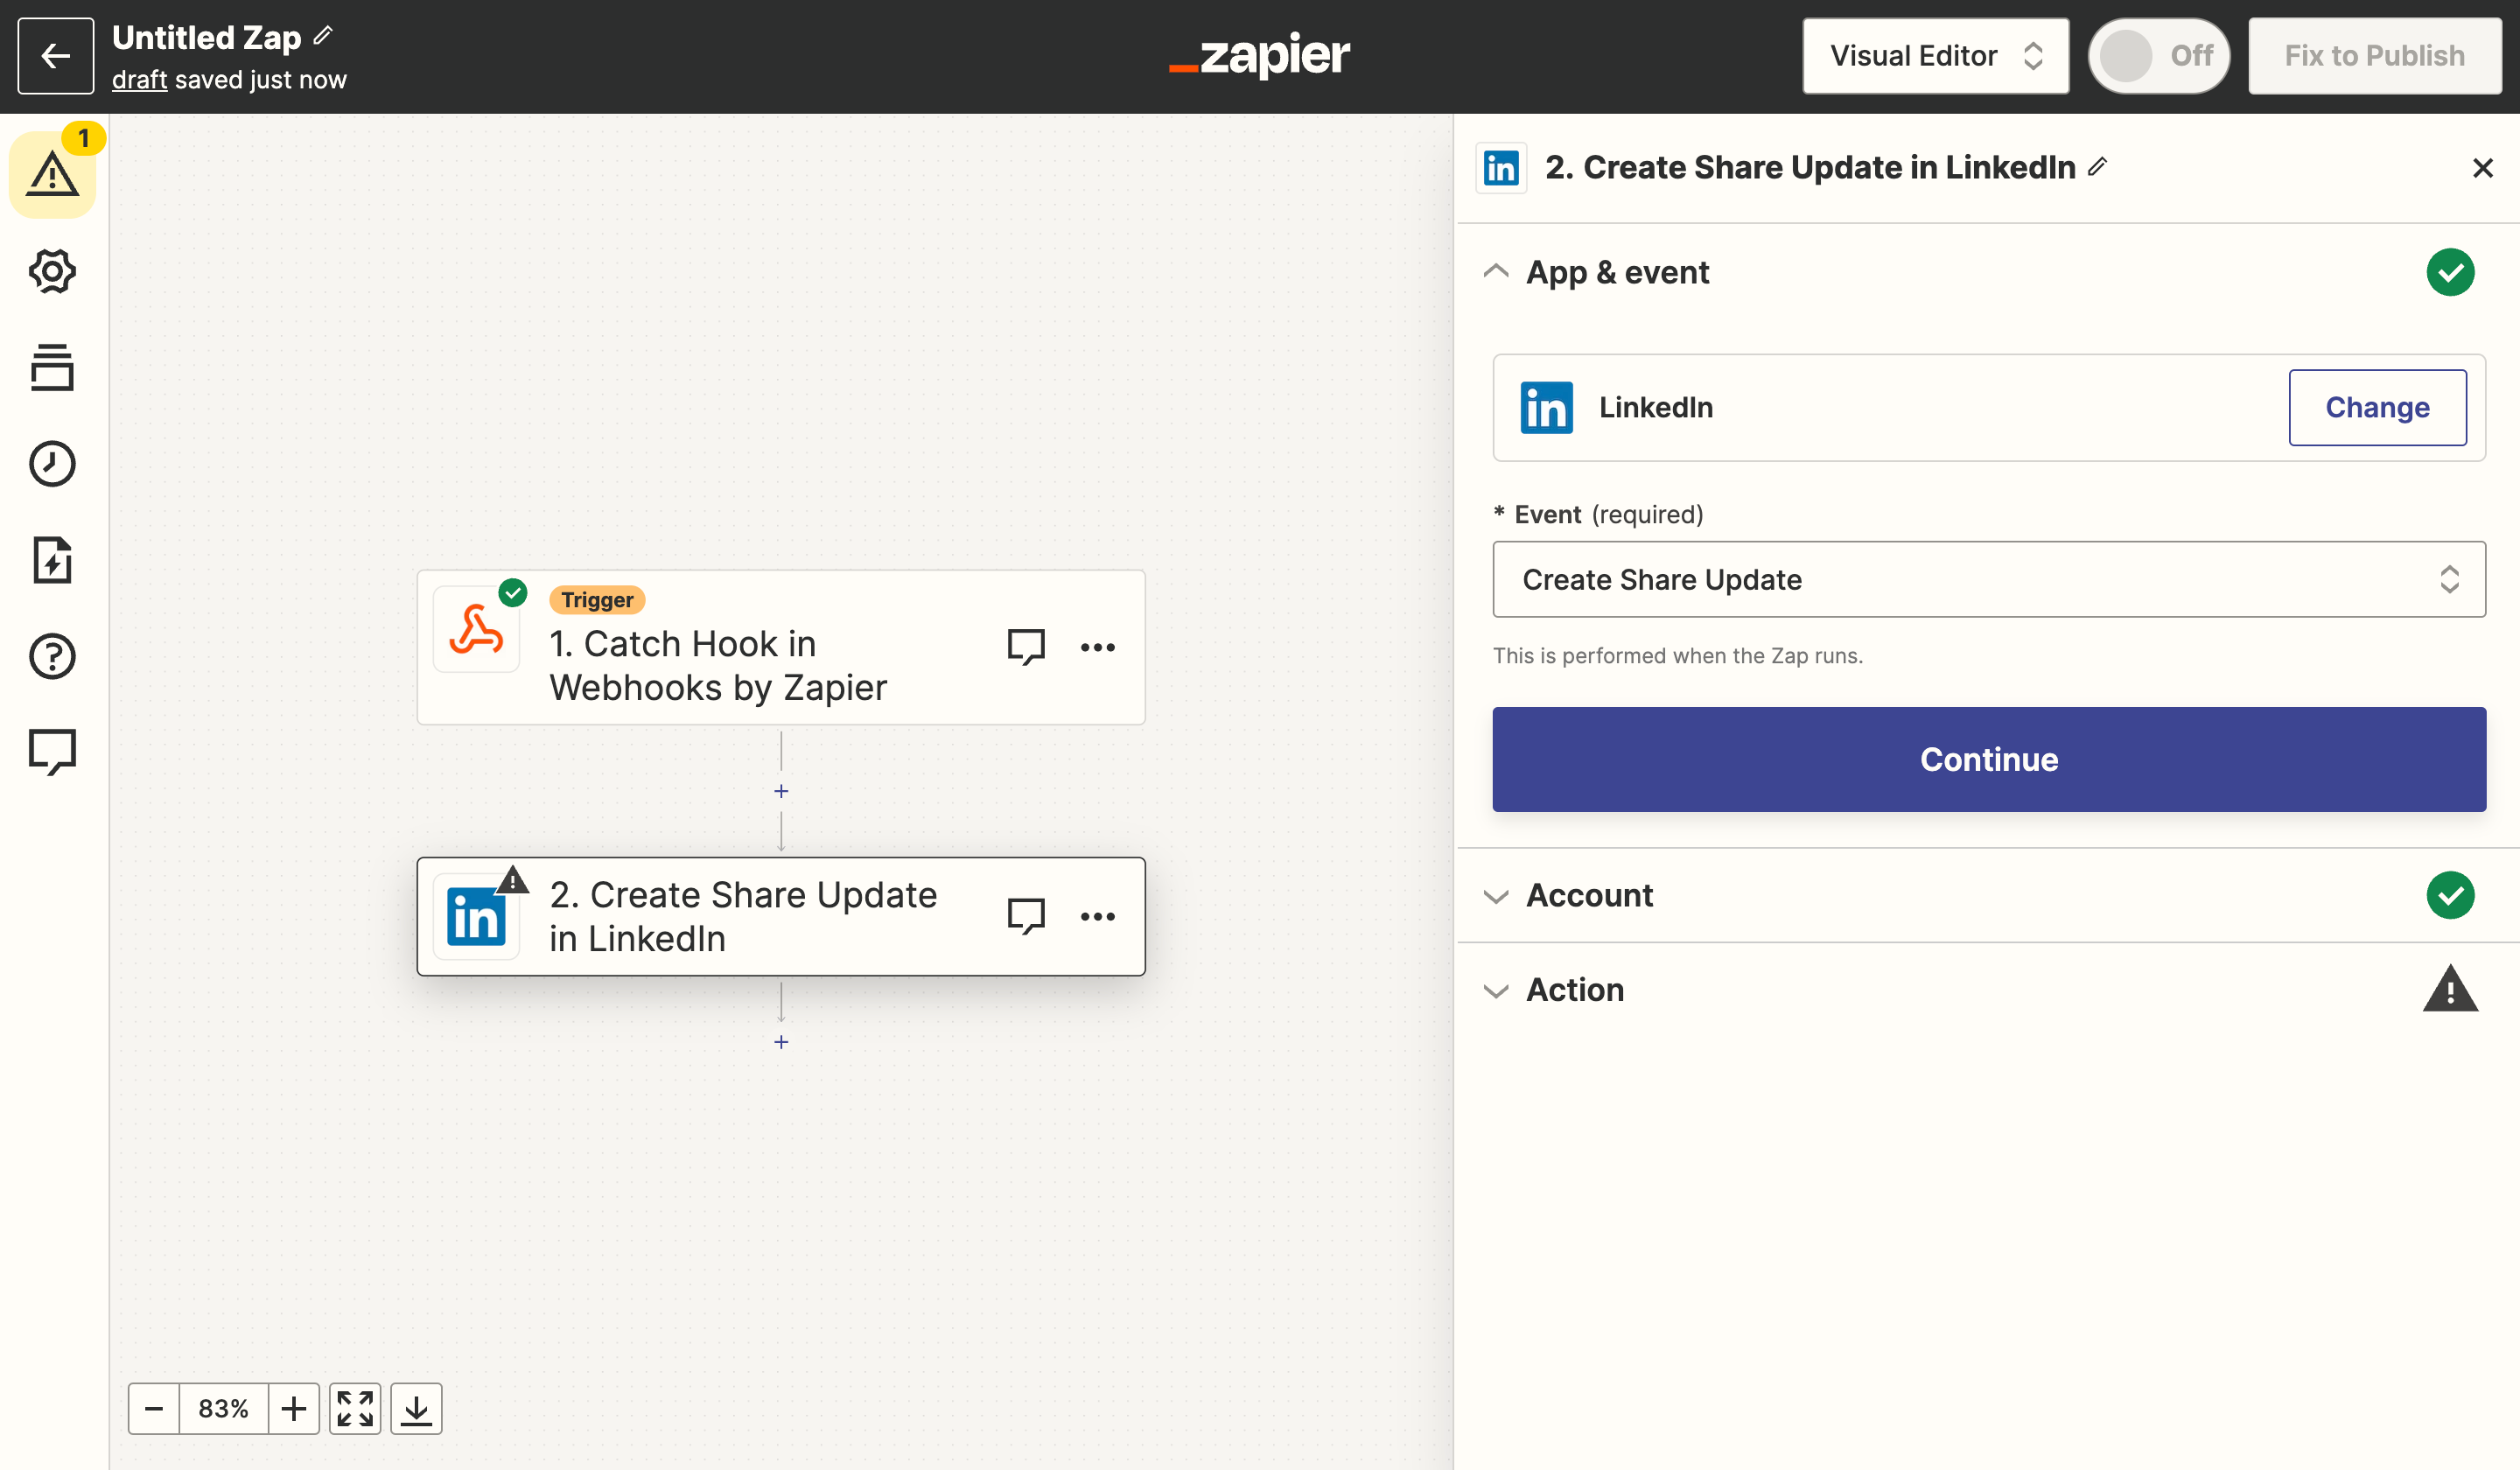
Configuring the LinkedIn integration in Zapier
After having provided Zapier with access to your LinkedIn account, the variables for the post can be inserted. Let’s use our available information as depicted here:
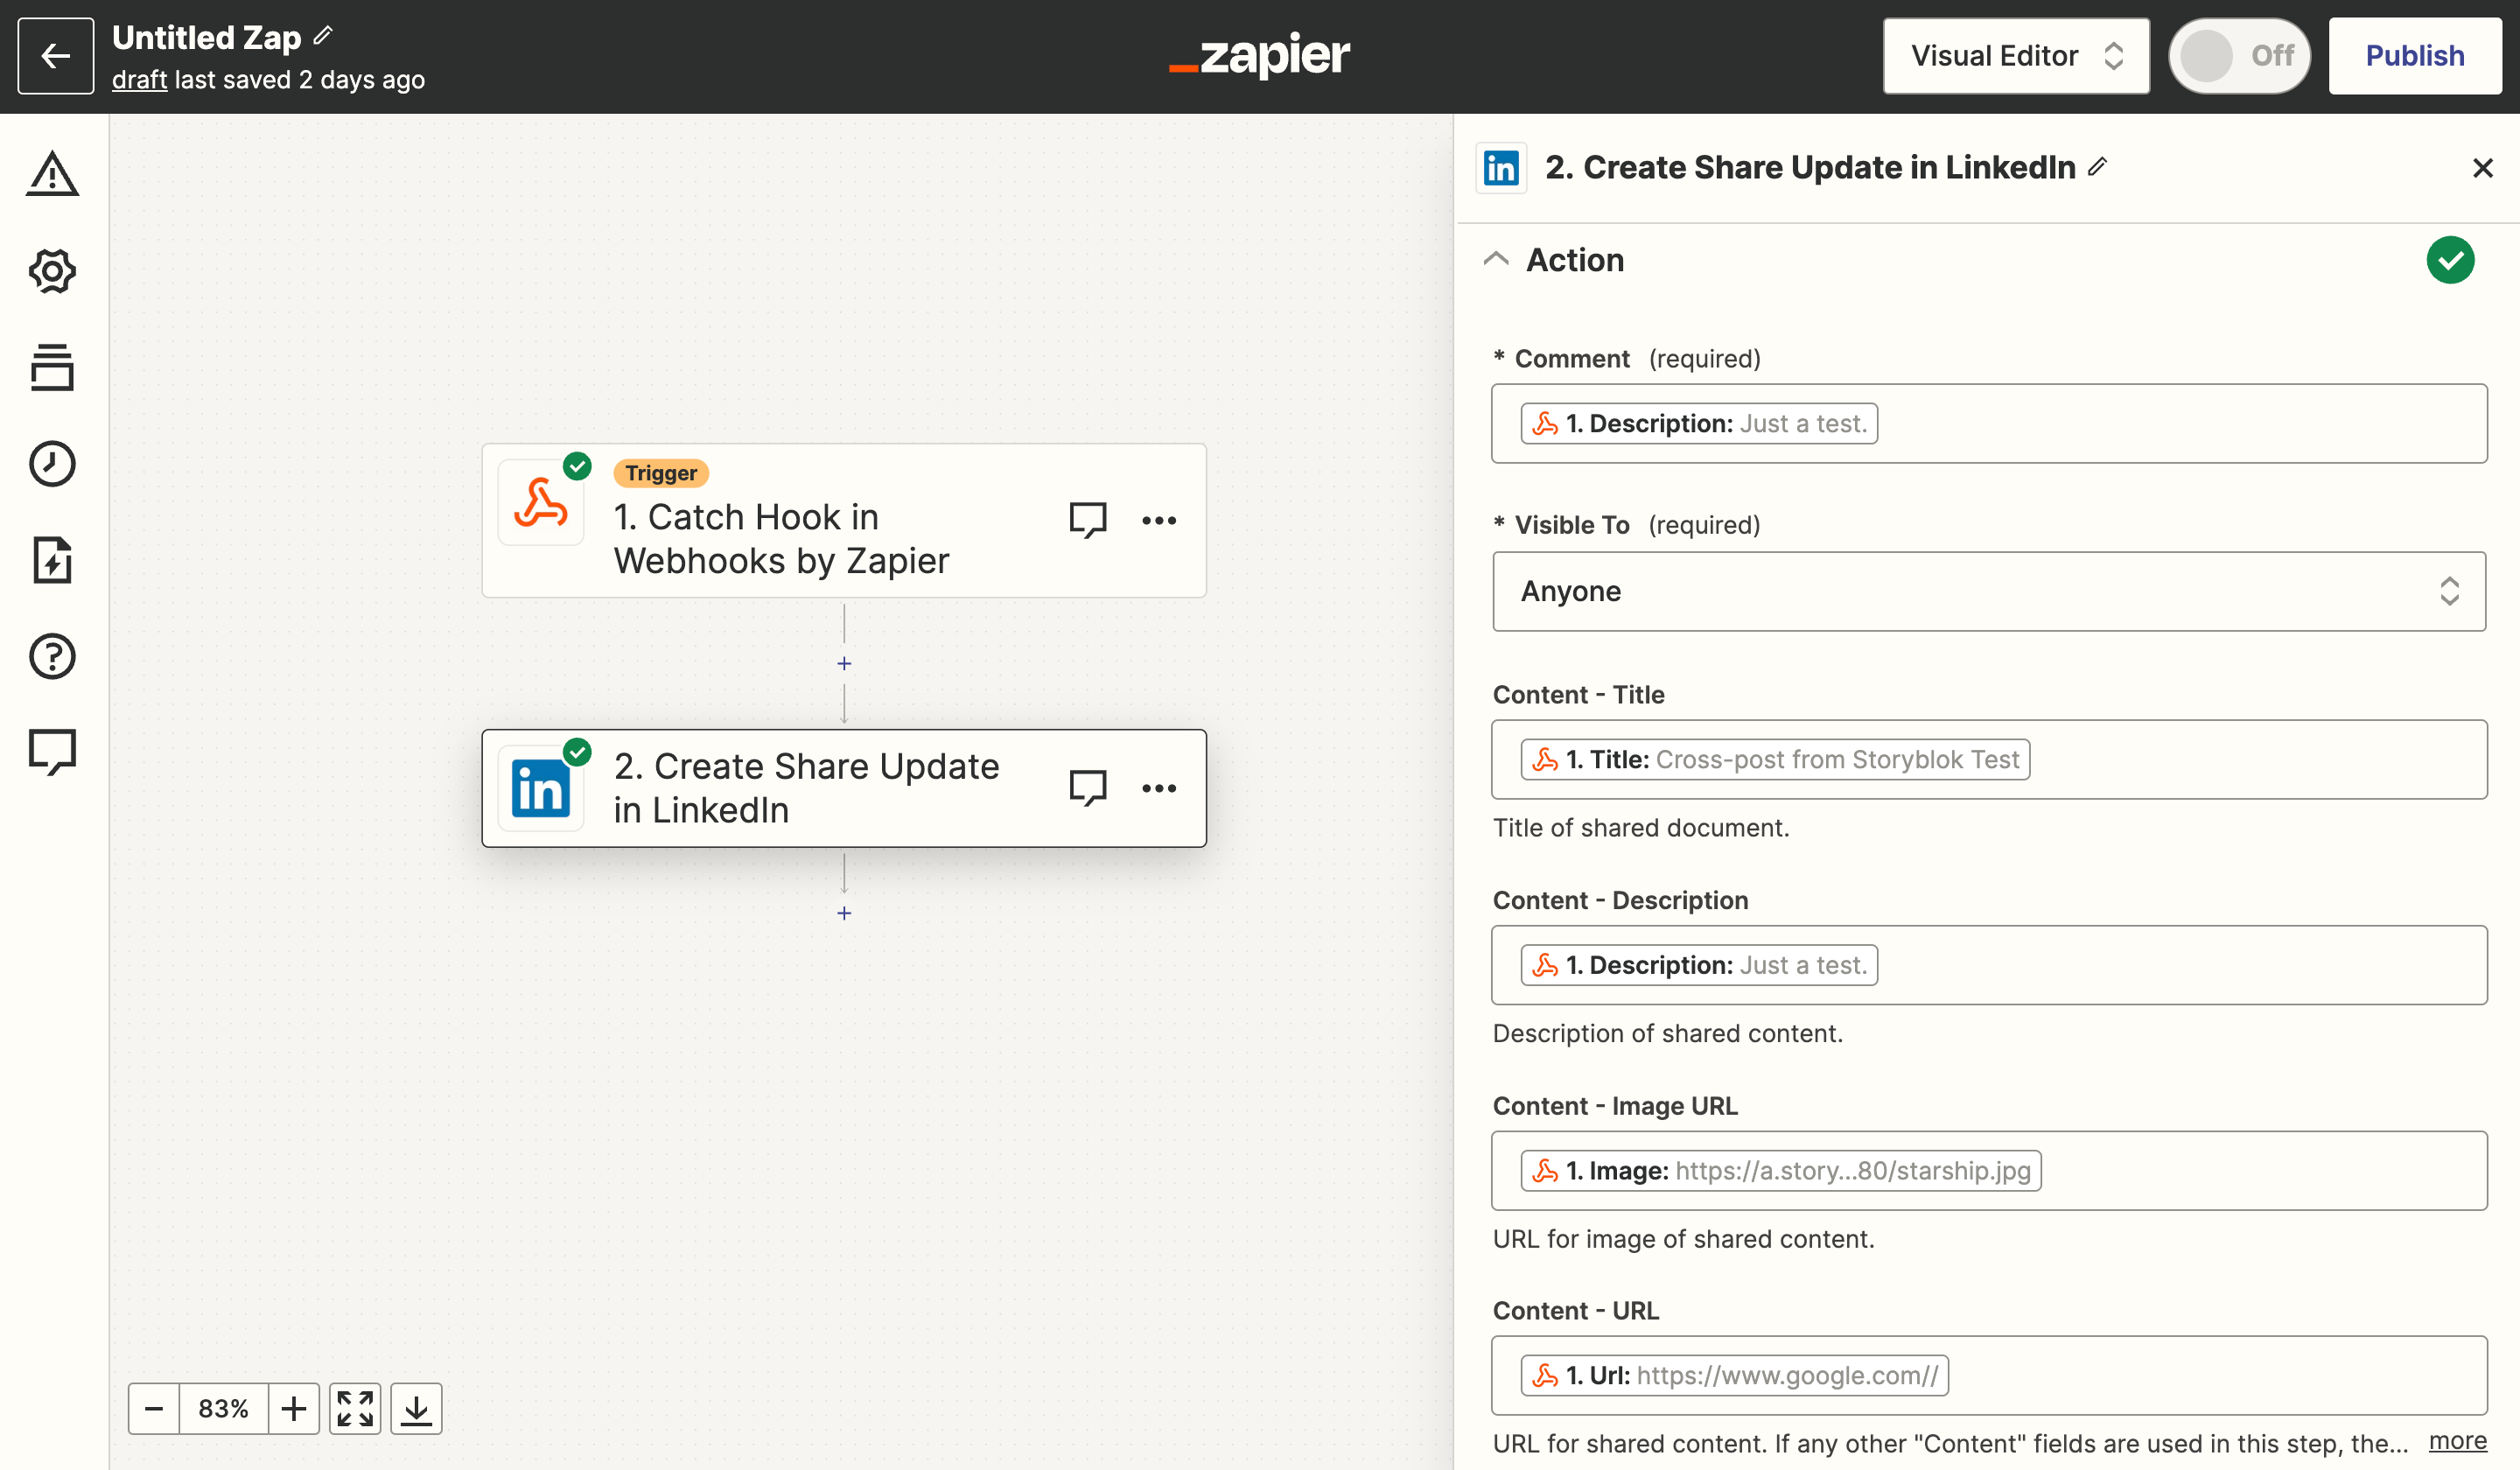
Using the data provided by the serverless function for LinkedIn posts in Zapier
To conclude your work on Zapier, you can click on Test Step and your post should successfully be created on your LinkedIn profile.
Finally, you can publish your Zap and everything should be good to go!
What if a story has been cross-posted previously, and you would want to prevent it from being posted again automatically once you publish any changes? There are plenty of possibilities at your disposal. Using Storyblok’s Management API, you could reset the boolean field(s) after every published event. Alternatively, you could set up a custom workflow stage and only cross-post if the story is in this particular stage. Or, you could use the Task-Manager App to have more refined control over what gets cross-posted.
Wrapping Up
Congratulations! In this tutorial, you learned how to cross-post your content from a Headless CMS to social media platforms using Zapier and a serverless function. Now you can customize what we’ve built and adapt it for your own use cases.
| Resource | Link |
|---|---|
| Webhooks by Zapier Integrations | https://zapier.com/apps/webhook/integrations |
| Intro to Serverless Functions | https://www.netlify.com/blog/intro-to-serverless-functions/ |
| Get started with Netlify CLI | https://docs.netlify.com/cli/get-started/ |
| Storyblok Webhooks Developer Guide | https://www.storyblok.com/docs/concepts/webhooks |
| Storyblok Task-Manager App | https://www.storyblok.com/apps/tasks |
| Storyblok APIs | https://www.storyblok.com/docs/api |
