How to use TailwindCSS, Express.js and Storyblok for AMP powered websites
Storyblok is the first headless CMS that works for developers & marketers alike.
In this article, I show you how to build a valid AMP layout to your Express.js app using Storyblok stories. Also, I show you how to add TailwindCSS in AMP and keep it valid.
Everything in this post is in this repo: https://github.com/Dawntraoz/amp-storyblok
What is AMP
AMP is a web component framework to easily create user-first websites. Pages built with it are so fast that they appear to load instantly. This happens because of the following:
- AMP allows only asynchronous JavaScript
JavaScript can block DOM construction and delay page rendering. While custom JS is allowed in amp-script, and third-party JS is allowed in iFrames, by restricting them to iFrames, they can’t block the execution of the main page. Also, AMP doesn’t let extension mechanisms block page rendering. Any page that uses a custom script must tell the AMP system that it will eventually have a custom tag. - Size all resources (images, ads or iFrames) statically
External resources must state their size in the HTML so that AMP can determine each element’s size and position before resources are downloaded. AMP loads the layout of the page without waiting for resources. - CSS inline and size-bound
In AMP HTML pages, only inline styles are allowed with a maximum size of 50 kilobytes. This removes one or often more HTTP requests from the critical rendering path compared to most web pages. While 50KB is big enough for very sophisticated pages, it requires the page author to practice good CSS hygiene. - Style recalculationsAll DOM reads happen first, before all the writes, ensuring there’s the max of one recalc of styles per frame.
- GPU-accelerated animations
GPU knows about how to perform on layers, it can move and fade them, but it can’t update the page layout so it will hand that task over to the browser. To avoid this behavior AMP only allows animating and transitioning on transform and opacity so that page layout isn’t required. - Prioritize resource loading
AMP prioritizes resource loading. It only loads what’s needed and prefetches lazy-loaded resources as early as possible. Things load very fast but CPU is only used when resources are actually shown to users. - Load pages in an instant
The new preconnect API is heavily used to ensure HTTP requests are as fast as possible when they are made. A page can be rendered before the user wants to navigate to it, it might already be available by the time the user selects it, leading to instant loading. AMP is optimized to reduce the use of bandwidth and CPU. Prerendering only downloads resources above the fold and doesn’t render things that might be expensive in terms of CPU.
Now, I'm sure you'll want to give AMP a chance and see for yourself the time-saving load. So let's get to it!
Prerequisites
You are already using Storyblok in your Express.js app, if not, check out this guide first https://www.storyblok.com/tp/node-js-cms and in five minutes you can have it ready.
Add the AMP validator extension to your browser, if you’re using Chrome go to this link https://chrome.google.com/webstore/detail/amp-validator/nmoffdblmcmgeicmolmhobpoocbbmknc.
Ready? Let’s start!
Add Valid AMP layout
To start building our AMP page we need to change the layout on main.hbs by:
<!doctype html>
<html amp lang="en">
    <head>
        <meta charset="utf-8">
        <script async src="https://cdn.ampproject.org/v0.js"></script>
        <title>{{ story.name }} - Storyblok</title>
        <link rel="canonical" href="https://localhost:4300/">
        <meta name="viewport" content="width=device-width,minimum-scale=1,initial-scale=1">
        <meta name="description" content="Open-source template with AMP, TailwindCSS, express.js & Storyblok">
        <link rel="icon" href="/public/favicon.ico">
        <script type="application/ld+json">
        {
          "@context": "https://schema.org",
          "@type": "NewsArticle",
          "mainEntityOfPage": {
            "@type": "WebPage",
            "@id": "https://www.storyblok.com/press"
          },
          "headline": "Article headline",
          "image": [
            "//a.storyblok.com/f/51376/3856x824/fea44d52a9/colored-full.png",
            ],
          "datePublished": "2015-02-05T08:00:00+08:00",
          "dateModified": "2015-02-05T09:20:00+08:00",
          "author": {
            "@type": "Person",
            "name": "Storyblok User"
          },
            "publisher": {
            "@type": "Organization",
            "name": "Storyblok",
            "logo": {
              "@type": "ImageObject",
              "url": "//a.storyblok.com/f/51376/3856x824/fea44d52a9/colored-full.png"
            }
          },
          "description": "A most wonderful article"
        }
        </script>
        <style amp-boilerplate>body{-webkit-animation:-amp-start 8s steps(1,end) 0s 1 normal both;-moz-animation:-amp-start 8s steps(1,end) 0s 1 normal both;-ms-animation:-amp-start 8s steps(1,end) 0s 1 normal both;animation:-amp-start 8s steps(1,end) 0s 1 normal both}@-webkit-keyframes -amp-start{from{visibility:hidden}to{visibility:visible}}@-moz-keyframes -amp-start{from{visibility:hidden}to{visibility:visible}}@-ms-keyframes -amp-start{from{visibility:hidden}to{visibility:visible}}@-o-keyframes -amp-start{from{visibility:hidden}to{visibility:visible}}@keyframes -amp-start{from{visibility:hidden}to{visibility:visible}}</style><noscript><style amp-boilerplate>body{-webkit-animation:none;-moz-animation:none;-ms-animation:none;animation:none}</style></noscript>
    </head>
    <body>
        {{{body}}}

        {{#if story.content._editable}}
            <script type="text/javascript" src="//app.storyblok.com/f/storyblok-latest.js"></script>
            <script type="text/javascript">
                storyblok.init();
                // On the change event refresh the window
                storyblok.on('change', function() {
                window.location.reload(true);
                });
            </script>
        {{/if}}
    </body>
</html>
As you can see, we need to add the Storyblok scripts only in the case of editing the content, otherwise our page will not be valid.
AMP components in each page
To have a valid AMP page you need to add only the amp scripts used on each page.
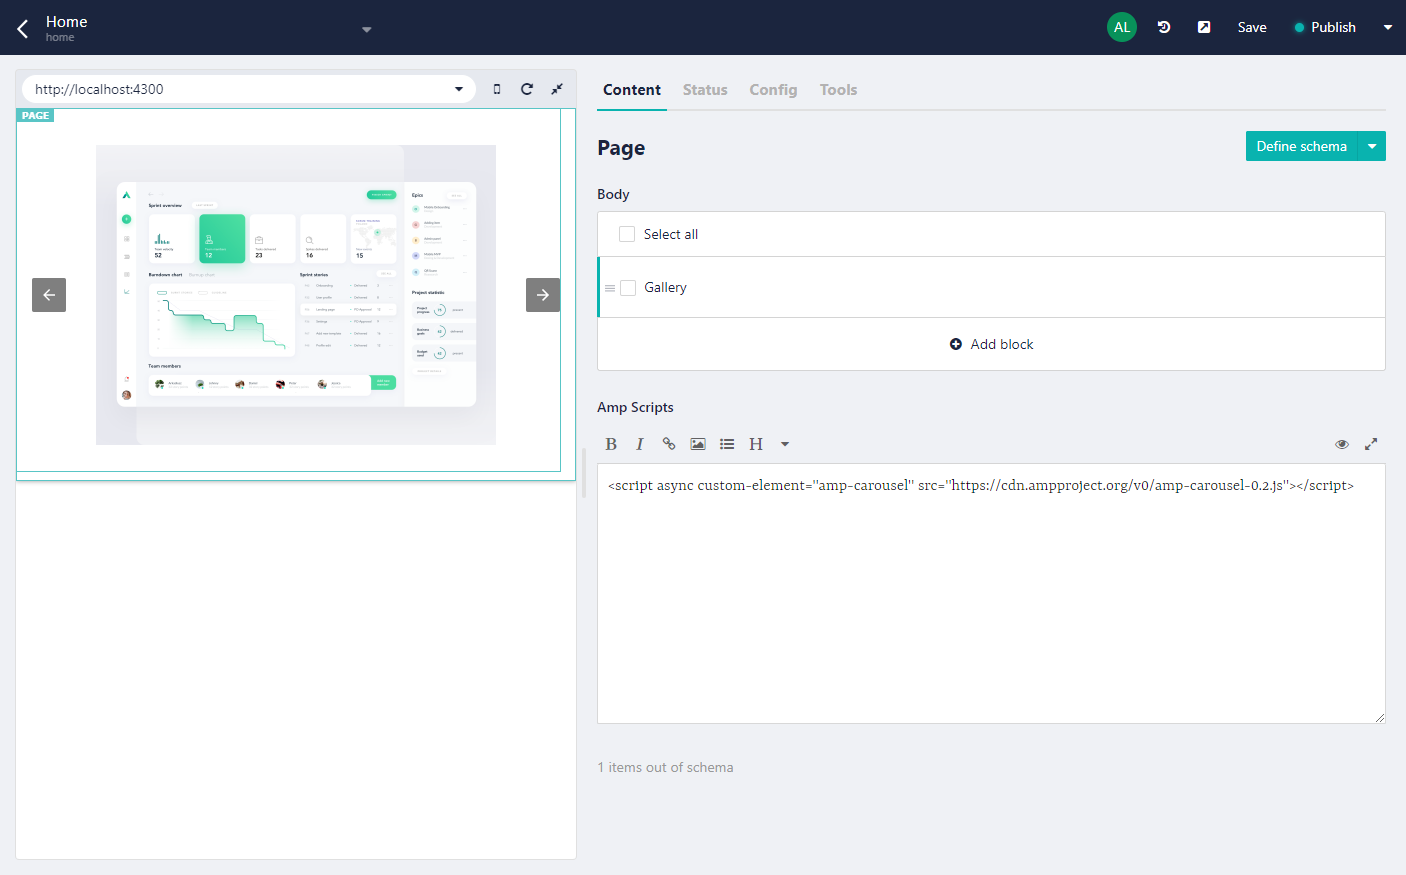
To do this, we go to our panel on Storyblok and add a Markdown field called amp_scripts to the Page template, then add the ones we need to show on each page. In this example we are using the AMP carousel to create our gallery.
To add these scripts in the layout’s <head> tag, we need to include a Helper in our app. Go to index.js, where we define the engine template to use and add a section to helpers:
// Define your favorite template engine here
app.engine('.hbs', exphbs({
  defaultLayout: 'main',
  extname: '.hbs',
  partialsDir: 'views/components/',
  helpers: {
    section: function(name, options) {
      if (!this._sections) this._sections = {};
        this._sections[name] = options.fn(this);
        return null;
      }
  }
}));
With this helper we can go to the main layout (main.hbs) and add this before the </head> close tag:
<head>
  ...
  {{{_sections.script}}}
</head>
In the pages where we want to use AMP components, such as index.hbs, we just need to add the script section with our markdown field on it:
{{#section 'script'}}
  {{{story.content.amp_scripts}}}
{{/section}}
That is, we already have the scripts we want only on the page that contains them. Now let's give it some style of its own. 🥰
Add custom CSS in AMP with TailwindCSS & PostCSS
If we want to load our own style we need to do add it on <style amp-custom>. Let's see how to do it if we want to add TailwindCSS.
First, install Tailwind CSS:
npm install tailwindcss --saveNext, create the configuration file (tailwind.js):
./node_modules/.bin/tailwind init tailwind.jsWarning: Each AMP page has a 75,000 byte CSS limit
We need to add purgecss to have a valid custom style. Luckily, in the latest version (v1.4), tailwind has added an option in its configuration file. Let’s add it:
module.exports = {
  purge:  [
    './views/**/*.hbs',
  ],
  ...
}
Then install PostCSS and cssnano to compress our result:
npm install -g postcss-cli
npm install cssnano --save-dev
Once it’s installed create a file in the root directory named postcss.config.js and add the following lines:
const tailwindcss = require('tailwindcss')
module.exports = {
  "plugins": [
    require('tailwindcss')('tailwind.js'),
    require('autoprefixer')(),
    require('cssnano')({
      preset: 'default',
    })
  ]
}
In order to use it, we will add a folder in public called assets and there we'll create our tailwind.css file to import its styles like:
@tailwind base;
@tailwind components;
@tailwind utilities;
Now that we've added it, we'll create a script to build it. Go to package.json and add:
"scripts": {
  "start": "yarn build:css && node index.js",
  "build:css": "postcss public/assets/tailwind.css -o public/assets/style.css"
}
To be able to load the generated style, since we have to enter it in the style amp-custom tag, we have to read its content and pass it to the view in a variable.
The solution I have found is to read the file at server initialization so that at each request you don't have to read the file again.
index.js would have these new lines:
const fs = require('fs');
let stylesheet = '';

fs.readFile('./public/assets/style.css', function (err, html) {
  if (err) {
    throw err;
  }
  stylesheet = html;
});

// Inside Storyblok.get(...).then
res.render('index', {
  style: stylesheet, // Add the stylesheet generated by PostCSS
  story: response.data.story
});
Now we can read our CSS in main.hbs with the style variable.
<style amp-custom>
    {{style}}
</style>
A valid AMP page is styled & ready 🙌
You can see the project at https://github.com/Dawntraoz/amp-storyblok and check the result in https://amp-storyblok.herokuapp.com/.

| Resources | Links |
|---|---|
| Github Repository | https://github.com/Dawntraoz/amp-storyblok |
| Result of the article | https://amp-storyblok.herokuapp.com |
