Building Digital Experience Platform with Nuxt 3, Algolia, Storyblok, and TailwindCSS
Storyblok is the first headless CMS that works for developers & marketers alike.
In this article, we will build a Cat Gallery with Nuxt 3 and TailwindCSS. Storyblok will be used to fetch the content. Algolia will deliver search results. Both services will be in sync, thanks to the indexer. This indexer will allow us to update the Algolia index after each content update on the Storyblok page, keeping both services up to date.
Our final application will look like this:

digital experience platform with storyblok
This article aims to get you familiar with all tools and how to connect them to achieve a functional Digital Experience Platform (DXP). You can easily add other content and styling using this example.
If you get lost at some point, you can always go to the code repository for the whole application example → https://github.com/Baroshem/dxp-nuxt3-storyblok-algolia-tailwindcss
What is a Digital Experience Platform?
A digital experience platform (DXP) creates, delivers, and optimizes connected digital experiences across multiple interaction channels, including websites, voice assistants, and mobile applications. Examples of digital experience platforms include Salesforce DXP, SAP, and Oracle.
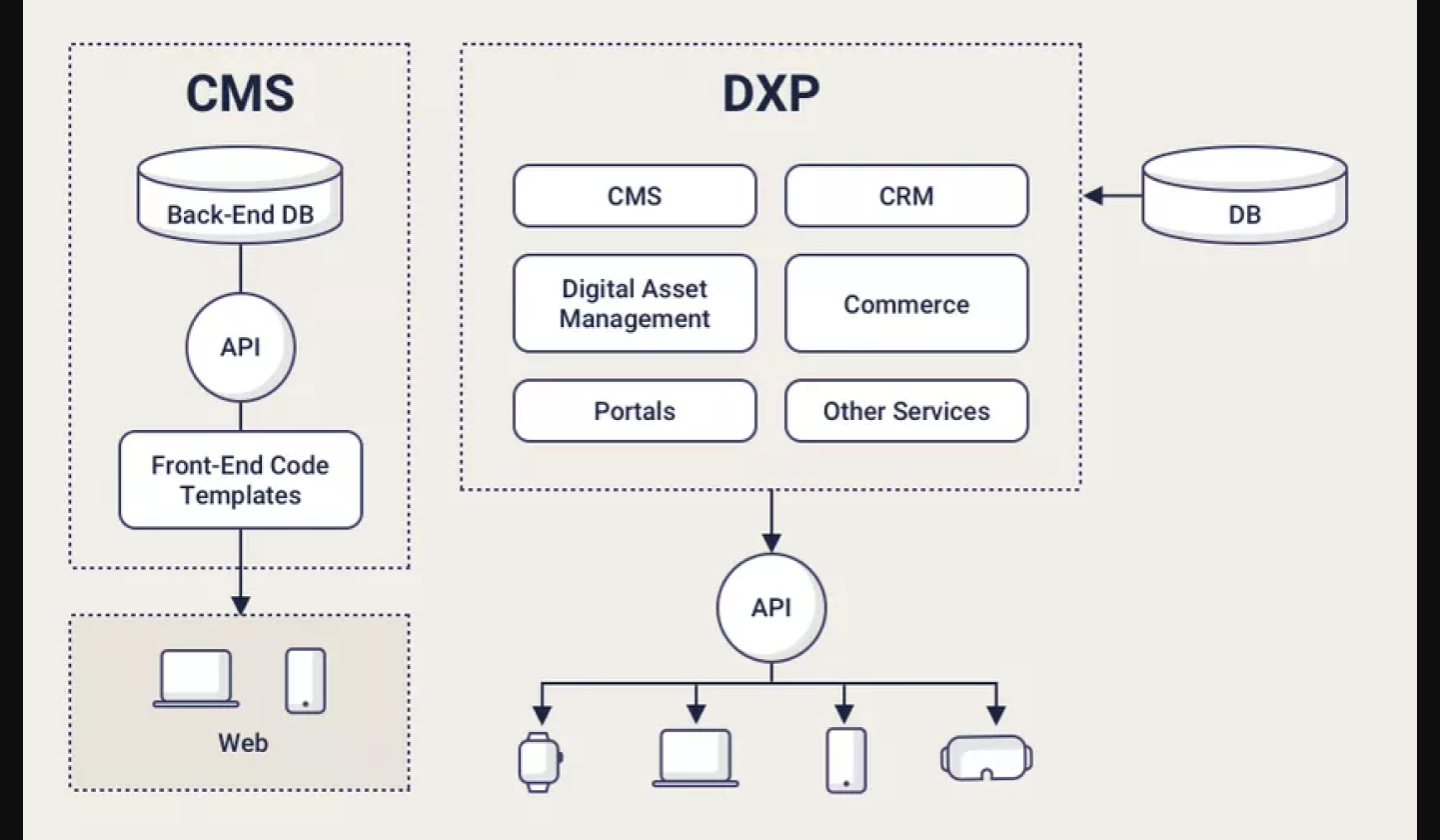
Digital experience platforms explained
You can check more about DXPs here → https://www.storyblok.com/mp/digital-experience-platform
Nuxt 3
Our core application will be a Nuxt 3 frontend website that will connect to external services by using the modules.
Let’s create our application by using the following command:
npx nuxi init dxp-nuxt3-storyblok-algoliaNow, we have the application created. We can proceed to add modules and integrate them with external services.
Algolia
To connect to the Algolia search engine, we will use the official Nuxt 3 module → https://algolia.nuxtjs.org/. I am delighted to use this module as I am a creator and maintainer of it 🙂
Let’s install it by using the following command:
yarn add @nuxtjs/algoliaLet’s create .env file and add these environment variables inside:
ALGOLIA_SEARCH_API_KEY=
ALGOLIA_APP_ID=
ALGOLIA_ADMIN_KEY=
All these variables can be found in the Algolia dashboard below:
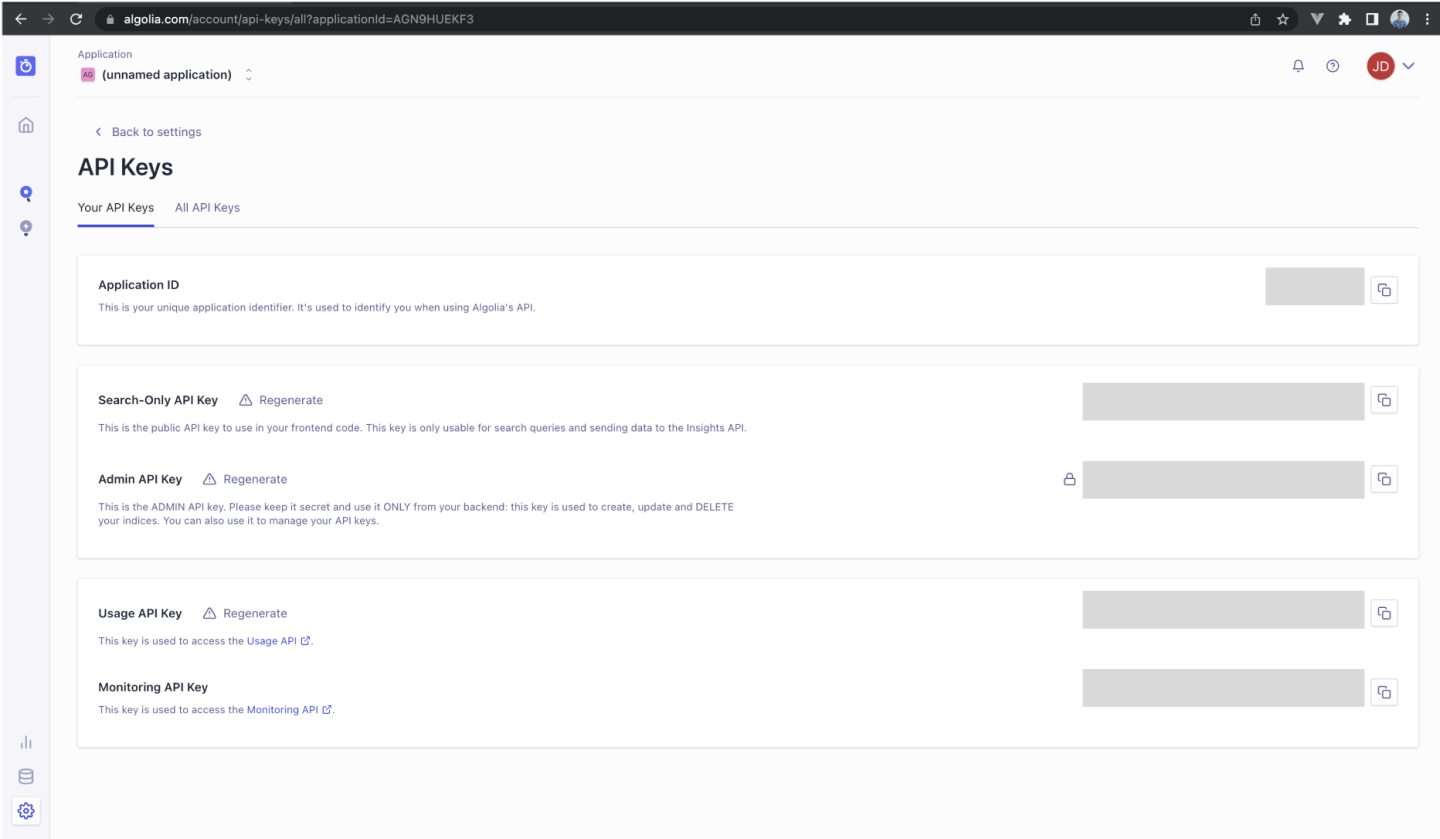
Algolia dashboard
Let’s register the module in our nuxt.config.ts file:
import { defineNuxtConfig } from "nuxt";

// https://v3.nuxtjs.org/api/configuration/nuxt.config
export default defineNuxtConfig({
  modules: [
    [
      "@nuxtjs/algolia",
      {
        apiKey: process.env.ALGOLIA_SEARCH_API_KEY,
        applicationId: process.env.ALGOLIA_APP_ID,
      },
    ],
  ],
});
To test if it works correctly, let’s add the following code to the app.vue component:
<template>
  <div>
    {{ result }}
  </div>
</template>

<script setup lang="ts">
const { result, search } = useAlgoliaSearch('test_index')

onMounted(async () => {
  await search({ query: 'Samsung' })
})
</script>
Let’s stop for a second to explain what is going on here. We are calling a useAlgoliaSearch composable in the script section of this page. From it, we are destructuring the result and search. The result is a computed property that will be populated with the data from Algolia. Search is an async method that will be used to fetch the data from Algolia. Next, we are just calling the search method inside the onMounted lifecycle hook. Finally, we are printing the result in the template.
If the Algolia connection works correctly. Let’s proceed to the Storyblok section.
Storyblok
To connect to the Storyblok, we will be using the official module → https://github.com/storyblok/storyblok-nuxt
Let’s install it by using the following command:
yarn add @storyblok/nuxtNow, let’s register the module in the nuxt.config.ts file:
import { defineNuxtConfig } from "nuxt";

// https://v3.nuxtjs.org/api/configuration/nuxt.config
export default defineNuxtConfig({
  modules: [
		...
		["@storyblok/nuxt", { accessToken: process.env.STORYBLOK_ACCESS_TOKEN }]
  ],
});
Let’s add a new environment variable to the .env file:
ALGOLIA_SEARCH_API_KEY=
ALGOLIA_APP_ID=
ALGOLIA_ADMIN_KEY=
STORYBLOK_ACCESS_TOKEN=
This environment variable can be easily located in the Storyblok Dashboard:
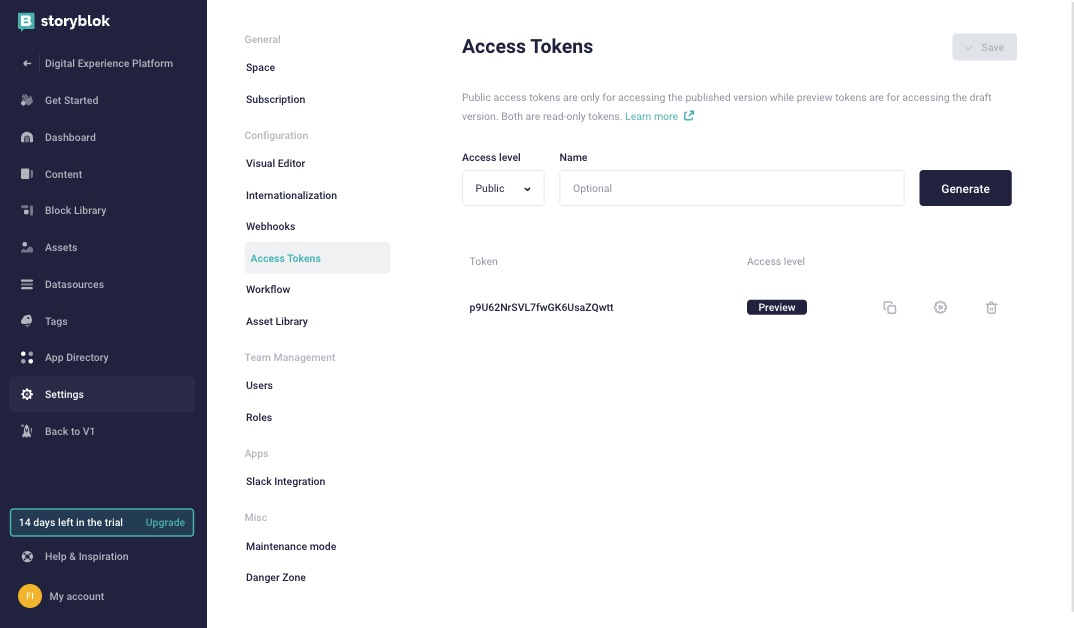
Storyblok access tokens for application
Let’s use the Storyblok composable in our app.vue:
<template>
  <div>
    <h2>Storyblok</h2>
    {{ story }}
    <h2>Algolia</h2>
    {{ result }}
  </div>
</template>

<script setup lang="ts">
const { result, search } = useAlgoliaSearch('test_index')
const story = await useStoryblok("home", { version: "draft" });

onMounted(async () => {
  await search({ query: 'Samsung' })
})
</script>
Let’s stop for a second here to explain all steps. We are calling a useStoryblok composable, and as a parameter, we are passing the name of our content page from which we want to fetch data. Next, we are also passing an options object with the version draft. The story property is ready to be used in the template. With this, we have successfully configured both services and can fetch data from them easily.
TailwindCSS
The application works but does not look good. Let’s add TailwindCSS to it so we can style our images of cats later. For that, we will be using the official TailwindCSS module that you can check out here → https://tailwindcss.nuxtjs.org/
Let’s install it by using the following command:
yarn add --dev @nuxtjs/tailwindcssAlso, don’t forget to register it in the nuxt.config.ts:
import { defineNuxtConfig } from "nuxt";

// https://v3.nuxtjs.org/api/configuration/nuxt.config
export default defineNuxtConfig({
  modules: [
		...
		'@nuxtjs/tailwindcss'
  ],
});
If you need it, you can also generate a tailwind.config.js, but it was not needed in my case. Let’s add some styling to see if it works:
<h2 class="text-xl font-bold">Storyblok</h2>We now can easily style our elements with TailwindCSS.
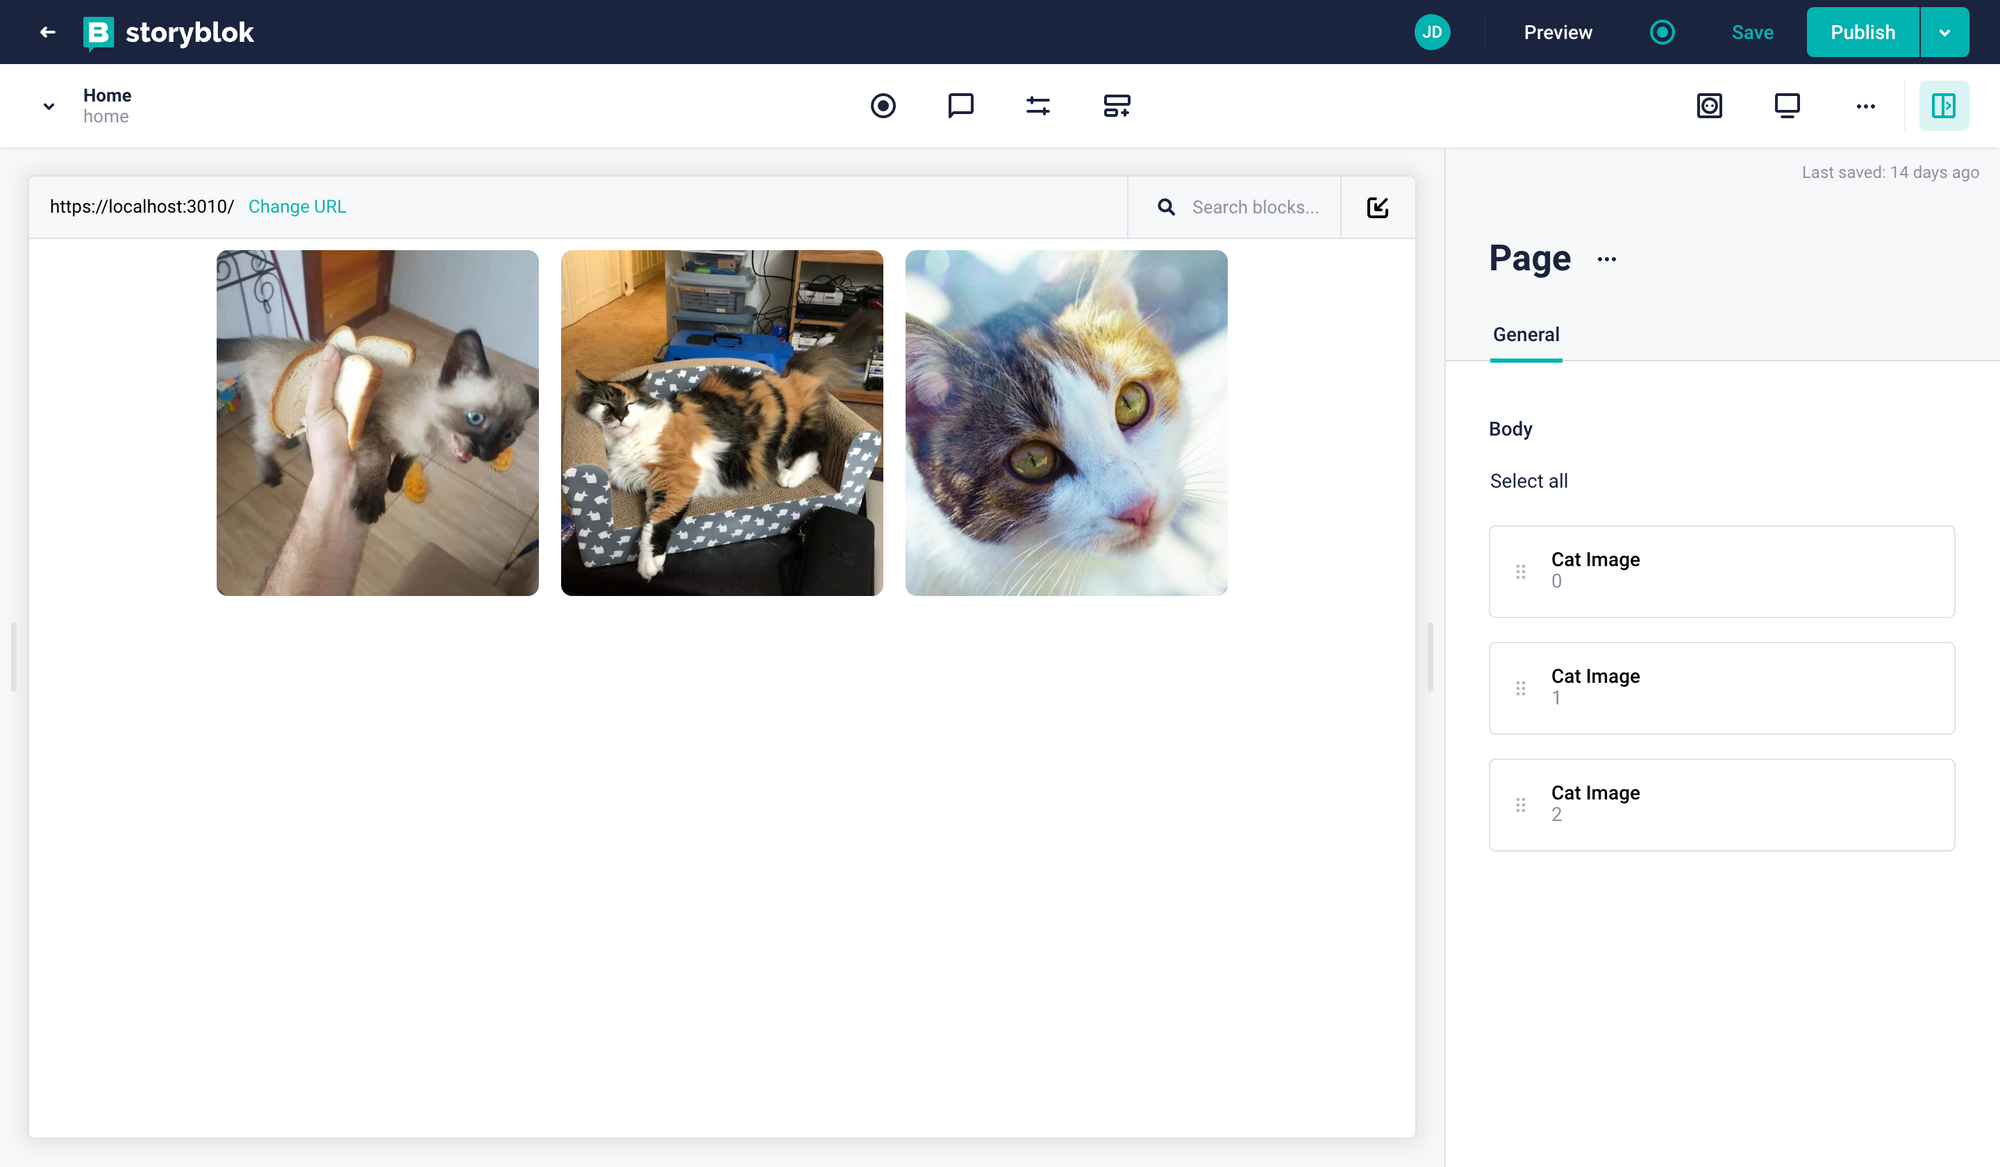
Fetching Cats from Storyblok
Let’s fetch some meaningful data from Storyblok. We will create a new Storyblok component called cat-image with three properties; id {1}, title {2}, and src {3}.
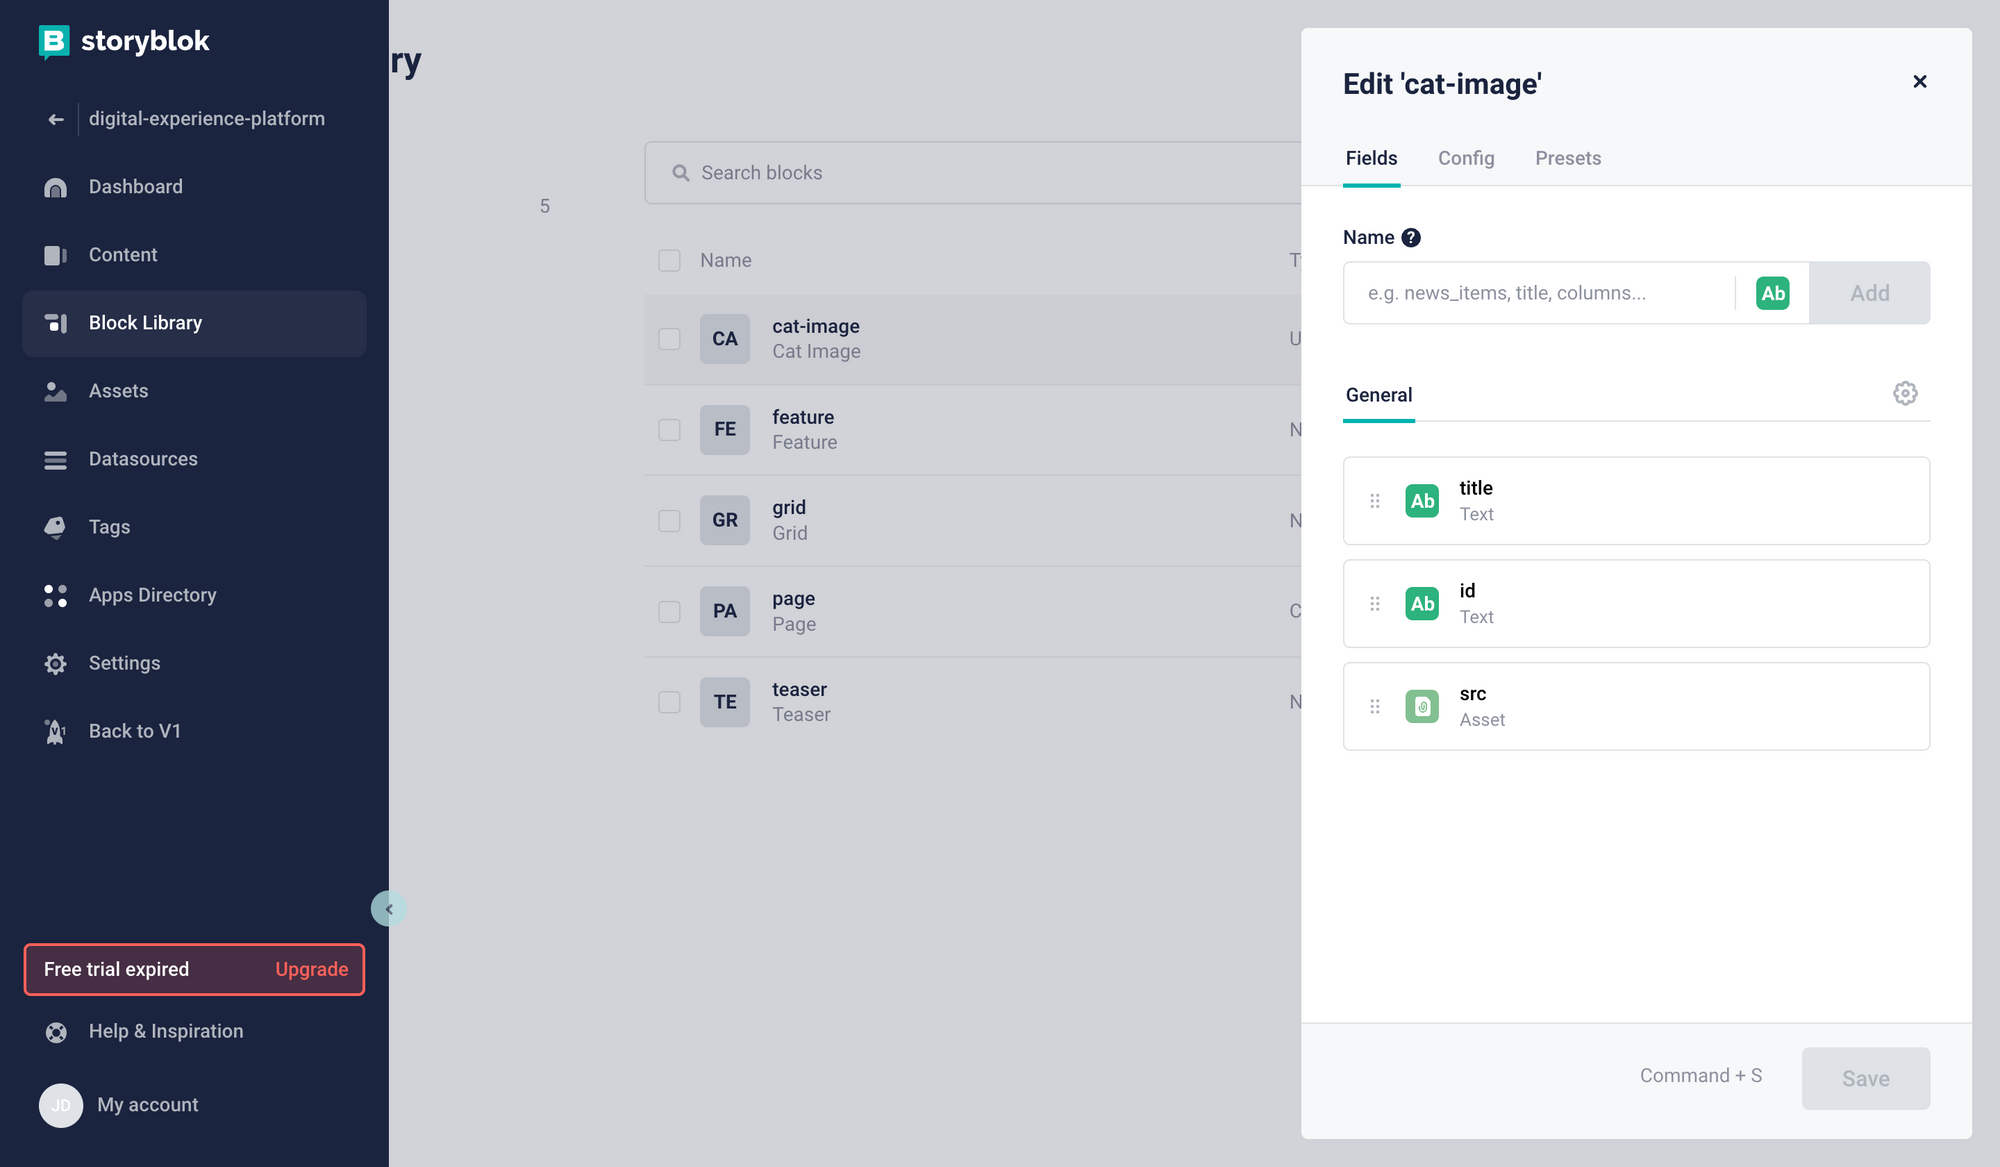
cat-image field with properties
Now, let’s create CatImage.vue component with the following code. It is a simple wrapper for images, and the component itself will have two props; src {1} and title {2}.
<template>
  <div class="flex flex-wrap w-1/3">
    <div class="w-full p-1 md:p-2 relative">
      <img
        class="block object-cover object-center w-full h-full rounded-lg"
        :alt="title"
        :src="src">
    </div>
  </div>
</template>

<script setup lang="ts">
const props = defineProps({
  src: {
    type: String,
    required: true,
  },
  title: {
    type: String,
    required: true,
  }
})
</script>
Furthermore, let’s create a CatImageGallery.vue component that will be a wrapper for our image components. It will accept one prop of images that will be an array of images we want to display.
<template>
  <section class="overflow-hidden text-gray-700 ">
    <div class="container px-5 py-2 mx-auto lg:pt-12 lg:px-32">
      <div class="flex flex-wrap -m-1 md:-m-2">
        <cat-image
          v-for="image in images"
          :key="image.id"
          :title="image.title"
          :src="image.src.filename"
        />
      </div>
    </div>
  </section>
</template>

<script setup lang="ts">
const props = defineProps({
  images: {
    type: Array,
    required: true,
  },
})
</script>
If we did everything correctly, this should be the result in the browser:
cats rendered on Storyblok
We now can easily add new cat images to our website by using Storyblok.
Populating Algolia with content from Storyblok
We can now add and fetch cats from Storyblok CMS. It would be beneficial also to have the same data in Algolia so that we can easily search for these cats when needed.
For that, we will be using the feature of the Algolia module for Nuxt called indexer you can check out here → https://algolia.nuxtjs.org/advanced/er
First, let’s modify the Algolia configuration in nuxt.config.ts like the following:
import { defineNuxtConfig } from "nuxt";

// https://v3.nuxtjs.org/api/configuration/nuxt.config
export default defineNuxtConfig({
  modules: [
		...
    [
      "@nuxtjs/algolia",
      {
        apiKey: process.env.ALGOLIA_SEARCH_API_KEY,
        applicationId: process.env.ALGOLIA_APP_ID,
        indexer: {
          storyblok: {
            secret: process.env.INDEXER_SECRET,
            algoliaAdminApiKey: process.env.ALGOLIA_ADMIN_KEY,
            indexName: process.env.ALGOLIA_INDEX_NAME,
            accessToken: process.env.STORYBLOK_ACCESS_TOKEN
          }
        }
      },
    ],
  ],
});
Let’s add the remaining environment variables:
ALGOLIA_SEARCH_API_KEY=
ALGOLIA_APP_ID=
ALGOLIA_ADMIN_KEY=
STORYBLOK_ACCESS_TOKEN=
INDEXER_SECRET=
ALGOLIA_INDEX_NAME=
INDEXER_SECRET will be used to check if you can access the endpoint where the indexer is triggered.
ALGOLIA_INDEX_NAME will be used to populate that index with the indexer.
Next, let’s try to add the previous code related to Algolia, and let’s see what the results fetched from Algolia this time:
<template>
  <div>
    <h1 class="text-xl">Cats from Storyblok</h1>
    <cat-image-gallery :images="story.content.body"/>
    <h2 class="text-xl">Cats from Algolia</h2>
    <p>{{ result }}</p>
  </div>
</template>

<script setup lang="ts">
const { result, search } = useAlgoliaSearch('dxp')
const story = await useStoryblok("home", { version: "draft" });

onMounted(async () => {
  await search({ query: '' })
})
</script>
At this point, the result should be empty as our index was not yet populated with data from Storyblok.

Storyblok Algolia setup
To populate it, we can access the api/indexer endpoint. If we go there directly, we will see a message that we are not allowed to access this resource. We want to secure this endpoint so that the indexing can be triggered only when the secret is passed. In the browser, you should see: “You are not allowed to access this resource”
After passing the correct secret in the url, indexing was successfully triggered, and the result in the browser is as follows: “Algolia indexed with the data from Storyblok!”
As a result, in our console, we can see a message that the index was populated with three entries (three cat images from Storyblok) with a message: “Index stored with 3 Entries”
This is an example of Server Side Rendered application, but the same result can also be done in Statically Generated Sites using serverless functions.
This can also be confirmed in the Algolia dashboard like the following:
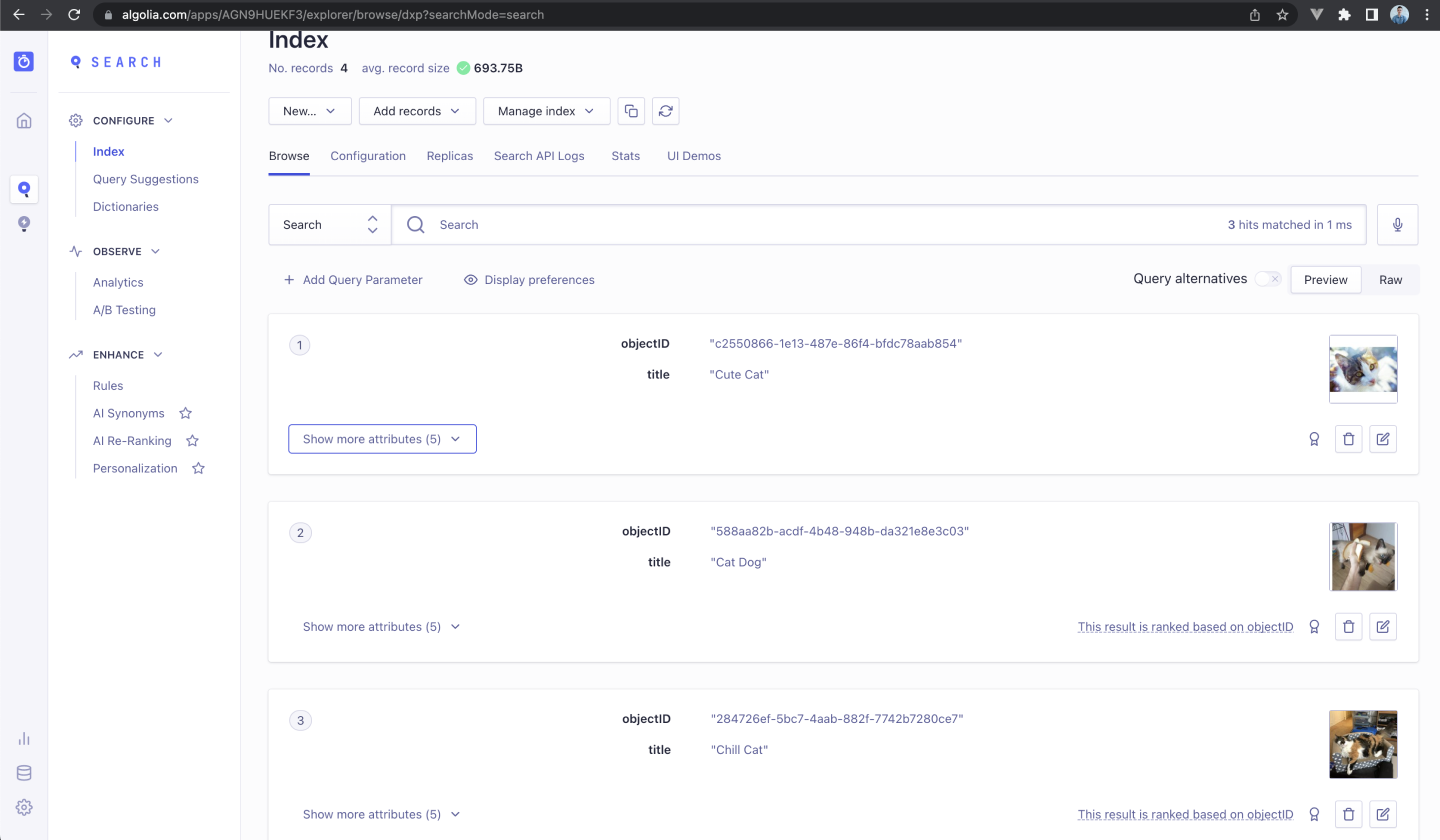
Algolia user dashboard
Our query in the search method is initially set to an empty string so that we will fetch all cats results.
await search({ query: '' })The result can be observed in the browser:
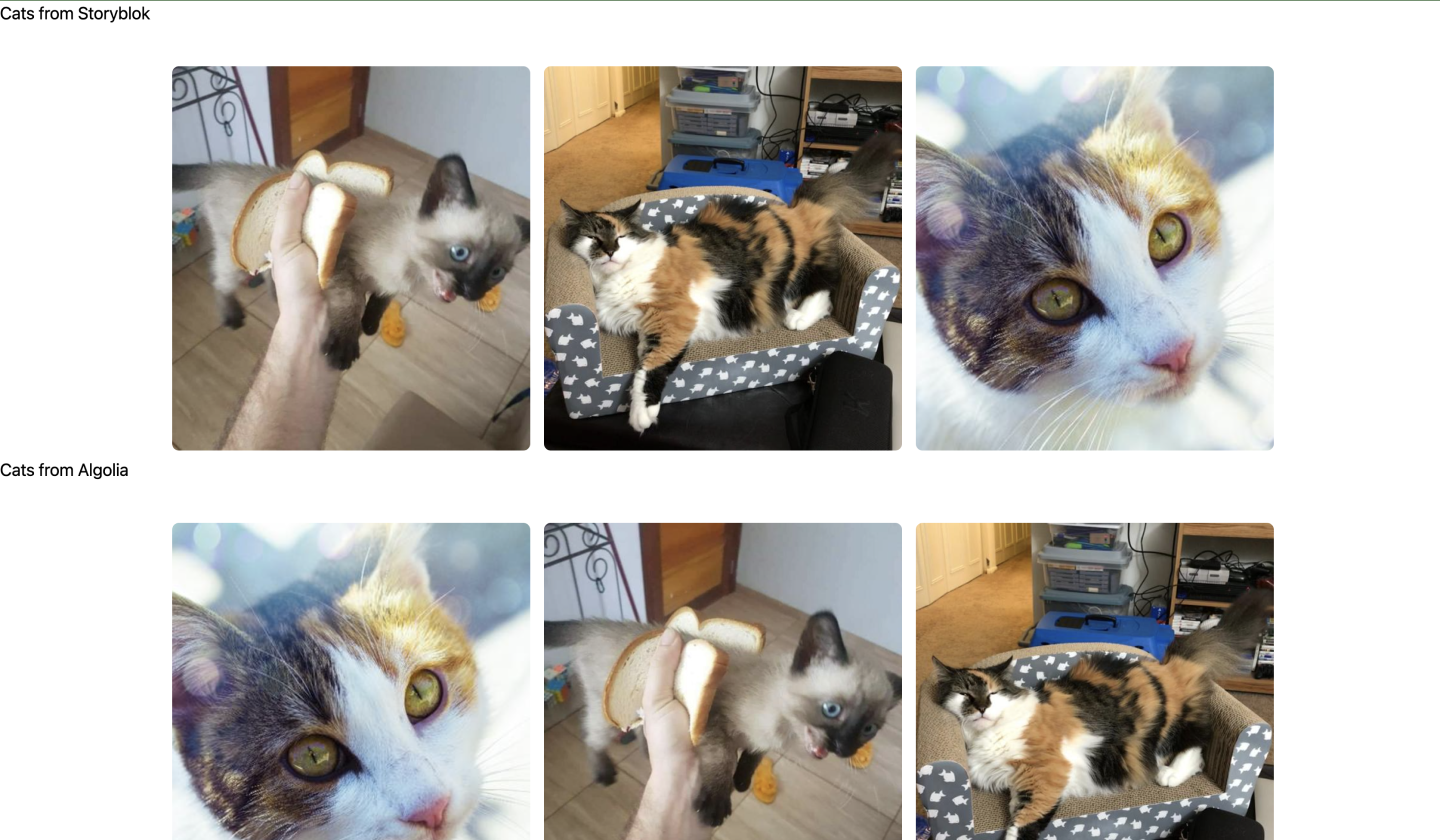
Storyblok Algolia digital experience platform
However, if we change it to some text (like chill as one of the cat objects is named chill-cat), we will get only one result.
await search({ query: 'chill' })That can be observed below:
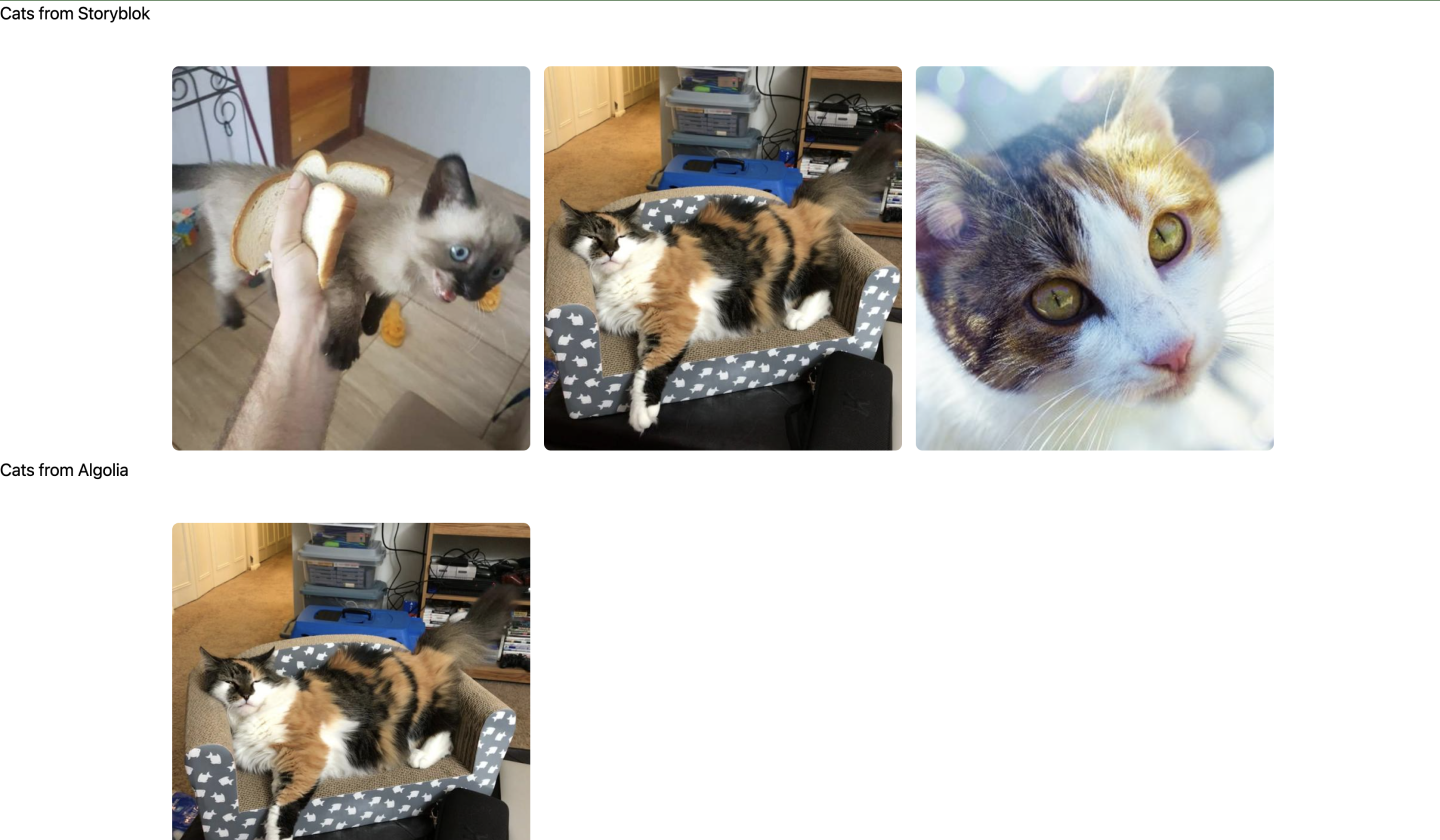
Chilled cats from Storyblok Algolia DXP
Summary
Nicely done! You have just created an application powered by Storyblok CMS content that can be easily searchable by Algolia. If you get lost at some point, visit the code repository here → https://github.com/Baroshem/dxp-nuxt3-storyblok-algolia-tailwindcss.
