Manage Multilingual Content in Storyblok and Remix
Storyblok is the first headless CMS that works for developers & marketers alike.
Let’s see how to add and manage multiple languages on our website. We will add internationalization to our blog and develop a simple language switcher in our header. For the backend, we will learn how to manage multiple languages in our Storyblok space and how to get the translations from our codebase.
Before starting with the practical part, it is important to know that Storyblok has three different approaches to implementing internationalization. In this tutorial, we will be using Field-Level translation. It will make sense to use one instead of the other, depending on your requirements. You can read all about the different approaches in our Internationalization guide.
If you’re in a hurry, look at our live demo in Netlify! Alternatively, you can explore or fork the code from the Remix Ultimate Tutorial GitHub Repository.
Requirements
This tutorial is part 6 of the Ultimate Tutorial Series for Remix. We recommend that you follow the previous tutorials before starting this one.
We will use the code from the previous tutorial as a starting point. You can find it here.
Adding a language in Storyblok
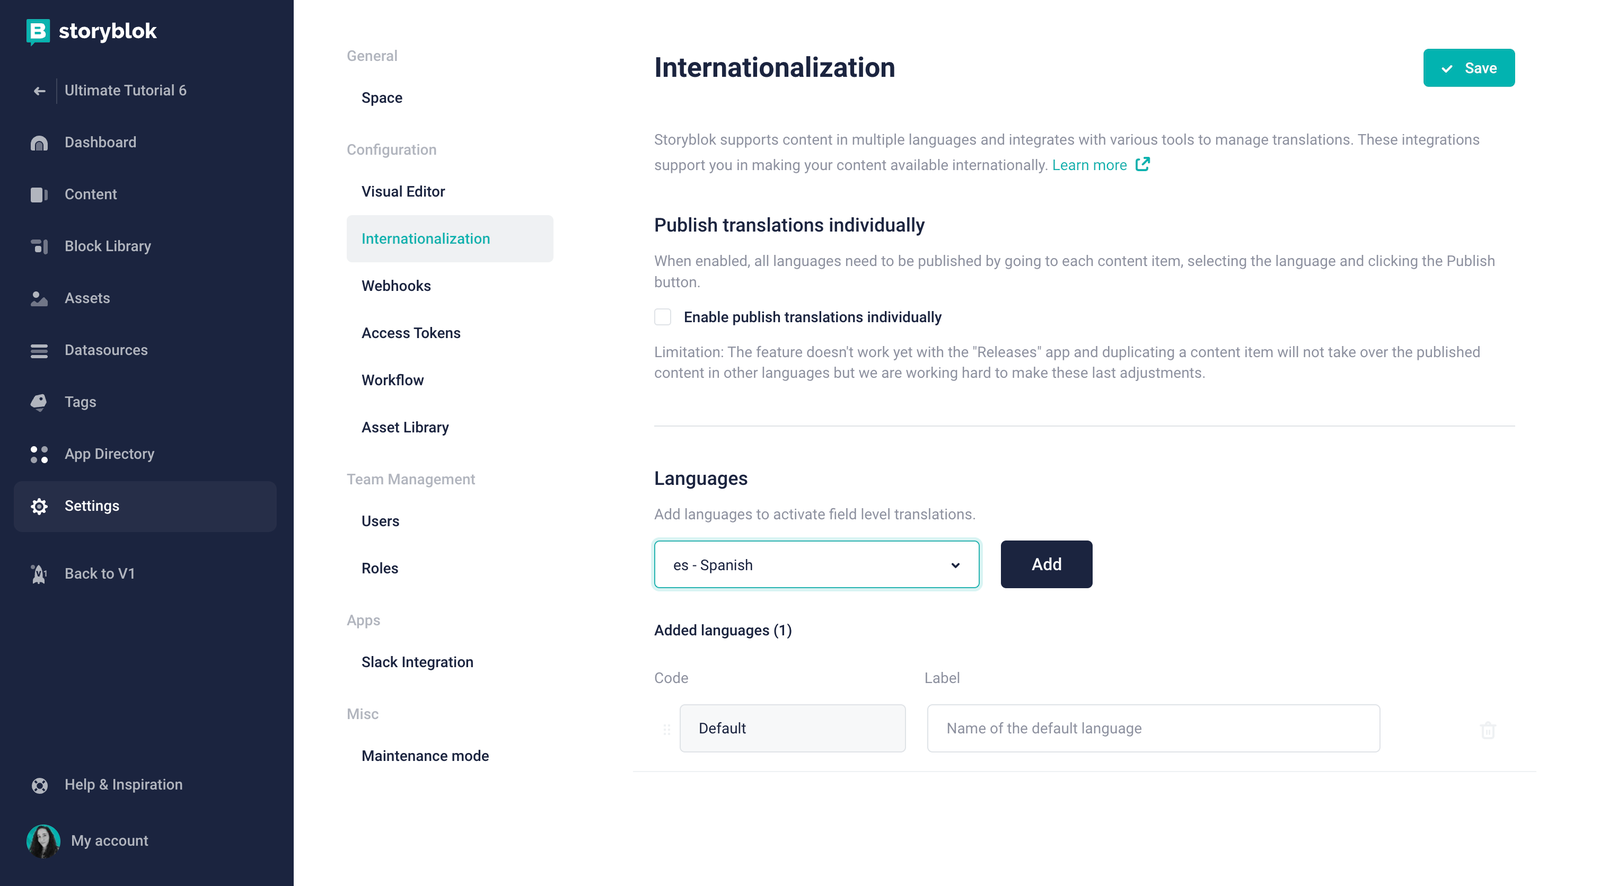
First, let's add a new language to our Storyblok space. Go to Settings {1} and click on Internationalization {2}. Here, you will find the configuration for field-level translation (opens in a new window).
Although you can select any language you want, for the purpose of this tutorial we will use Spanish as the second language.
Let's select the Spanish language from the drop-down {3} and hit the Add button {4}. Once the Spanish language is added, save the changes by clicking on the Save button {5}.
Adding a language in the Storyblok space
If we go to the Content section and open any Story, we will see a language drop-down in the action bar {1}.
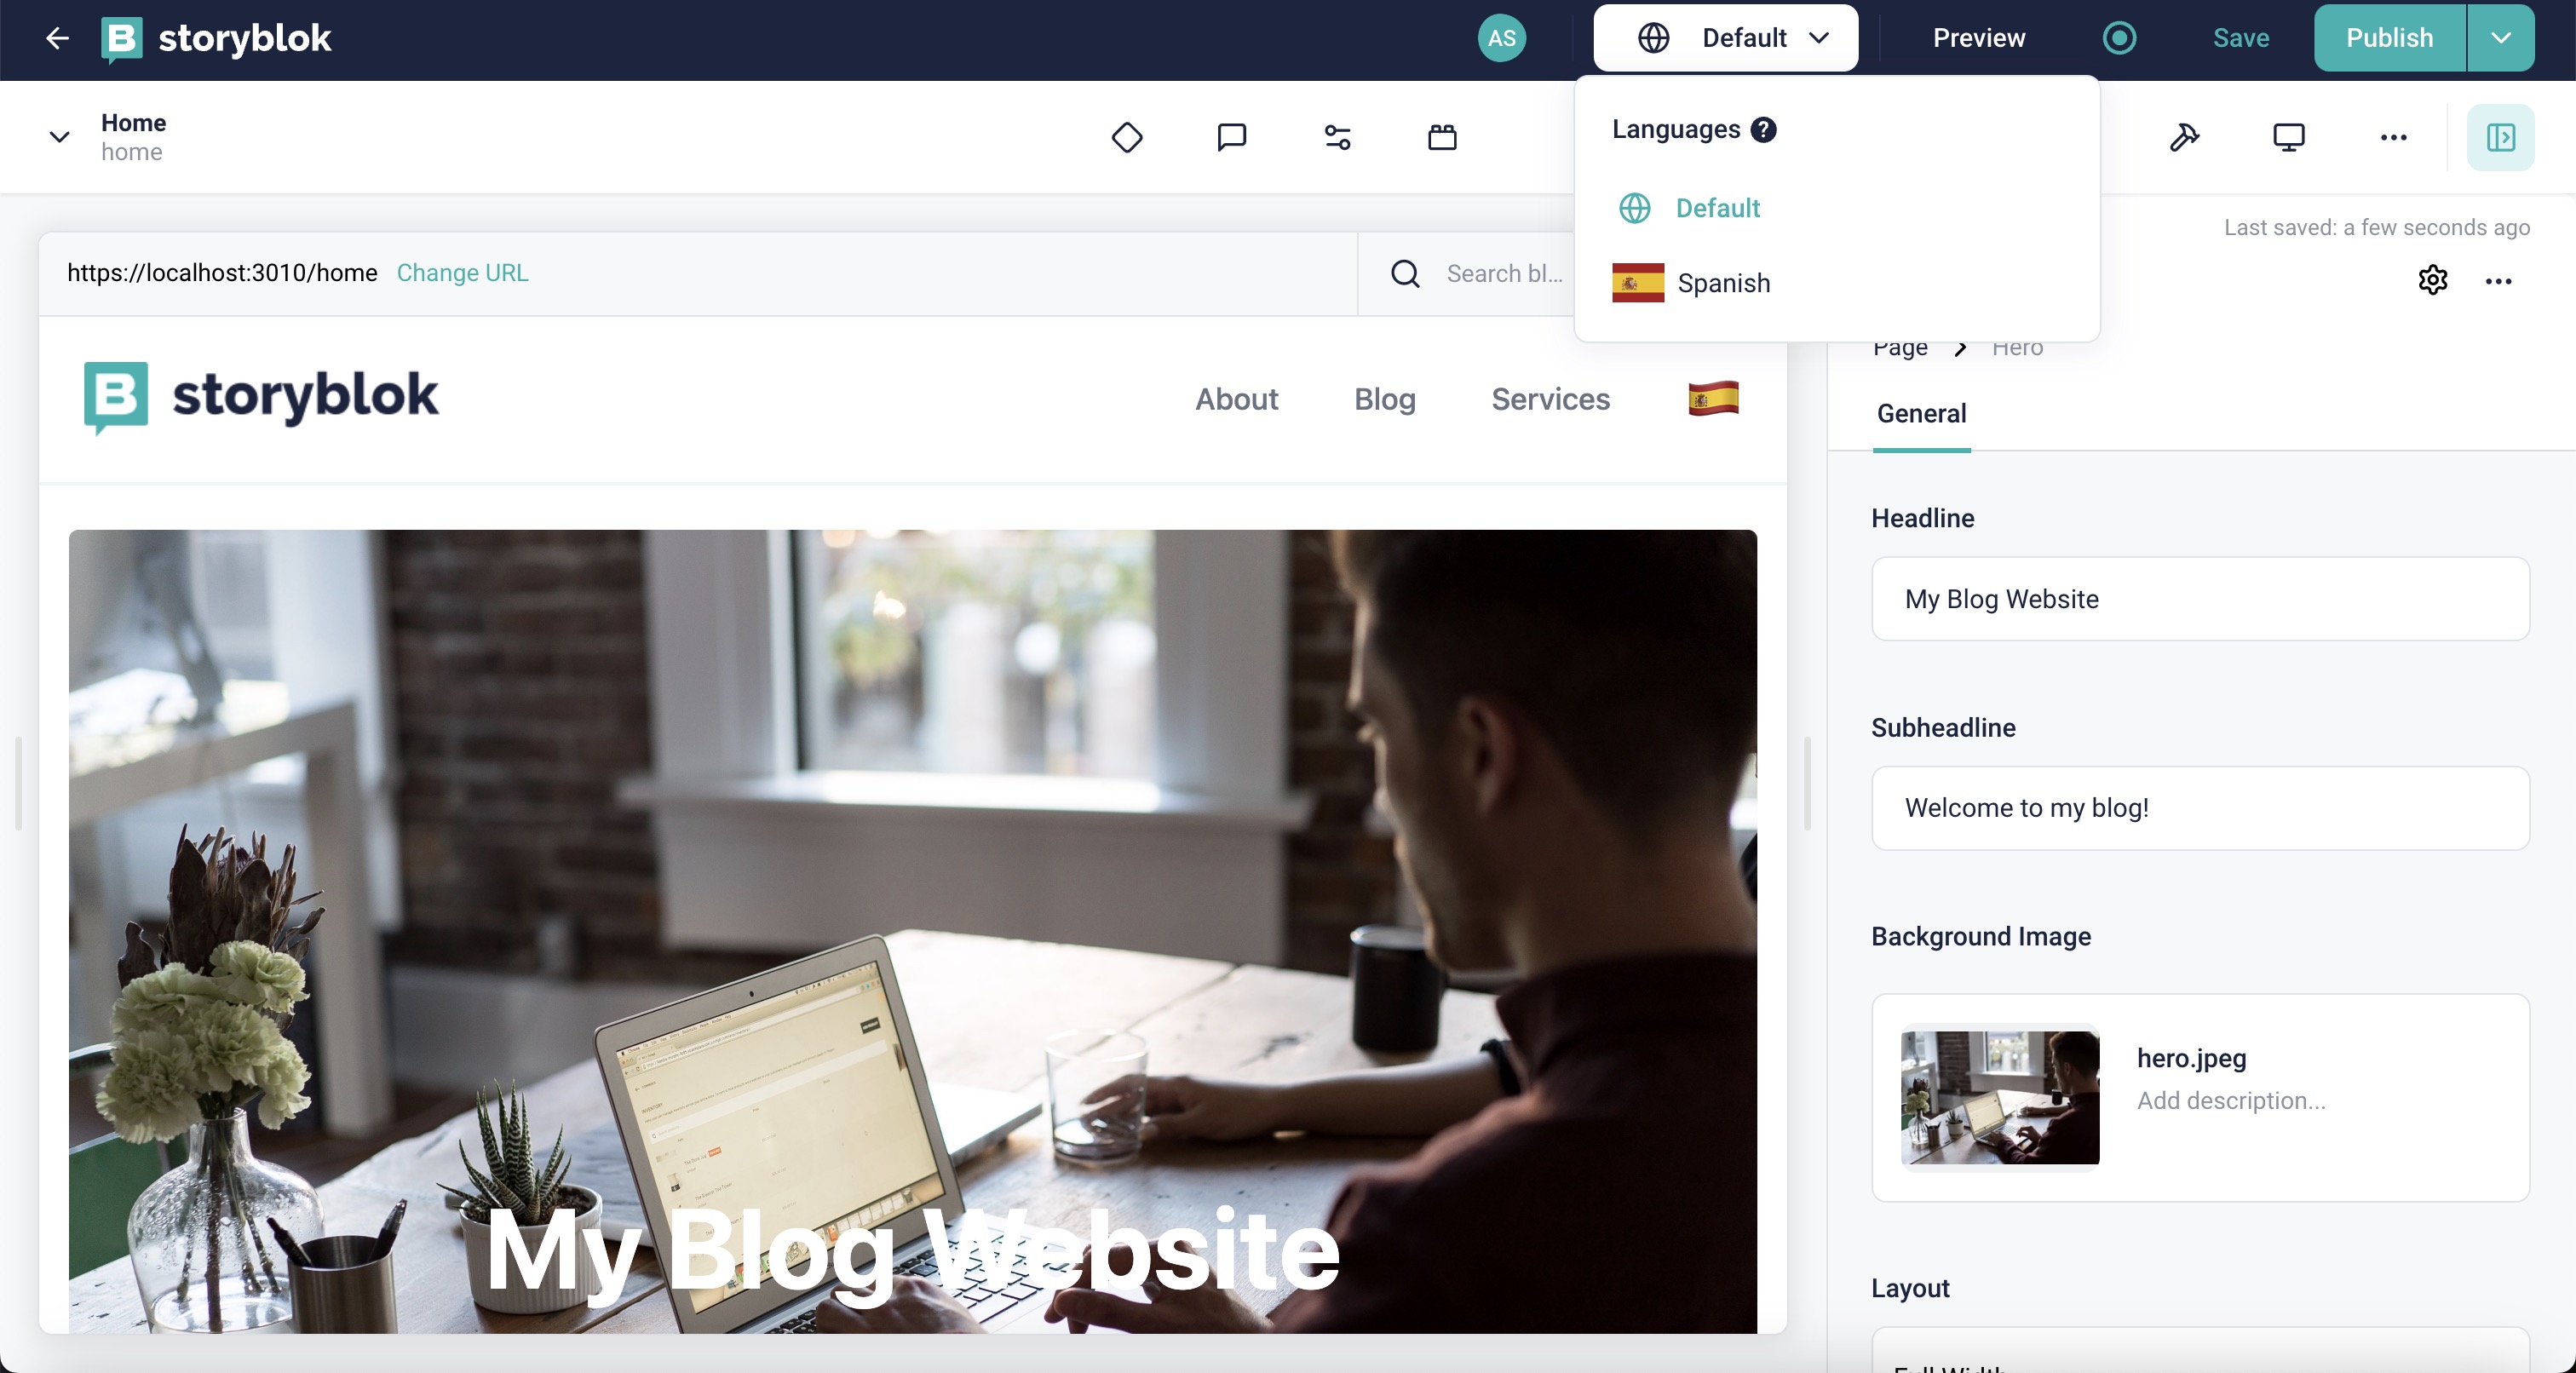
Switching the language from the drop-down won't work because we haven't translated anything yet.
Since we’re using the field-level translation approach, we need to make the fields translatable in our component schema to allow the translation of our content. Let's edit the title field of the article Content Type and mark it as Translatable {1}. Hit the Save & Back to Fields button after changing the field {2}.

For the home page, as it has a real path set to it, it won't change the path when the language is switched from the dropdown. It will only work fine in the browser. You can use the Advanced paths app to configure the preview url programmatically for the visual editor.
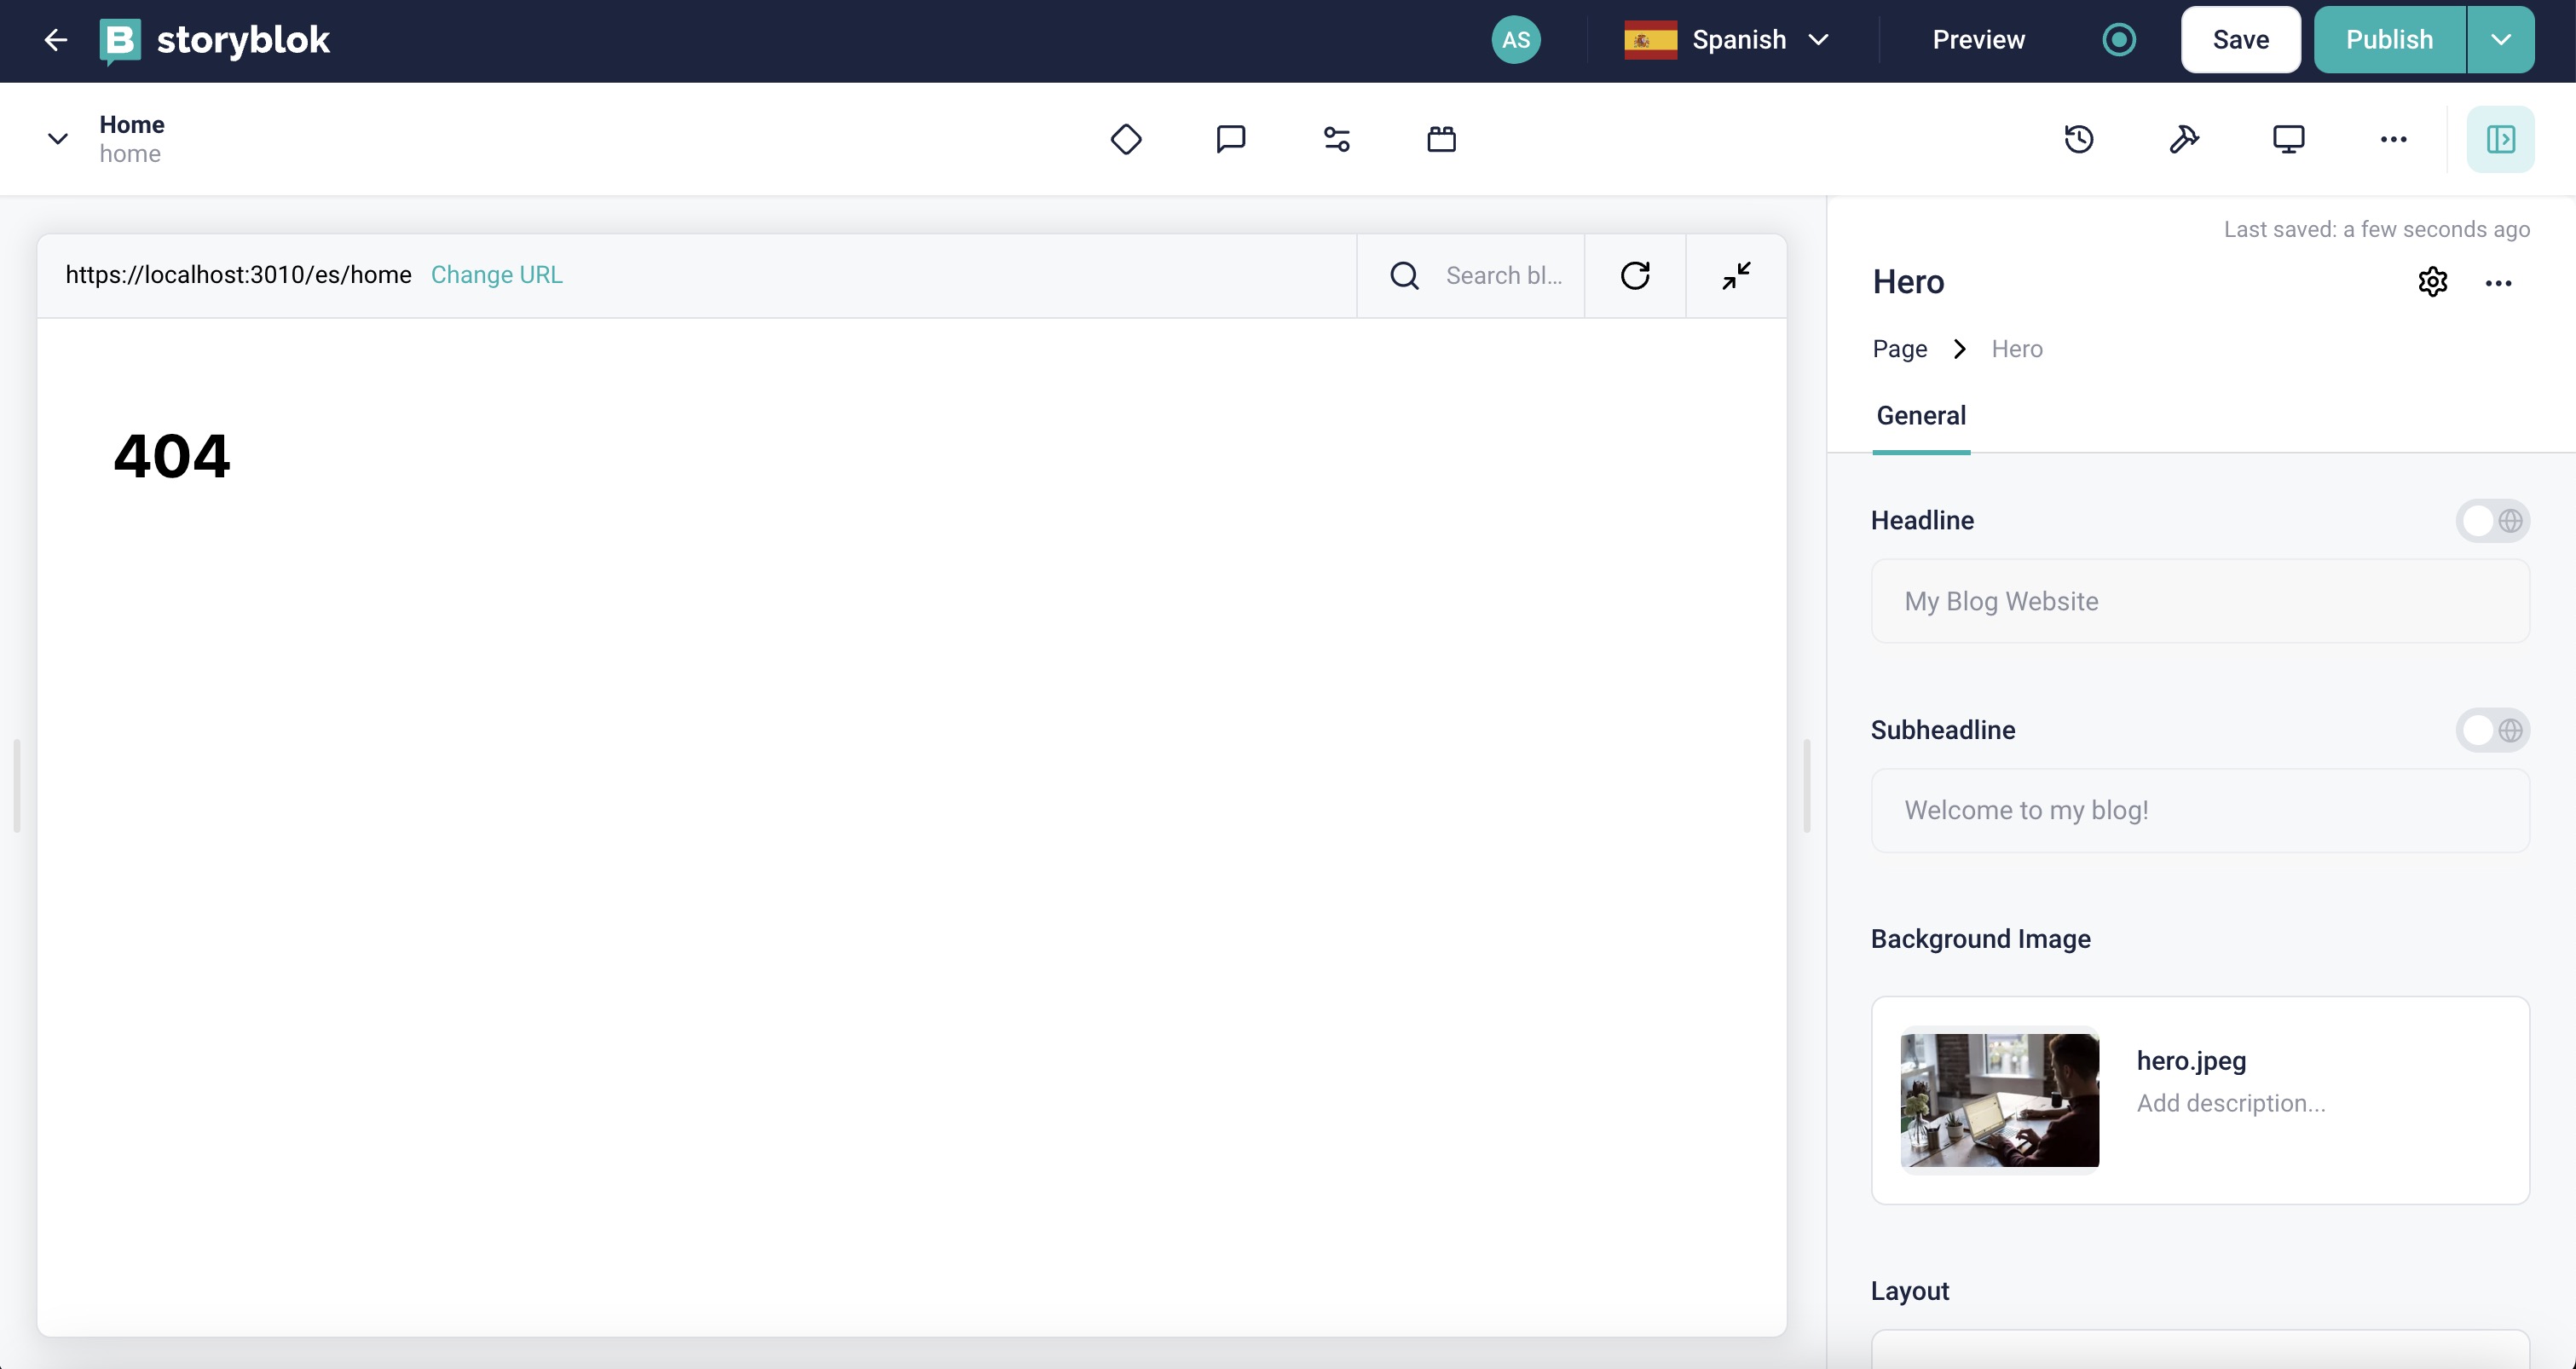
If we change the language now, we will get a 404 error in Remix. This is because we have not generated these new routes.
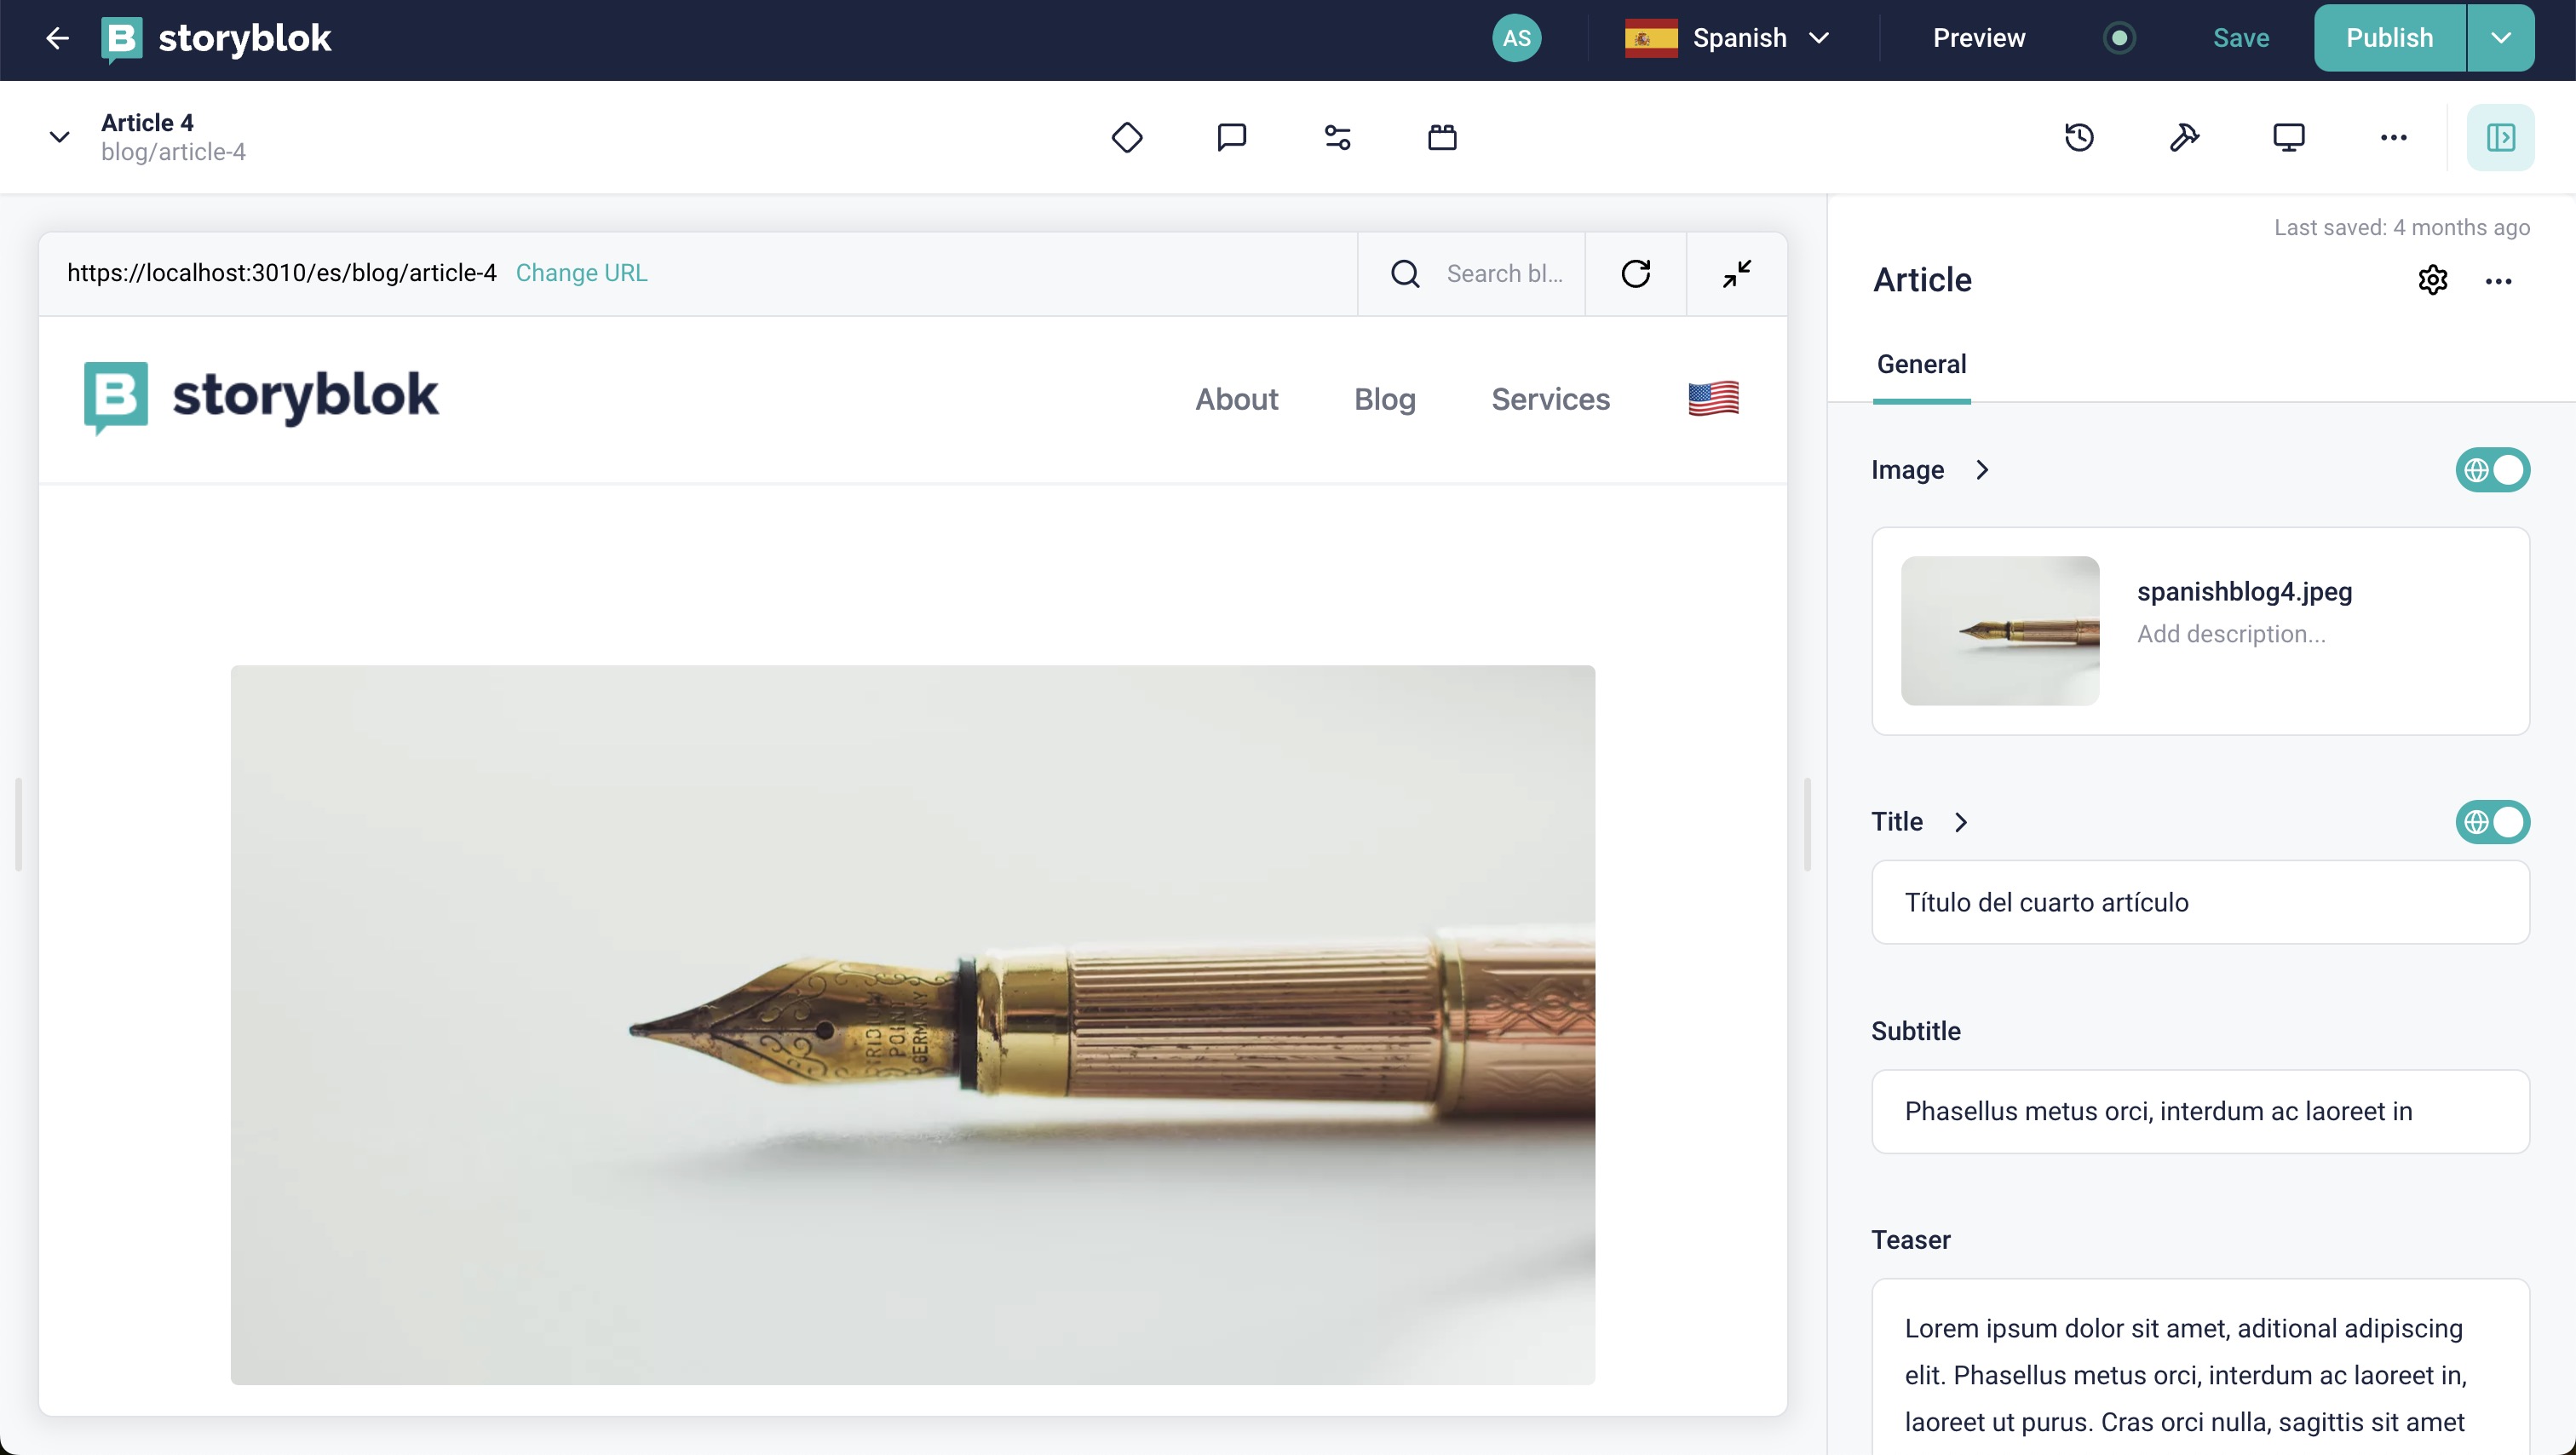
Looking now at the translatable field, you will notice a change in the UI. You will see that the field is non-editable and contains the default language's content {1}. If we want to translate it, we must click on the Translate checkbox {2}.
By activating it, we can edit the field and add the content in Spanish. But not only that. As we can see in the screenshot below, when we activate the translate option, an arrow button {1} appears. If we expand it, we will see the default language content {2}, a button to add the default language content in the new language {3}, and the option to go to Google Translate {4}.
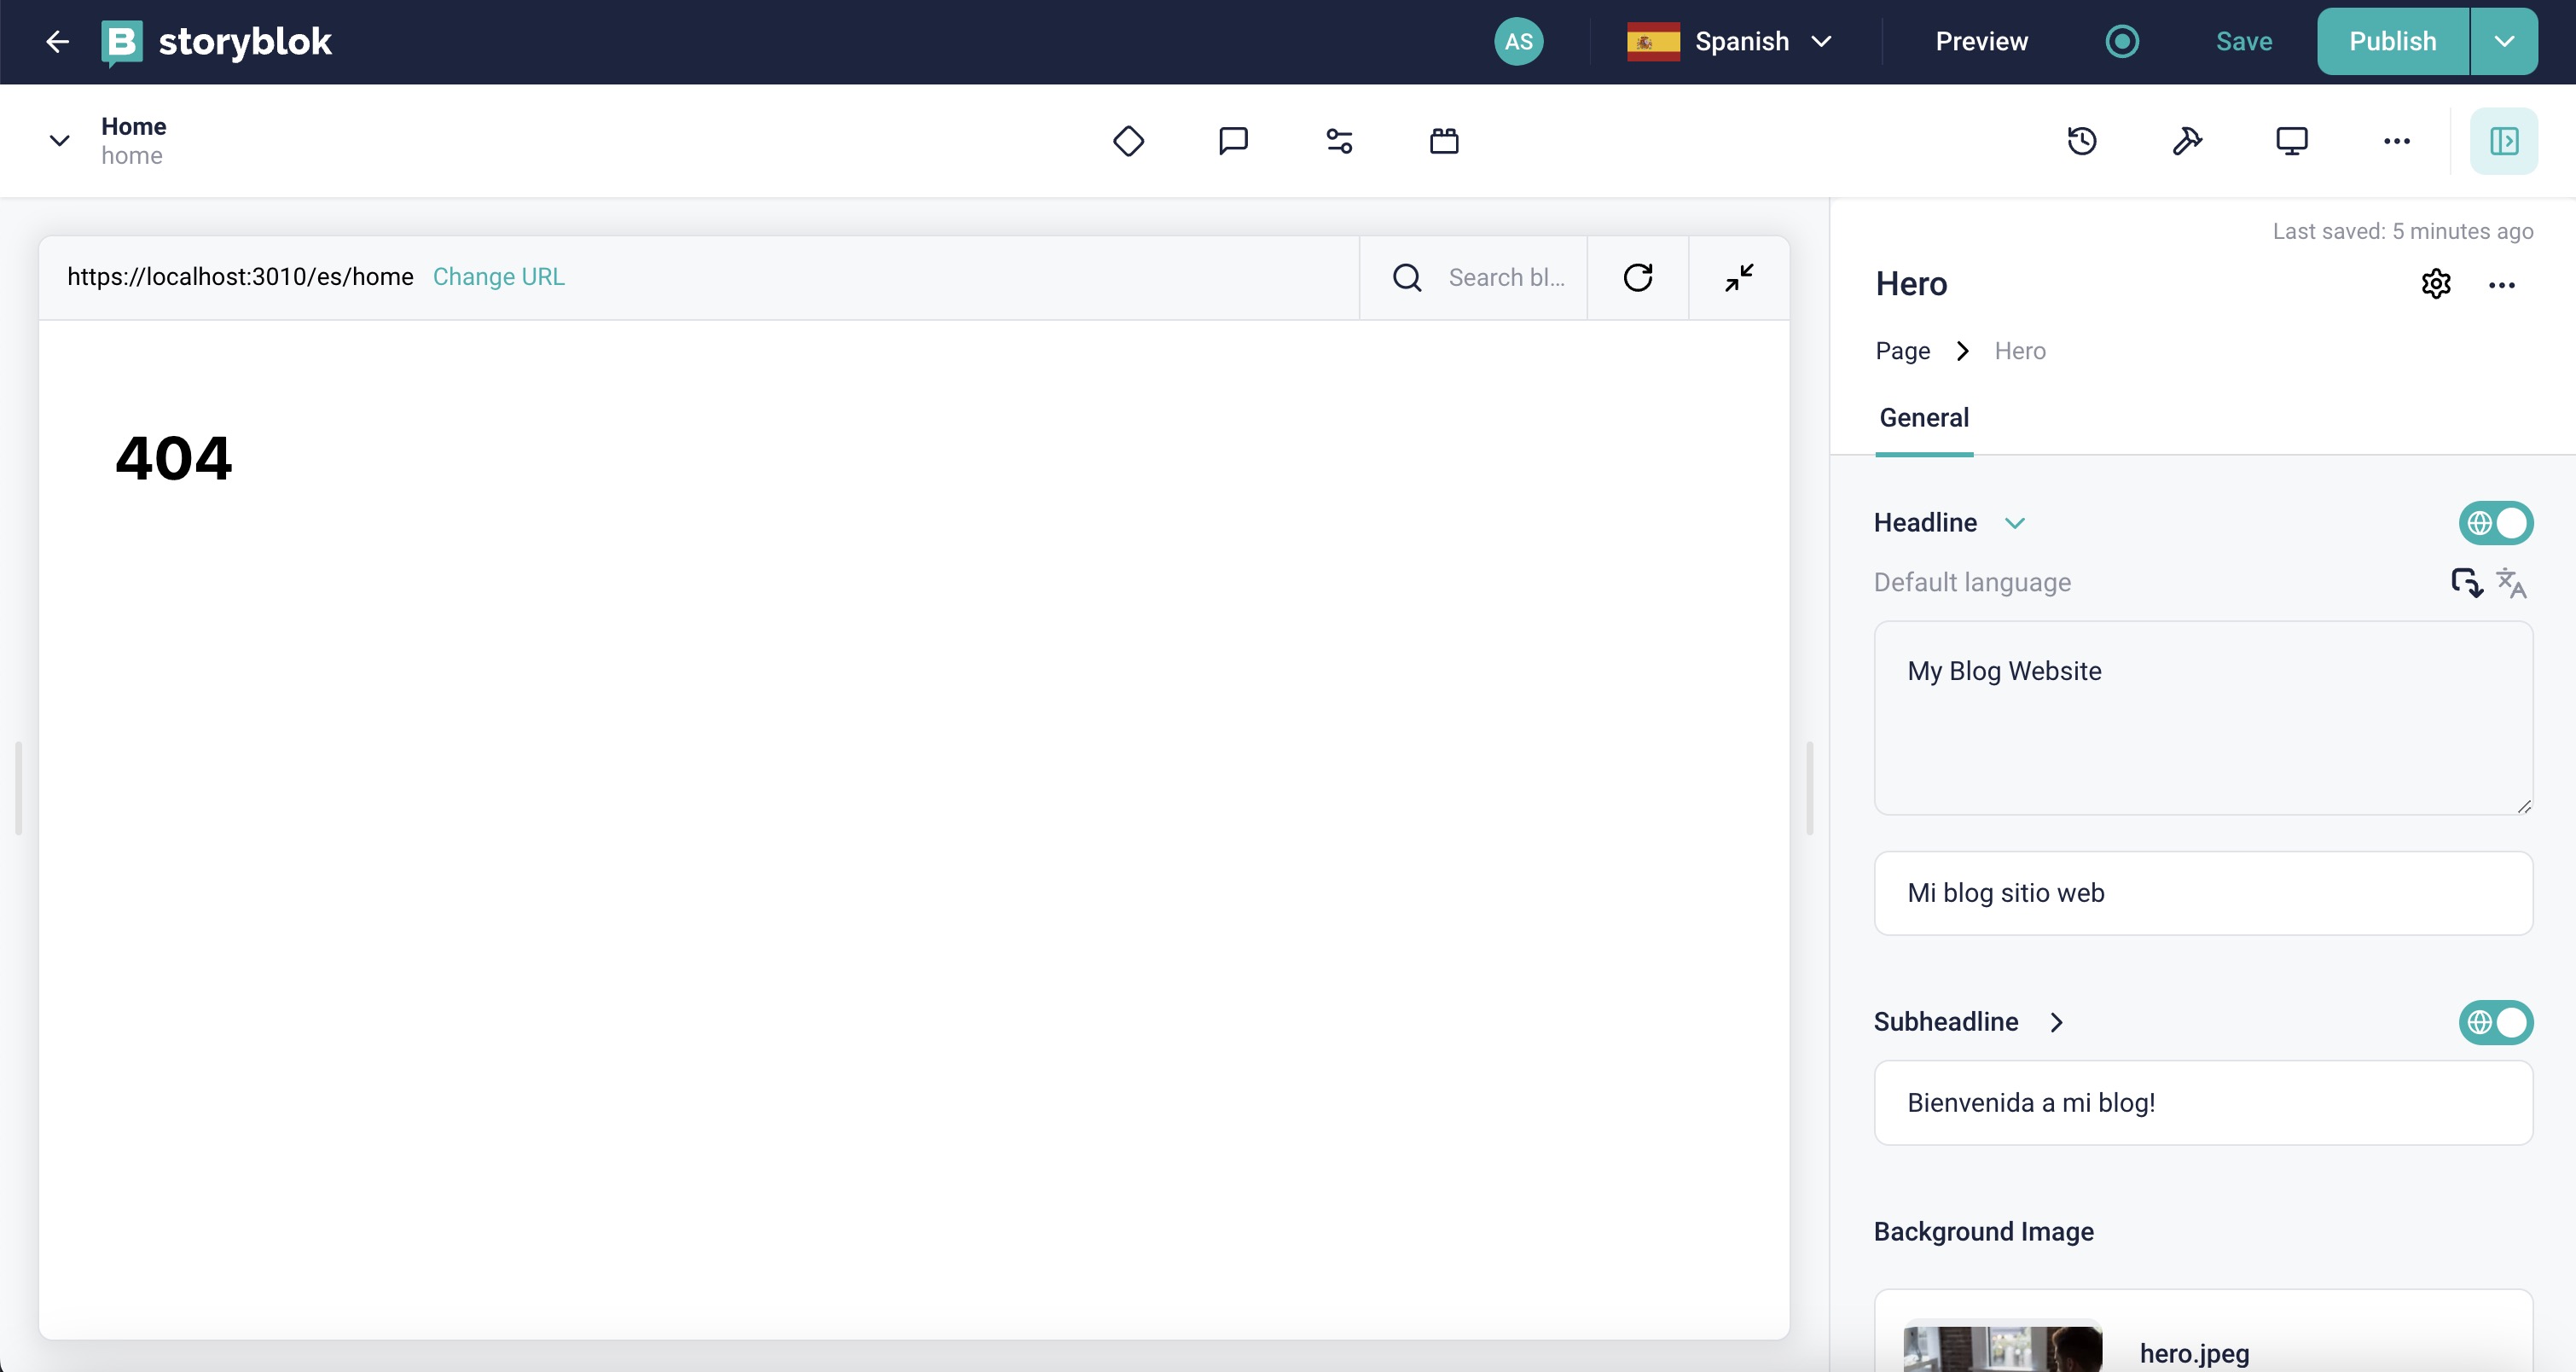
Let's hit the Publish button with the translated content and configure our code in the frontend to make it work.
Implementing i18n in Remix
First, we'll define a languages variable within utils/langs.jsx. This will make it accessible globally across our application. Next, we'll populate this variable with the list of languages we intend to support.
let languages = ["en", "es"];Open routes/$.jsx and update the loader function to generate all new language pages.
//...
import { languages } from "../utils/langs";

import {
  getStoryblokApi,
  useStoryblokState,
  StoryblokComponent,
} from "@storyblok/react";

export default function Page() {
  let { story } = useLoaderData();
  story = useStoryblokState(story, {
    resolveRelations: ["popular-articles.articles"],
  });

  return (
    <>
      <StoryblokComponent blok={story.content} />
    </>
  );
}

export const loader = async ({ params, request}) => {
  let slug = params["*"] ?? "home";
  let blogSlug = params["*"] === "blog/" ? "blog/home" : null;

  // Extract the language from the URL
  let url = new URL(request.url);
  let pathParts = url.pathname.split("/");
  let language = pathParts[1];

  // If the language is not one of the supported languages, it's 'en' and the first part of the URL is part of the slug

  if (!languages.includes(language)) {
    language = "en";
  } else {
    // Remove the language part from the slug
    if (pathParts[0] === "") {
      pathParts.shift(); // Remove the first empty string from the array
    }
    pathParts.shift(); // Remove the language part from the array
  }

  slug = pathParts.join("/") || slug;
  slug = slug === "/" || slug === language ? "home" : slug;

  slug = blogSlug ? blogSlug : slug;

  let sbParams = {
    version: "draft",
    resolve_relations: ["popular-articles.articles"],
    language,
  };

  const { data } = await getStoryblokApi()
    .get(`cdn/stories/${slug}`, sbParams)
    .catch((e) => {
      console.log("e", e);
      return { data: null };
    });

  if (!data) {
    throw new Response("Not Found", { status: 404 });
  }

  let { data: articles } = await getStoryblokApi().get(`cdn/stories`, {
    version: "draft", // or 'published'
    starts_with: "blog/",
    language,
    is_startpage: 0,
  });
  return json({ story: data?.story, articles: articles?.stories });
};
Okay, we did quite a bit of refactoring, so let's understand what's happening. Here's a step-by-step breakdown of how we handle multilingual content in the loader function:
- Determine the Current Slug: We first get the current path or slug from the URL parameters. If no specific path is provided, we default to "
home." - Extract the Language from the URL: We analyze the URL to extract the language code. This involves splitting the URL path and checking the first segment for a language code. If the segment matches one of our supported languages, we use it; otherwise, we default to English (
en). - Adjust the Slug for Language: If a valid language code is found in the URL, we remove it from the slug. This ensures that the slug accurately represents the resource path without including the language code.
- Fetch Content Based on Language: With the language determined, we must also pass it
languageas a parameter in thestoryblokApi.getfunction. This will now fetch the proper data for each page.
We dynamically manage languages in our Remix application by parsing the URL and using conditional logic.
By doing this, we can see our article pages now showing correct data based on the language, and we are not seeing 404 pages.
Translating the AllArticles Component
If we look at our Blog home story, it does not work properly.
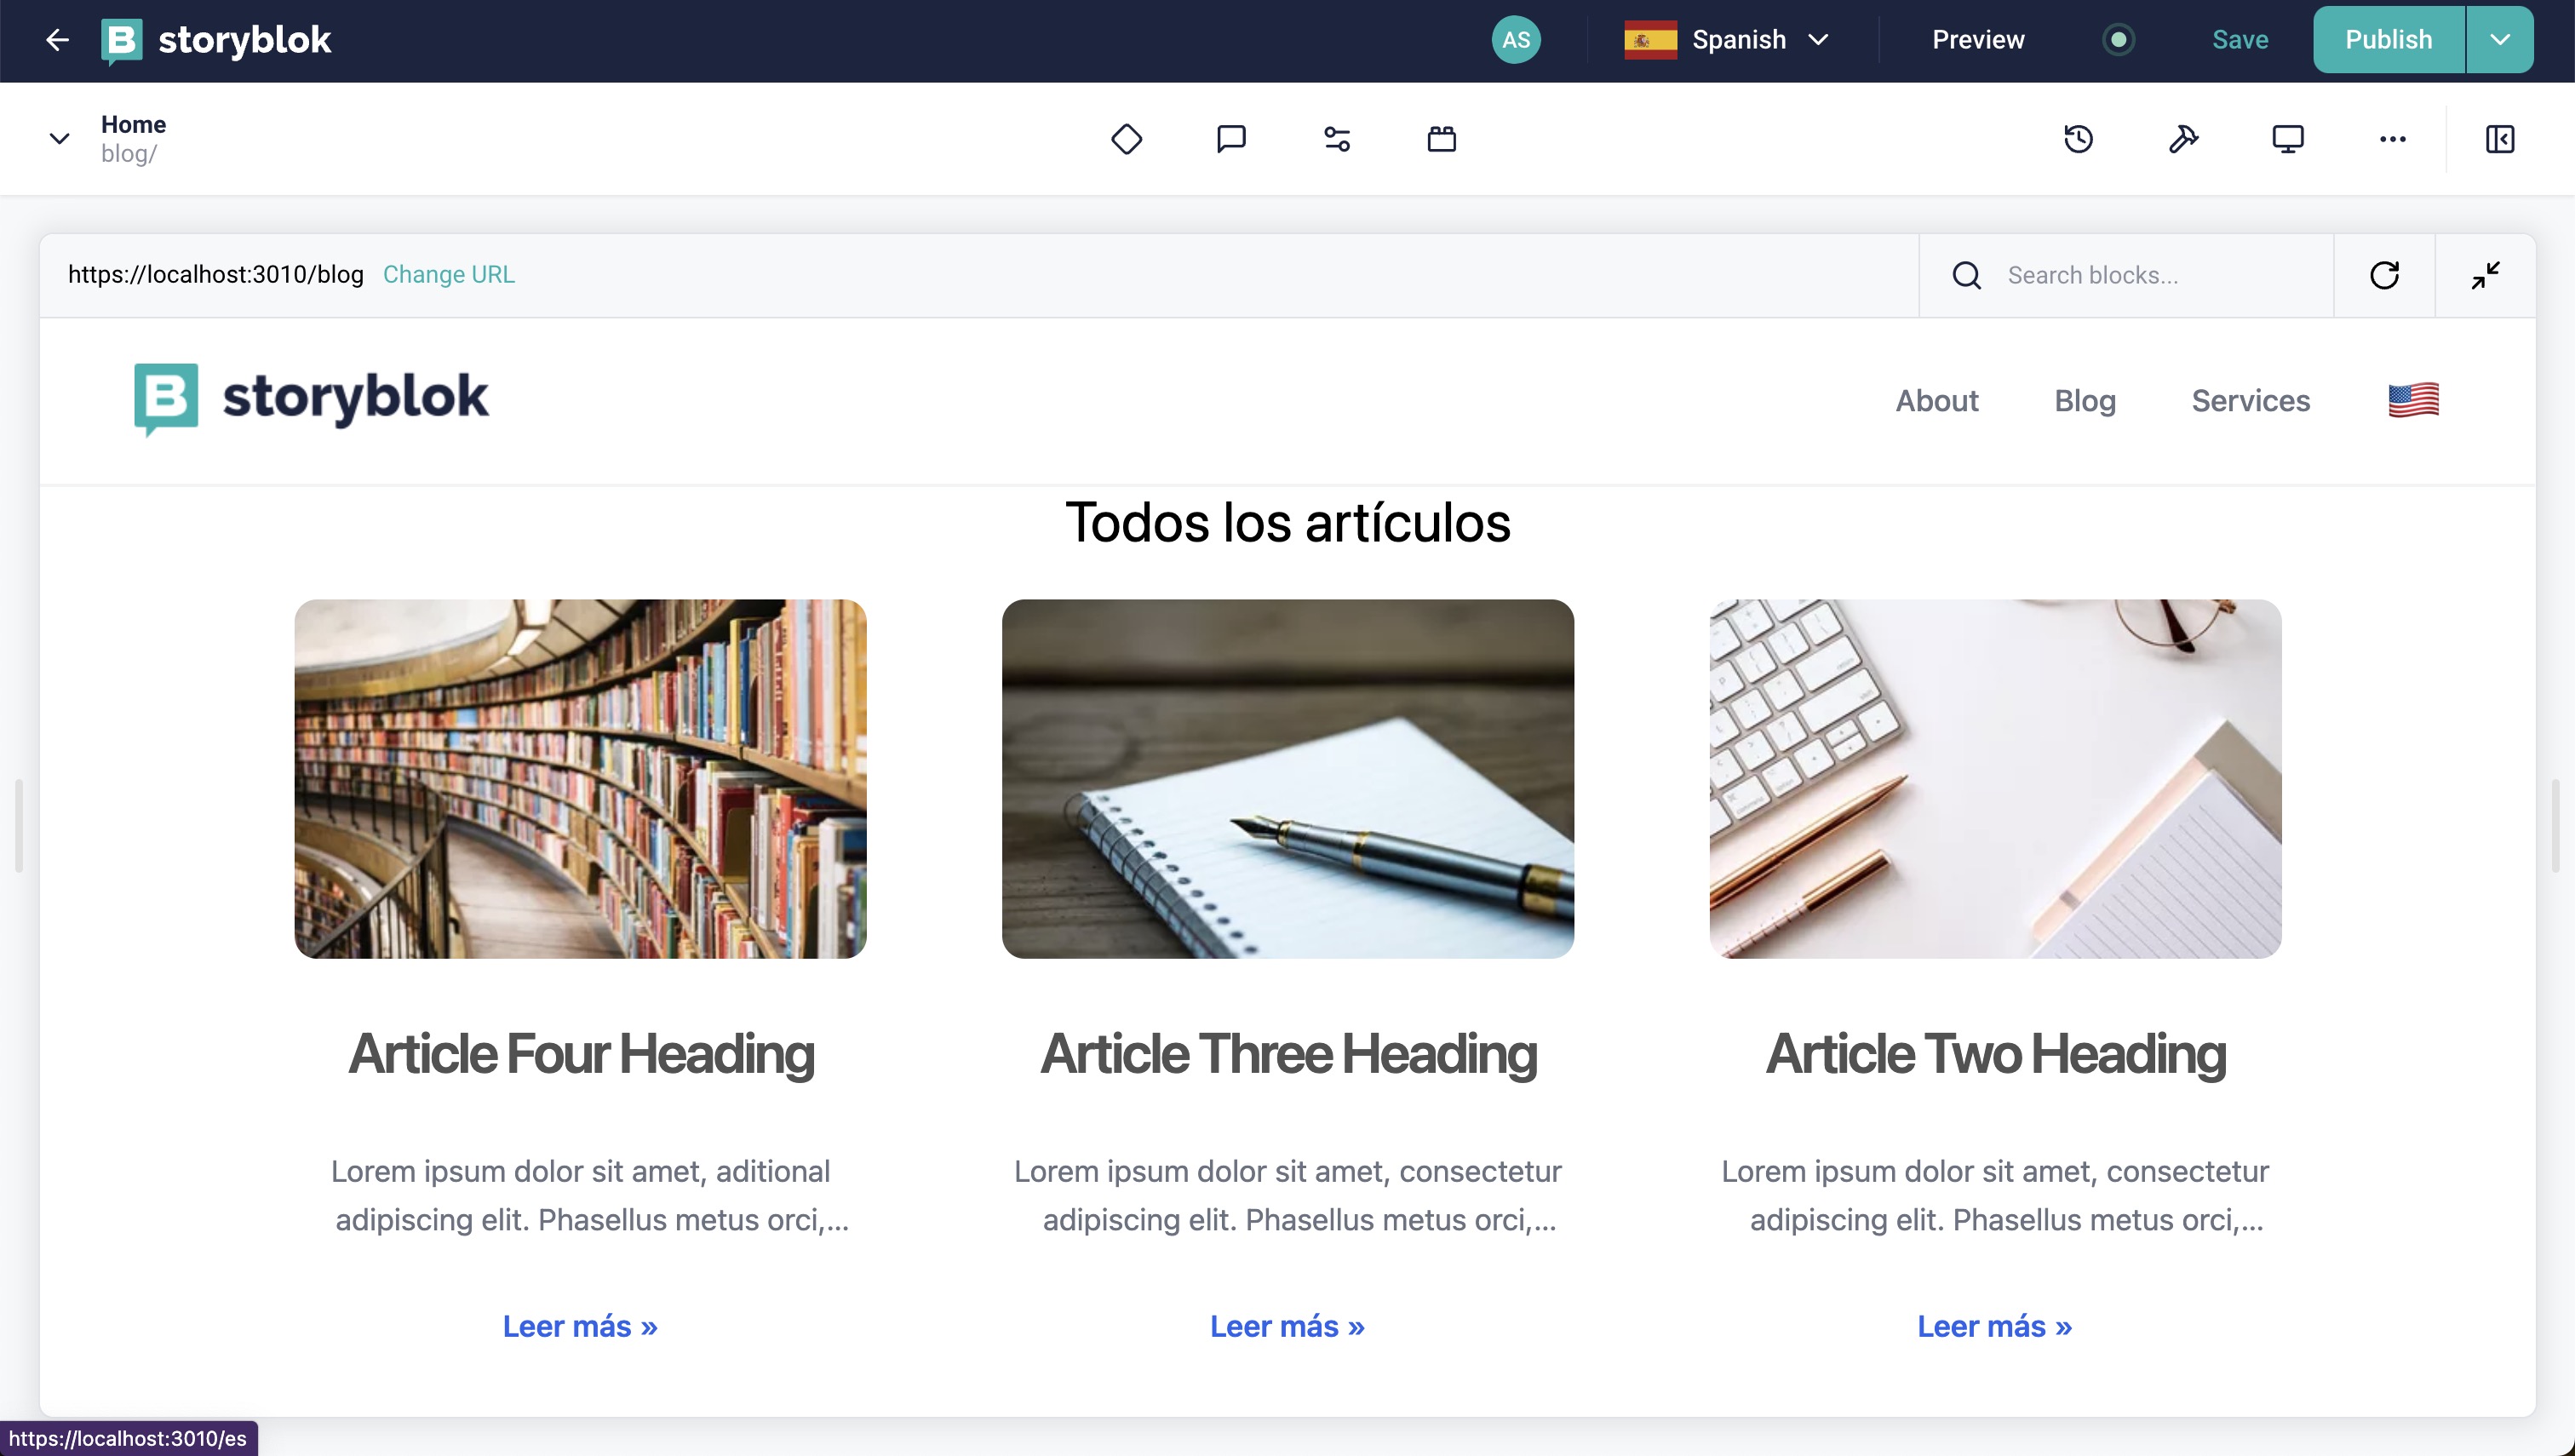
We can see the title in Spanish but all the article cards are still showing in English. Let's fix this issue by passing the language to the fucntion that retrieve the article in the loader
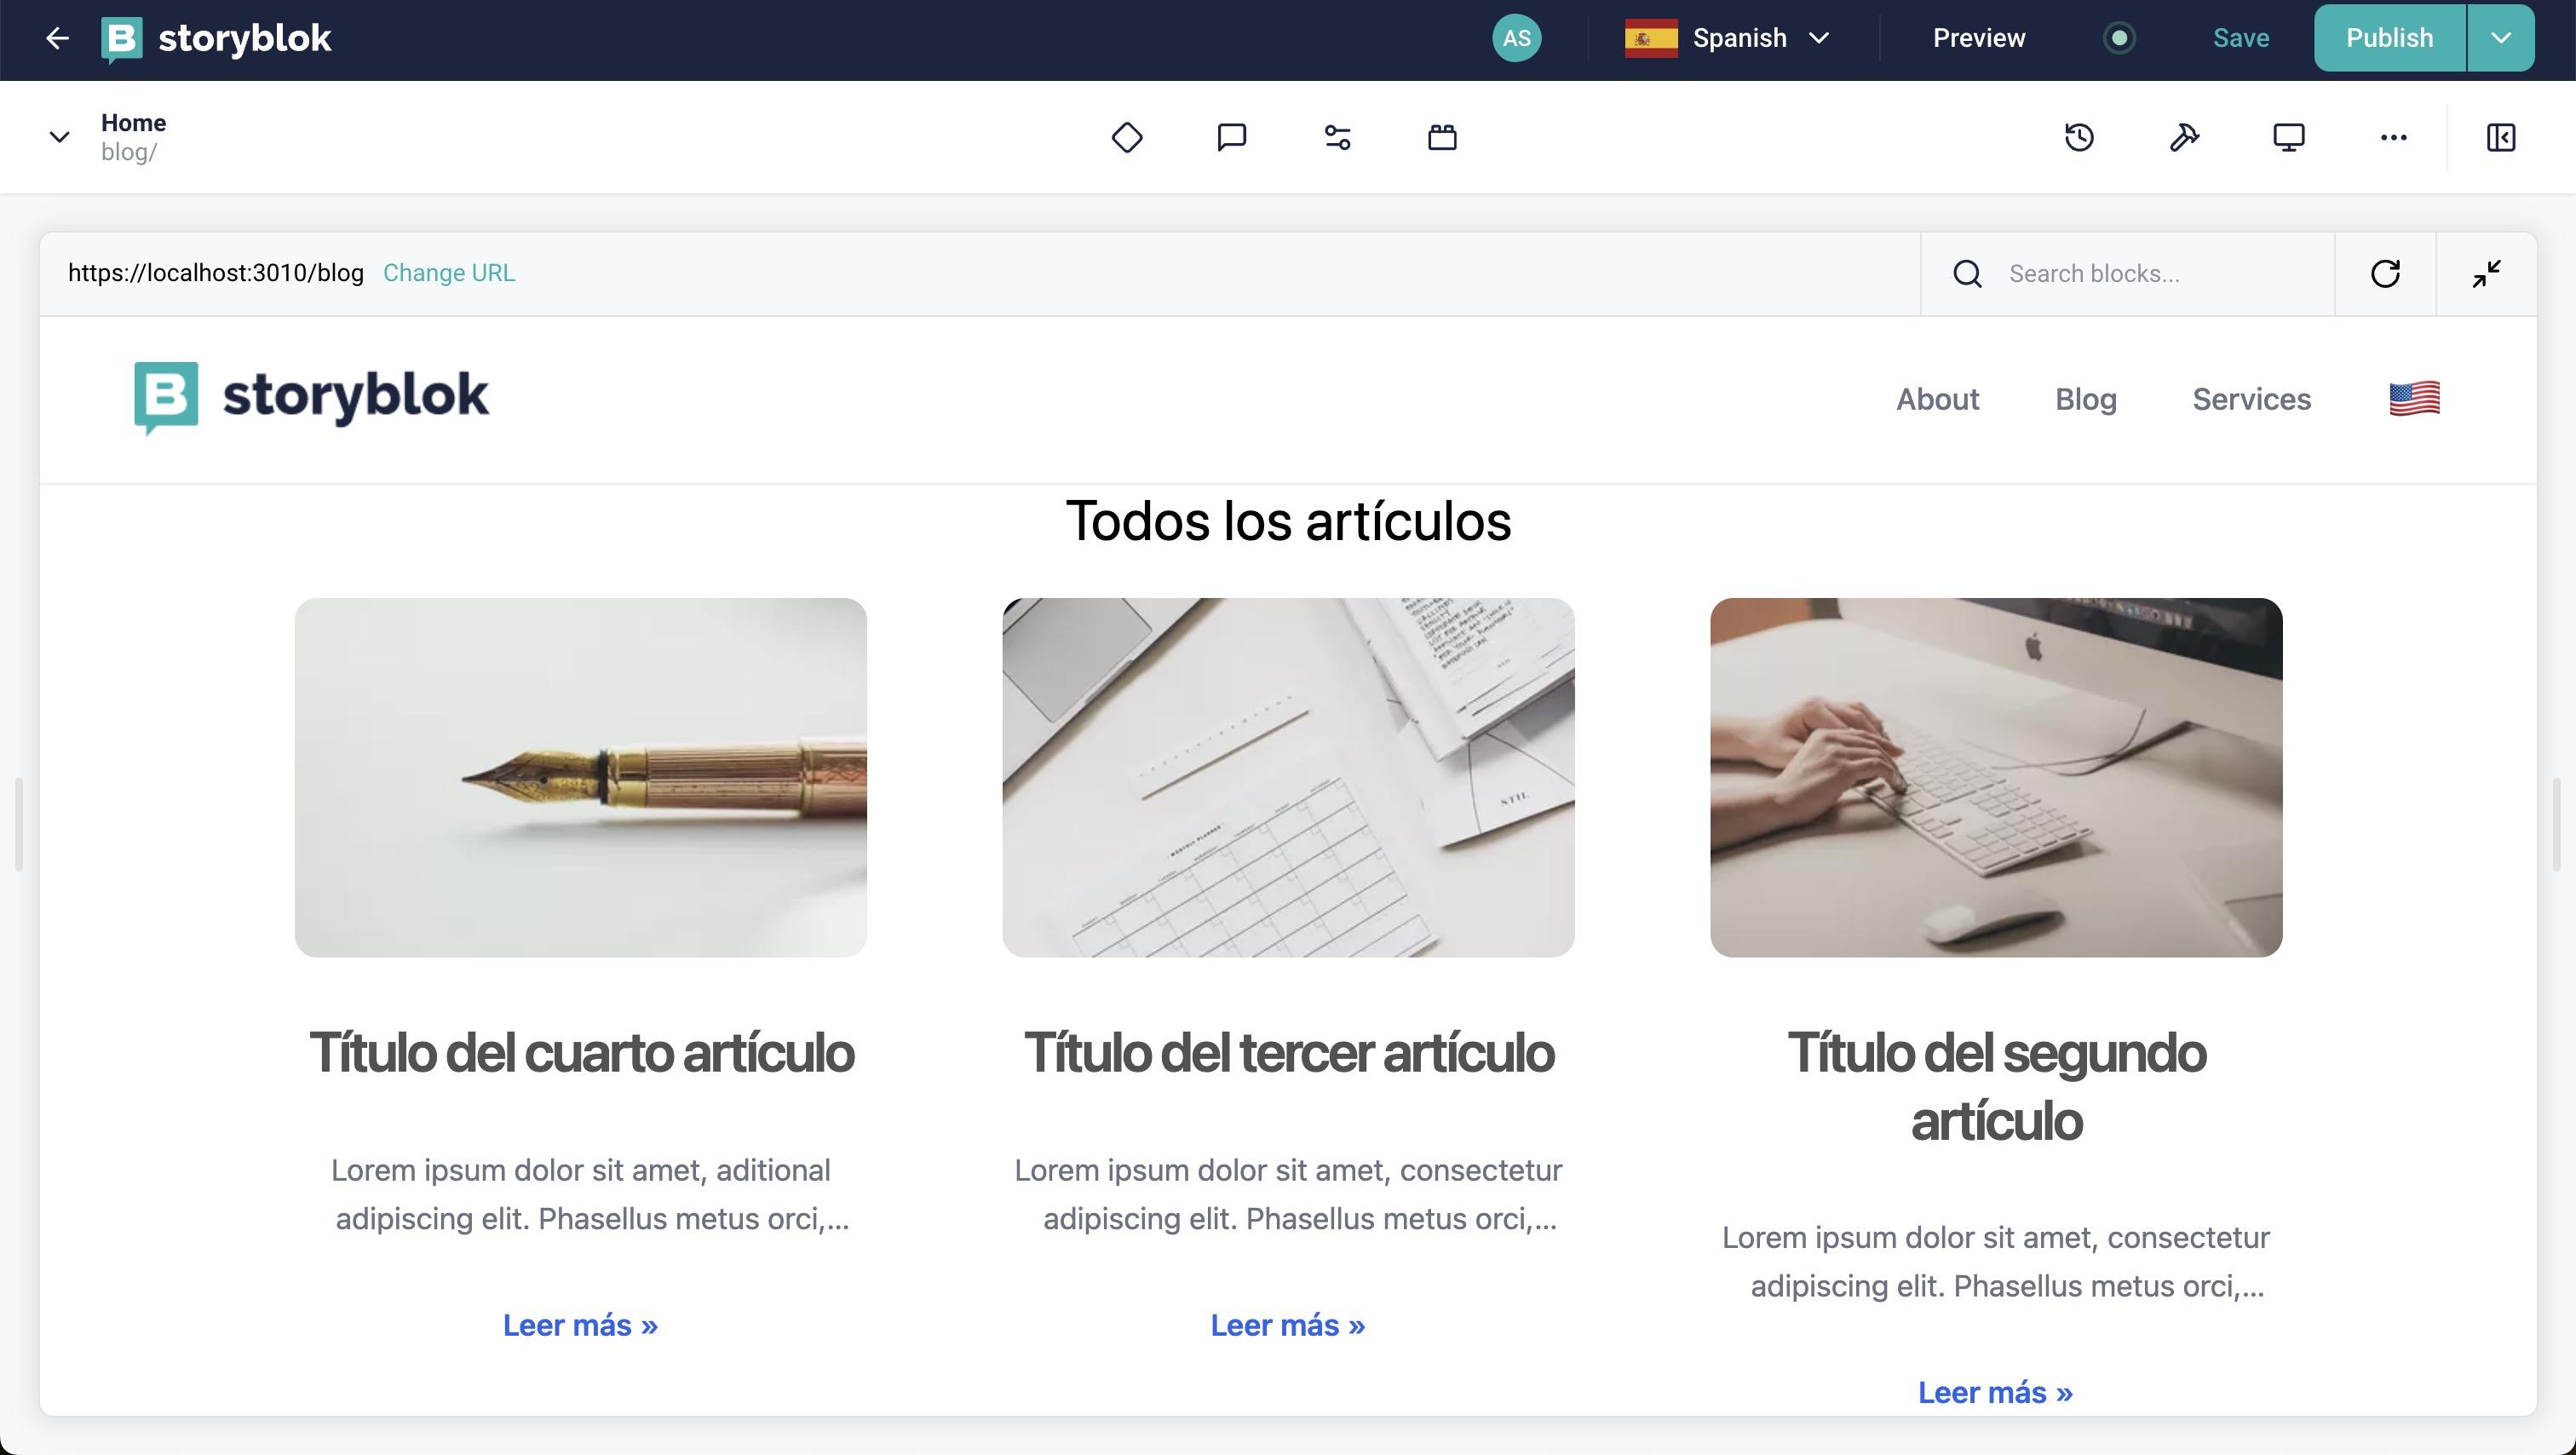
Looking at the Blog home story again, we can see all the article cards showing the correct data.
Refactoring internal links
Now that we can see our pages translated, we must refactor our internal links. This way, the links of our page will have the corresponding locale automatically added to each URL.
To handle language settings in our app, we create a hook. This hook looks at the website's URL to figure out what language to show the user.
import { useLocation } from "@remix-run/react";

const languages = ["en", "es"]; // List of languages your app supports

const useCurrentLanguage = () => {
  const location = useLocation(); // Get info about the current webpage
  const currentPath = location.pathname; // Find out the current webpage pathname

  // Look for a language in the webpage pathname. If not found, use English.
  const currentLanguage = languages.find(lang => currentPath.startsWith(`/${lang}`)) || "en";

  // Give back the webpage pathname and the language we found
  return { currentPath, currentLanguage };
};
Here's what happens:
- Get Webpage Info: We use
useLocationfrom Remix (opens in a new window) to get details about the current location on the webpage. - Find Language: We check the webpage pathname to see if it starts with a language code from our list. We choose English (
en) if we can't find one.
Now, let's create a small utility function that will help us manage translated links.
function getTransLink(slug, language) {
  if (slug === "/") {
    return language === "en" ? slug : `/${language}`;
  }
  return language === "en" ? slug : `/${language}${slug}`;
}

export { getTransLink, languages, useCurrentLanguage };- Home Page Link: If the link (
slug) is for the home page (/), the function checks the language. For English (en), it returns the original slug. For other languages, it adds the language code to the slug (e.g.,/esfor Spanish). - Other Pages: If the language is English, it returns the slug as is for pages other than the home page. For other languages, it prefixes the slug with the language code (e.g.,
/es/about-usfor the Spanish version of the "About Us" page).
We can now use this function in our ArticleTeaser and Navigation components
import { Link } from "@remix-run/react";
import { getTransLink, useCurrentLanguage } from "../utils/langs";

const ArticleTeaser = ({ article }) => {
  const { currentLanguage } = useCurrentLanguage();
  return (
    <div className="column feature">
      <div className="p-6">
        {article.image && (
          <img
            className="object-cover object-center w-full mb-8 lg:h-48 md:h-36 rounded-xl"
            src={`${article.image.filename}/m/360x240`}
            alt={article.image.alt}
          />
        )}
        <h2 className="mx-auto mb-8 text-2xl font-semibold leading-none tracking-tighter text-neutral-600 lg:text-3xl">
          {article.title}
        </h2>
        <div className="mx-auto text-base leading-relaxed text-gray-500 line-clamp-2">
          {article.teaser}
        </div>
        <div className="mt-4">
          <Link
            to={getTransLink(`/blog/${article.slug}`, currentLanguage)}
            prefetch="intent"
            className="inline-flex items-center mt-4 font-semibold text-blue-600 lg:mb-0 hover:text-neutral-600"
          >
            {currentLanguage === "en" ? "Read More »" : "Leer más »"}
          </Link>
        </div>
      </div>
    </div>
  );
};
export default ArticleTeaser;import { useState } from "react";
import { Link, NavLink } from "@remix-run/react";
import { getTransLink, languages, useCurrentLanguage } from "../utils/langs";
const Navigation = () => {
const [openMenu, setOpenMenu] = useState(false);
const { currentLanguage, currentPath } = useCurrentLanguage();
return (
<div className="relative bg-white border-b-2 border-gray-100">
<div className="max-w-7xl mx-auto px-4 sm:px-6">
<div className="flex justify-between items-center py-6 md:justify-start md:space-x-10">
<div className="flex justify-start lg:w-0 lg:flex-1">
<Link prefetch="intent" to={getTransLink("/", currentLanguage)}>
<span className="sr-only">Storyblok</span>
<img
className="h-20 w-auto sm:h-10 hidden sm:block"
src="https://a.storyblok.com/f/88751/251x53/0d3909fe96/storyblok-primary.png"
alt="Storyblok"
/>
<img
className="h-20 w-auto sm:h-10 sm:hidden"
src="https://a.storyblok.com/f/88751/92x106/835caf912a/storyblok-logo.png"
alt="Storyblok"
/>
</Link>
</div>
<div className="-mr-2 -my-2 md:hidden">
<button
type="button"
onClick={() => setOpenMenu(true)}
className="bg-white rounded-md p-2 inline-flex items-center justify-center text-gray-400 hover:text-gray-500 hover:bg-gray-100 focus:outline-none focus:ring-2 focus:ring-inset focus:ring-indigo-500"
aria-expanded="false"
>
<span className="sr-only">Open menu</span>
{/* <!-- Heroicon name: outline/menu --> */}
<svg
className="h-6 w-6"
xmlns="http://www.w3.org/2000/svg"
fill="none"
viewBox="0 0 24 24"
stroke="currentColor"
aria-hidden="true"
>
<path
strokeLinecap="round"
strokeLinejoin="round"
strokeWidth="2"
d="M4 6h16M4 12h16M4 18h16"
/>
</svg>
</button>
</div>
<div className="hidden md:flex items-center justify-end md:flex-1 lg:w-0 space-x-10">
<NavLink
prefetch="intent"
to={getTransLink("/about", currentLanguage)}
className="text-base font-medium text-gray-500 hover:text-gray-900"
>
About
</NavLink>
<NavLink
prefetch="intent"
to={getTransLink("/blog", currentLanguage)}
className="text-base font-medium text-gray-500 hover:text-gray-900"
>
Blog
</NavLink>
<NavLink
prefetch="intent"
to={getTransLink("/services", currentLanguage)}
className="text-base font-medium text-gray-500 hover:text-gray-900"
>
Services
</NavLink>
</div>
{languages.map((lang) => {
if (lang === currentLanguage) return null; // Don't create a switcher for the current language
let switchLanguagePath;
if (currentPath === "/" || currentPath === `/${currentLanguage}`) {
switchLanguagePath = lang === "en" ? "/" : `/${lang}`; // Special case for the home page
} else if (currentPath.startsWith(`/${currentLanguage}`)) {
switchLanguagePath =
lang === "en"
? currentPath.replace(`/${currentLanguage}`, "") // Remove current language prefix for English
: currentPath.replace(`/${currentLanguage}`, `/${lang}`); // Replace current language prefix with new language
} else {
switchLanguagePath = `/${lang}${currentPath}`; // Add new language prefix to the current path
}
let flagEmoji;
if (lang === "en") {
flagEmoji = "🇺🇸";
} else if (lang === "es") {
flagEmoji = "🇪🇸";
}
return (
<Link
key={lang}
to={switchLanguagePath}
className="font-bold text-3xl"
>
{flagEmoji}
</Link>
);
})}
</div>
</div>
{/* <!--
Mobile menu, show/hide based on mobile menu state.
--> */}
{openMenu && (
<div className="absolute top-0 inset-x-0 p-2 transition transform origin-top-right md:hidden">
<div className="rounded-lg shadow-lg ring-1 ring-black ring-opacity-5 bg-white divide-y-2 divide-gray-50">
<div className="pt-5 pb-6 px-5">
<div className="flex items-center justify-between">
<div>
<img
className="h-8 w-auto"
src="https://a.storyblok.com/f/88751/92x106/835caf912a/storyblok-logo.png"
alt="Storyblok"
/>
</div>
<div className="-mr-2">
<button
type="button"
onClick={() => setOpenMenu(false)}
className="bg-white rounded-md p-2 inline-flex items-center justify-center text-gray-400 hover:text-gray-500 hover:bg-gray-100 focus:outline-none focus:ring-2 focus:ring-inset focus:ring-indigo-500"
>
<span className="sr-only">Close menu</span>
{/* <!-- Heroicon name: outline/x --> */}
<svg
className="h-6 w-6"
xmlns="http://www.w3.org/2000/svg"
fill="none"
viewBox="0 0 24 24"
stroke="currentColor"
aria-hidden="true"
>
<path
strokeLinecap="round"
strokeLinejoin="round"
strokeWidth="2"
d="M6 18L18 6M6 6l12 12"
/>
</svg>
</button>
</div>
</div>
<div className="mt-6">
<nav className="grid gap-y-8">
<Link
to="/about"
className="-m-3 p-3 flex items-center rounded-md hover:bg-gray-50"
>
<span className="ml-3 text-base font-medium text-gray-900">
About
</span>
</Link>
<Link
to="/blog"
className="-m-3 p-3 flex items-center rounded-md hover:bg-gray-50"
>
{/* <!-- Heroicon name: outline/cursor-click --> */}
<span className="ml-3 text-base font-medium text-gray-900">
Blog
</span>
</Link>
<Link
to="/services"
className="-m-3 p-3 flex items-center rounded-md hover:bg-gray-50"
>
<span className="ml-3 text-base font-medium text-gray-900">
Services
</span>
</Link>
</nav>
</div>
</div>
</div>
</div>
)}
</div>
);
};
export default Navigation;That's it. This is how easily you can translate your content and manage multiple languages with Storyblok and Remix. Similarly, you can translate all the blogs and any other content you want. Let's also do one more thing: add a language switcher in the navigation.
Adding a Language Switcher
This will be pretty straightforward. We have the languages and currentLanguage already available in our Navigation component
//...
 {languages.map((lang) => {
            if (lang === currentLanguage) return null; // Don't create a switcher for the current language

            let switchLanguagePath;

            if (currentPath === "/" || currentPath === `/${currentLanguage}`) {
              switchLanguagePath = lang === "en" ? "/" : `/${lang}`; // Special case for the home page
            } else if (currentPath.startsWith(`/${currentLanguage}`)) {
              switchLanguagePath =
                lang === "en"
                  ? currentPath.replace(`/${currentLanguage}`, "") // Remove current language prefix for English
                  : currentPath.replace(`/${currentLanguage}`, `/${lang}`); // Replace current language prefix with new language
            } else {
              switchLanguagePath = `/${lang}${currentPath}`; // Add new language prefix to the current path
            }

            let flagEmoji;
            if (lang === "en") {
              flagEmoji = "🇺🇸";
            } else if (lang === "es") {
              flagEmoji = "🇪🇸";
            }

            return (
              <Link
                key={lang}
                to={switchLanguagePath}
                className="font-bold text-3xl"
              >
                {flagEmoji}
              </Link>
            );
          })}
...- We go through each language in our list (
languages.map) to link switching languages. - If the language we are checking is the same as the current language of the page, we don’t link it. This is because you don't need a link to switch to the language you already view.
- We then figure out what the link (
switchLanguagePath) should be for switching to another language:- If we're on the home page, the link is "
/" for English or "/lang" for other languages. - If we're on a different page, and it starts with the current language code, we change that part of the link to match the new language we want to switch to. For English, we remove the language code to use a simpler path.
- If the current path doesn’t start with a language code, we add the new language code to the path.
- If we're on the home page, the link is "
- We also pick an emoji flag (
flagEmoji) to represent each language, making the switch more visual and intuitive. - Finally, we return a clickable link (
<Link>) for each language, use the flag emoji as the link text. This link lets users switch to a different language version of the current page.
Wrapping Up
Congrats! You can now build a full-blown multilingual Remix website using Storyblok. In this tutorial, you saw how to add and manage multiple languages in your Remix and Storyblok website with Storyblok's field-level translation. We also added a basic language switcher on the website's navigation bar so that your project is ready for production and serves as a base for future projects.
In the next part, We will learn how to create a preview environment for your Remix application.
| Resource | Link |
|---|---|
| Storyblok Remix Ultimate Tutorial | https://www.storyblok.com/tp/the-storyblok-remix-ultimate-tutorial |
| Github repository | https://github.com/storyblok/remix-ultimate-tutorial |
| Storyblok Technologies Hub | https://www.storyblok.com/technologies |
| Remix Technology Hub | https://www.storyblok.com/tc/remix |
| Storyblok React SDK | https://github.com/storyblok/storyblok-react |
| Remix docs | https://remix.run/docs/en/main |
