Guideline on How to format Storyblok Tutorials
Storyblok is the first headless CMS that works for developers & marketers alike.
This guideline explains how to format your Storyblok tutorials before they are published on storyblok.com. Following the instructions below ensures that your tutorial will be coherent with all previously published tutorials.
How can I submit the completed tutorial?
If you have an approved writing sample and topic, you can submit the tutorial as a link to Google Docs, Dropbox Paper, or an .md attachment.
Code Formatting
Each code block line of a tutorial should be limited to 80 characters or less. You should also add your code in blocks; you can use it backticks `` on dropbox Paper and the code block extension for Google Docs. Please use npm as a package manager.
Article Title
Your tutorial should begin with a title using an H1 headline. This should be the first line of your file.
For procedural tutorials, the title should begin with How to. A typical title should follow the format of How to do Task with Tool and Another Tool.
For example: How to Deploy Storyblok Applications with Vercel.
You can make it shorter for SEO purposes by saying, “Deploy Storyblok with Vercel”
For introductory tutorials, the title should begin with Getting Started with, e.g. Getting Started with Node.js and Jasmine.
In other cases, try to formulate the title using a phrase that summarizes what you are teaching the reader to do.
Introduction
The first section of your tutorial should consist of a paragraph or two describing the goals, methods, tools, and results of the tutorial.
Typically, the introduction should cover:
- The main topic of the tutorial.
- What the reader will learn from it.
- Methods to be applied and all tools involved.
- What the reader will have accomplished or learned at the end of the tutorial.
Prerequisites (Optional)
Introduce the prerequisites with a sentence or several paragraphs (as needed).
Common prerequisite bullet points include:
- Link to a tutorial about installing the required software, such as Storyblok CLI or a sample application
- Link to a source code repository that the reader should clone.
- Link to a part of a tutorial, e.g. Follow the steps from this tutorial to set up an HTTPS proxy.
- When you link to another Storyblok tutorial as a prerequisite, make sure that in preparing your new tutorial, you follow all the commands from that other tutorial yourself.
H2 Sections and Related Descriptions
Under every header, add at least a sentence explaining the section's purpose. A good example of this can be found below:
Setting up a Sample Project
In this section, we will set up a simple application that will serve as a starting point for our custom Storyblok application.
Use of Subheadings
You should format your text using only H2 and H3. H4 should be avoided for SEO reasons.
Code
Code formatting should be used for:
- Code snippets and scripts
- Commands
Every code block needs an explanation. The sentence(s) must describe what the code block does, and end with either a period or a colon. Examples of good explanations include:
- Start by creating an empty Nuxt 3 project.
- At this point, your project tree should have the following structure:
After a code block, you should always start with a new sentence.
Commands
Any command that the reader needs to execute to complete the tutorial should be in its own line, not inline (e.g. npm install express), and it should be formatted with a code block as seen below:
npm install express --save
When to Use Inline Code Formatting
Inline commands are useful for reference:
- Command names (e.g.
mkdir) - Package names (e.g.
env - Function names (e.g.
useStoryblok()) - File and directory names or paths (e.g.
app/hello_world.js) - Example URLs (e.g.
http://example.com/myapp - Ports (e.g.
:3000) - Key presses (e.g.
ENTER)
Don’t use inline code for commands the reader needs to execute. Also, don’t use it to emphasize something – use bold formatting instead.
Guidelines for Images
- Image/screenshots should be taken in a resolution of 1440x840 pixels.
- For accessibility purposes, images should contain descriptive alt texts.
- Please do not add screenshots of your terminal or console output.
When taking screenshots, please only capture the actual window content (the actual browser UI elements should not be visible).
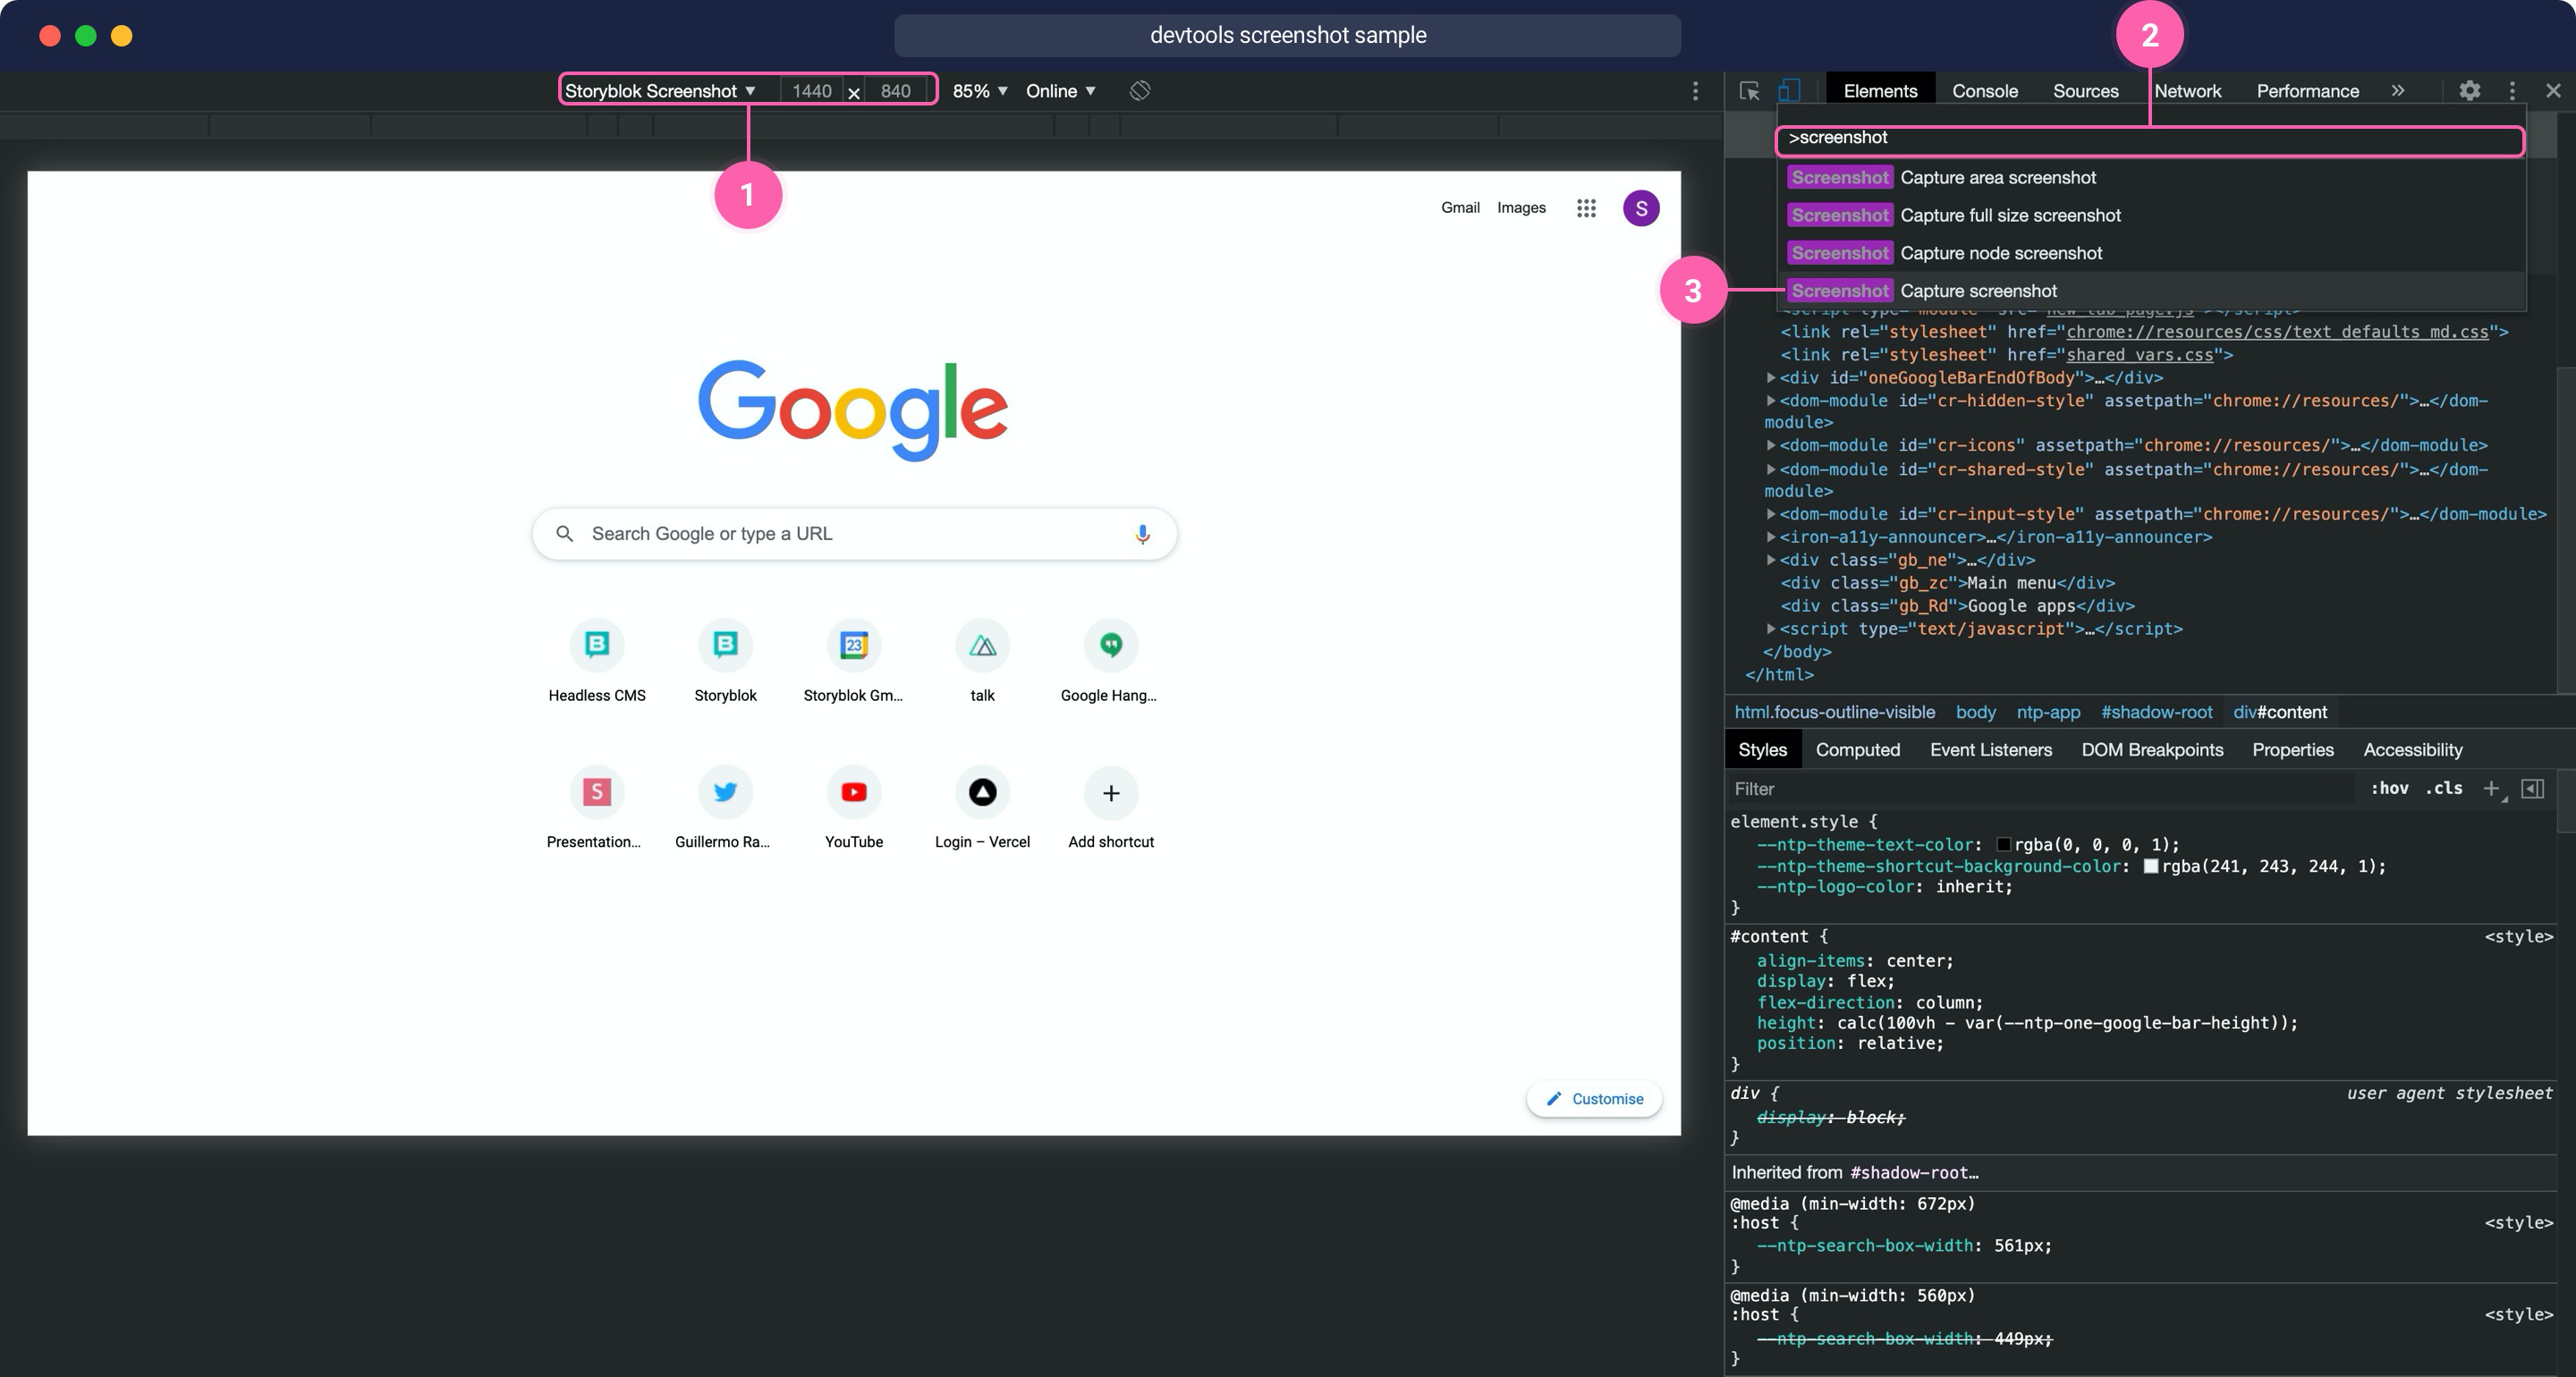
How to take a screenshot
It is recommended to use Google Chrome. Follow these steps:
- Open Dev Tools (Right click with mouse → Inspect)
- Set the resolution of the preview to
1440x840[1] - Position the content in the preview as needed
- Press
Shift+Cmd+Pand writeScreenshot[2] - selectCapture screenshot[3]
Reference to other Tools and Software
When referring to other tools and software, always use capitalization and be consistent within your article. For example, Node.js or Nuxt3. You can also use acronyms such as SSH and HTTPS.
The first time you mention a software tool, add a link to its homepage or GitHub repository.
Please generally try to refer to existing parts of the Storyblok documentation rather than providing very detailed explanations of basic features (e.g. creating a space or creating a space) → if in doubt, please reach out and let’s discuss if specific instructions are needed.
