How to create a global search with Remix and Storyblok
Storyblok is the first headless CMS that works for developers & marketers alike.
In this tutorial, we'll demonstrate the simple steps to creating a global search feature for your blog using the powerful tools of Remix and Storyblok.
You'll be amazed at how effortlessly you can implement this feature and enhance the user experience of your blog or any website.
- On the Storyblok side, we'll leverage the power of the filter_query parameter from the Content Delivery API (opens in a new window). This will allow us to retrieve only the relevant content for our global search.
- On the Remix side, we'll leverage the convenience of the Actions (opens in a new window) feature to capture and process form data easily.
With these tools, building a functional and user-friendly global search for your site will be a breeze.
You can see the final result here: https://remix-global-search.vercel.app
and the final repository: https://github.com/alexadark/remix-global-search/tree/main
Requirements
In this guide, we assume that you meet these requirements:
- Basic understanding of Remix If you want a beginner guide about Remix.run & Storyblok; you should look at our Add a headless CMS to Remix in 5 minutes guide.
- Node.js LTS version.
- A Storyblok (opens in a new window) account to manage content.
Setting up the project
To show how to implement a global search with Remix on a Storyblok site, we will create a basic blog site with posts and pages to search through.
Let’s start by running the following commands so we clone the example repository for the blog website:
git clone https://github.com/alexadark/remix-global-search.git
Click on the following link to create a clone of a space with the necessary content structure already set up for the project.
https://app.storyblok.com/#!/build/1 (opens in a new window)92330 (opens in a new window)
Now, we need to set our preview URL for our development server.
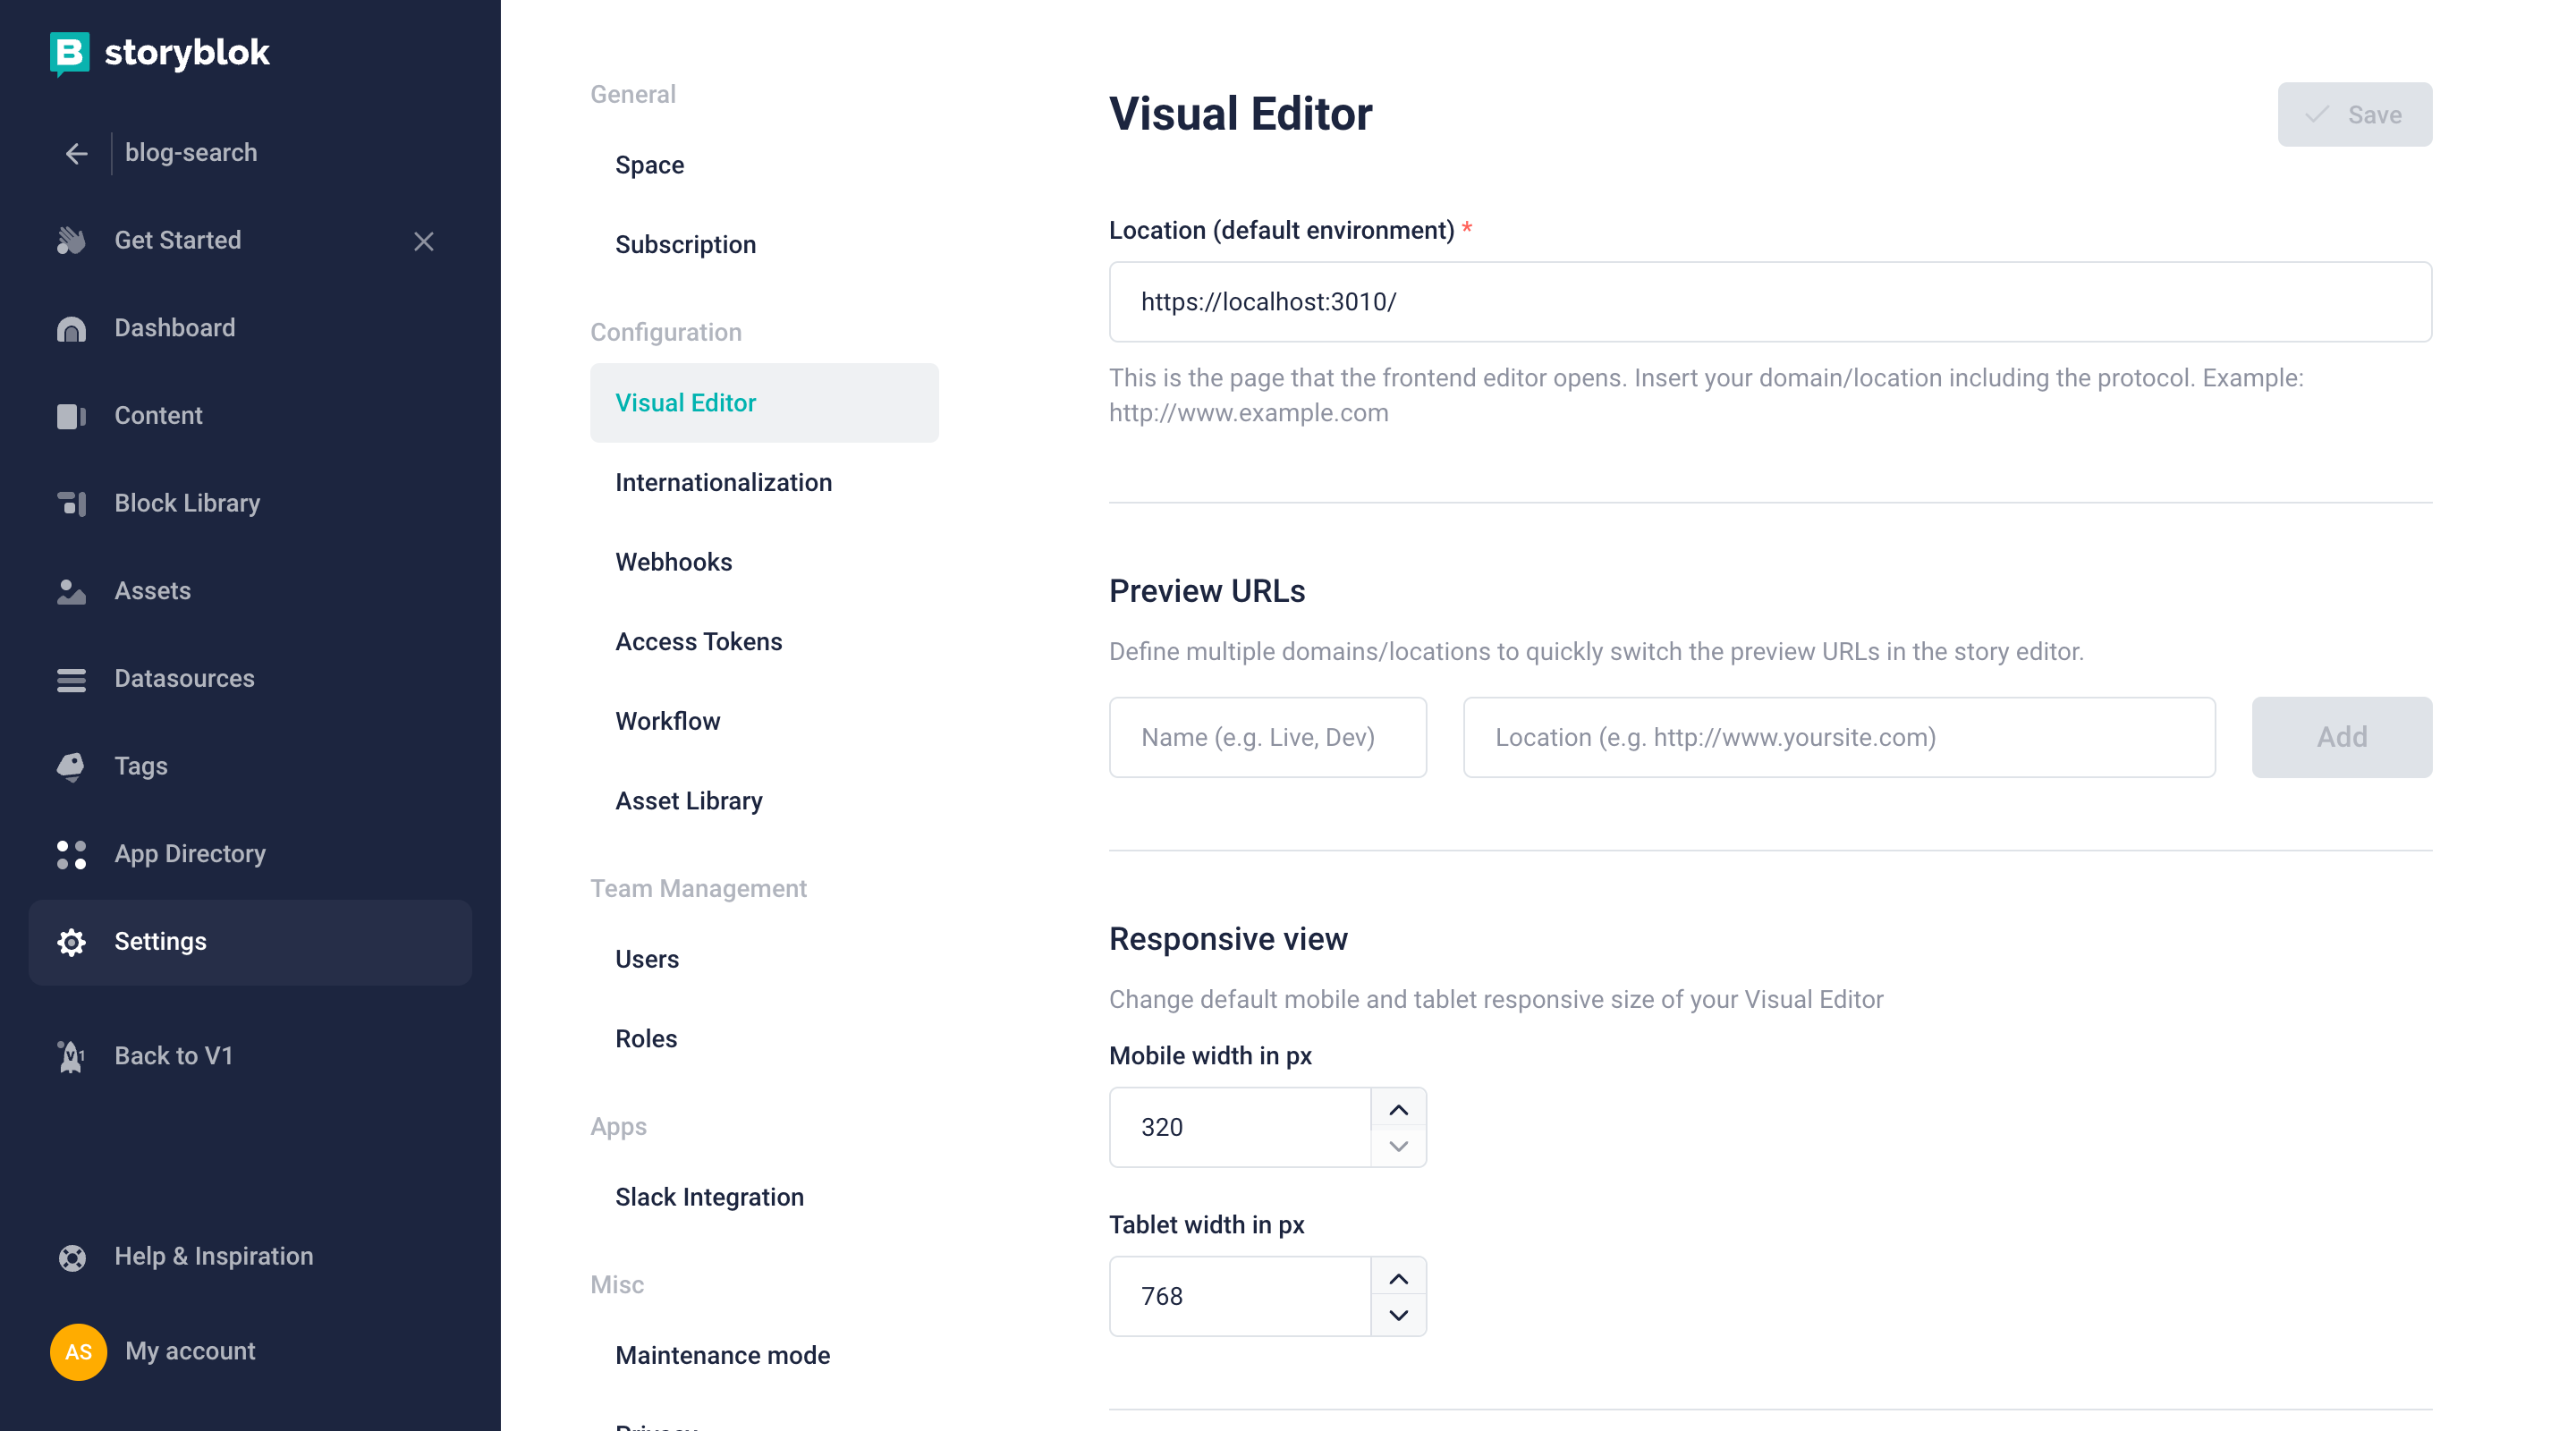
Once you duplicated the space, go to "Settings" menu of Storyblok and "Visual Editor", then change the URL in Location (default environment) to https://localhost:3010/ {1}. Keep in mind that you need to start the "https" server in your localhost, and it should listen to the "3010" port.
You can follow this guide for setting up a dev server with HTTPS Proxy for macOs (opens in a new window) and for Windows (opens in a new window).
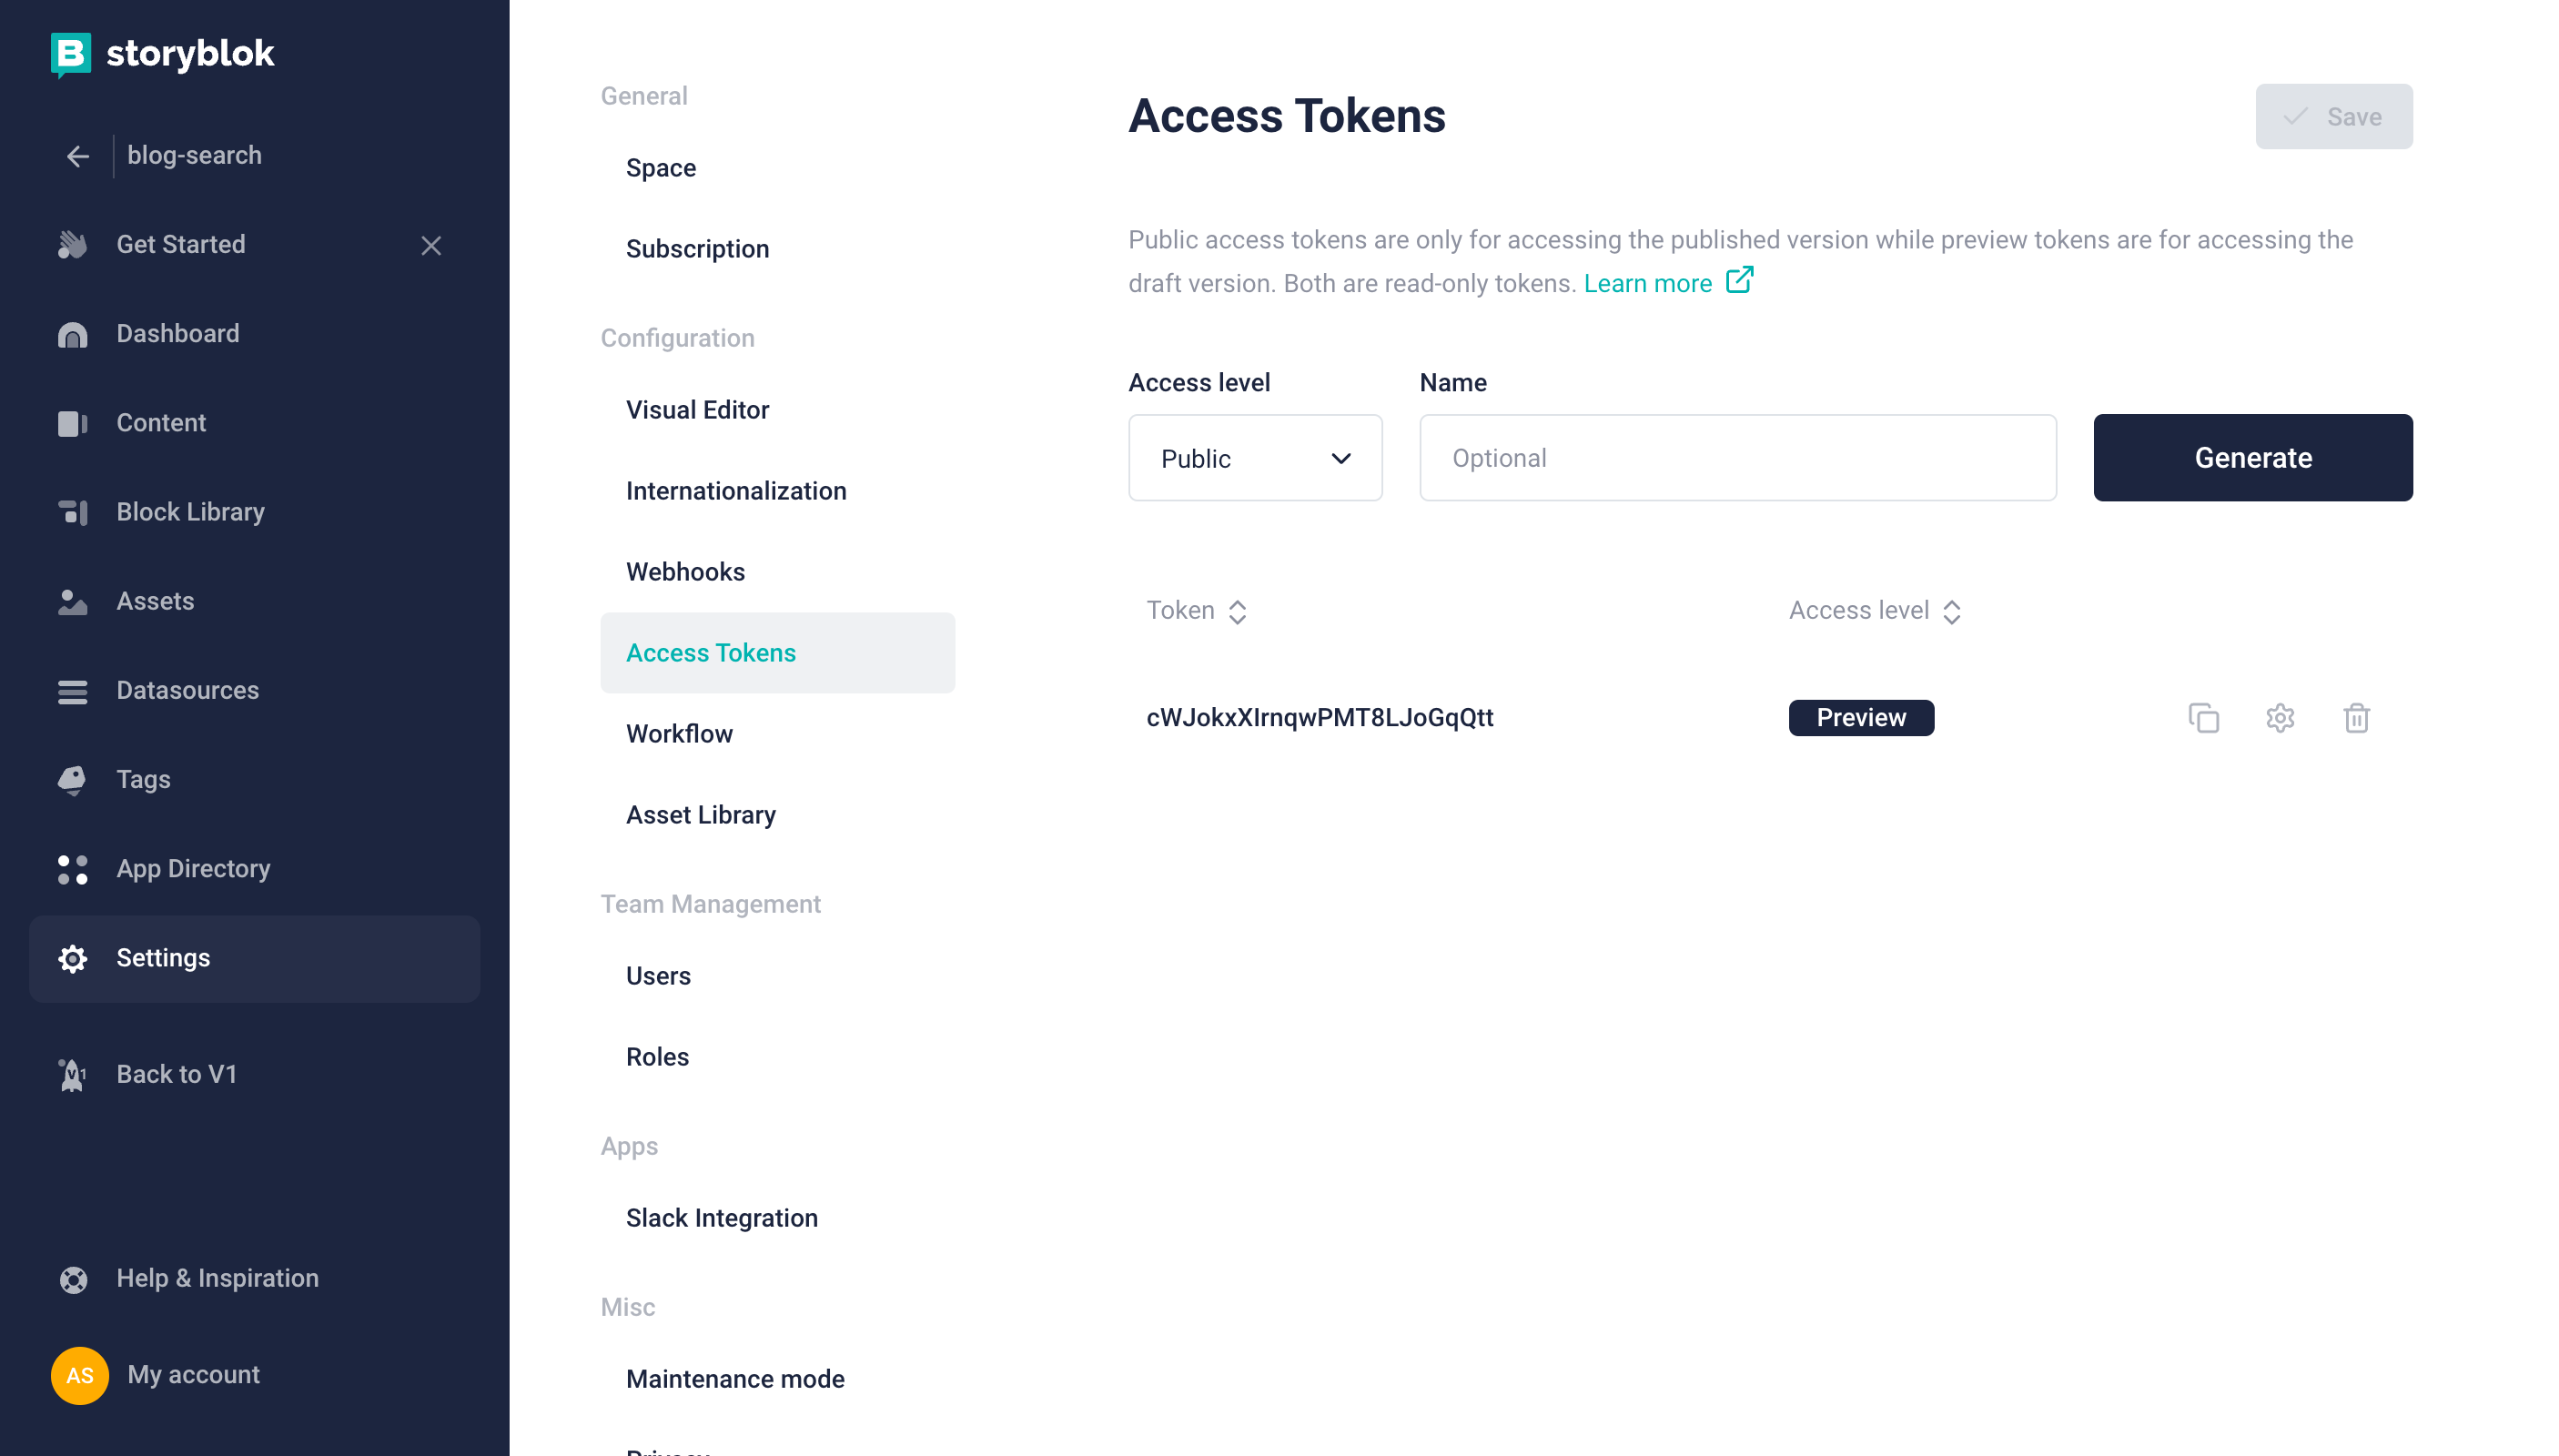
Go to the "Settings" menu of the Storyblok space and retrieve the "preview" token {1} from the Access Tokens section.
In the code base, create a .env file at the root of the project and create this environment variable
STORYBLOK_PREVIEW_TOKEN= “your preview token”
with the preview token you just retrieved.
Run npm install to install all the packages.
We can now start the development server by running npm run dev, and see how our website works. Let’s dive into the main parts of the project to understand how the search will work.
The repository default branch is starting point. If you are in a hurry, you can jump to the main branch where the project is already completed.
Components
Search Form
/app/components/search/SearchForm.tsx
A basic form with a search input, styled with tailwindcss (opens in a new window), no functionalities are implemented at this point.
To improve the user experience, we'll trigger an autofocus on the search input field by utilizing the useRef and useEffect hooks in React. This will ensure that the cursor is automatically placed in the input field as soon as the form is loaded, allowing the user to start typing their search query without manually clicking into the field.
Search
/app/components/search/index.tsx
We have wrapped the form into a nice modal built with headlessui (opens in a new window).
Header
/app/components/Header.tsx
We place this form component as well as a basic navigation into our header.
Layout
/app/components/search/Layout.tsx
A Layout component that will bring the header and a main container to wrap the whole site
AllPosts.tsx, Page.tsx, PageContent.tsx and Post.tsx, are our Storyblok components
AllPost.tsx will load all the posts to show on the blog page.
Root
In this file, we'll load all the components from Storyblok and integrate them into our project. Additionally, we'll wrap the Outlet component with our Layout component, making the header and search functionality available and accessible throughout the entire website.
Routes
Splat route
$.tsx
here we use a splat route; these routes will map to any URL not matched by other route files in the same directory. In this route we load the data for our pages.
Blog route
blog/$.tsx
Another Splat route where we load the data for our posts, as well as for our Post List.
Hint: While it would have been possible to use a single splat route, I've chosen to implement this architecture to provide the option for nested layouts. This design decision allows for greater flexibility without having to overhaul the entire routing structure.
Search Results
search-results.tsx
The route where our results will be displayed.
Styling
We're using Tailwind CSS, a utility-first CSS framework for rapid UI development. For a guide on setting up Tailwind in a Remix project, visit this (opens in a new window)link. (opens in a new window)
Getting the Query from the form
If you're familiar with handling form submissions and button clicks through <form onSubmit> and <button onClick>, prepare to be amazed by the simplicity of HTML.
Building a feature like a global search requires just an HTML form to collect data from the user and an action attribute.
With Remix, these components are seamlessly integrated, simplifying the entire process.
<form action="search-results" className="flex justify-between md:w-[90%]">
      <input
        type="text"
        name="query"
        placeholder="Search..."
        ref={inputRef}
        className={clsx(
          "w-full h-12",
          "bg-teal-800",
          "border-0 border-l-8 border-teal-200 focus:border-teal-600",
          "text-teal-100",
          "text-xl font-bold tracking-wide uppercase",
          "focus:outline-none focus:ring-transparent  placeholder-teal-200"
        )}
      />
    </Form>
The action attribute in an HTML <form> element specifies the URL to which the form data should be sent after submission. It defines the endpoint or the destination where the form data will be processed.
When a user enters a query into the input field and submits the form, the browser will make a GET request (by default) to the URL specified in the action attribute of the form. This sends the user to a route like /search-results?query=USER_QUERY.
Enhancing UX with Remix's Form component and useNavigation hook
After setting up the basic search form, we can further enhance the user experience by leveraging the Form component provided by Remix. This component is designed to make form submissions smoother and more efficient.
Replace the traditional HTML <form> tag with Remix's Form component:
import { Form } from '@remix-run/react';

// ...

<Form action="/search-results" className="flex justify-between md:w-[90%]">
    <input
        type="text"
        name="query"
        placeholder="Search..."
        ref={inputRef}
        className={clsx(
            "w-full h-12",
            "bg-teal-800",
            "border-0 border-l-8 border-teal-200 focus:border-teal-600",
            "text-teal-100",
            "text-xl font-bold tracking-wide uppercase",
            "focus:outline-none focus:ring-transparent  placeholder-teal-200"
        )}
    />
</Form>
Enhancing User Feedback with useNavigation
In modern web applications, providing feedback during operations like searching is essential for a good user experience. With Remix's useNavigation hook, we can easily detect navigation changes and provide timely feedback to users.
Here's how it works:
1- Initialisationconst navigation = useNavigation()
The useNavigation hook gives us insights into the current navigation state and location:
2- Determining Search State:
We check if the application is navigating (navigation.state !== "idle") and if the current path is the search results page (navigation.location.pathname === "/search-results"). This combination indicates that a search is in progress:
const isSearching =
  navigation.state !== "idle" &&
  navigation.location.pathname === "/search-results";
3- Handling Modal Closure:
Using the useEffect hook, we monitor the isSearching state. If the application starts searching, we close the modal:
useEffect(() => {
  if (isSearching) {
    setOpen(false);
  }
}, [isSearching]);
4- Rendering the Overlay:
If isSearching is true, we display an overlay with a "Searching..." message to inform the user that their search is being processed:
{isSearching && (
  <div className="absolute inset-0 flex items-center justify-center w-full h-full bg-green-900 overlay opacity-80">
    <h3>Searching...</h3>
  </div>
)}
Here is the complete code for the search modal component:
import { Fragment, useEffect, useState } from "react";
import { Dialog, Transition } from "@headlessui/react";
import { HiOutlineSearch as SearchIcon } from "react-icons/hi";
import { MdClose as Close } from "react-icons/md";
import { useNavigation } from "@remix-run/react";

import SearchForm from "./SearchForm";
import clsx from "clsx";

const Search = () => {
  const [open, setOpen] = useState(false);

  const navigation = useNavigation();
  const isSearching =
    navigation.state !== "idle" &&
    navigation.location.pathname === "/search-results";

  useEffect(() => {
    if (isSearching) {
      setOpen(false);
    }
  }, [isSearching]);
  return (
    <>
      {isSearching && (
        <div className="absolute inset-0 flex items-center justify-center w-full h-full bg-green-900 overlay opacity-80">
          <h3>Searching...</h3>
        </div>
      )}
      <button
        aria-label="search"
        onClick={() => setOpen(true)}
        className="border-l border-white cursor-pointer"
      >
        <SearchIcon className={`text-[24px] text-white   ml-3`} />
      </button>
      <Transition show={open} as={Fragment}>
        <Dialog
          as="div"
          static
          className={clsx("fixed inset-0 overflow-hidden", "z-20")}
          open={open}
          onClose={setOpen}
        >
          <div className={clsx("absolute inset-0 overflow-hidden")}>
            {/* Overlay */}
            <Transition.Child
              as={Fragment}
              enter="ease-in-out duration-500"
              enterFrom="opacity-0"
              enterTo="opacity-100"
              leave="ease-in-out duration-500"
              leaveFrom="opacity-100"
              leaveTo="opacity-0"
            >
              <Dialog.Overlay
                className={clsx(
                  "absolute inset-0",
                  "transition-opacity",
                  "bg-teal-900 bg-opacity-80"
                )}
              />
            </Transition.Child>
            <div
              className={clsx("fixed inset-x-0 top-0", "flex", "max-w-full")}
            >
              {/* Sliding search */}
              <Transition.Child
                as={Fragment}
                enter=" transition ease-in-out duration-500"
                enterFrom="-translate-y-full"
                enterTo="-translate-y-0"
                leave="transition ease-in-out duration-500 "
                leaveFrom="-translate-y-0"
                leaveTo="-translate-y-full"
              >
                <div
                  className={clsx(
                    "relative",
                    "w-screen max-w-full",
                    "bg-teal-900",
                    "px-10 py-5"
                  )}
                >
                  <button
                    className={clsx("absolute right-3 top-3")}
                    aria-label="close menu"
                  >
                    <Close
                      className={`text-[24px] text-white `}
                      onClick={() => setOpen(false)}
                    />
                  </button>
                  <div>
                    <SearchForm />
                  </div>
                </div>
              </Transition.Child>
            </div>
          </div>
        </Dialog>
      </Transition>
    </>
  );
};

export default Search;
Filtering the stories with the query
Our form is now functioning properly and passing queries to the results page.
Our next step is to use it to filter the stories with the Storyblok Content Delivery API.
Extracting the Query from the URL
To extract the query from the URL, we'll use the URL (opens in a new window) constructor (opens in a new window) to create an object representing the URL defined by the parameters.
This object includes a searchParams property, which provides utilitty methods to work with the query string of a URL.
const url = new URL(request.url);
const search = new URLSearchParams(url.search);
const query = search.get("query");
We will include this in a loader (opens in a new window) (In Remix, loaders are executed when a page is hit with a GET request) and log our query to ensure it works. For the moment, we'll return null.
export const loader = async ({ request }:LoaderArgs) => {
  const url = new URL(request.url);
  const search = new URLSearchParams(url.search);
  const query = search.get("query");
  console.log("query", query);
  return null;
};
Using the Storyblok Content Delivery API to Filter Results
- Import the
getStoryblokApimethod from the React SDK. - To filter the stories, we need to use the filter_query (opens in a new window) parameter. (opens in a new window) This parameter allows us to filter the stories by specific attributes.
- In our case, we will use the like (opens in a new window) operation, (opens in a new window) which filters the entries by checking if a custom attribute (any field inside the content field) has a value that is "like" the value provided. The custom attribute is our query, and we want to retrieve all entries that contain the query. To achieve this, we add an asterisk (*) at the beginning and end of the query.
- We apply the filter to all the fields where we want to search the query. For pages, we search in the body field, and for posts, we search in the headline and text fields.
- By default, the applied filters are connected by the AND operator. However, it is possible to apply filters by the OR operator using the __or keyword.
const filter_query = {
    __or: [
      {
        body: {
          like: `*${query}*`,
        },
      },
      {
        headline: {
          like: `*${query}*`,
        },
      },
      {
        text: {
          like: `*${query}*`,
        },
      },
    ],
  };
We pass the filters as parameters in our request and retrieve the filtered stories.
Here's the code for our loader:
export const loader = async ({ request }: LoaderArgs) => {
  const url = new URL(request.url);
  const search = new URLSearchParams(url.search);
  const query = search.get("query");
  const filter_query = {
    __or: [
      {
        body: {
          like: `*${query}*`,
        },
      },
      {
        headline: {
          like: `*${query}*`,
        },
      },
      {
        text: {
          like: `*${query}*`,
        },
      },
    ],
  };
  const { data } = await getStoryblokApi().get(`cdn/stories`, {
    version: "draft",
    filter_query,
  });
  return { stories: data.stories };
};
Displaying Filtered Stories
- Load the stories using the
useLoaderDatamethod. - Filter the stories by content type.
- Display the filtered stories.
import { useLoaderData, Link } from "@remix-run/react";
import { getStoryblokApi } from "@storyblok/react";
import type { LoaderArgs } from "@remix-run/node";
import type { StoryblokStory } from "storyblok-generate-ts";

export const loader = async ({ request }: LoaderArgs) => {
  const url = new URL(request.url);
  const search = new URLSearchParams(url.search);
  const query = search.get("query");
  const filter_query = {
    __or: [
      {
        body: {
          like: `*${query}*`,
        },
      },
      {
        headline: {
          like: `*${query}*`,
        },
      },
      {
        text: {
          like: `*${query}*`,
        },
      },
    ],
  };
  const { data } = await getStoryblokApi().get(`cdn/stories`, {
    version: "draft",
    filter_query,
  });
  return { stories: data.stories };
};

const SearchResults = () => {
  const { stories } = useLoaderData();
  const pagesResults = stories.filter(
    (s: StoryblokStory<any>) => s.content.component === "page"
  );
  const postsResults = stories.filter(
    (s: StoryblokStory<any>) => s.content.component === "post"
  );
  if (stories.length === 0) return <h1>No results found</h1>;
  return (
    <>
      {pagesResults.length > 0 && <h2>Pages</h2>}
      {pagesResults?.map((p: StoryblokStory<any>) => {
        return (
          <h3 key={p.id}>
            <Link to={`/${p.full_slug}`}>{p.name}</Link>
          </h3>
        );
      })}

      {postsResults.length > 0 && <h2>Posts</h2>}
      {postsResults?.map((p: StoryblokStory<any>) => {
        return (
          <h3 key={p.id}>
            <Link to={`/${p.full_slug}`}>{p.content.headline}</Link>
          </h3>
        );
      })}
    </>
  );
};

export default SearchResults;
Conclusion
In conclusion, this tutorial has shown the simplicity of creating a search function in Remix.
By using the built-in form handling capabilities and the Form component in Remix, we were able to easily pass the search query from our form to the page results.
The filtering of stories from the Storyblok content delivery API was made effortless by utilizing the filter_query parameter.
