Add a headless CMS to Remix in 5 minutes
Storyblok is the first headless CMS that works for developers & marketers alike.
In this article, we’ll see how to integrate Storyblok into our Remix application so we can manage the content of our project inside a Headless CMS. We'll also see how we can enable a live preview of the content that's created, using Storyblok's Visual Editor (opens in a new window).
If you have less than 5 minutes, you can take a look at the source code of the sample project on this GitHub Repository.
Environment Setup
In order to follow this guide, we assume that you meet these requirements:
- Basic understanding of React and JavaScript.
- Node.js LTS version.
- Storyblok (opens in a new window) account, to create a space for the project.
Create a new Remix project
In the terminal, let's type the following command:
npx create-remix@latestOr, if you plan to deploy on Netlify:
npx create-remix@latest --template netlify/remix-templateExecuting this command will generate a boilerplate that we can use as the starting point for our new Remix application. After all the files are generated and the project is set up, we should be able to start the Remix application:
cd [directory-of-your-project]
npm run dev
That initializes the development server, and we should be able to see the sample page of the project visiting http://localhost:3000.

Remix starter page
For this tutorial, we will set up our dev server with an HTTPS proxy, to use a secure connection with the application. We'll use port 3010, so the URL to access our website will end up being https://localhost:3010/.
If you don't know how to setup an HTTPS proxy on macOS, you can read this guide.
Configuration of the space
You can easily configure a new space by clicking Add Space {1} after having logged in to Storyblok.

Creating a new space in Storyblok
Create a new space in the Storyblok app by choosing the Create space {1} option. Pick a name for it {2}. Optionally, you can choose between different server locations for your space {3} (if you choose the United States or China, please be mindful of the required API parameter explained hereinafter).
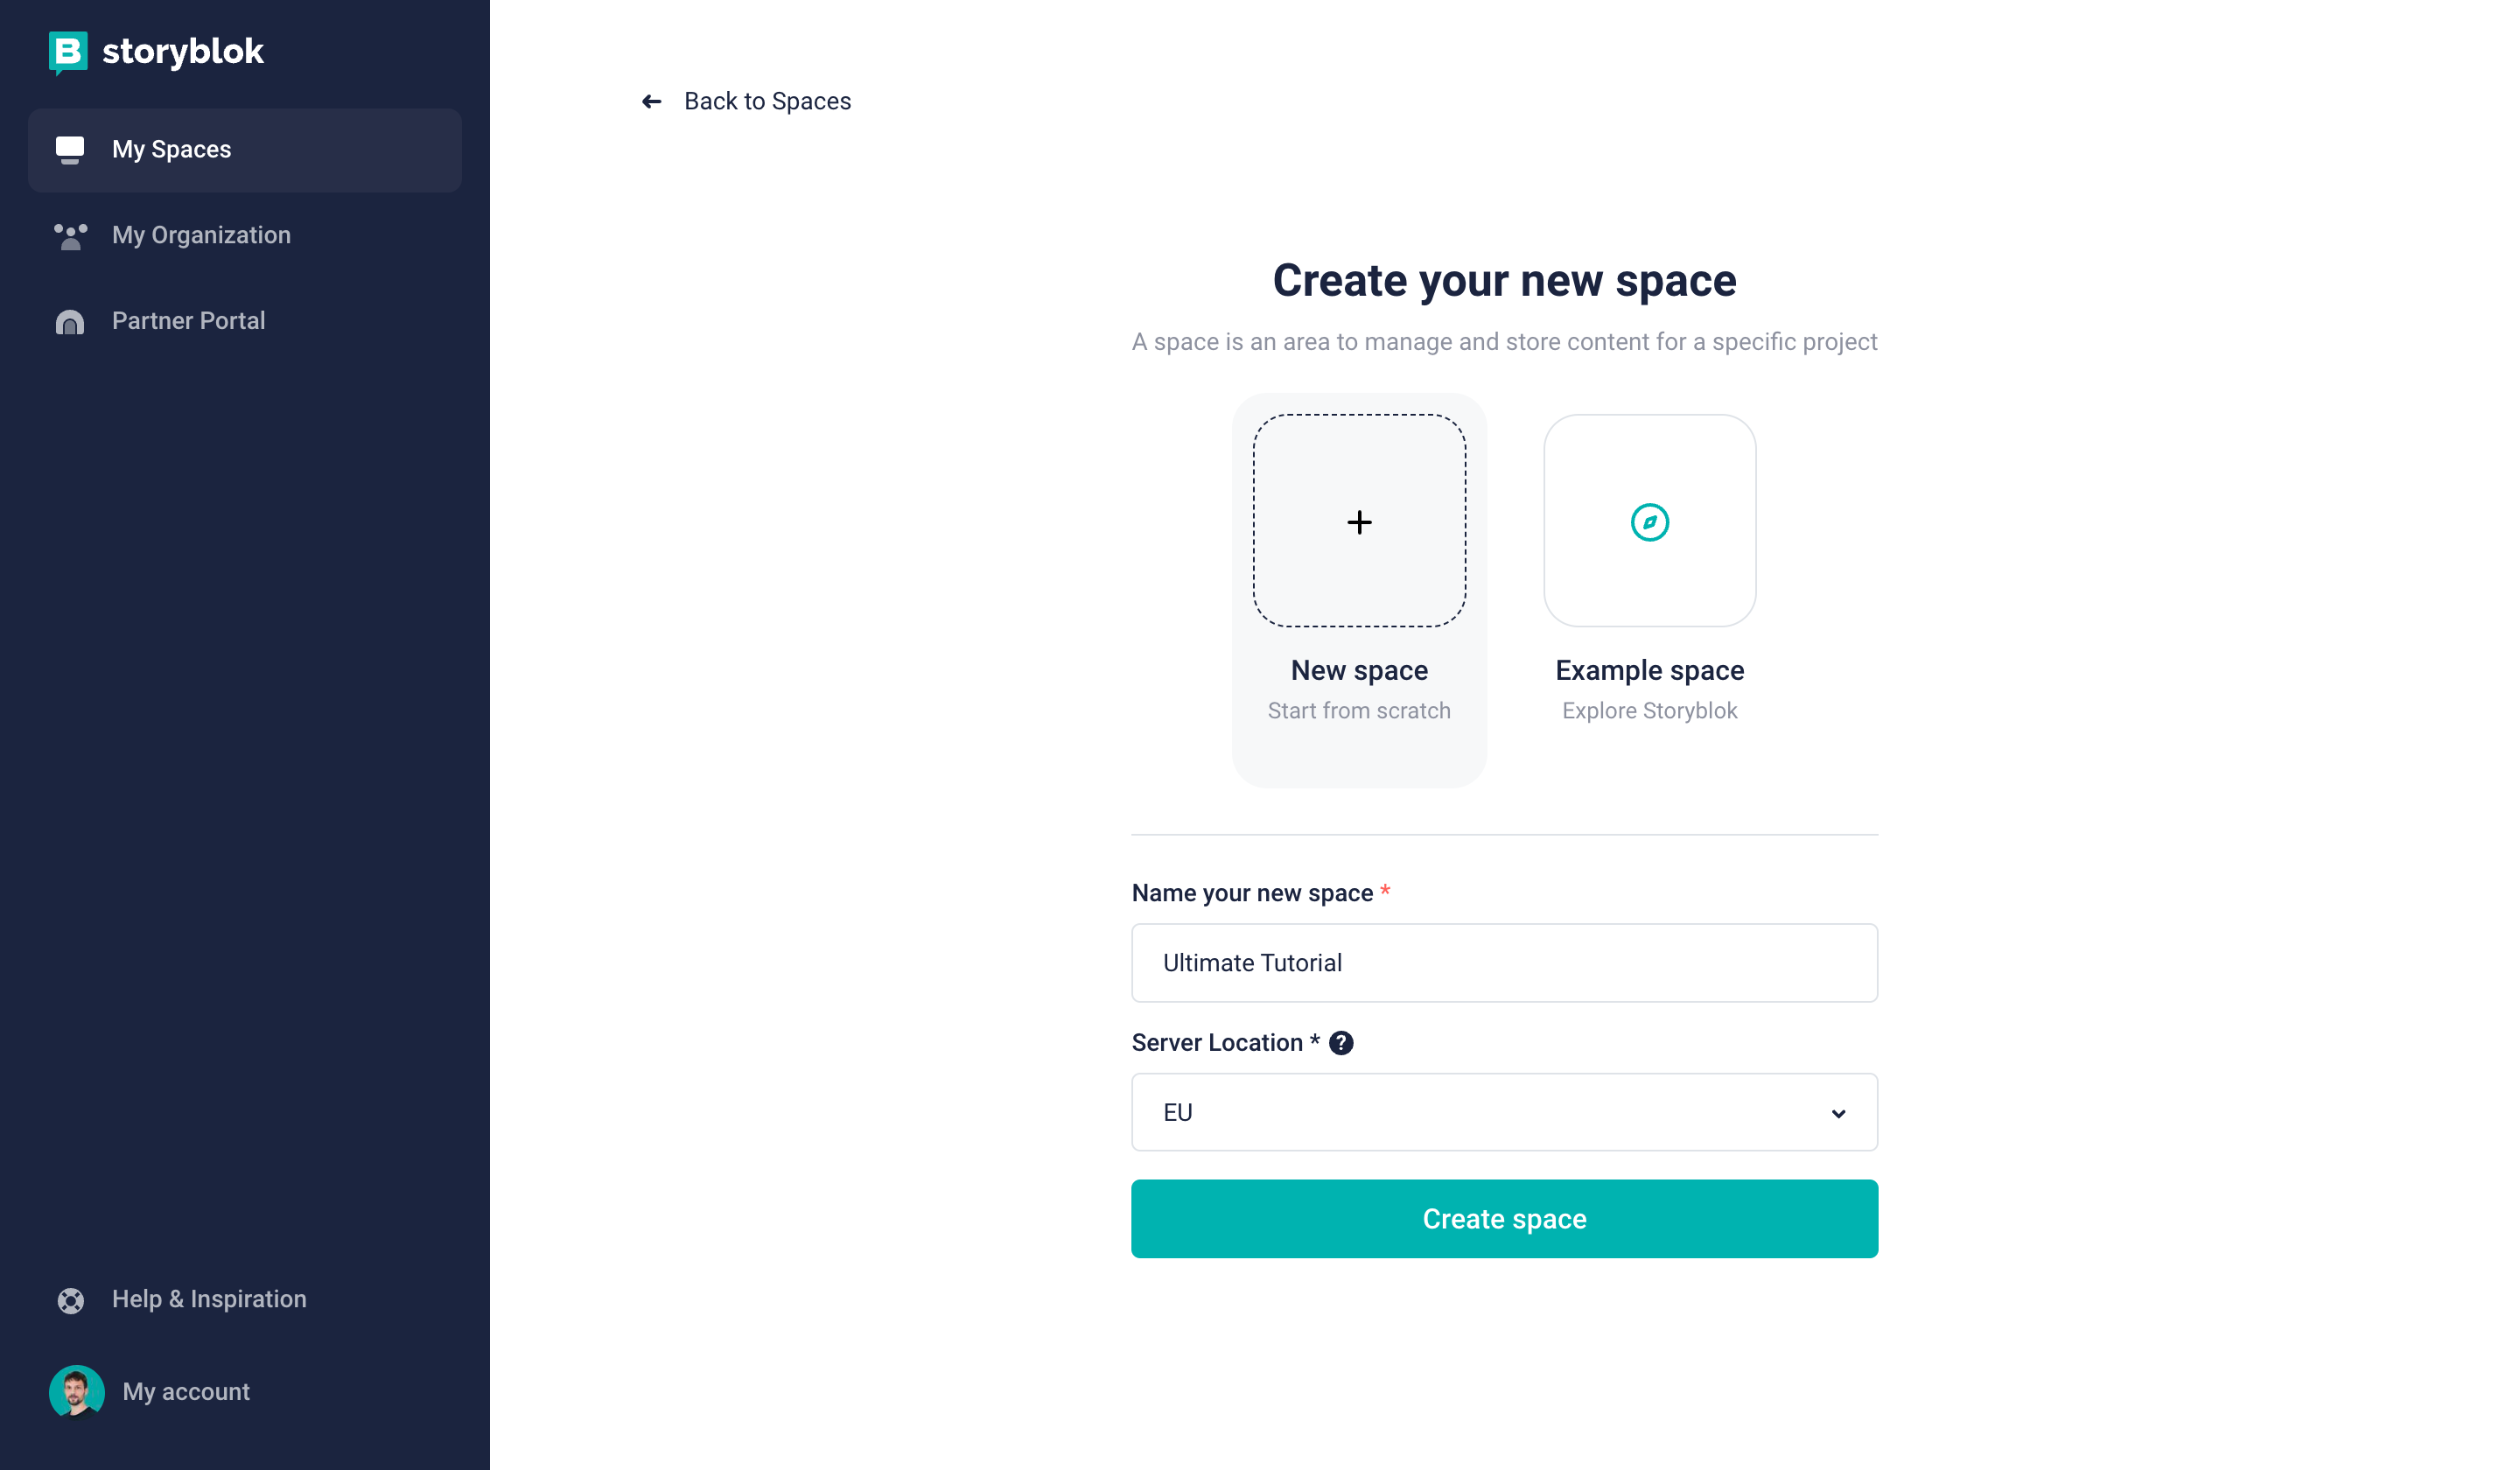
Creating a new space in Storyblok
Shortly afterward, a Storyblok space with sample content has been created for you. Let’s open the Home story by first clicking on Content {1} and then on Home {2}:
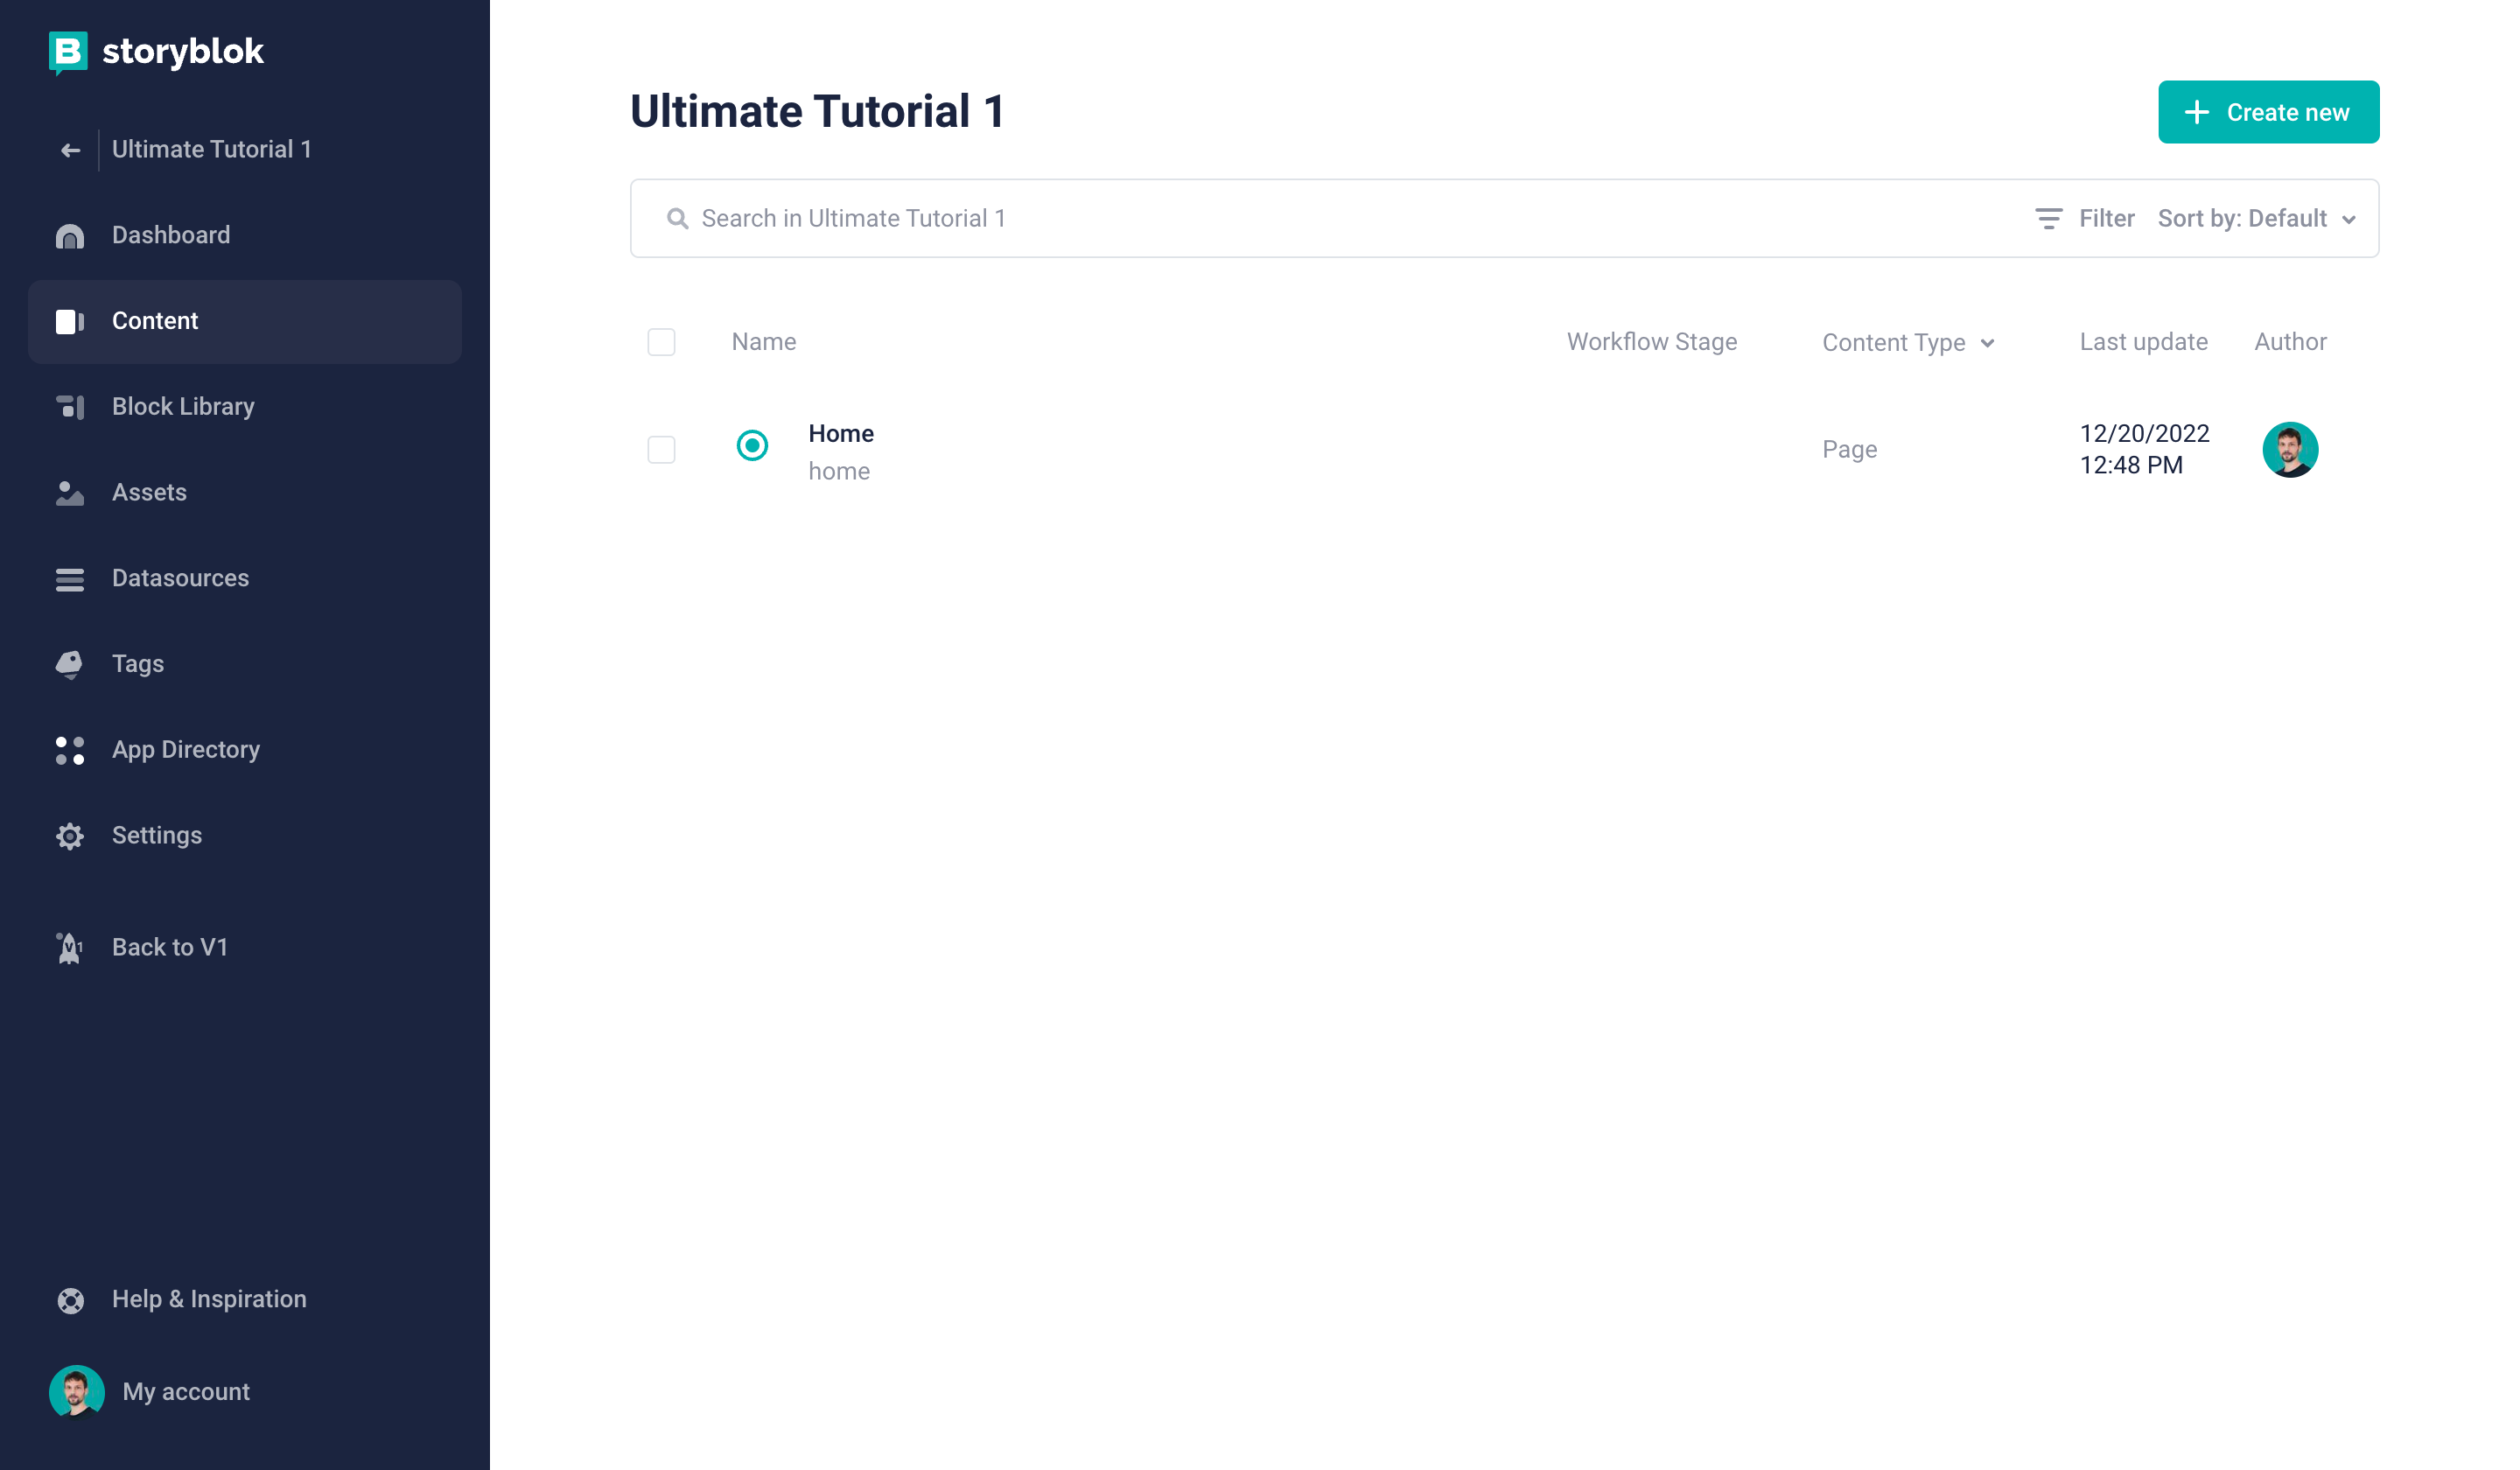
Opening the Home story
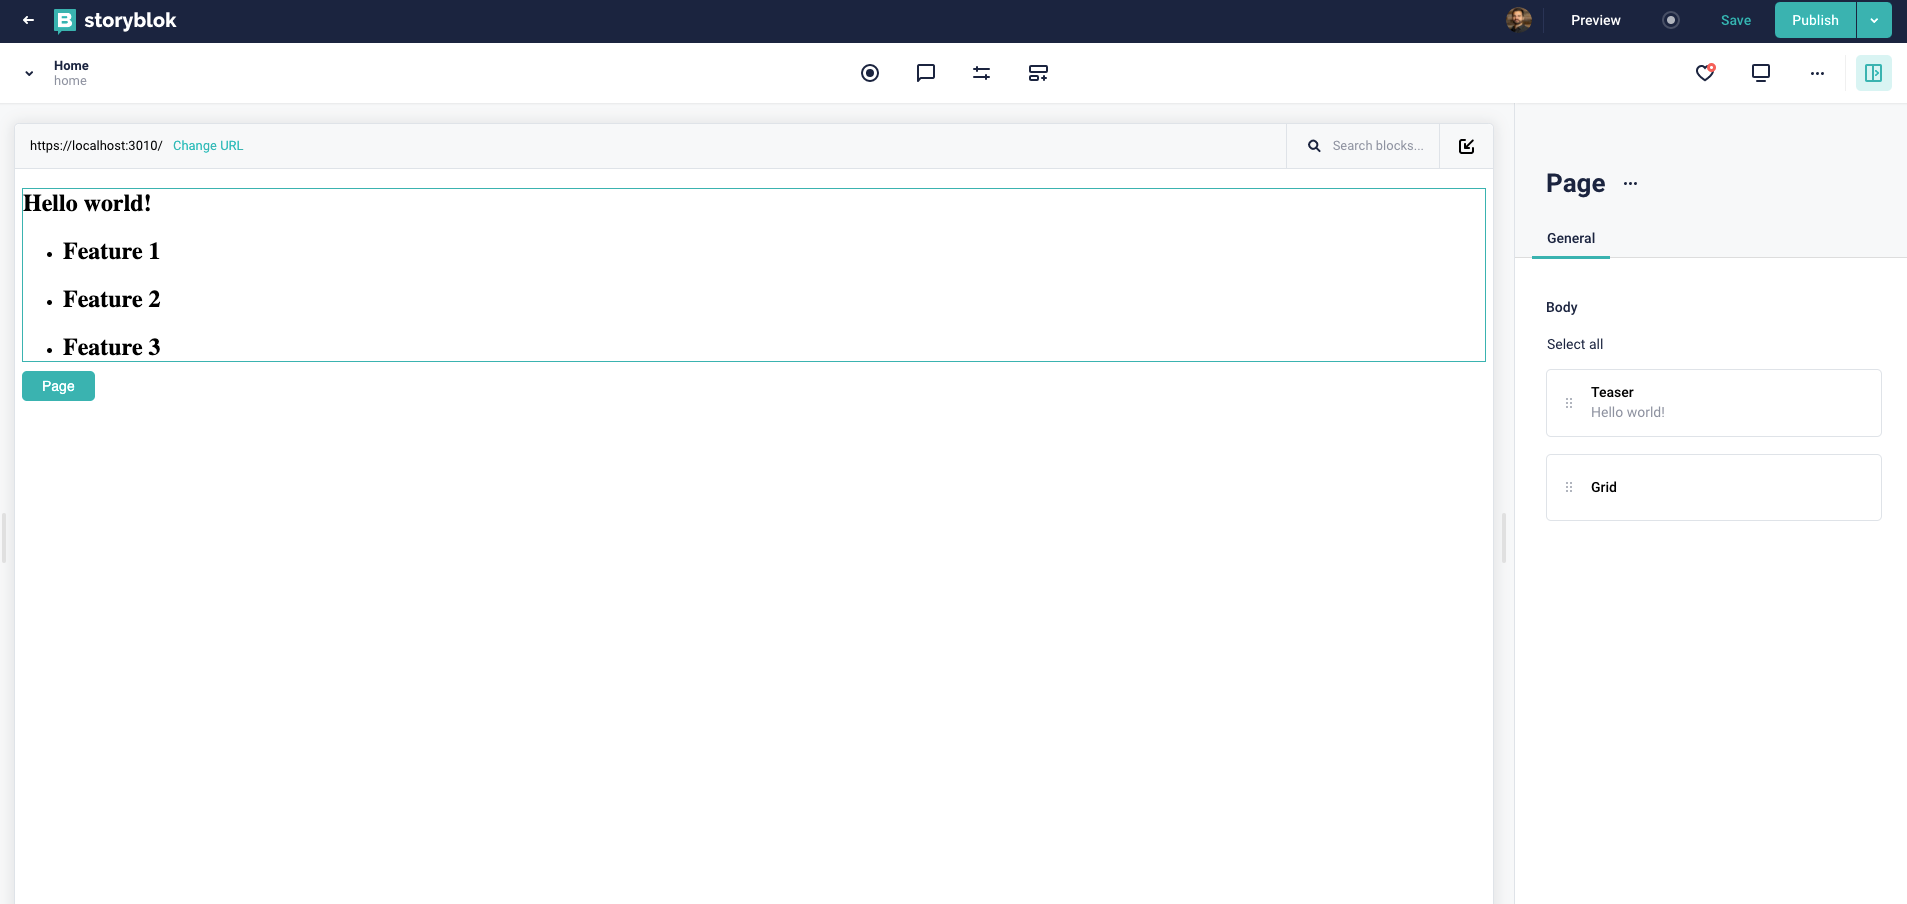
Now you’ll see the default screen and the Visual Editor:
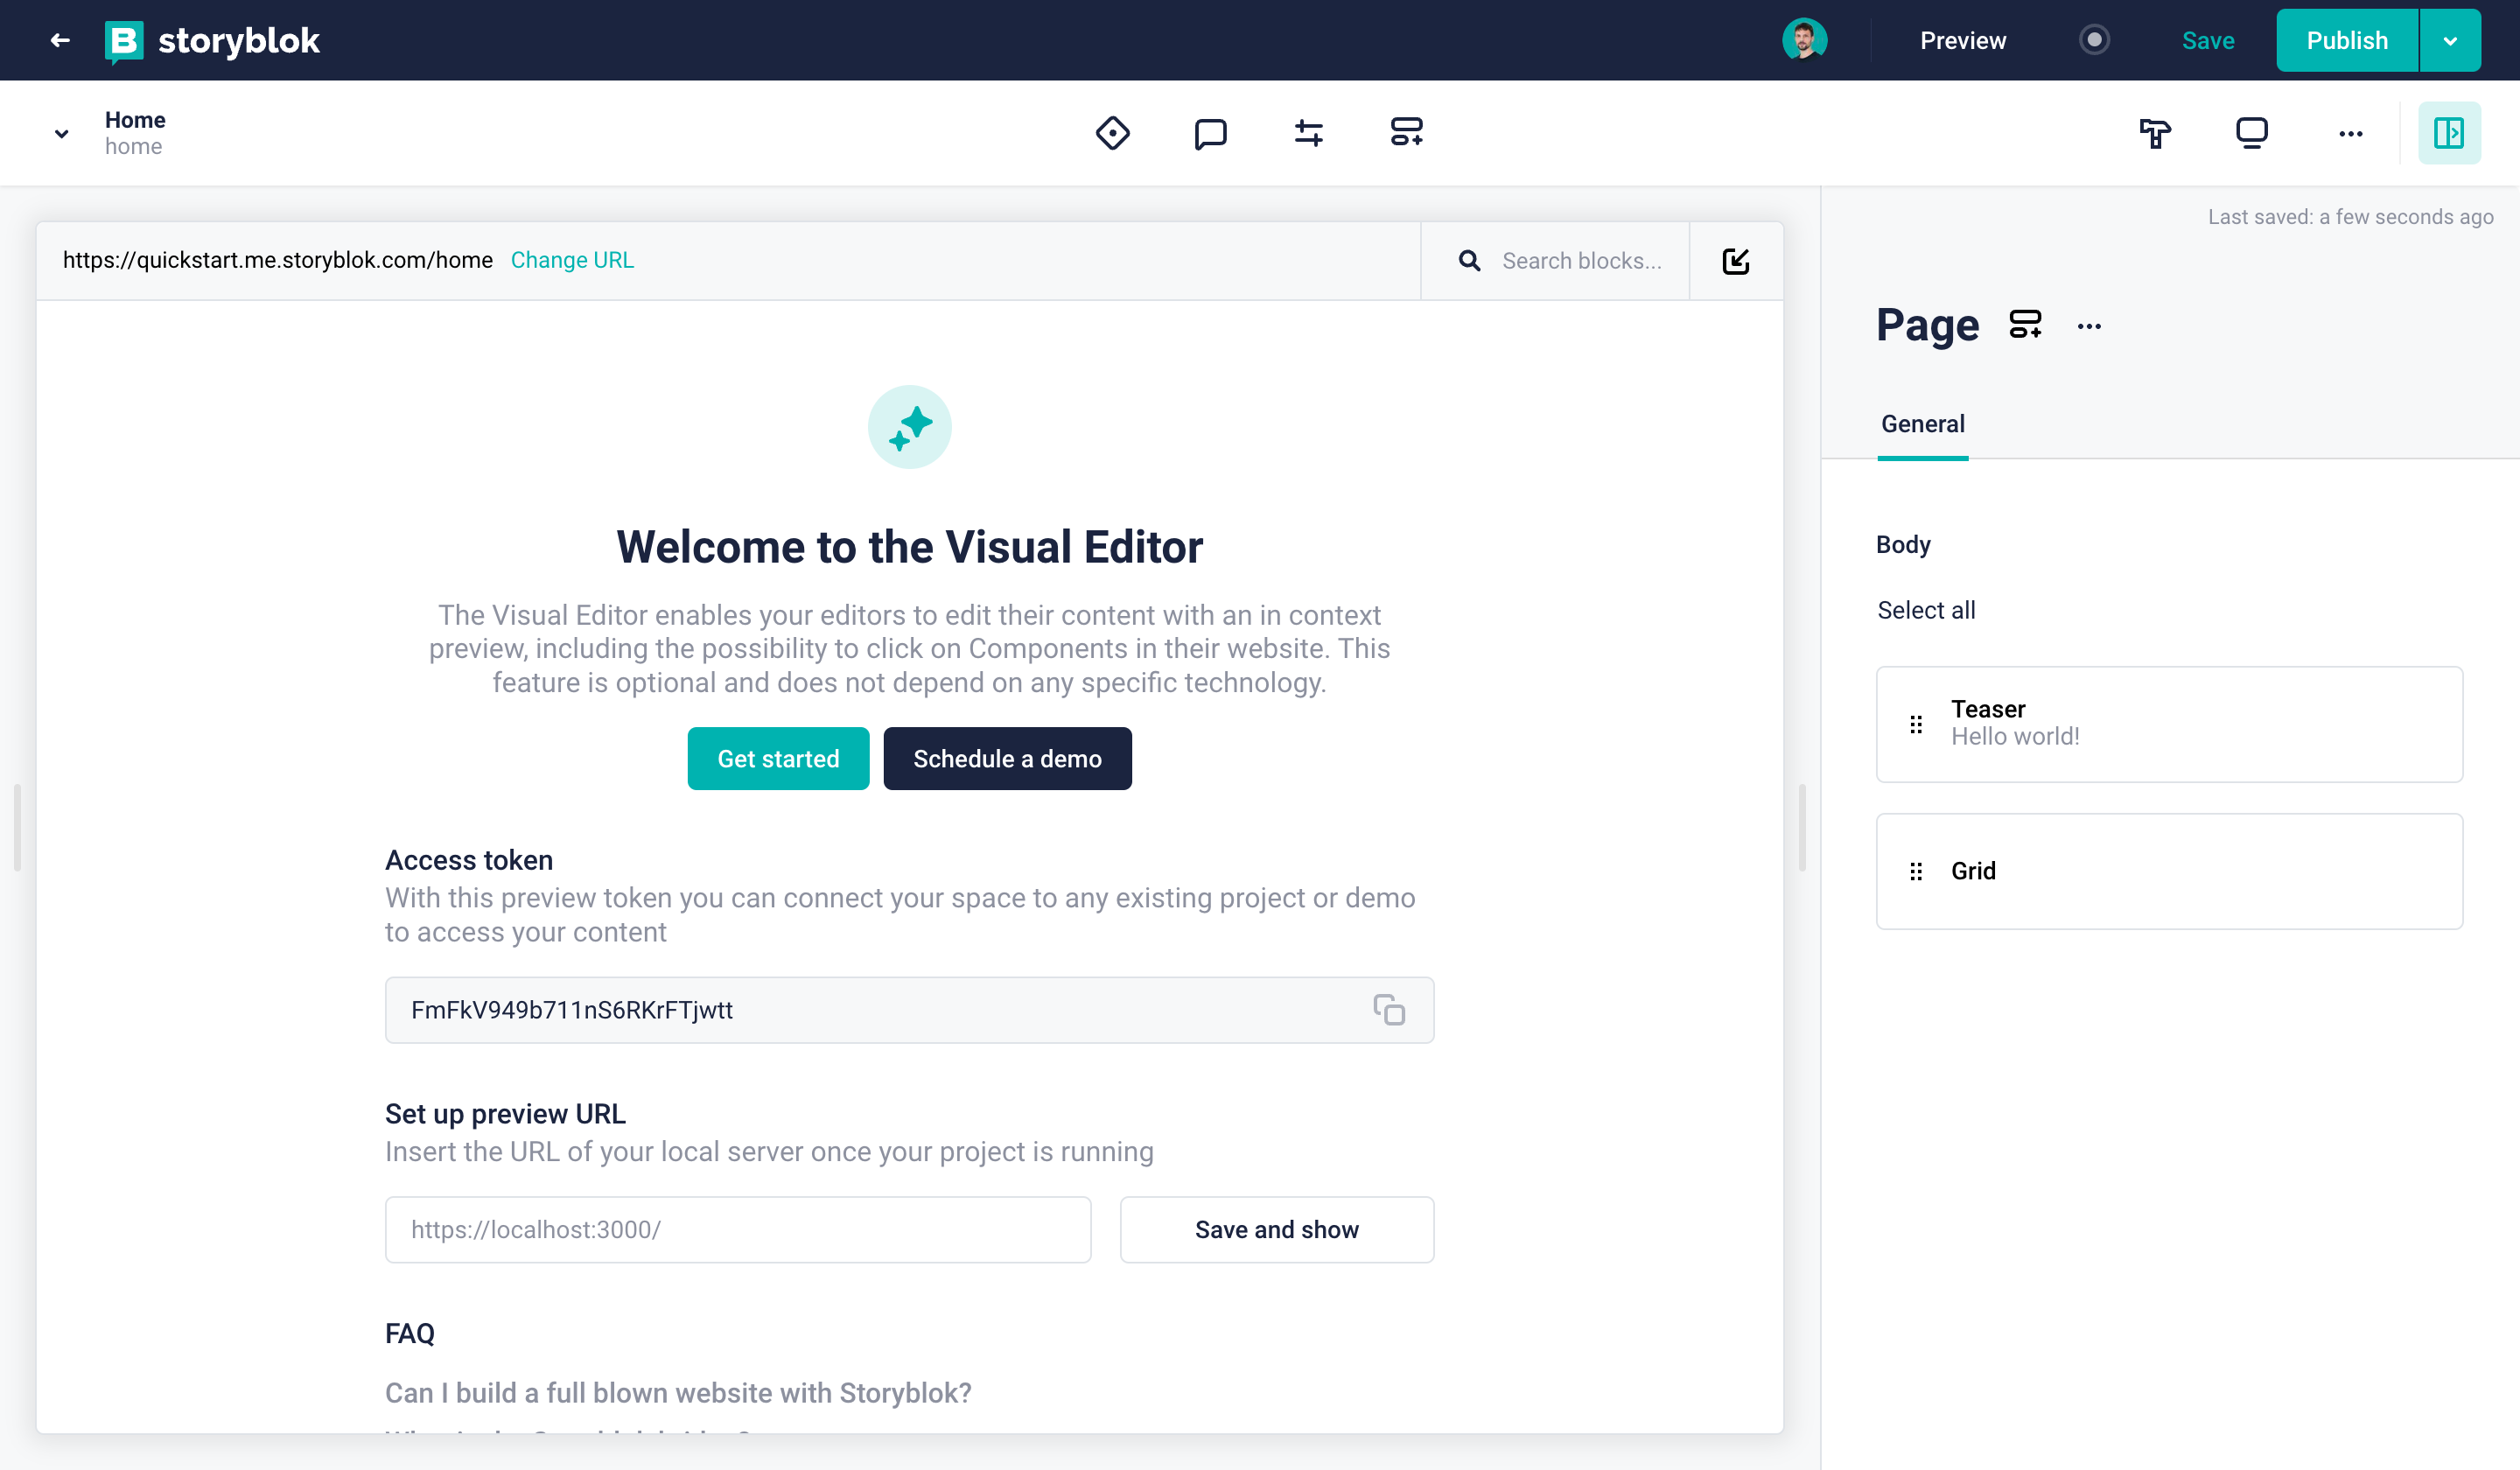
Visual Editor representing your Home story
After we create our space, we need to configure the preview URL that will connect Storyblok to the frontend of our application. By doing this, we'll be able to see our website inside the Visual Editor. Once we're inside our new space, go to Settings {1} > Visual Editor {2}, and set the Location (default environment) to https://localhost:3010/.
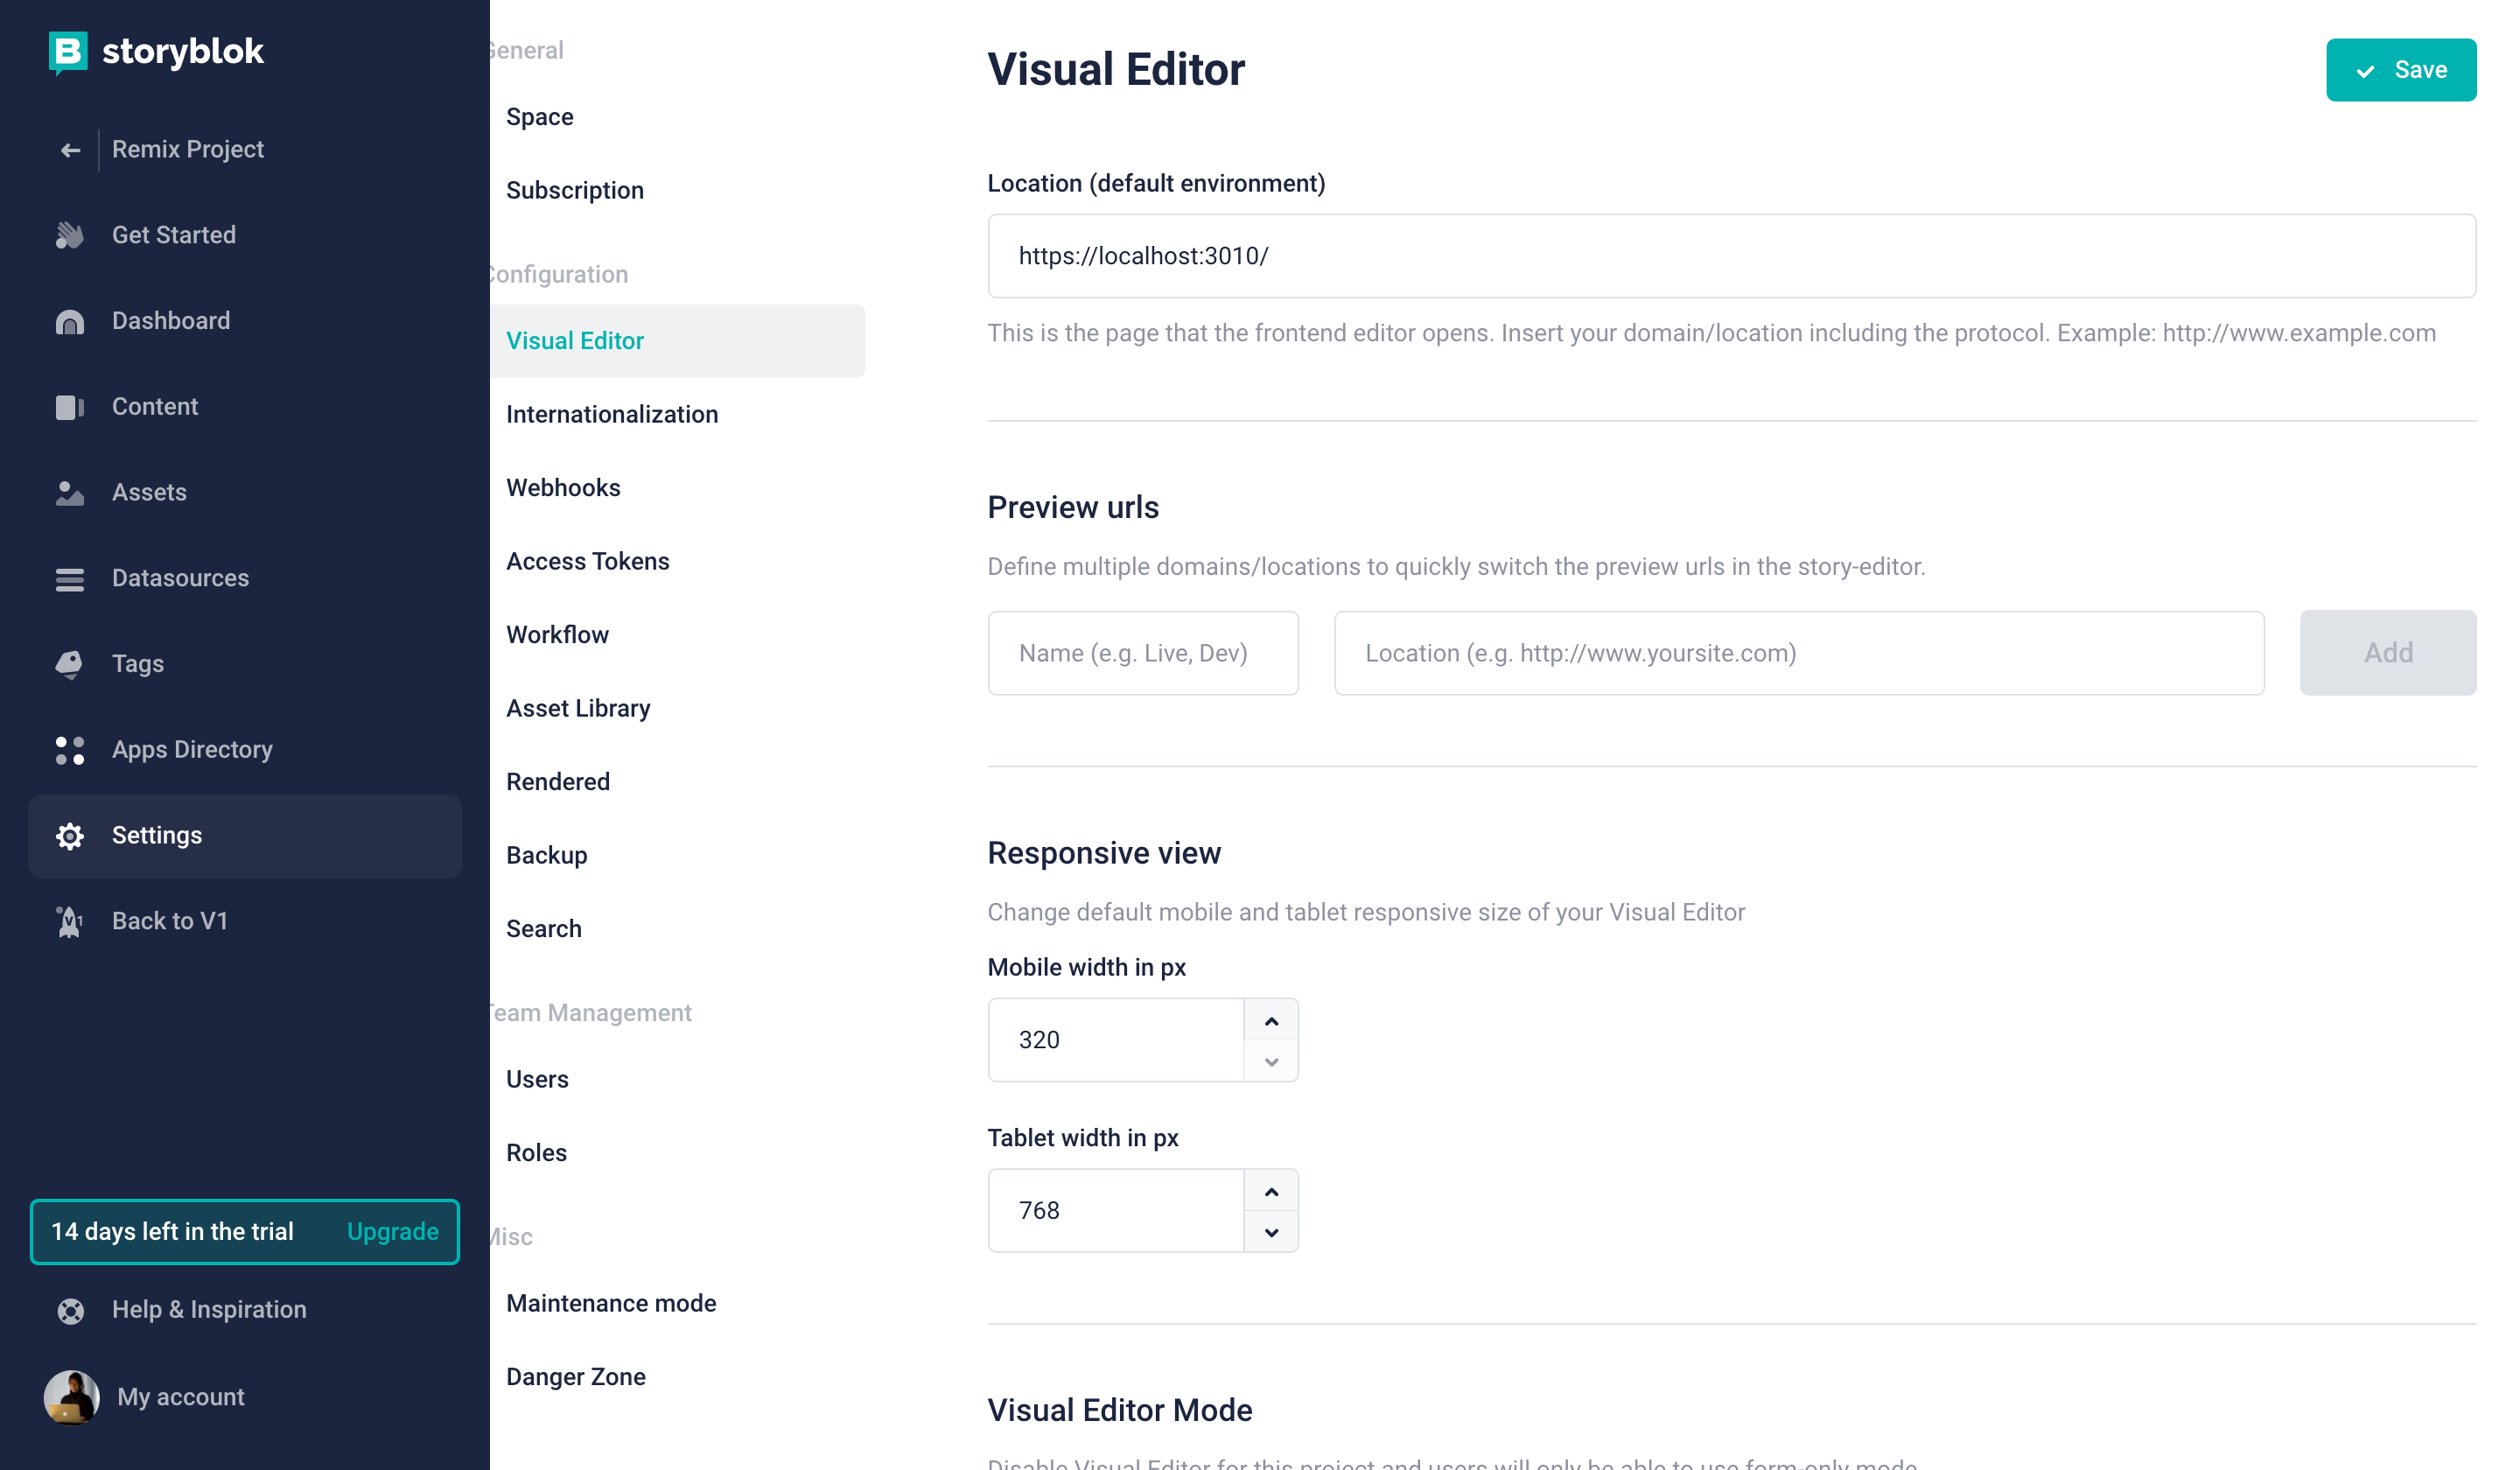
Preview URL
We can set our Home page as the initial page of our website. Go to Content and open the Home story in the Visual Editor. Click on the Entry configuration option, and set the Real Path to /.
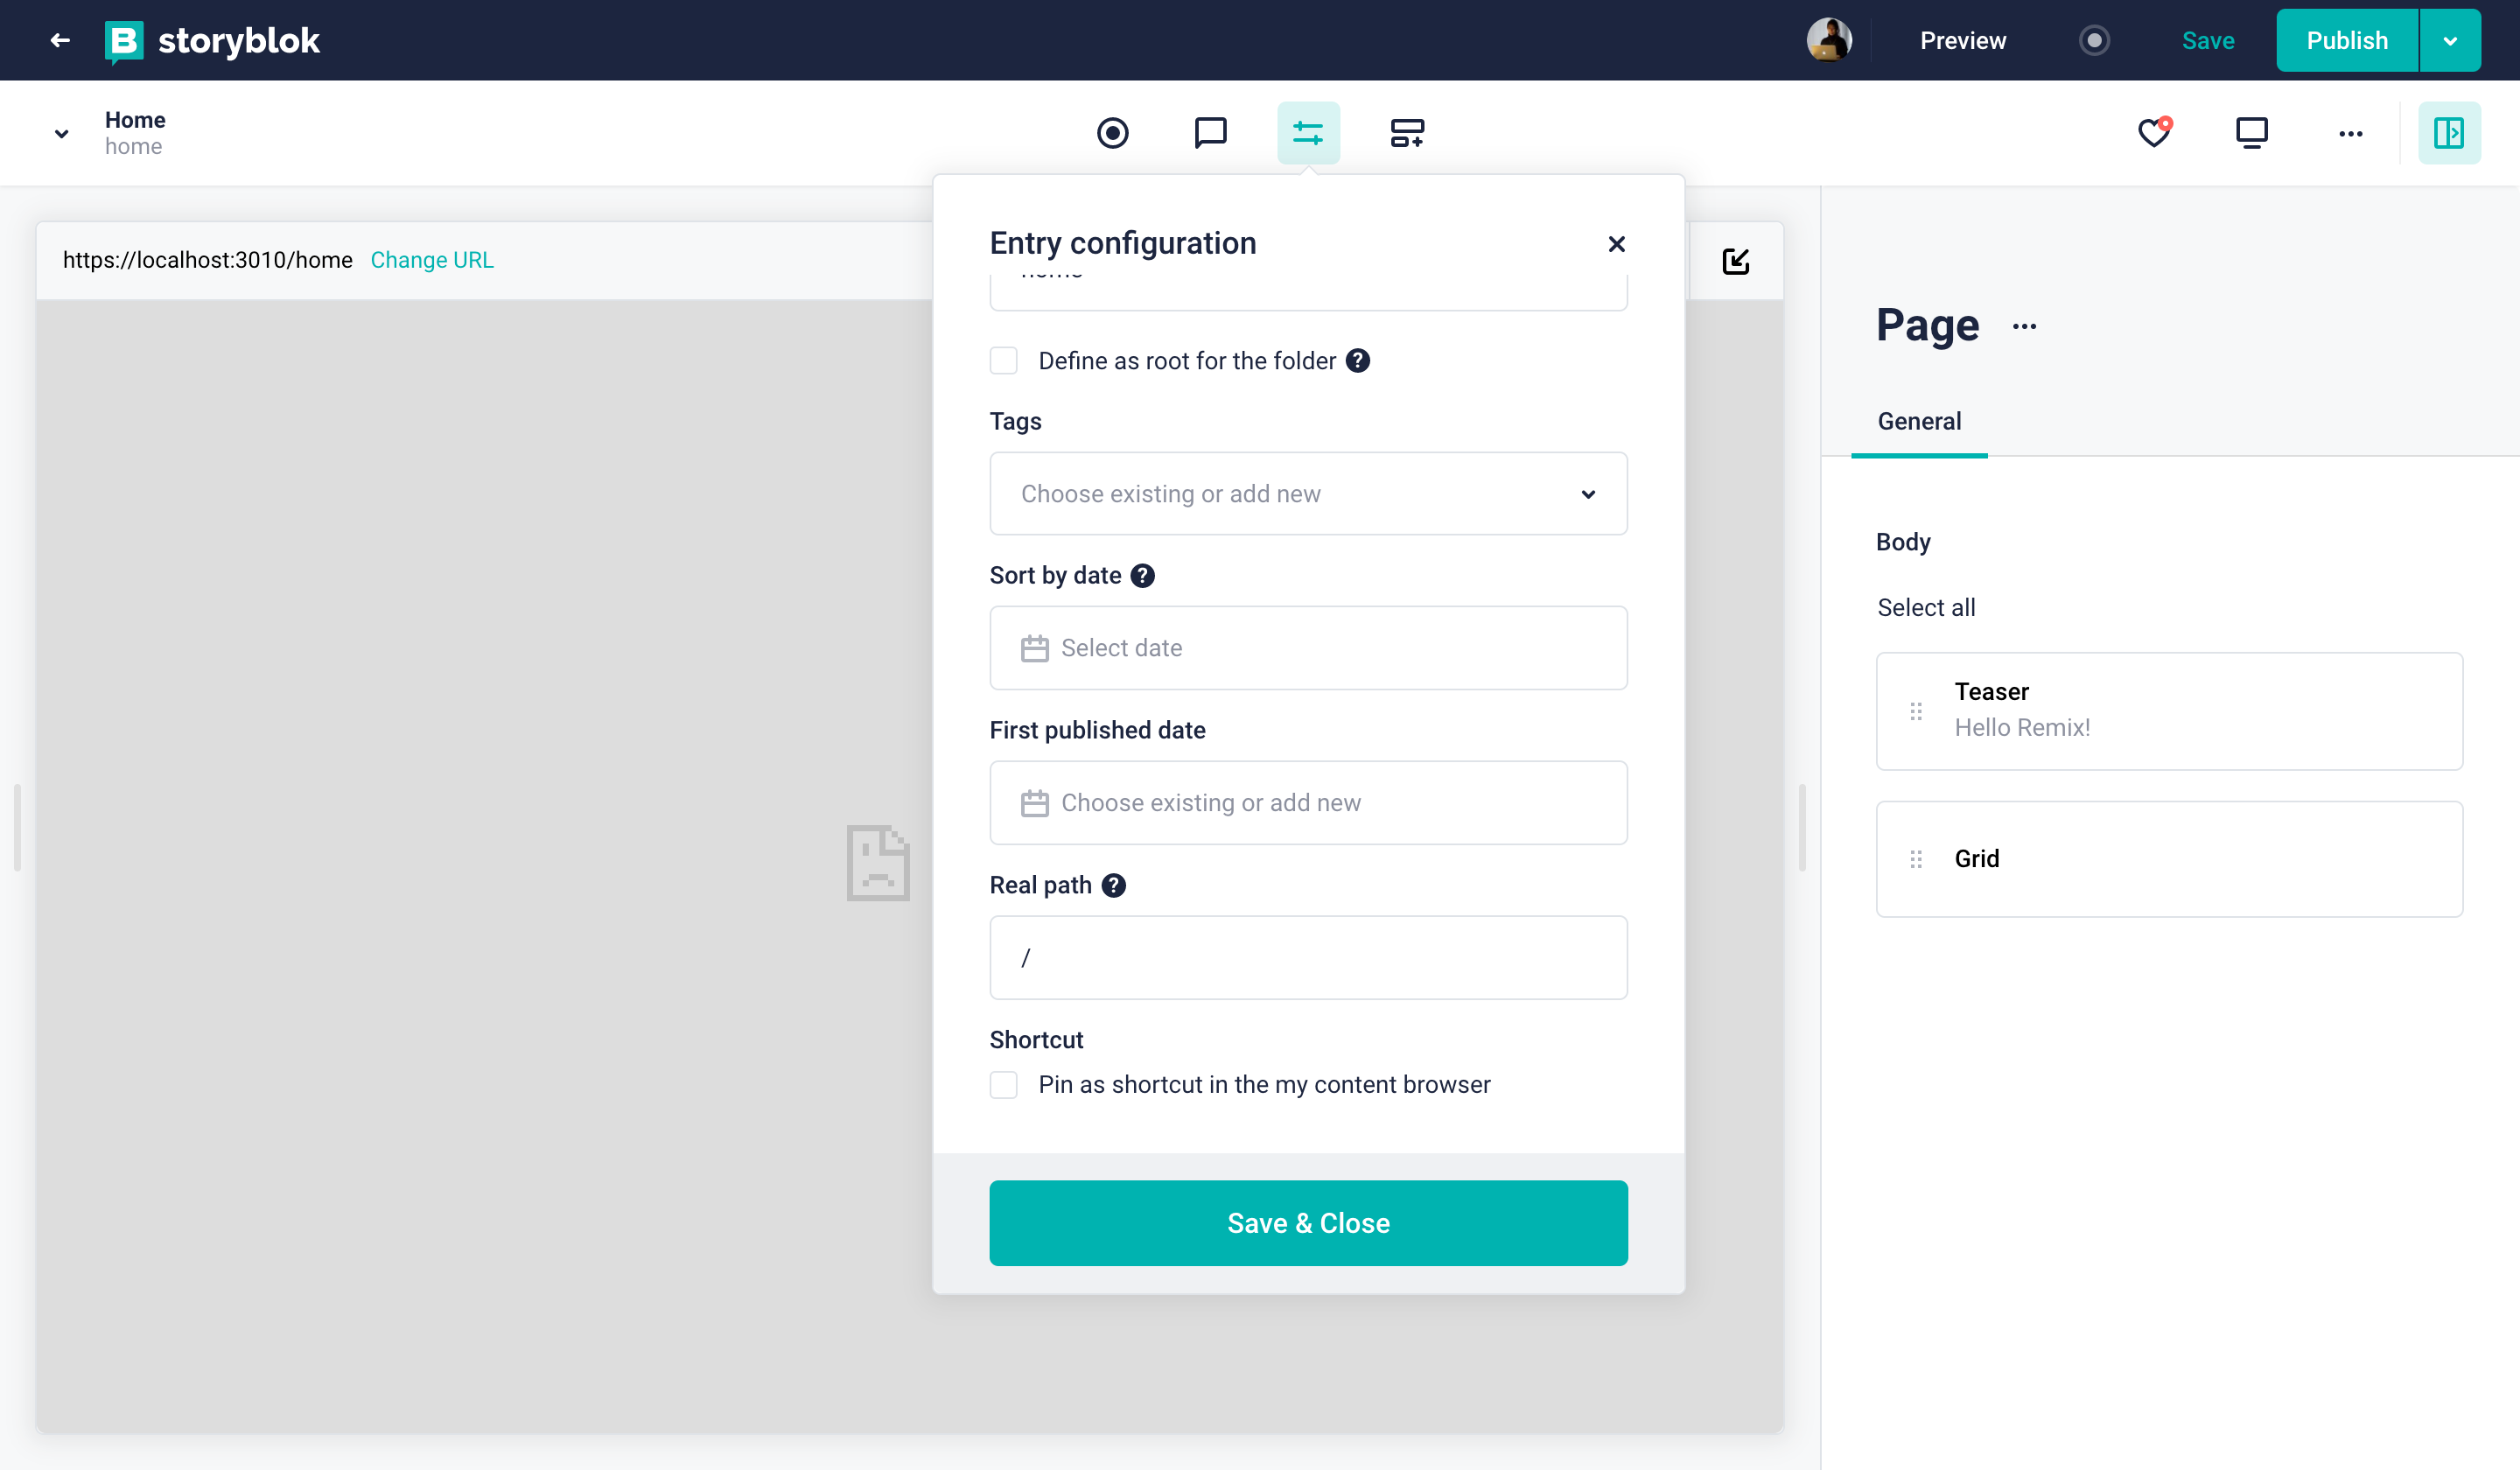
Set the real path
Setting the correct region
Depending on whether your space was created in the EU, the US, Australia, Canada, or China, you may need to set the region parameter of the API accordingly:
eu(default): For spaces created in the EUus: For spaces created in the USap: For spaces created in Australiaca: For spaces created in Canadacn: For spaces created in China
Here's an example for a space created in the US:
apiOptions: {
  region: "us",
},Note: For spaces created in any region other than the EU, the region parameter must be specified.
Connect the Remix project to Storyblok
We have a tool that will make it easy to connect our Remix application to Storyblok. Let's install the official Storyblok React SDK (opens in a new window), which is the only package we need.
npm install @storyblok/reactThis NPM package (SDK) allows us to interact with the Storyblok API (opens in a new window), and will help us to enable the real-time editing experience inside the Visual Editor. In order to do that, we need to add some configuration.
If you want to learn more about configuration and options from @storyblok/react , you can read more from here. If you want to try out a demo, you can see our Stackblitz demo.
In our Storyblok space, go to Settings {1} > Access Tokens {2}, and copy the Preview access token.
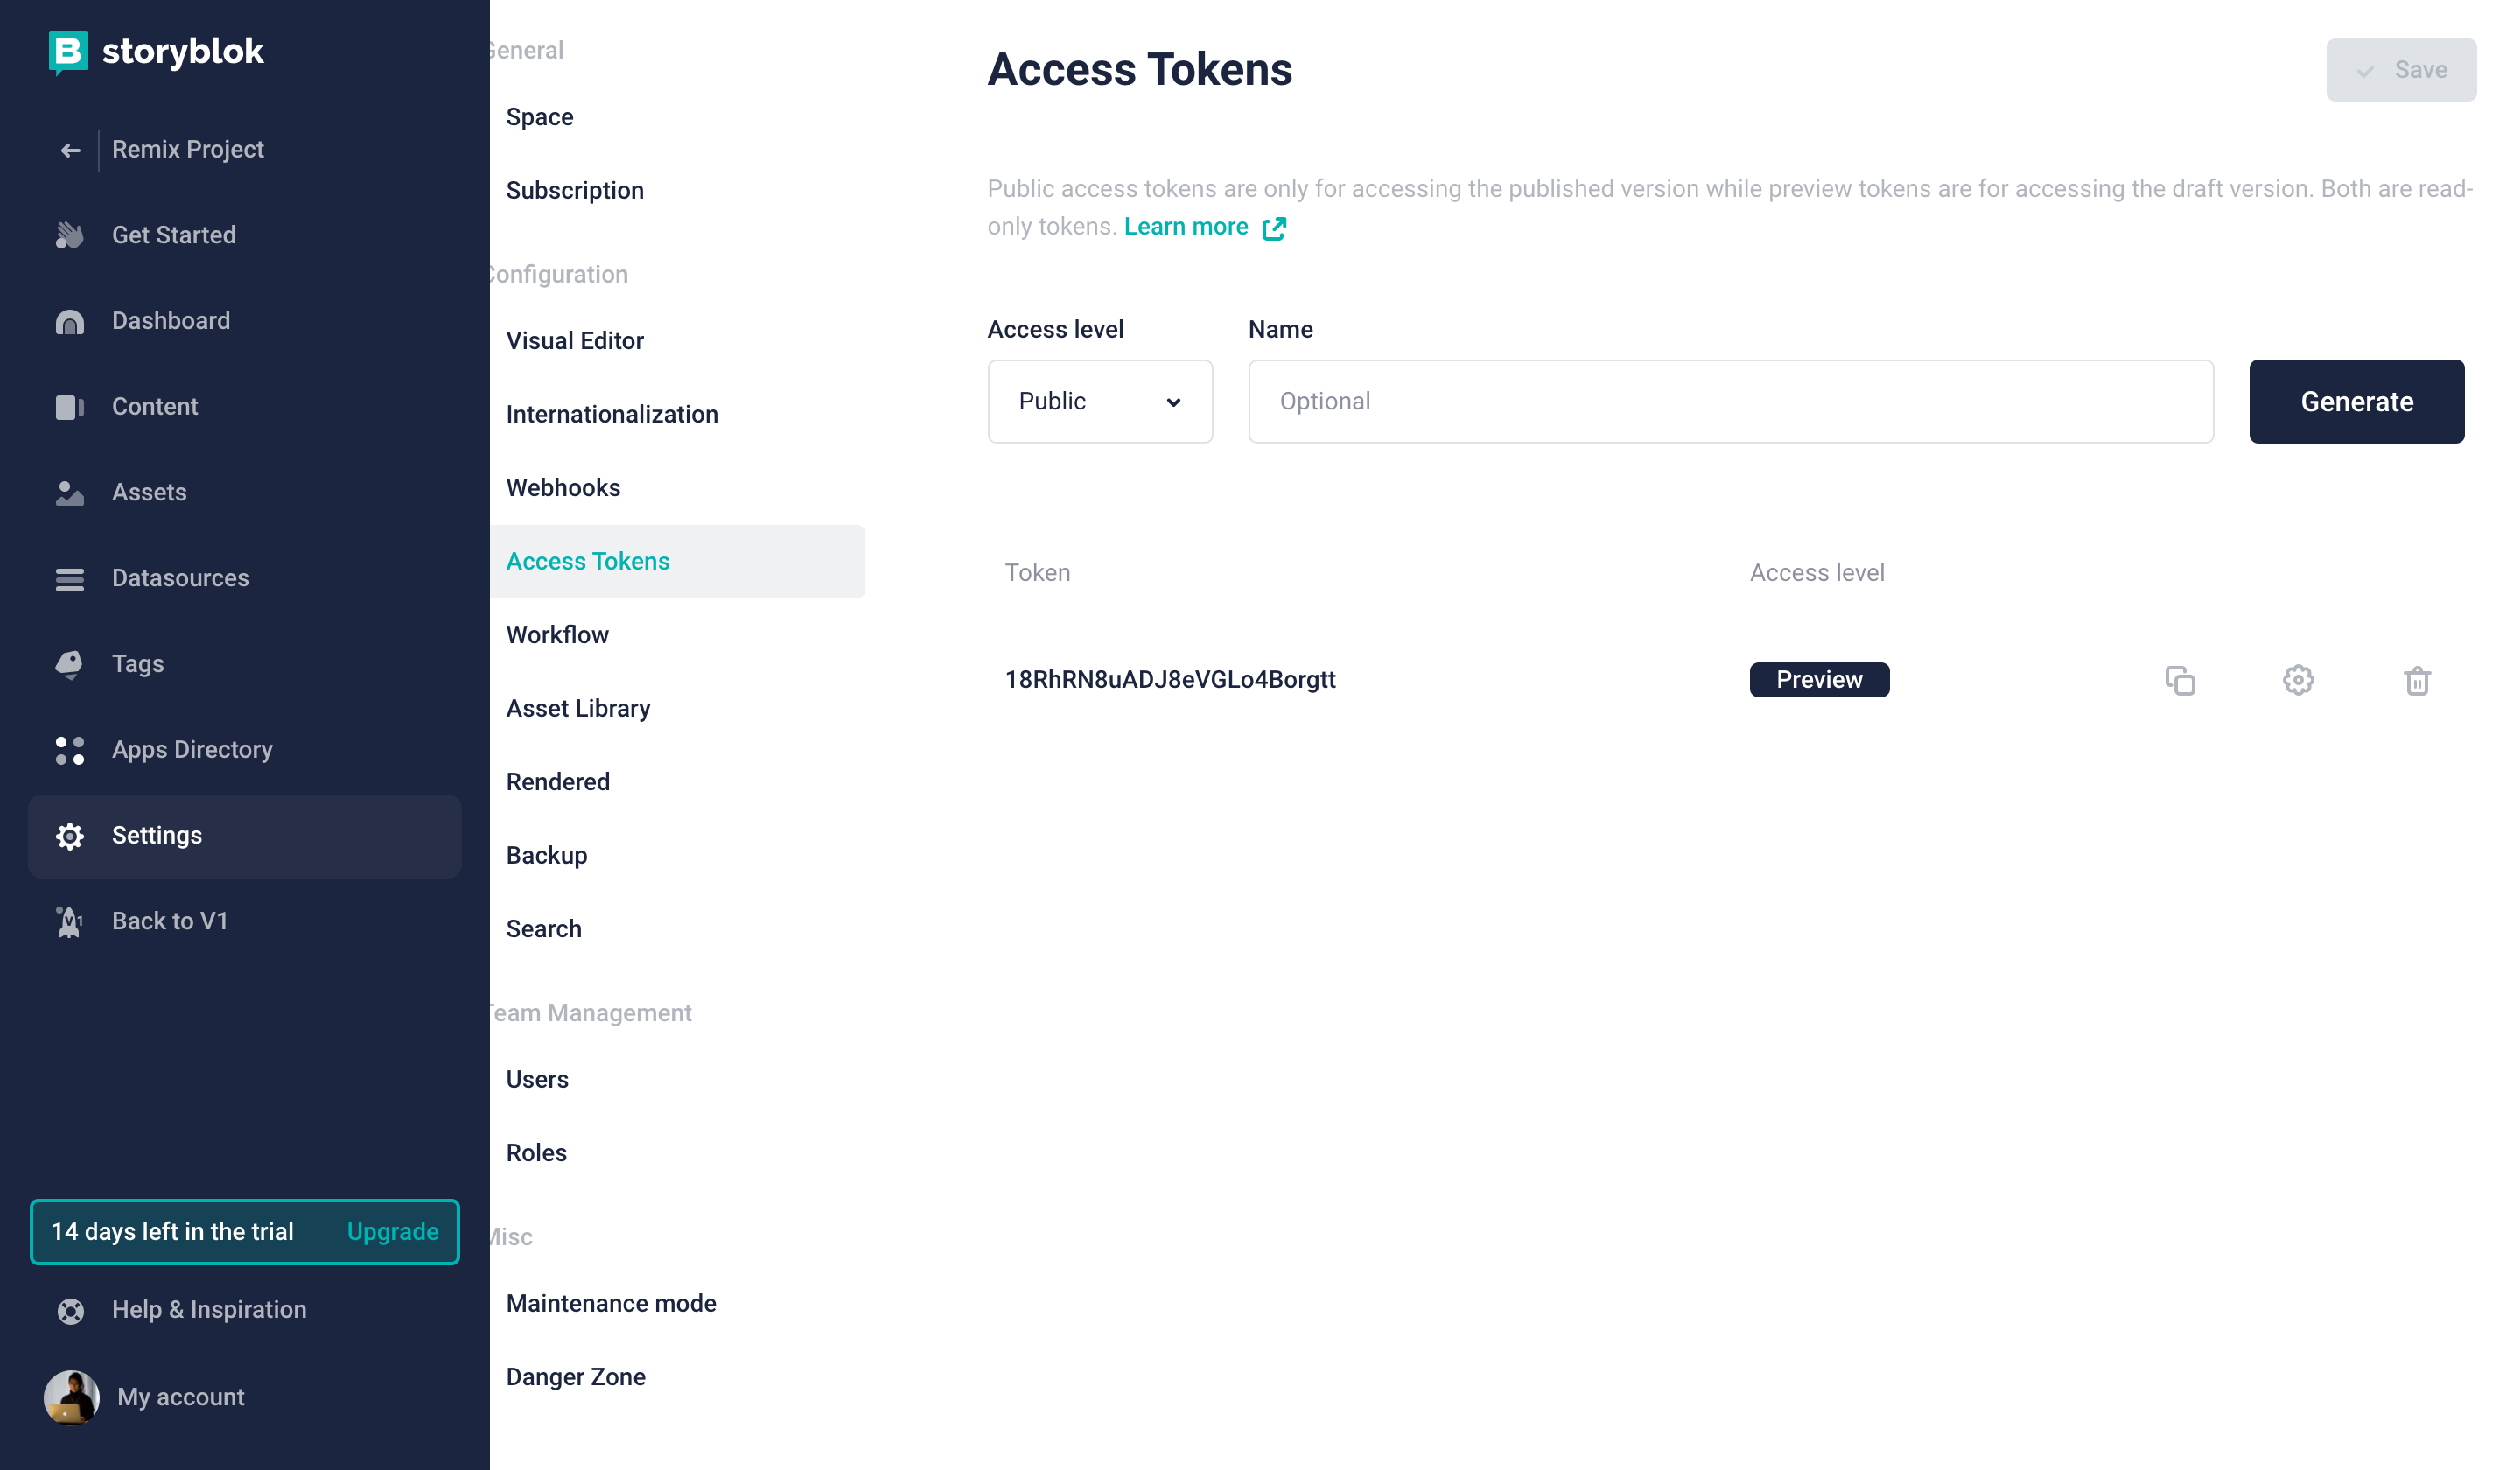
Preview Access Token
Now, go to the app/root.jsx file in our Remix project, and add this piece of code before the existing functions, replacing the value of accessToken with the one we copied from the Storyblok space.
...

import { storyblokInit, apiPlugin } from "@storyblok/react";

storyblokInit({
  accessToken: "your-preview-token",
  use: [apiPlugin],
});

...If you'd like to learn more about environment variable configuration with Remix, we recommend you to have a look at this Remix documentation.
storyblokInit sets up the connection with the space. It initializes the Storyblok Bridge (opens in a new window), that allows us to enable the real-time editing experience inside the Visual Editor. The function also provides an instance of the Storyblok API client that we can use to retrieve content from Storyblok.
As you may have already seen, the content in Storyblok is structured as components (or blocks). We can have stories/pages, that are composed of different components. You can see an example in the Home story of our new space.
If you want to learn more about how the content is structured in Storyblok, you can read this guide.
In order to display the content in our Remix application, to structure it, and to be able to manipulate it inside the Visual Editor, we need to create the visual representation of the components.
Create and configure components
We will create React components that will link to the component structures available in our Storyblok space. When a new space is created in Storyblok, it comes with four default component types: Page, Teaser, Grid, and Feature. Let's create React components for each one of them.
Inside the app folder of our Remix project, create a components directory. Let's create one file for each React component:
import { storyblokEditable, StoryblokComponent } from "@storyblok/react";

const Page = ({ blok }) => (
  <main {...storyblokEditable(blok)} key={blok._uid} className="px-4">
    {blok.body.map((nestedBlok) => (
      <StoryblokComponent blok={nestedBlok} key={nestedBlok._uid} />
    ))}
  </main>
);

export default Page;
Here we are rendering the HTML markup for the Page content type. We can use all the properties coming from the Storyblok API to display the content. In this case, the Page content type has a property called body, which includes a list of blocks.
In this first component, we can identify two elements related to Storyblok, included in the @storyblok/react package:
storyblokEditable: This function allows us to mark a React component as "editable". So, when we load a page that contains it inside the Visual Editor, we'll be able to click on it and edit its properties. We'll mark all the React components that link to Storyblok components/blocks as "editable".
StoryblokComponent: This React generic component allows us to render any React component linked to a Storyblok item. So, in the case that we don't know the exact structure of a component, or which blocks are included in a certain property/structure, we can use this wildcard to render the content. To makeStoryblokComponentwork properly, we will need to list all the React components that we want to handle, and link them to their representation in the Storyblok space. We will see later how to do that.
Let's create the other three components:
import { storyblokEditable } from "@storyblok/react";

const Teaser = ({ blok }) => {
  return (
    <div {...storyblokEditable(blok)} key={blok._uid} className="py-32 text-6xl text-[#50b0ae] font-bold text-center">
      {blok.headline}
    </div>
  );
};

export default Teaser;import { storyblokEditable, StoryblokComponent } from "@storyblok/react";
const Grid = ({ blok }) => (
<ul {...storyblokEditable(blok)} key={blok._uid} className="container mx-auto grid md:grid-cols-3 gap-12 my-12 place-items-center">
{blok.columns.map((blok) => (
<li key={blok._uid}>
<StoryblokComponent blok={blok} />
</li>
))}
</ul>
);
export default Grid;import { storyblokEditable } from "@storyblok/react";
const Feature = ({ blok }) => {
return (
<div {...storyblokEditable(blok)} key={blok._uid} className="w-full p-12 bg-[#f7f6fd] rounded-[5px] text-center">
<h3 className="text-2xl text-[#1d243d] font-bold"> {blok.name} </h3>
</div>
);
};
export default Feature;As mentioned before, we need to configure the components identified by StoryblokComponent, and link them to their representation in the Storyblok space. To do that, let's go back to app/root.jsx and add a new parameter to storyblokInit call:
...

import { storyblokInit, apiPlugin } from "@storyblok/react";
import Feature from "./components/Feature";
import Grid from "./components/Grid";
import Page from "./components/Page";
import Teaser from "./components/Teaser";

const components = {
  feature: Feature,
  grid: Grid,
  teaser: Teaser,
  page: Page,
};
storyblokInit({
  accessToken: "your-preview-token",
  use: [apiPlugin],
  components,
});

...
One more thing is left to finish our sample project: We need to create the Remix routes that will render the different pages of our website.
Create the dynamic route
If we want to handle multiple routes with a unique file definition, Remix offers Dynamic Routes (opens in a new window). Let's create a file inside the app/routes directory called $slug.jsx. With it, we will handle all the different URLs that we'll have on our website, and all the slugs for the stories in our Storyblok space.
import { json } from "@remix-run/node";
import { useLoaderData } from "@remix-run/react";

import {
  getStoryblokApi,
  useStoryblokState,
  StoryblokComponent,
} from "@storyblok/react";

export const loader = async ({ params }) => {
  const slug = params.slug ?? "home";

  let sbParams = {
    version: "draft",
  };

  let { data } = await getStoryblokApi()
    .get(`cdn/stories/${blogSlug ? blogSlug : slug}`, sbParams)
    .catch((e) => {
      console.log("e", e);
      return { data: null };
    });

  if (!data) {
    throw new Response("Not Found", { status: 404 });
  }

 return json({ story: data?.story });
};

export default function Page() {
  let {story} = useLoaderData();

  story = useStoryblokState(story);

  return <StoryblokComponent blok={story.content} />;
}
In this dynamic route, we are executing code on the server (the loader function), that retrieves content from the Storyblok API, and a Page function that render HTML markup based on the API response.
The loader function grabs the slug from the URL that is being requested, and uses it to bring the data related to the story from the Storyblok space that has the same slug. To do this, we use getStoryblokApi to use the instance of the API client that we initialized with storyblokInit.
By incorporating this .catch() block, we capture and log any error during the API call. If an error is caught, data is defaulted to null. Immediately after, we check if data is null and, if so, throw a 404 error to signify that the requested story could not be found.
This ensures our application behaves predictably even when requests fail, improving overall reliability and user experience.
The Page function consumes the retrieved story (useLoaderData) and sends it as a parameter for useStoryblokState. This function will link the story to the Storyblok Visual Editor, so we are able to load and manipulate the content inside of it. Now, we will be able to listen for Storyblok Visual Editor changes and update the state of the components in our page.
Finally, as we don't know exactly which content type or components we will render on each page, we use StoryblokComponent with the content retrieved from the Storyblok API.
This dynamic route would be able to cover all the URLs from entries without a nested folder structure. But there is a small issue: Remix, by definition, needs an index.jsx file inside the routes directory. The problem is that this will collide with the route of our home page. So, as we don't want to repeat the code from our dynamic route, we can replace the code of the index.jsx file to look like this:
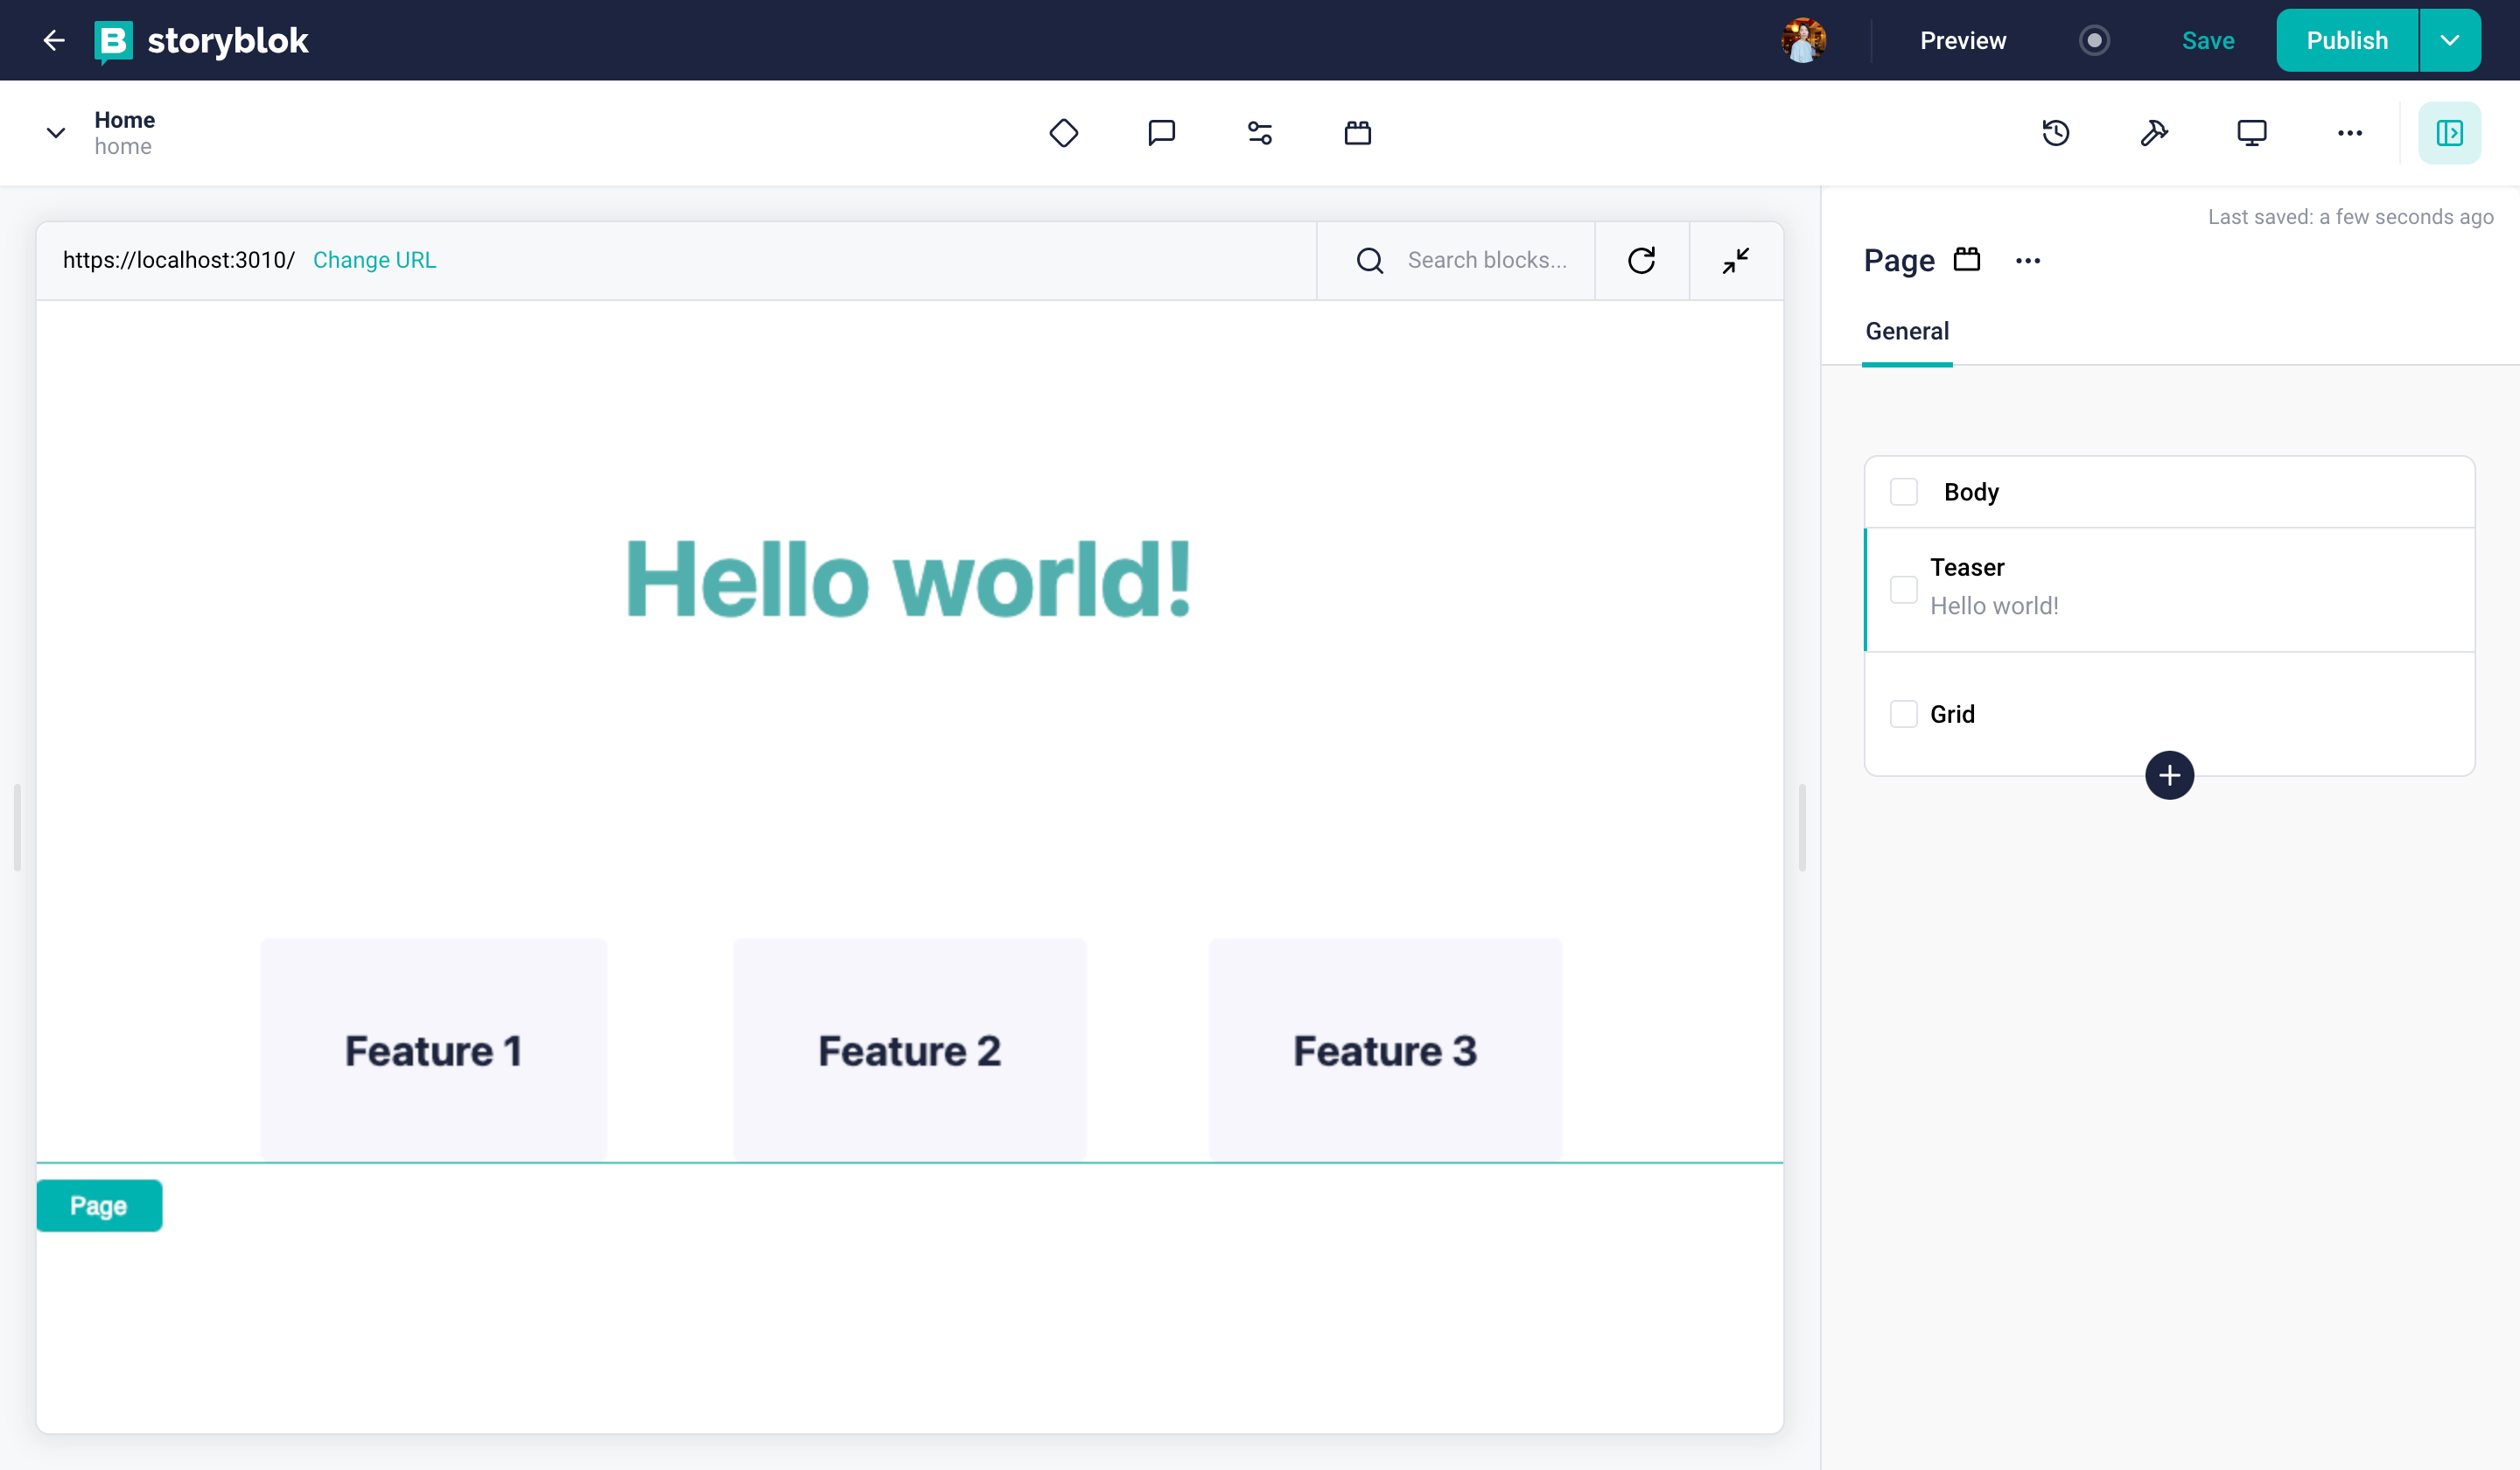
export { default, loader } from "./$slug";And that's it! We have our project ready to be used. Now, we can start the development server, go to the Storyblok Visual Editor and interact in real time with the different components of our pages.
Storyblok real-time Visual Editor
Create splat routes
If you want to cover a folder nested entry structure, Remix already provides the approach to handle such cases. Splat routes from Remix can catch all slugs regardless of being nested by folders or without. In this case, instead of creating $slug.jsx, we create $.jsx file. By using splat routes, your content editors would be able to create new pages with a folder nested structure.
import { json } from "@remix-run/node";
import { useLoaderData } from "@remix-run/react";

import {
  getStoryblokApi,
  useStoryblokState,
  StoryblokComponent,
} from "@storyblok/react";

export default function Page() {
  let { story } = useLoaderData();
  story = useStoryblokState(story);

  return (
    <>
      <StoryblokComponent blok={story.content} />
    </>
  );
}

export const loader = async ({ params}) => {
  let slug = params["*"] ?? "home";
  let blogSlug = params["*"] === "blog/" ? "blog/home" : null;

  let sbParams = {
    version: "draft",
  };
  let { data } = await getStoryblokApi()
    .get(`cdn/stories/${blogSlug ? blogSlug : slug}`, sbParams)
    .catch((e) => {
      console.log("e", e);
      return { data: null };
    });

  if (!data) {
    throw new Response("Not Found", { status: 404 });
  }
  return json({ story: data?.story });
};There is a Remix Conf talk YouTube video from us talking about how you can handle splat routes with Storyblok. You can see how editors can create nested routes from the Storyblok UI.
Optional: Use Tailwind CSS to style your components
You may have noticed that we’ve been using Tailwind CSS classes in our components. In order to make these work, let’s quickly add Tailwind to our Nuxt project by running:
npm install -D tailwindcss
npx tailwindcss init --ts
Next, let’s add it to the modules in remix.config.js:
/** @type {import('@remix-run/dev').AppConfig} */
module.exports = {
  tailwind: true,
}
tailwind.config.js file will be created in the root and you can add the configuration below:
import type { Config } from 'tailwindcss'

export default {
  content: ['./app/**/*.{js,jsx,ts,tsx}'],
  theme: {
    extend: {},
  },
  plugins: [],
} satisfies Config
Create a new file ./app/tailwind.css and add below:
@tailwind base;
@tailwind components;
@tailwind utilities;
Let's import a CSS file in ./app/root.jsx :
import stylesheet from "~/tailwind.css";

export const links: LinksFunction = () => [
  { rel: "stylesheet", href: stylesheet },
];
That's it! Tailwind CSS can be used from now on whenever you call utility classes to style your content.
Wrapping up
In this tutorial, we saw how to create a web application using the Remix framework, and how to connect that project to a Storyblok space, in order to manage the content using a Headless approach. We also saw how to configure Storyblok's real-time Visual Editor, so we are able to see how the content that we create is going to look like when we publish it.
| Resources | Link |
|---|---|
| GitHub demo repository | https://github.com/storyblok/remix-ultimate-tutorial |
| Remix docs | https://remix.run/docs |
| Storyblok Visual Editor | https://www.storyblok.com/docs/editor-guides/visual-editor |
| Storyblok React SDK | https://github.com/storyblok/storyblok-react |
| Storyblok Technologies Hub | https://www.storyblok.com/technologies |
| Remix Conf talk, "Remix your UI & UX to another level" | https://www.youtube.com/watch?v=bUlIRAfxcM8 |


