Build Your Own Showcase Gallery With Storyblok, SvelteKit and Edgio
Storyblok is the first headless CMS that works for developers & marketers alike.
This guide describes how to create and deploy your own Showcase Gallery built with Storyblok & SvelteKit to Edgio. Clone the repo showcase-gallery-storyblok-sveltekit-edgio-starter to get the entire setup.
Set up Storyblok space
To set up a Storyblok space, log in to your account or create a new one, and click on New Space {1}.
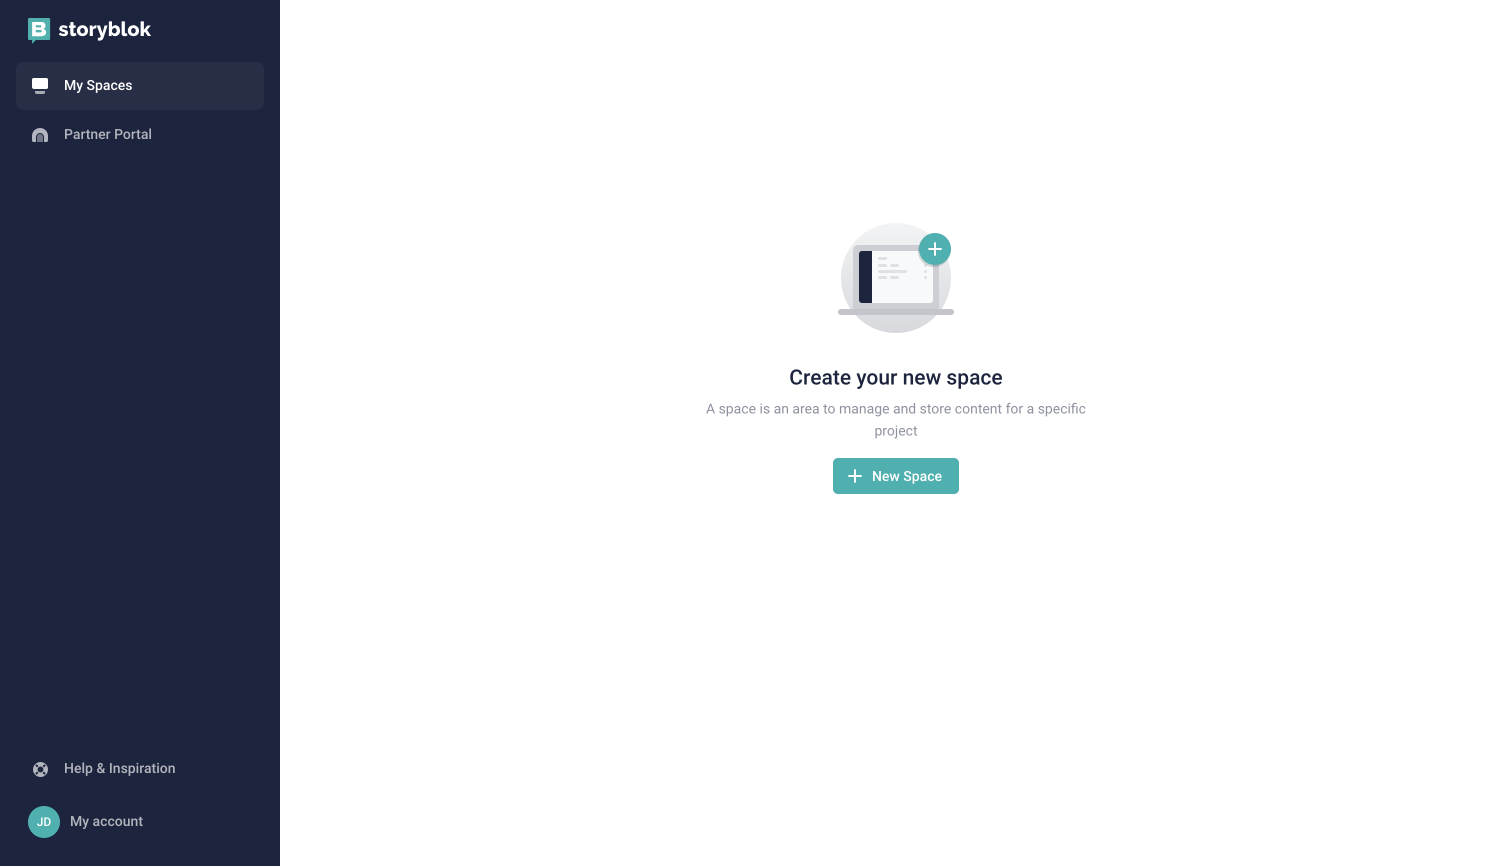
create a new space
Create a new Storyblok space by giving it a name.
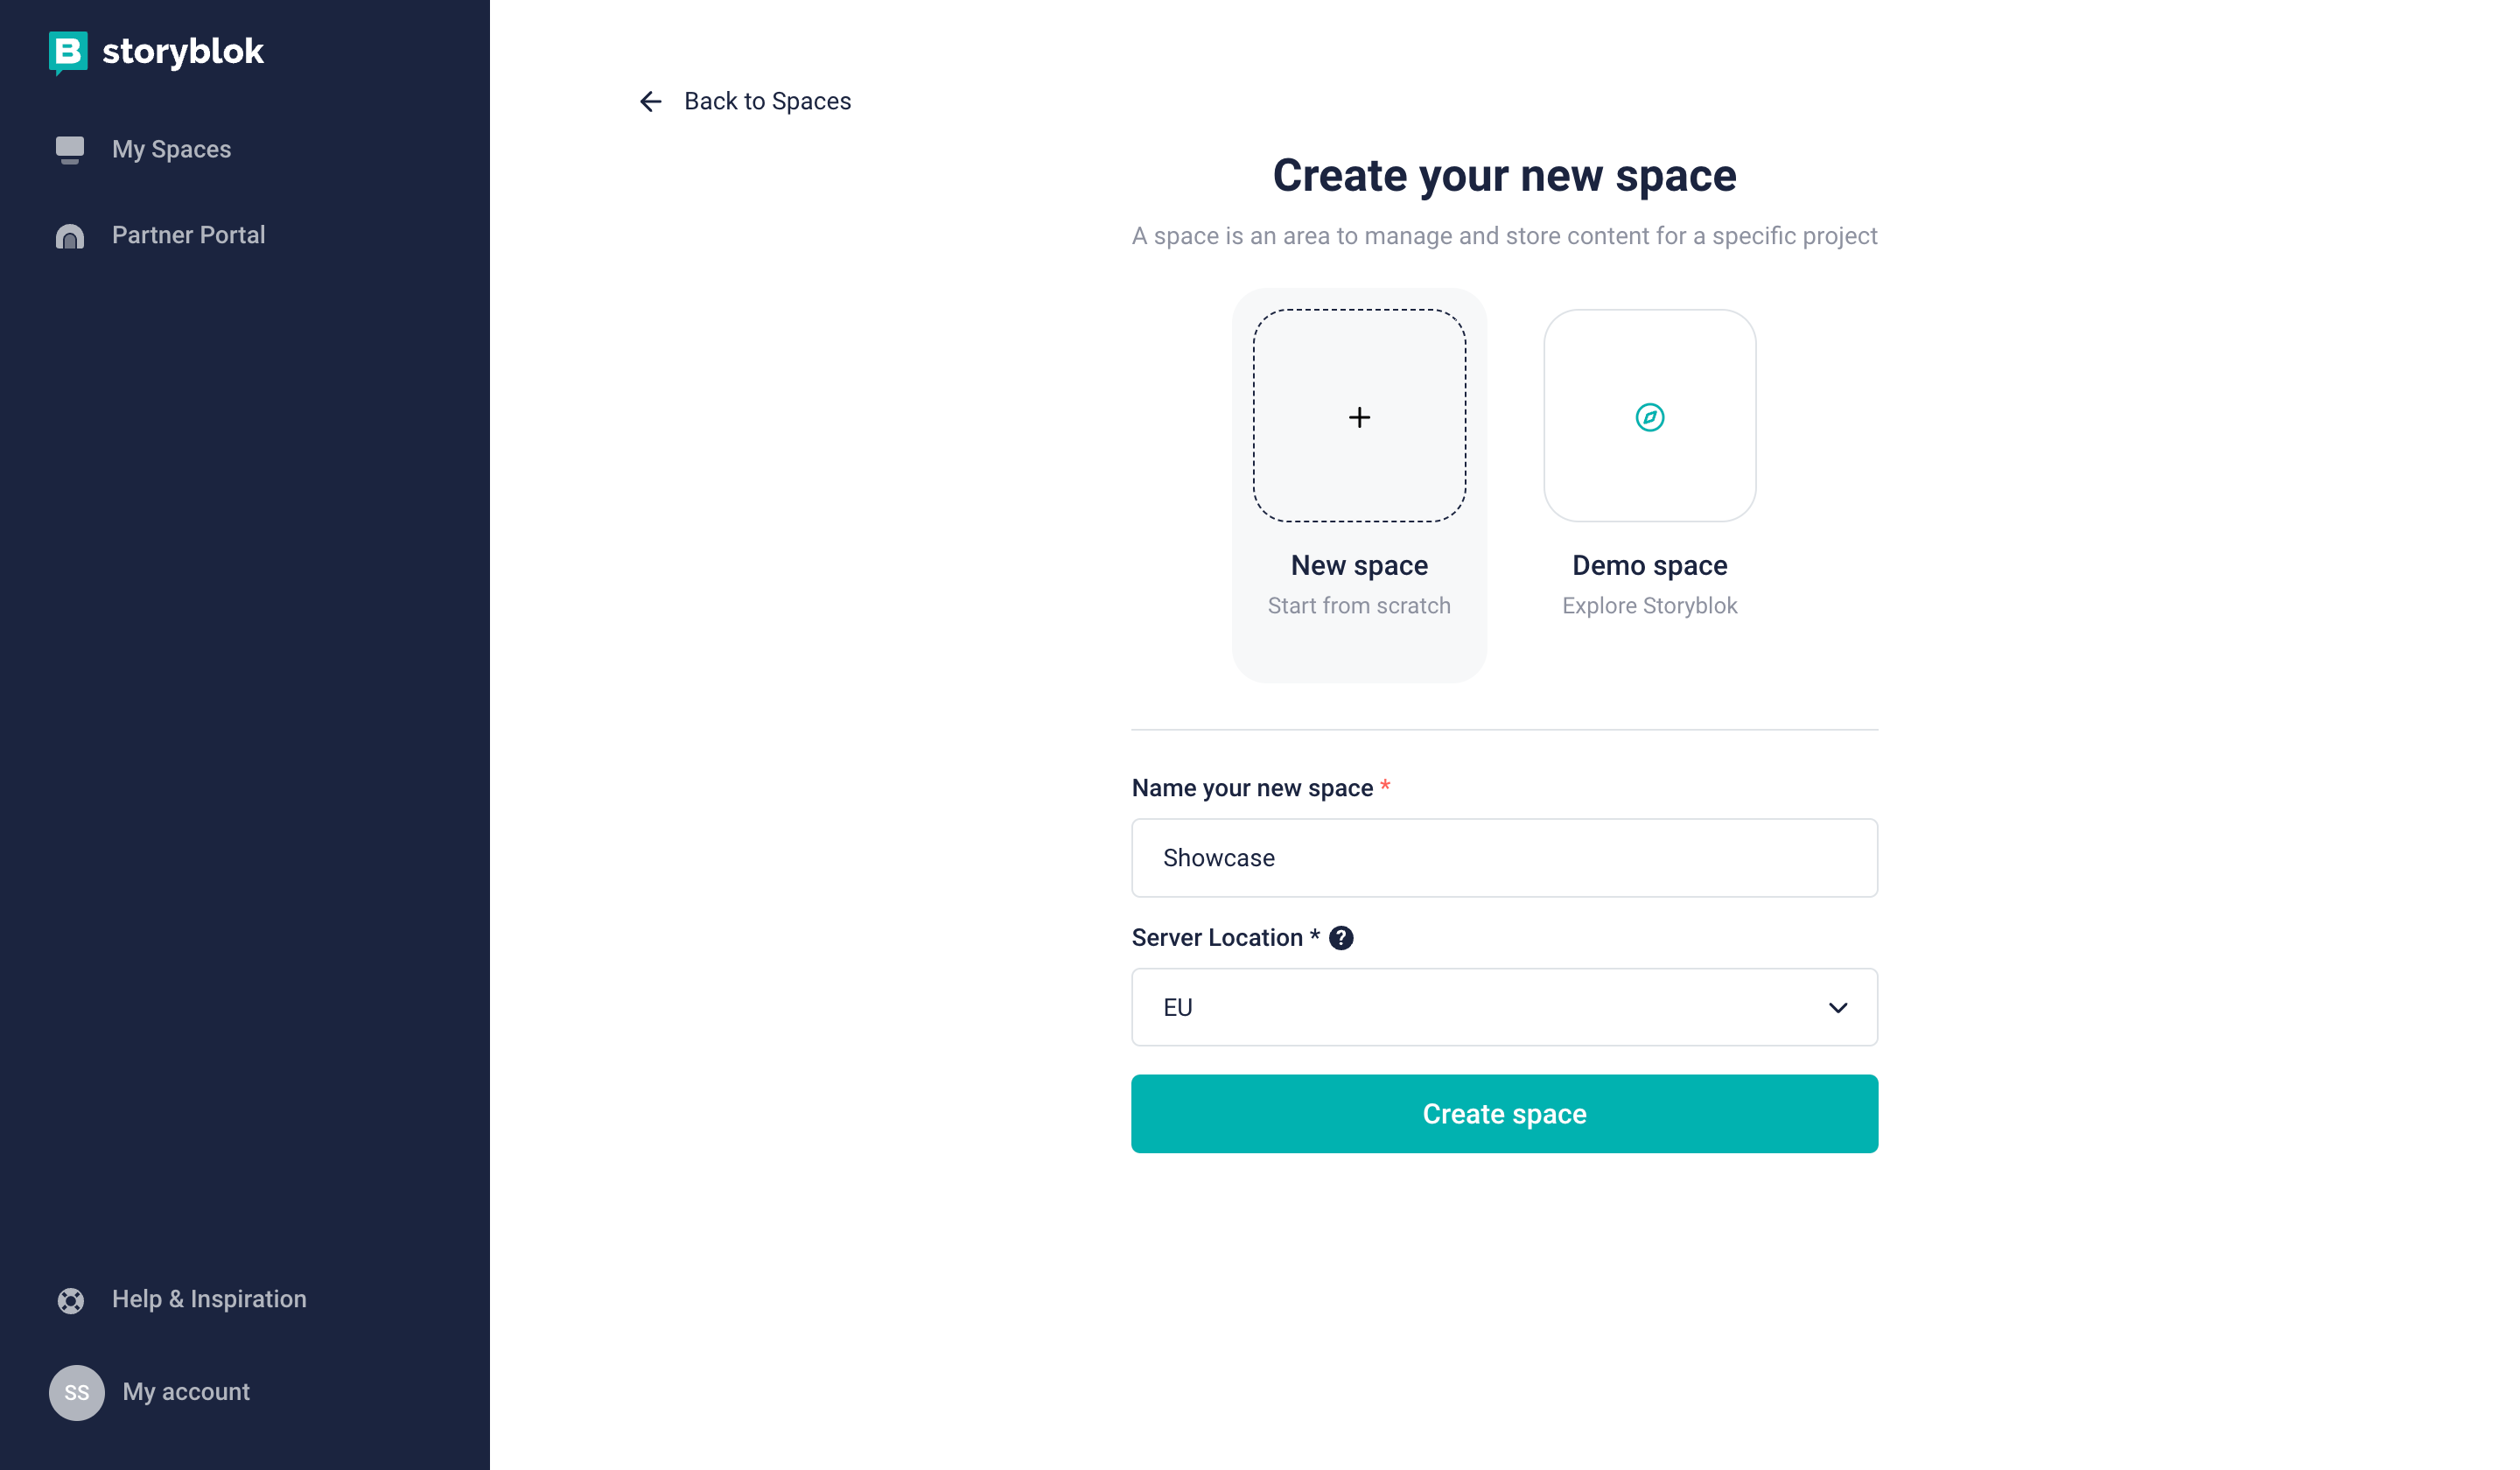
Select New Space, Give It A Name and Click Create Space
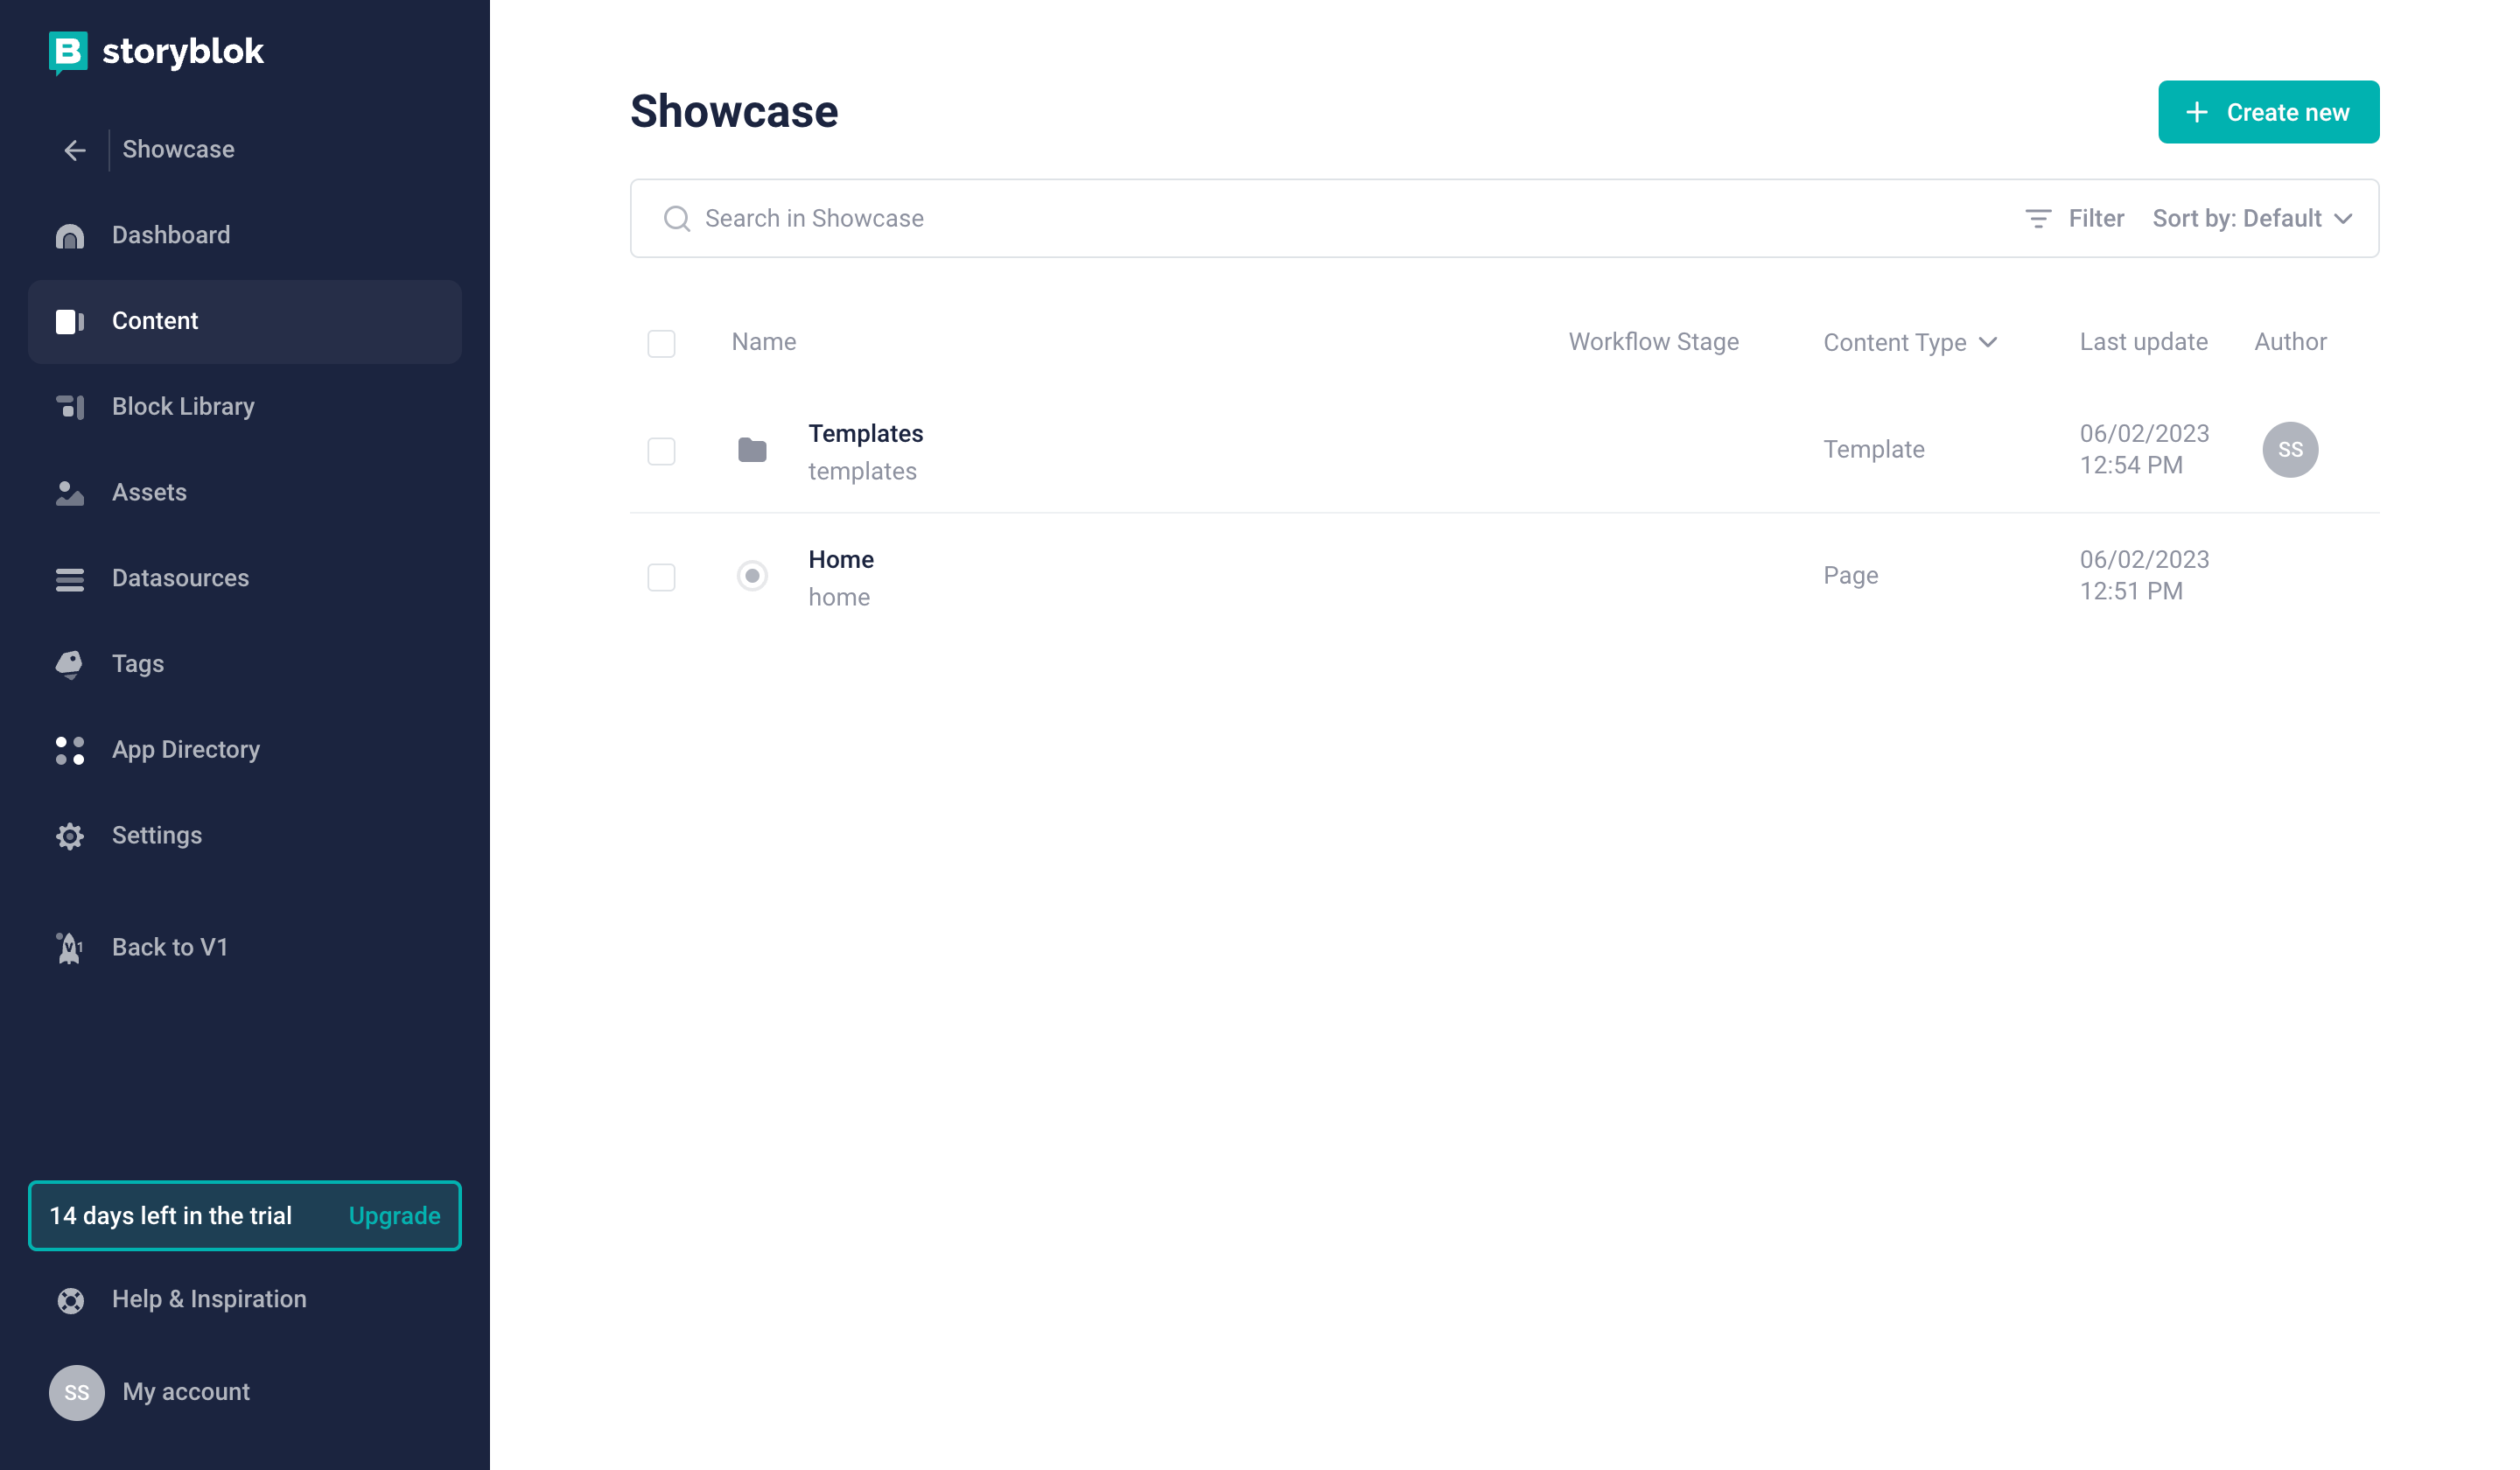
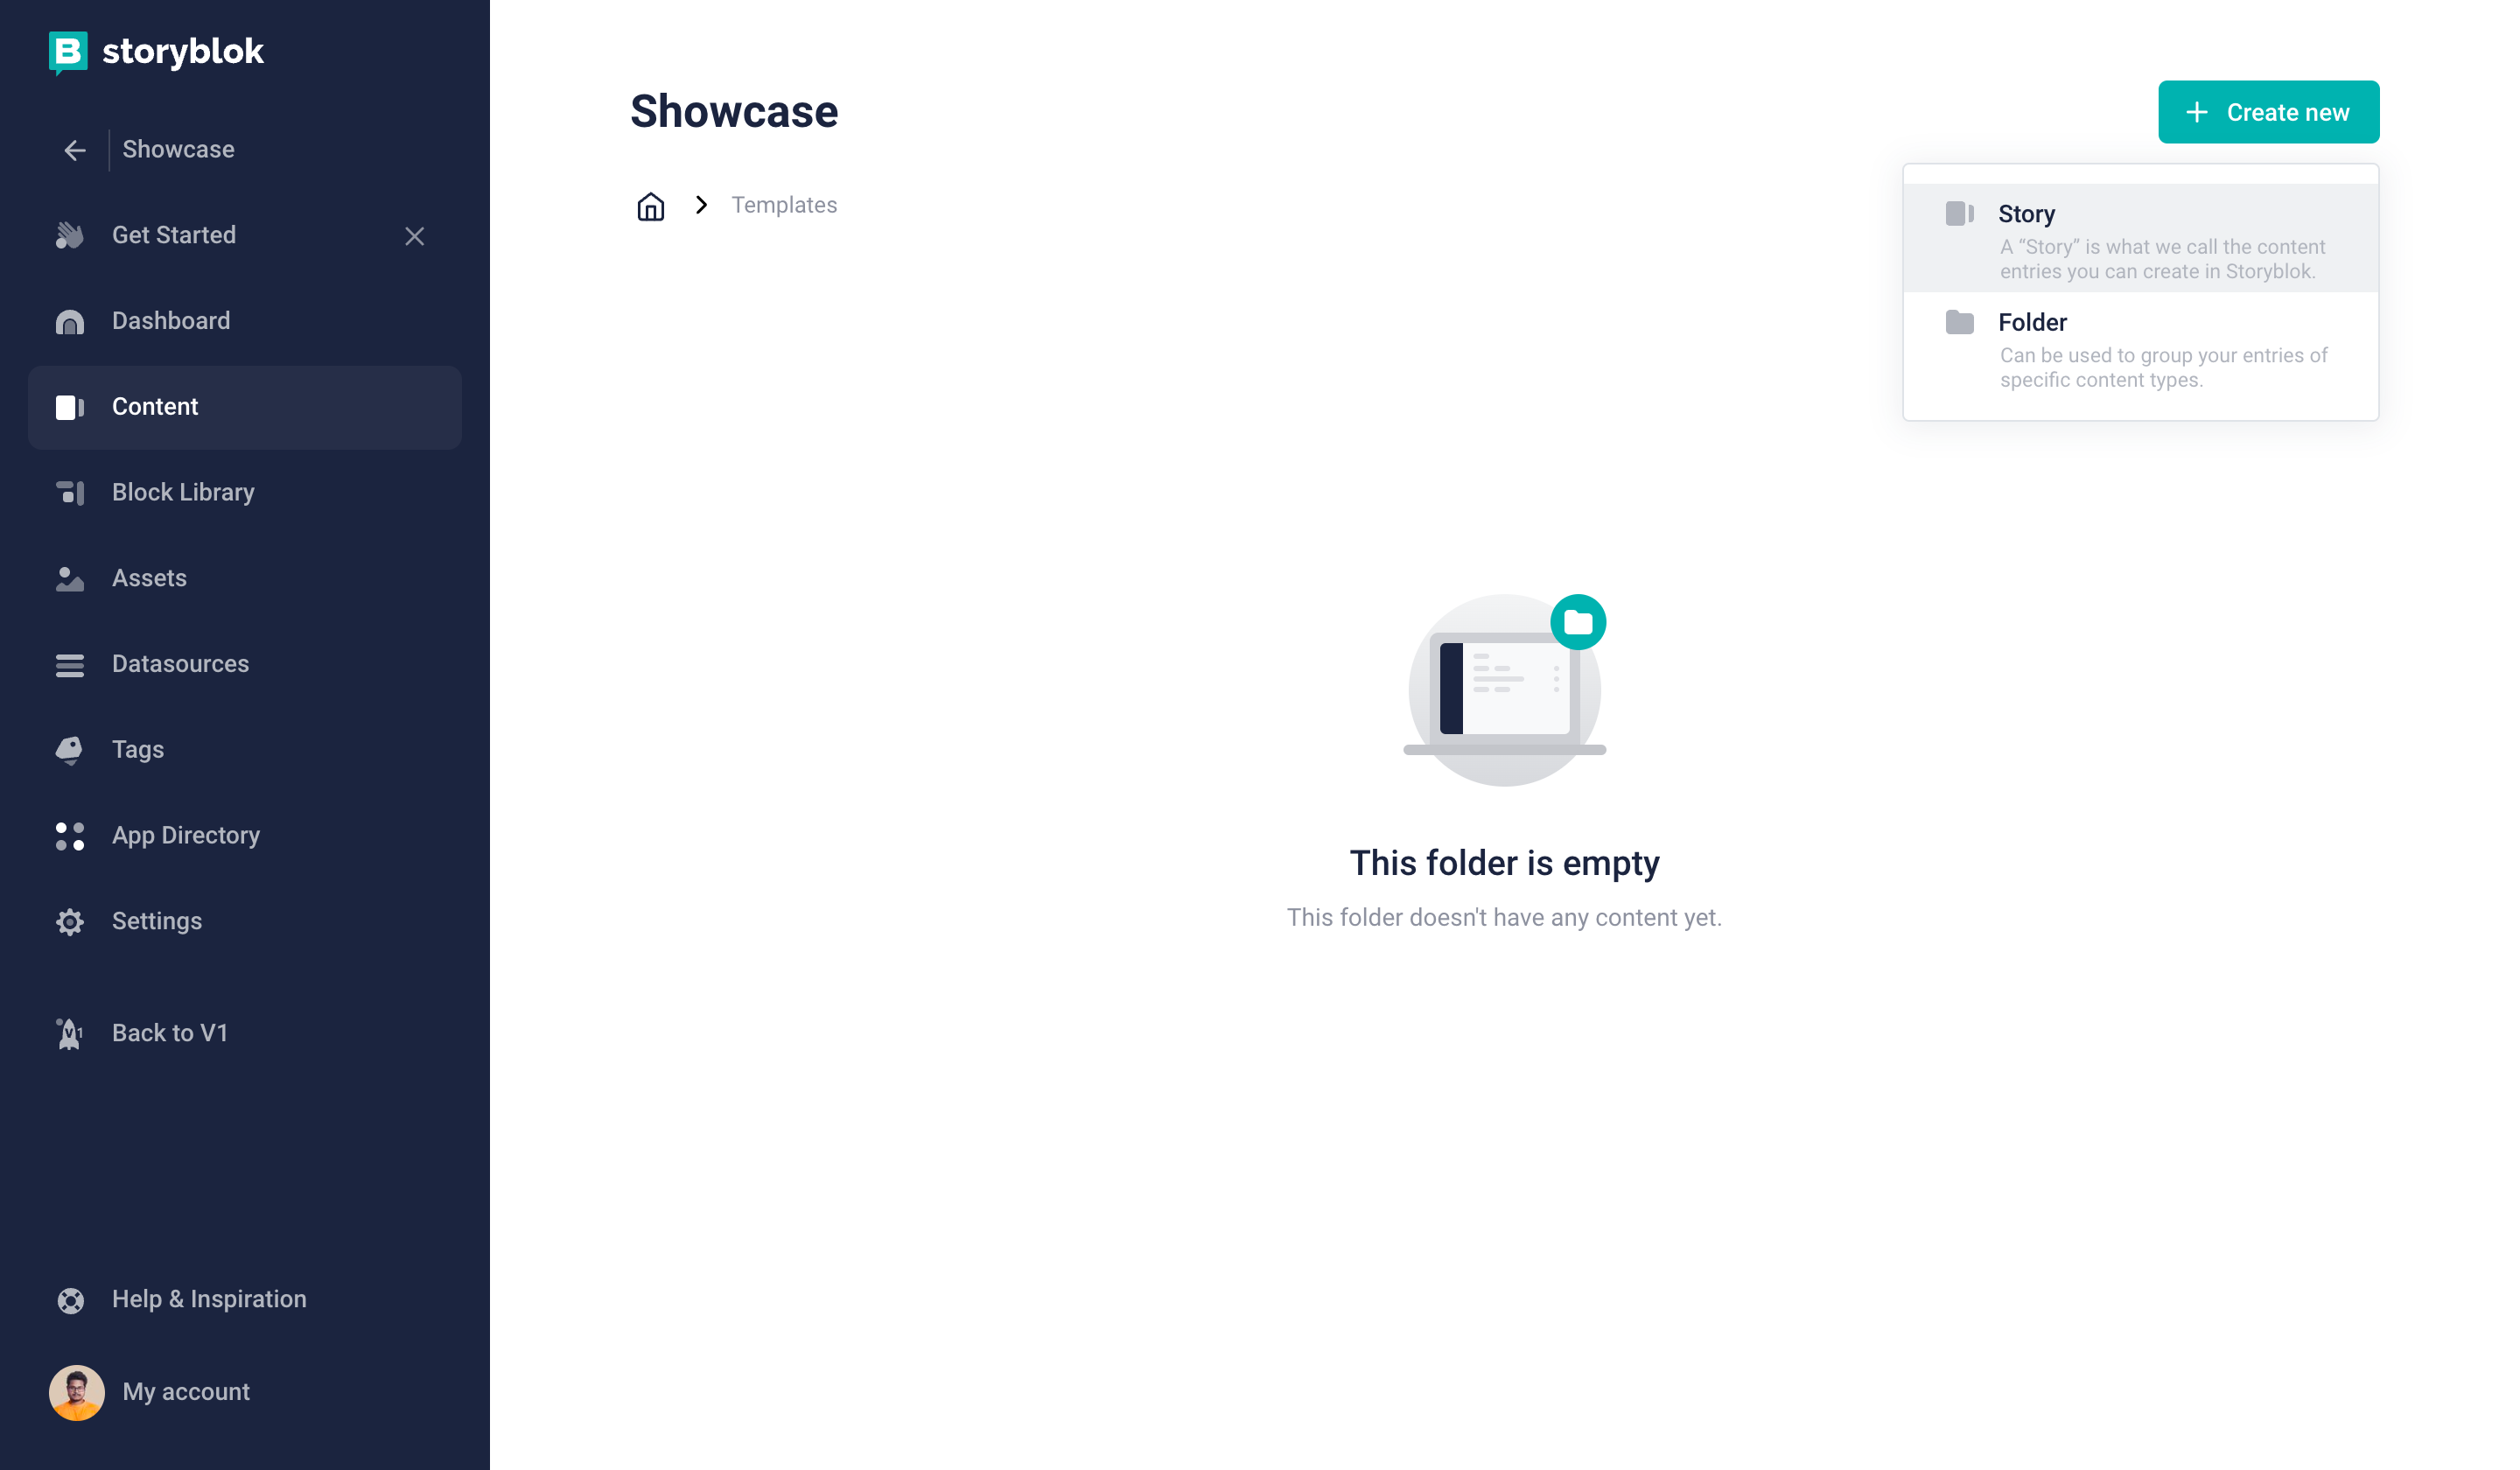
Get started with creating the Templates folder.
- Click on Create new {1} button.
- Next, click the Folder {2} button to start creating the Templates folder.
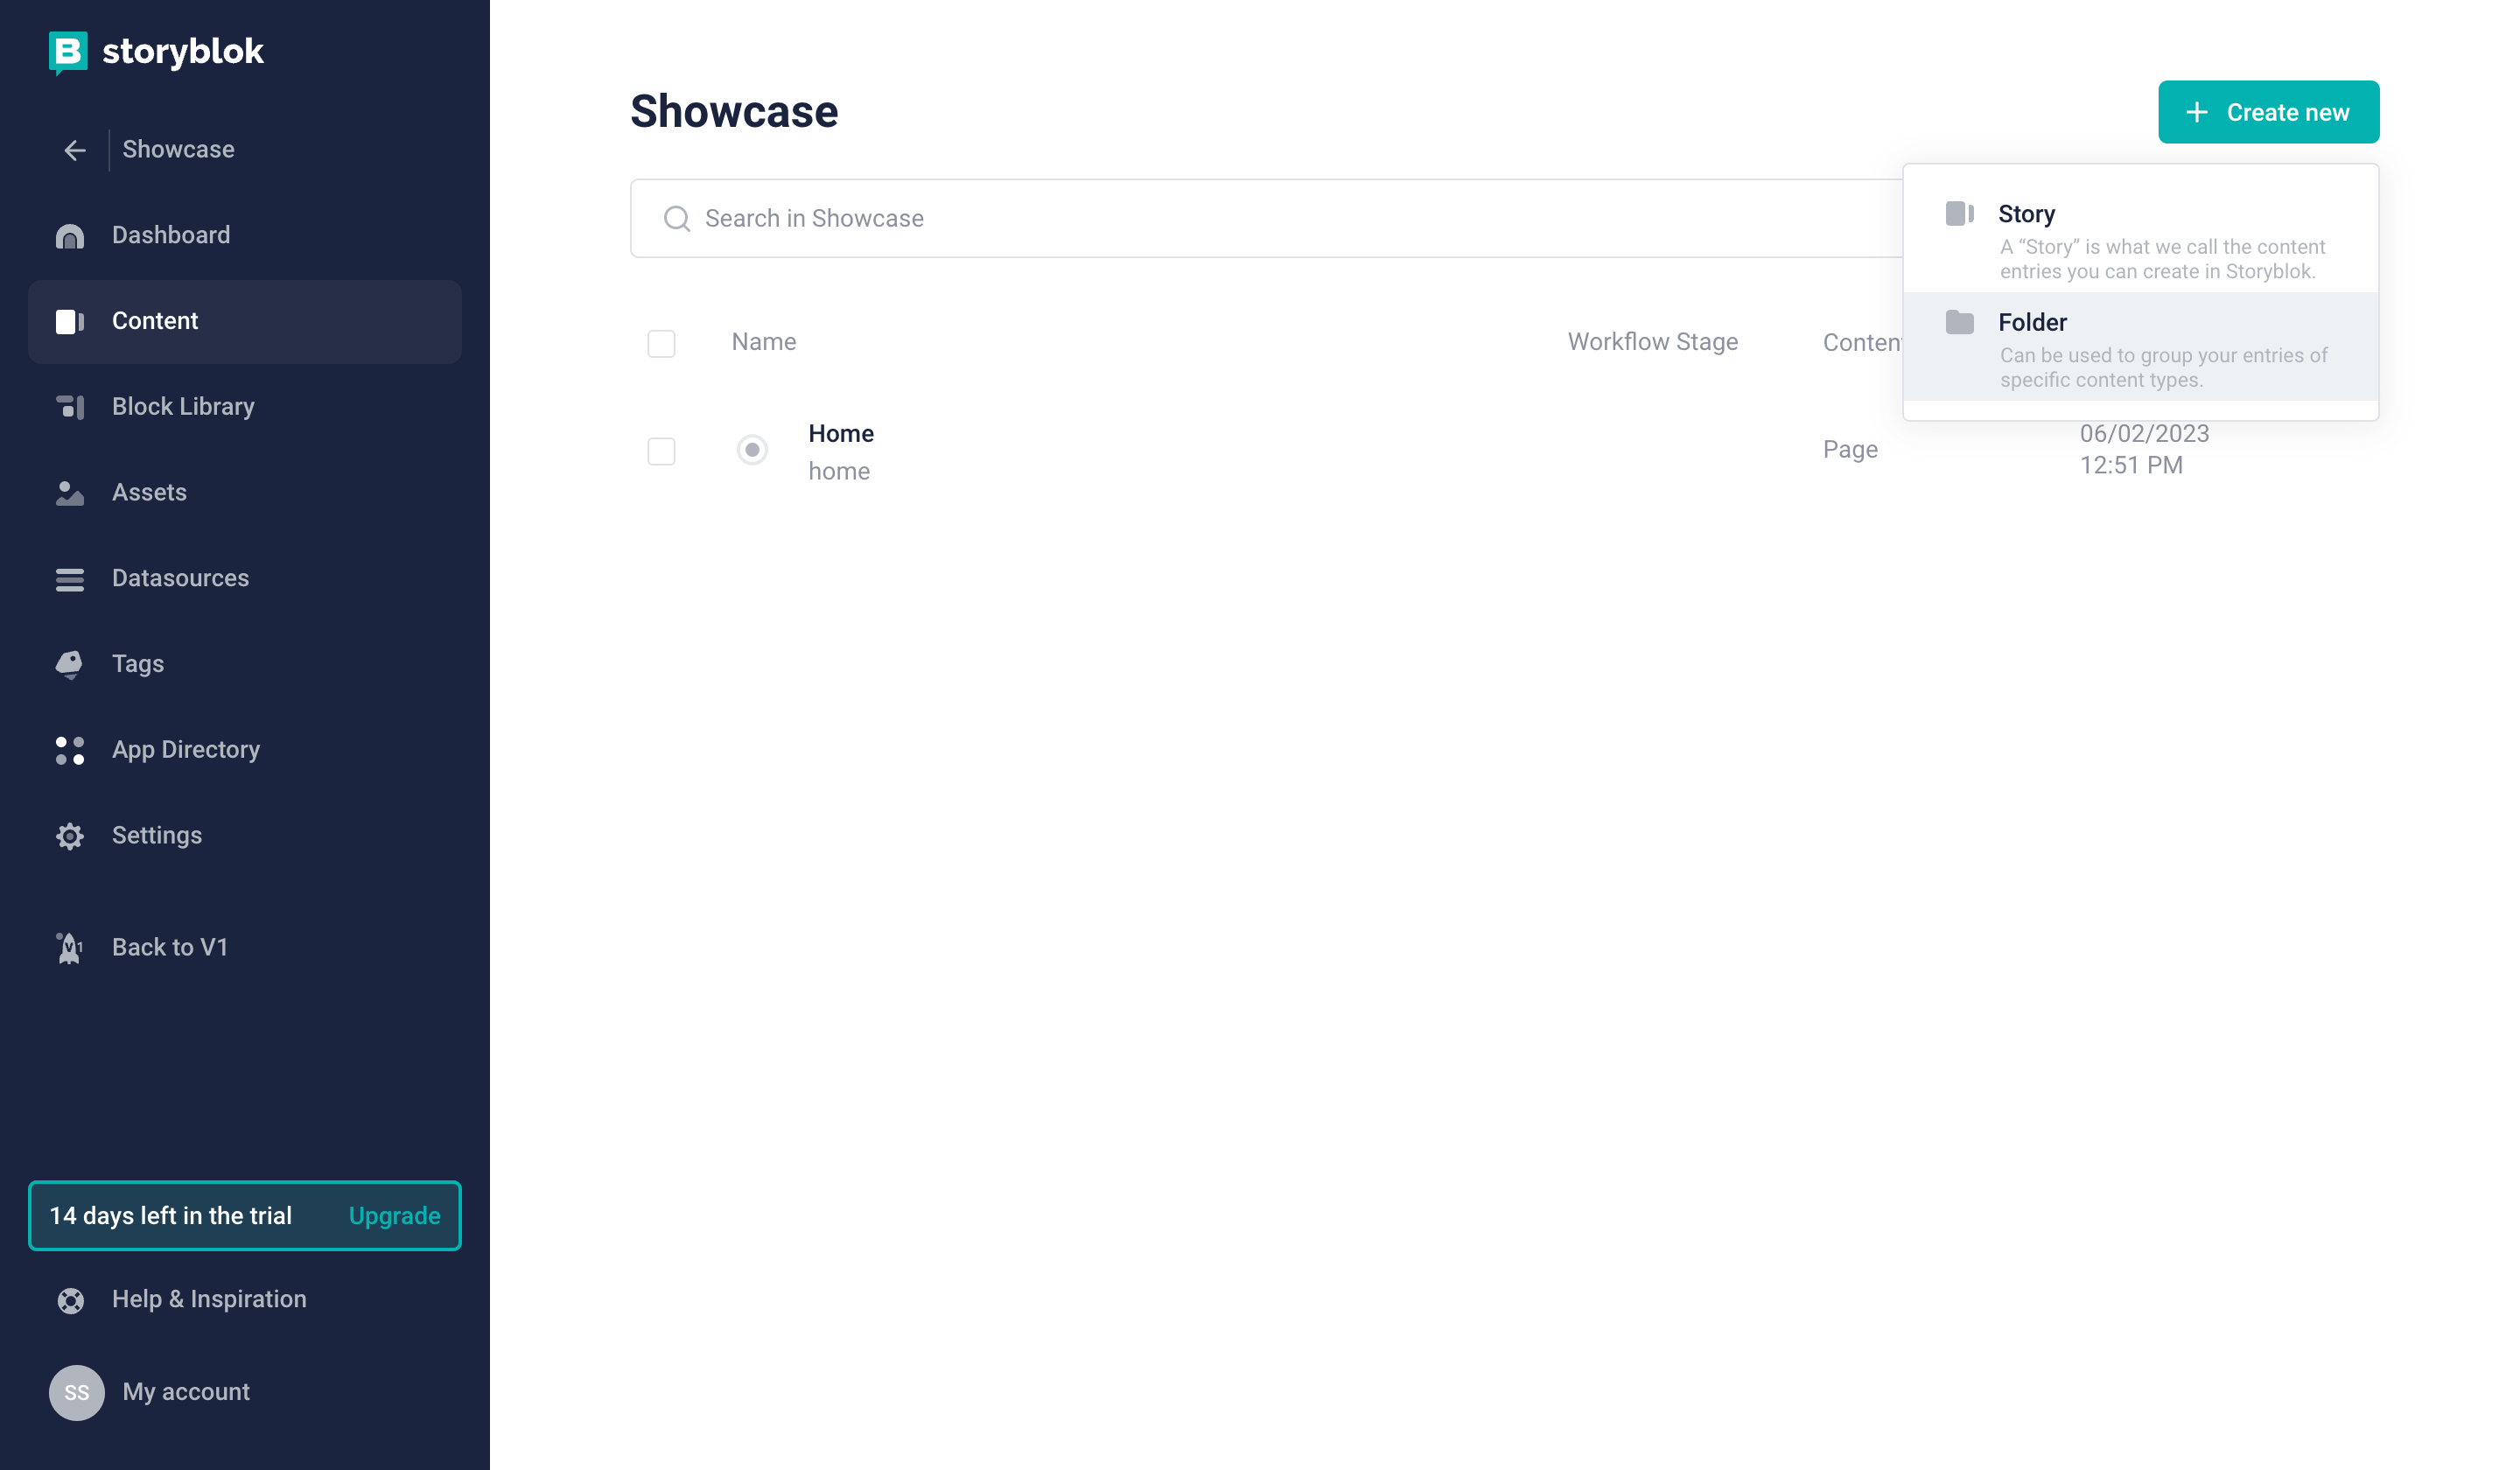
Storyblok create a new folder
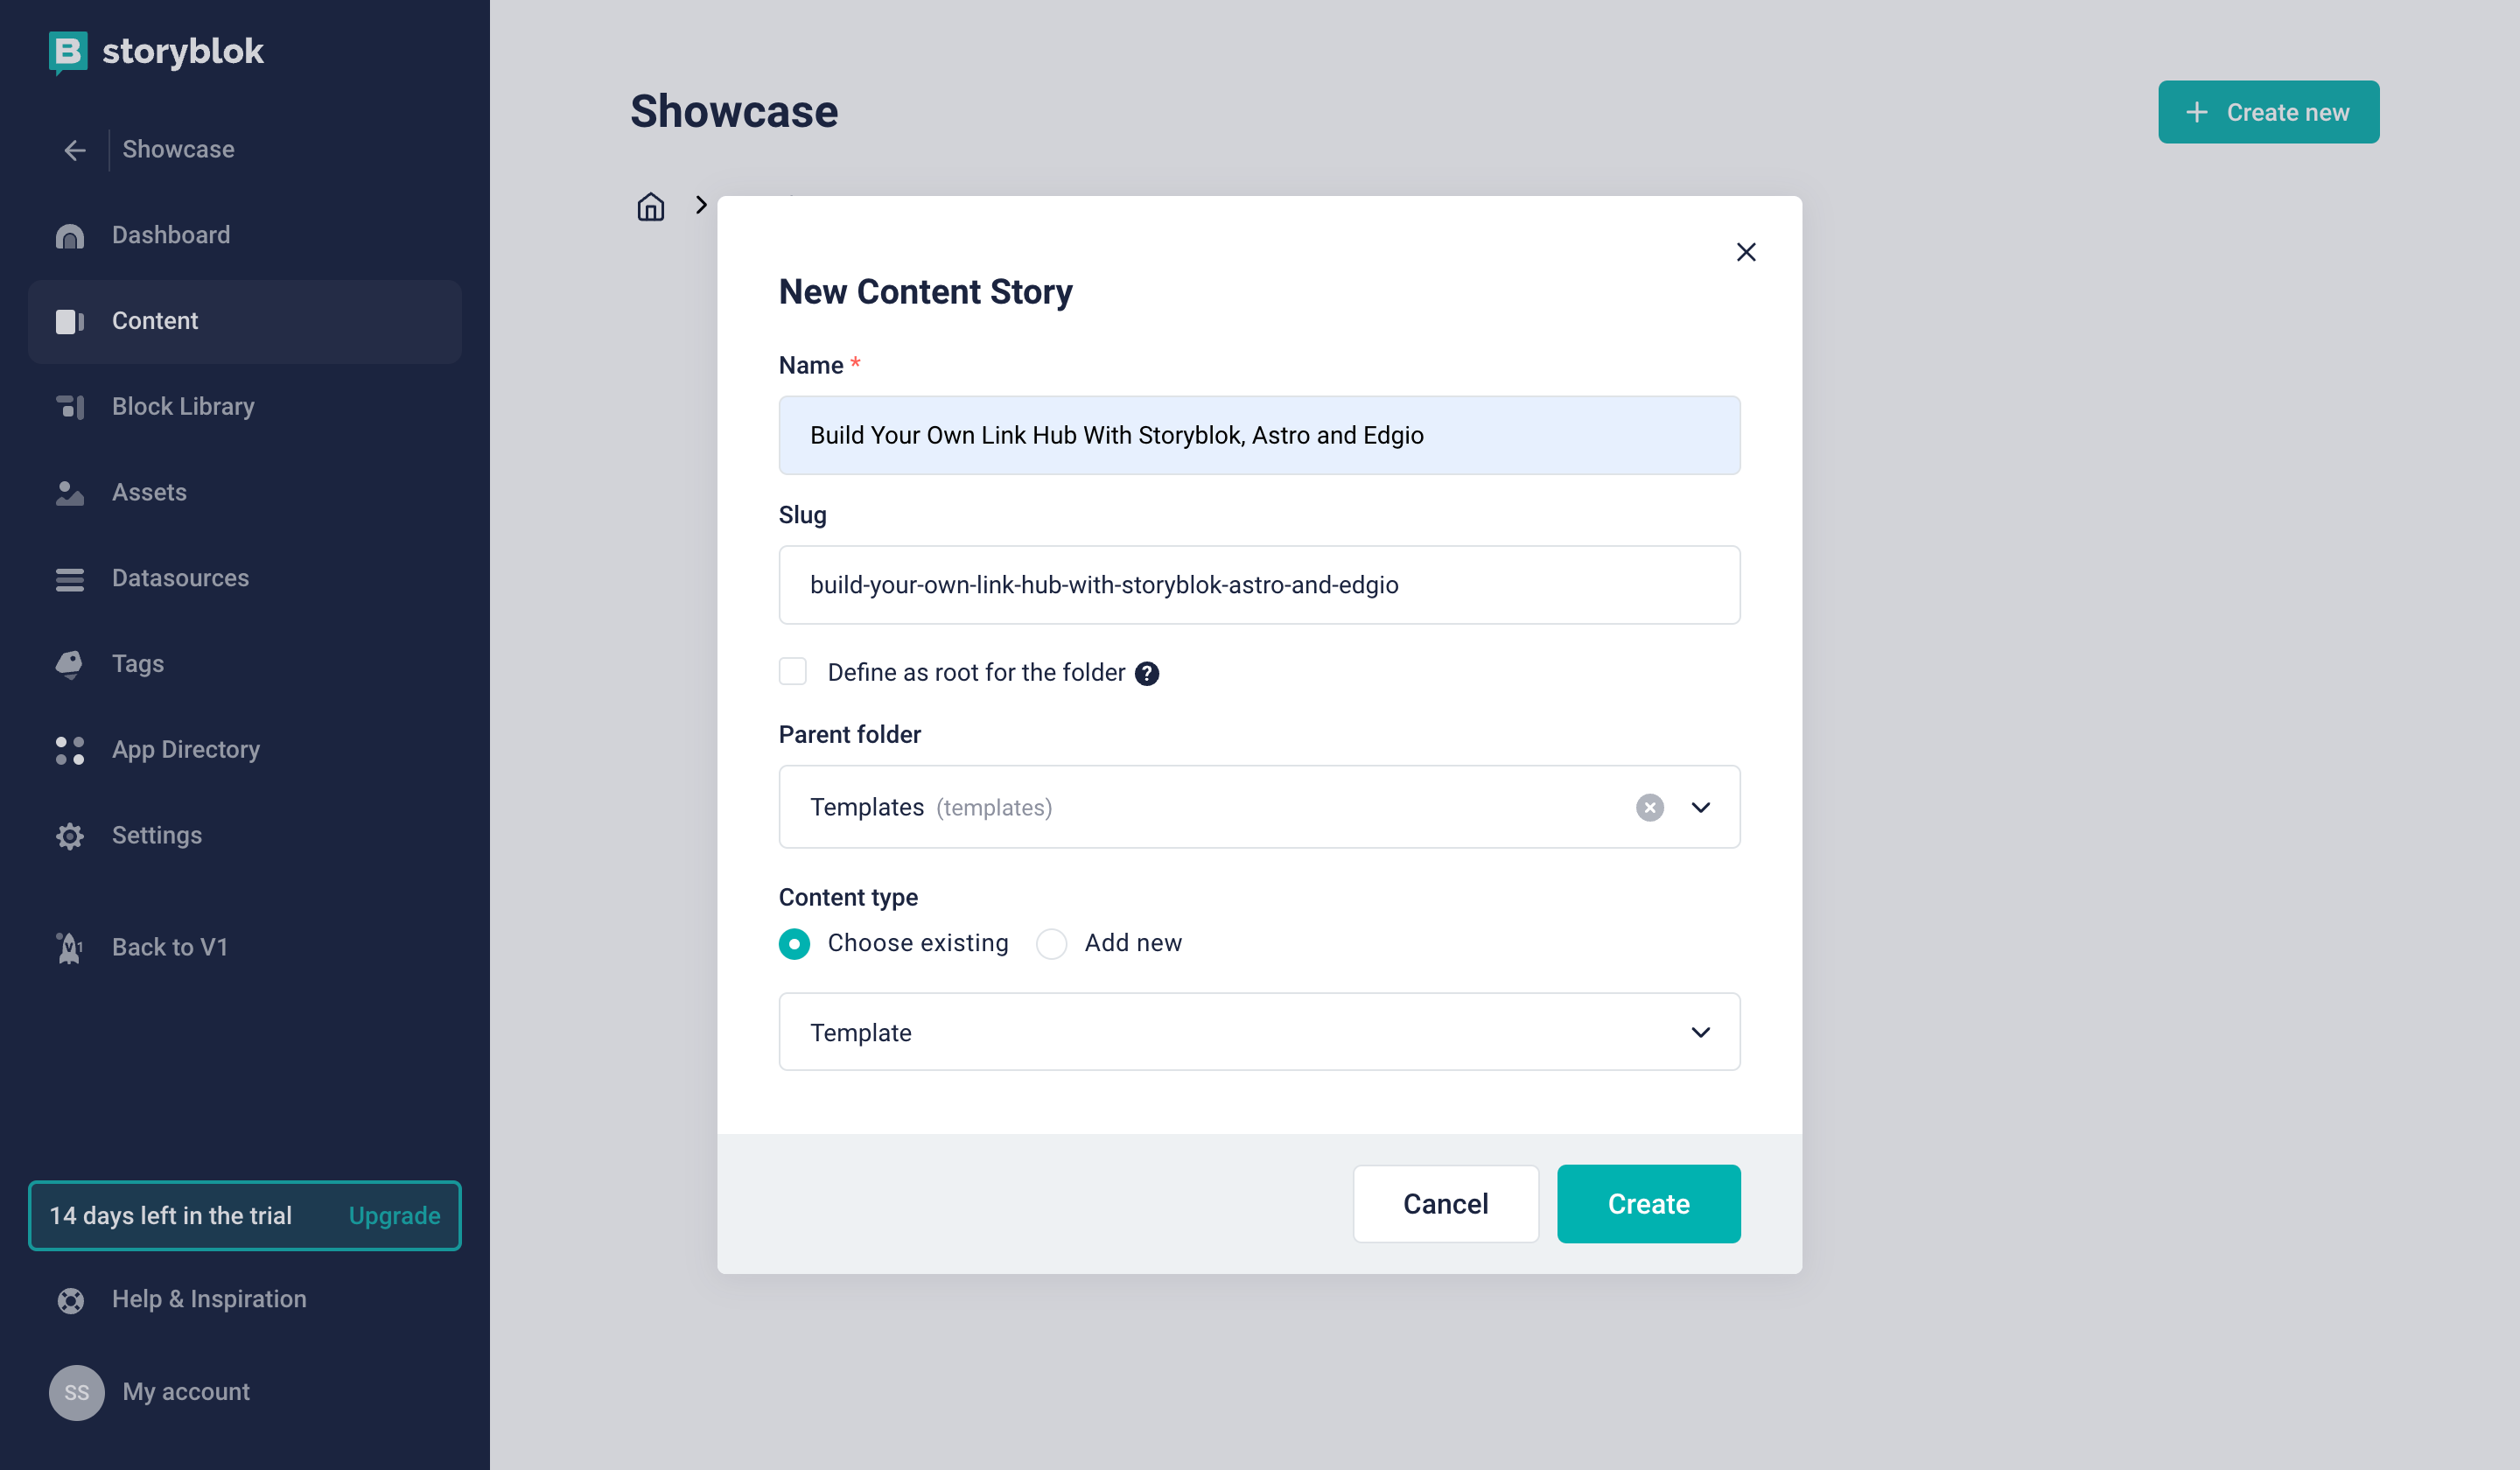
Imagine Storyblok's folder as a collection of items; each Storyblok entry is an item itself. We'll be creating a single folder named Templates. Each entry that lives inside Templates represents an individual Template.
After typing in the Name, click on Add New as the content type and give it a personalised Name (here: Template) as we'll be giving it our own blueprint. Click save to create an Templates folder.
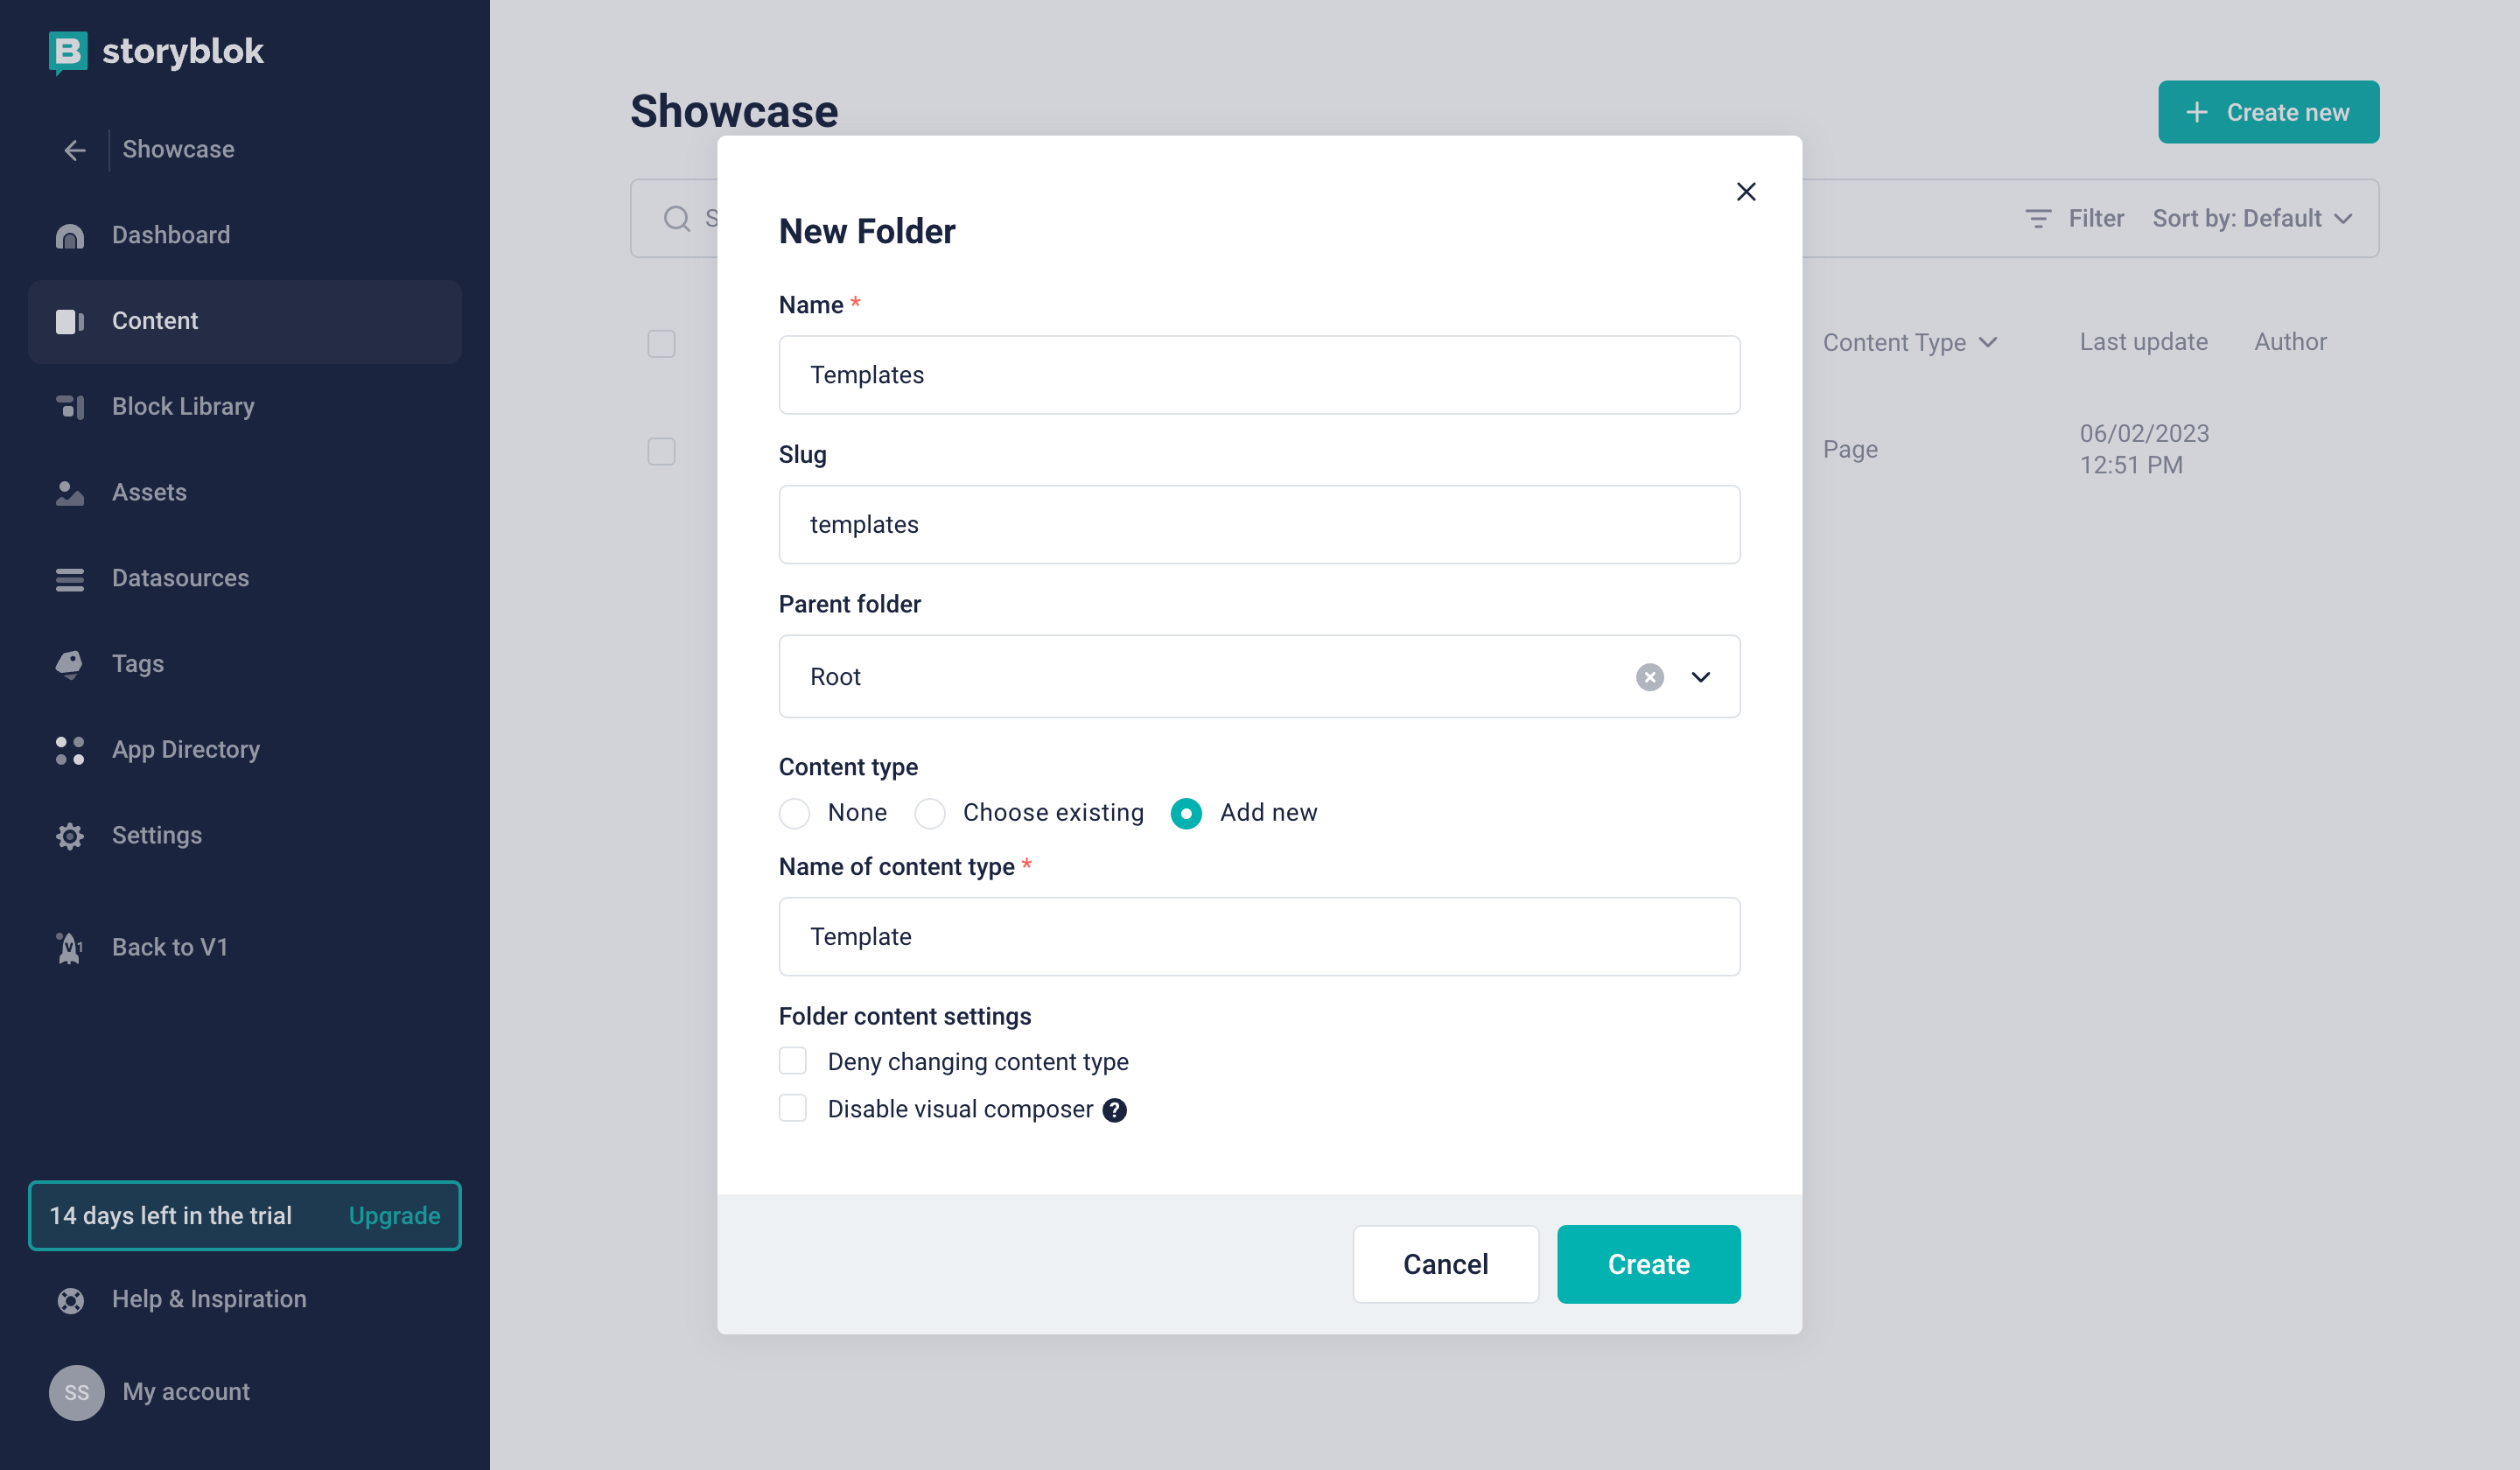
Select the content type to “Add new” and give it a personalised name
Click the Templates folder to start creating each template
Click on Create New to start creating your first Template entry.
Click Create New to create your first template
Select the personalized name of the content type you gave while creating the folder and create the first story
The current Template has an empty blueprint. Let's start defining our own schema by first adding a story.
Click on Define {1} to start defining the Template schema.
Click Define to set how a single template data will look like
Add a Name field to the schema (type Text).
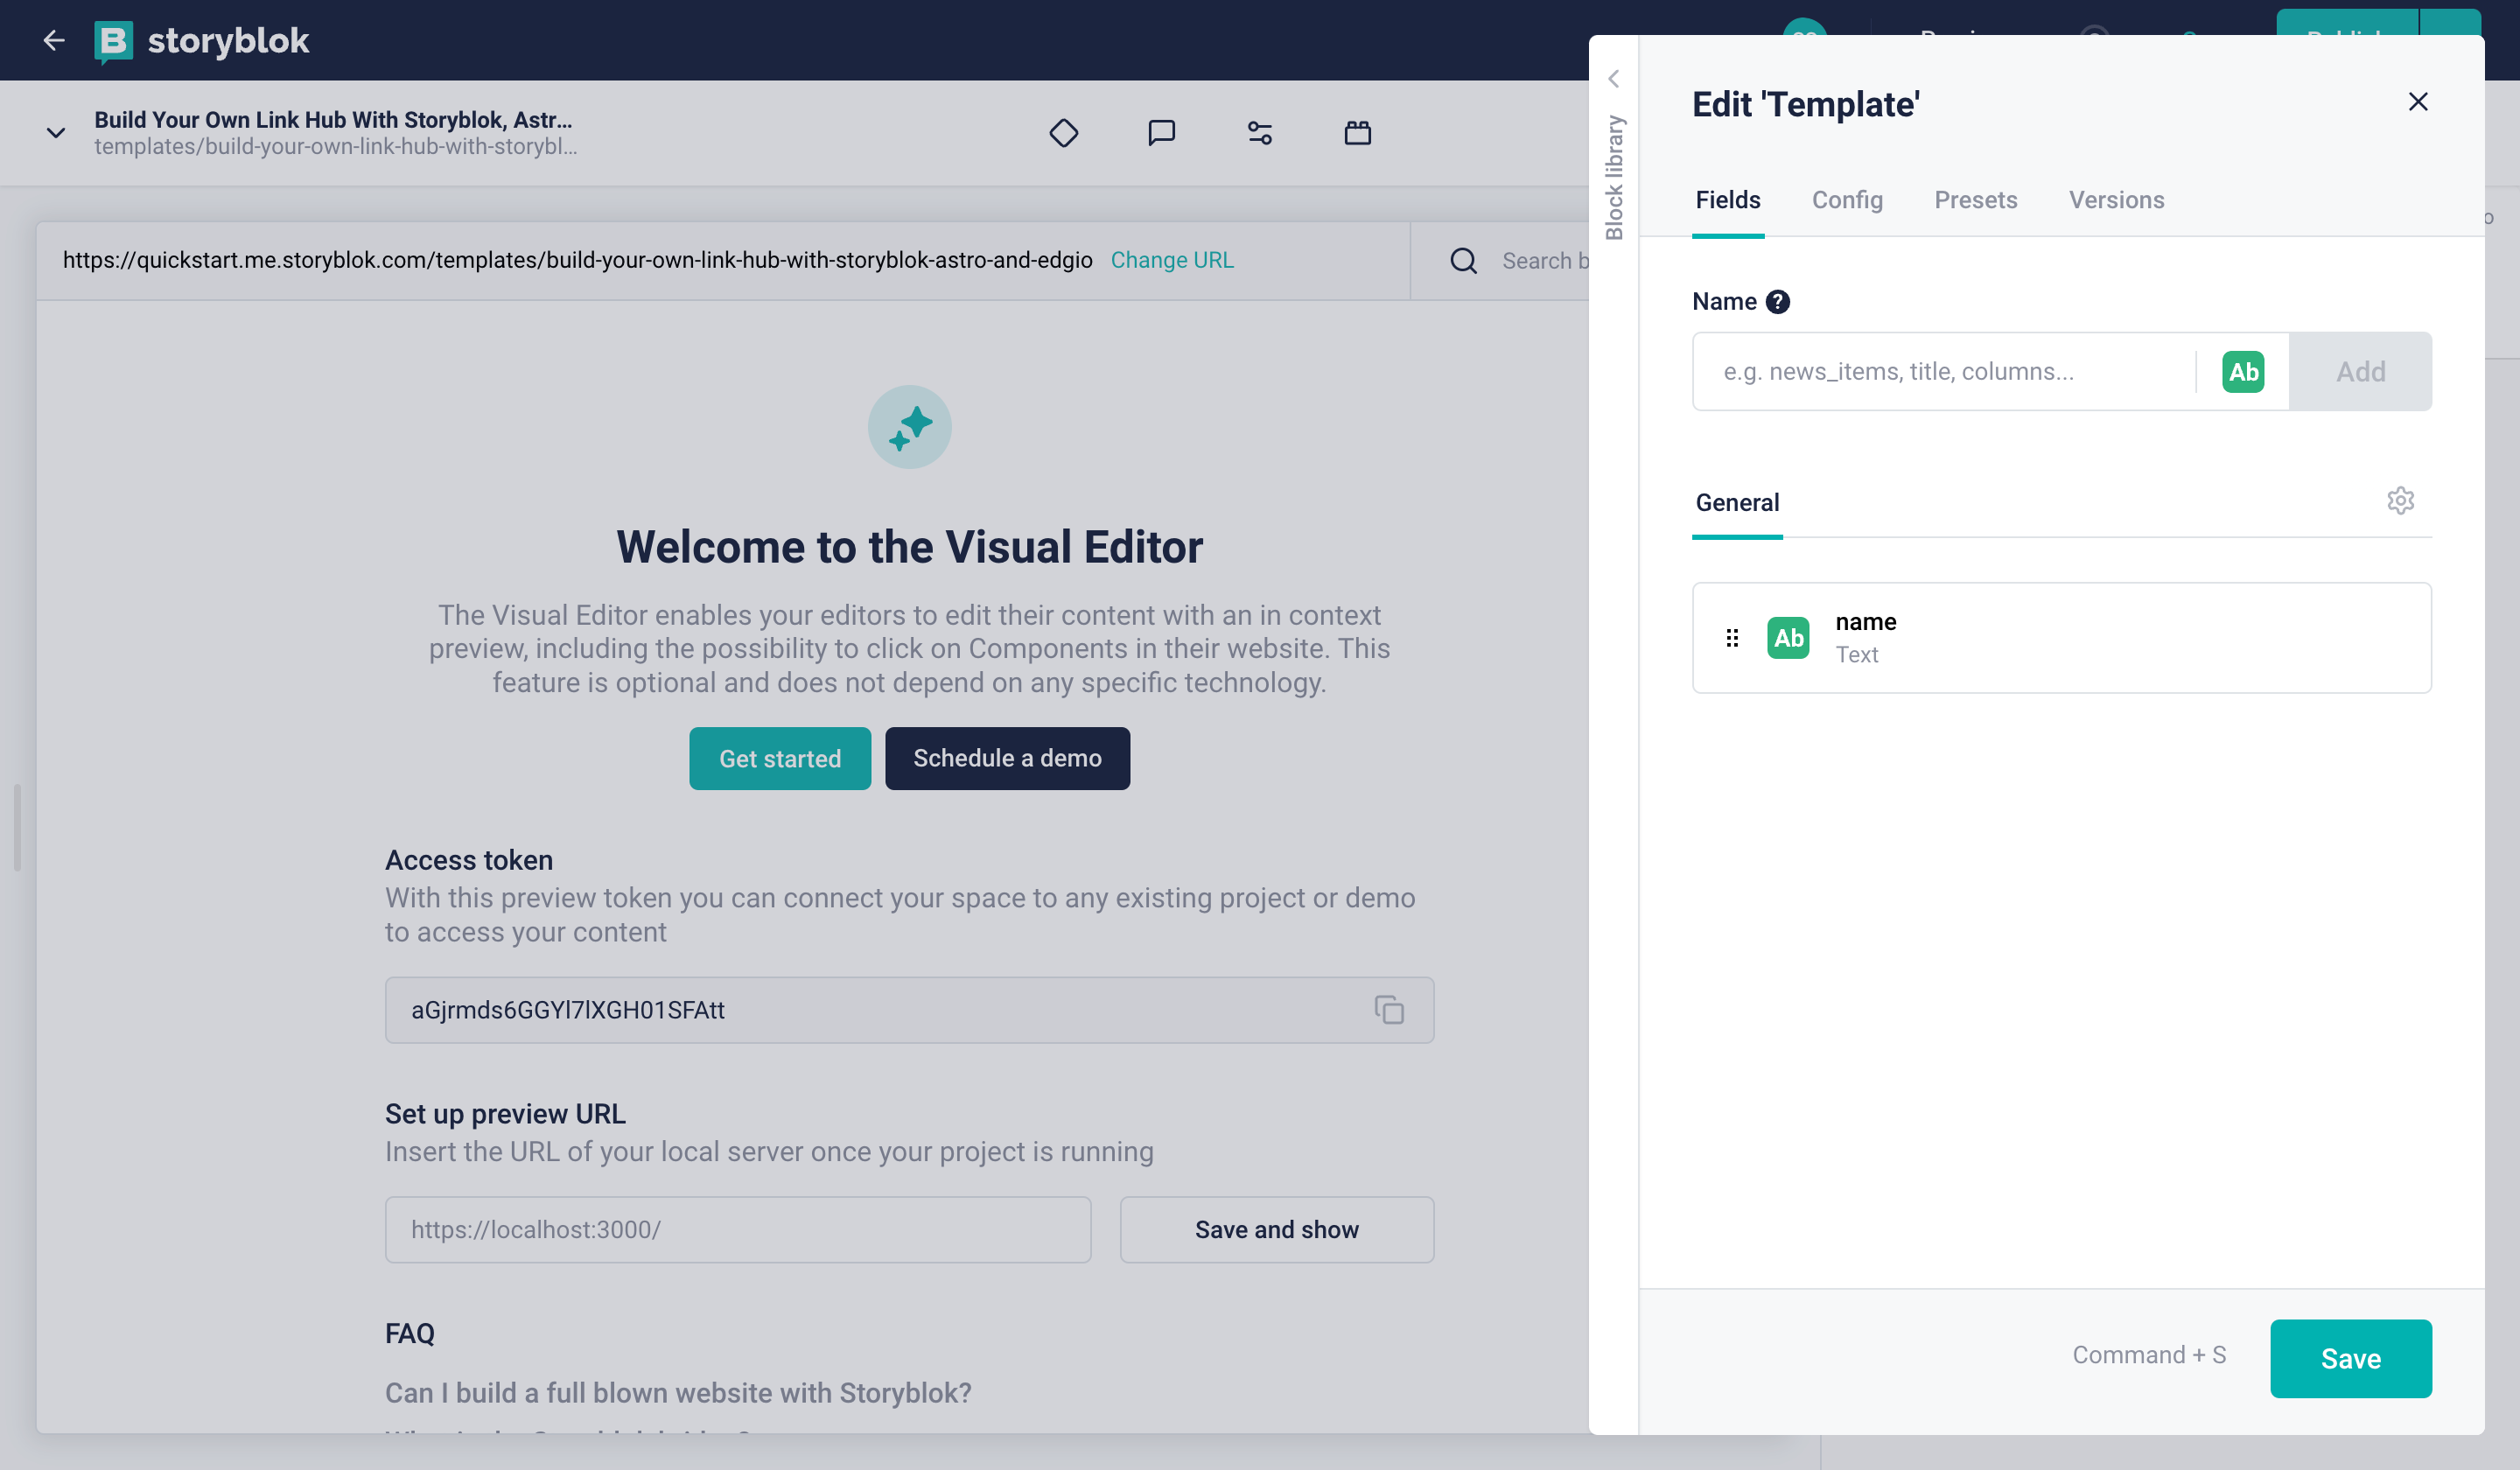
After typing Name under the input, press enter to assign Name as Text type
Similarly, add description, publisher,type,css,cms and framework fields to the schema as Text type
Add demoUrl & githubUrl field to the schema as Link type
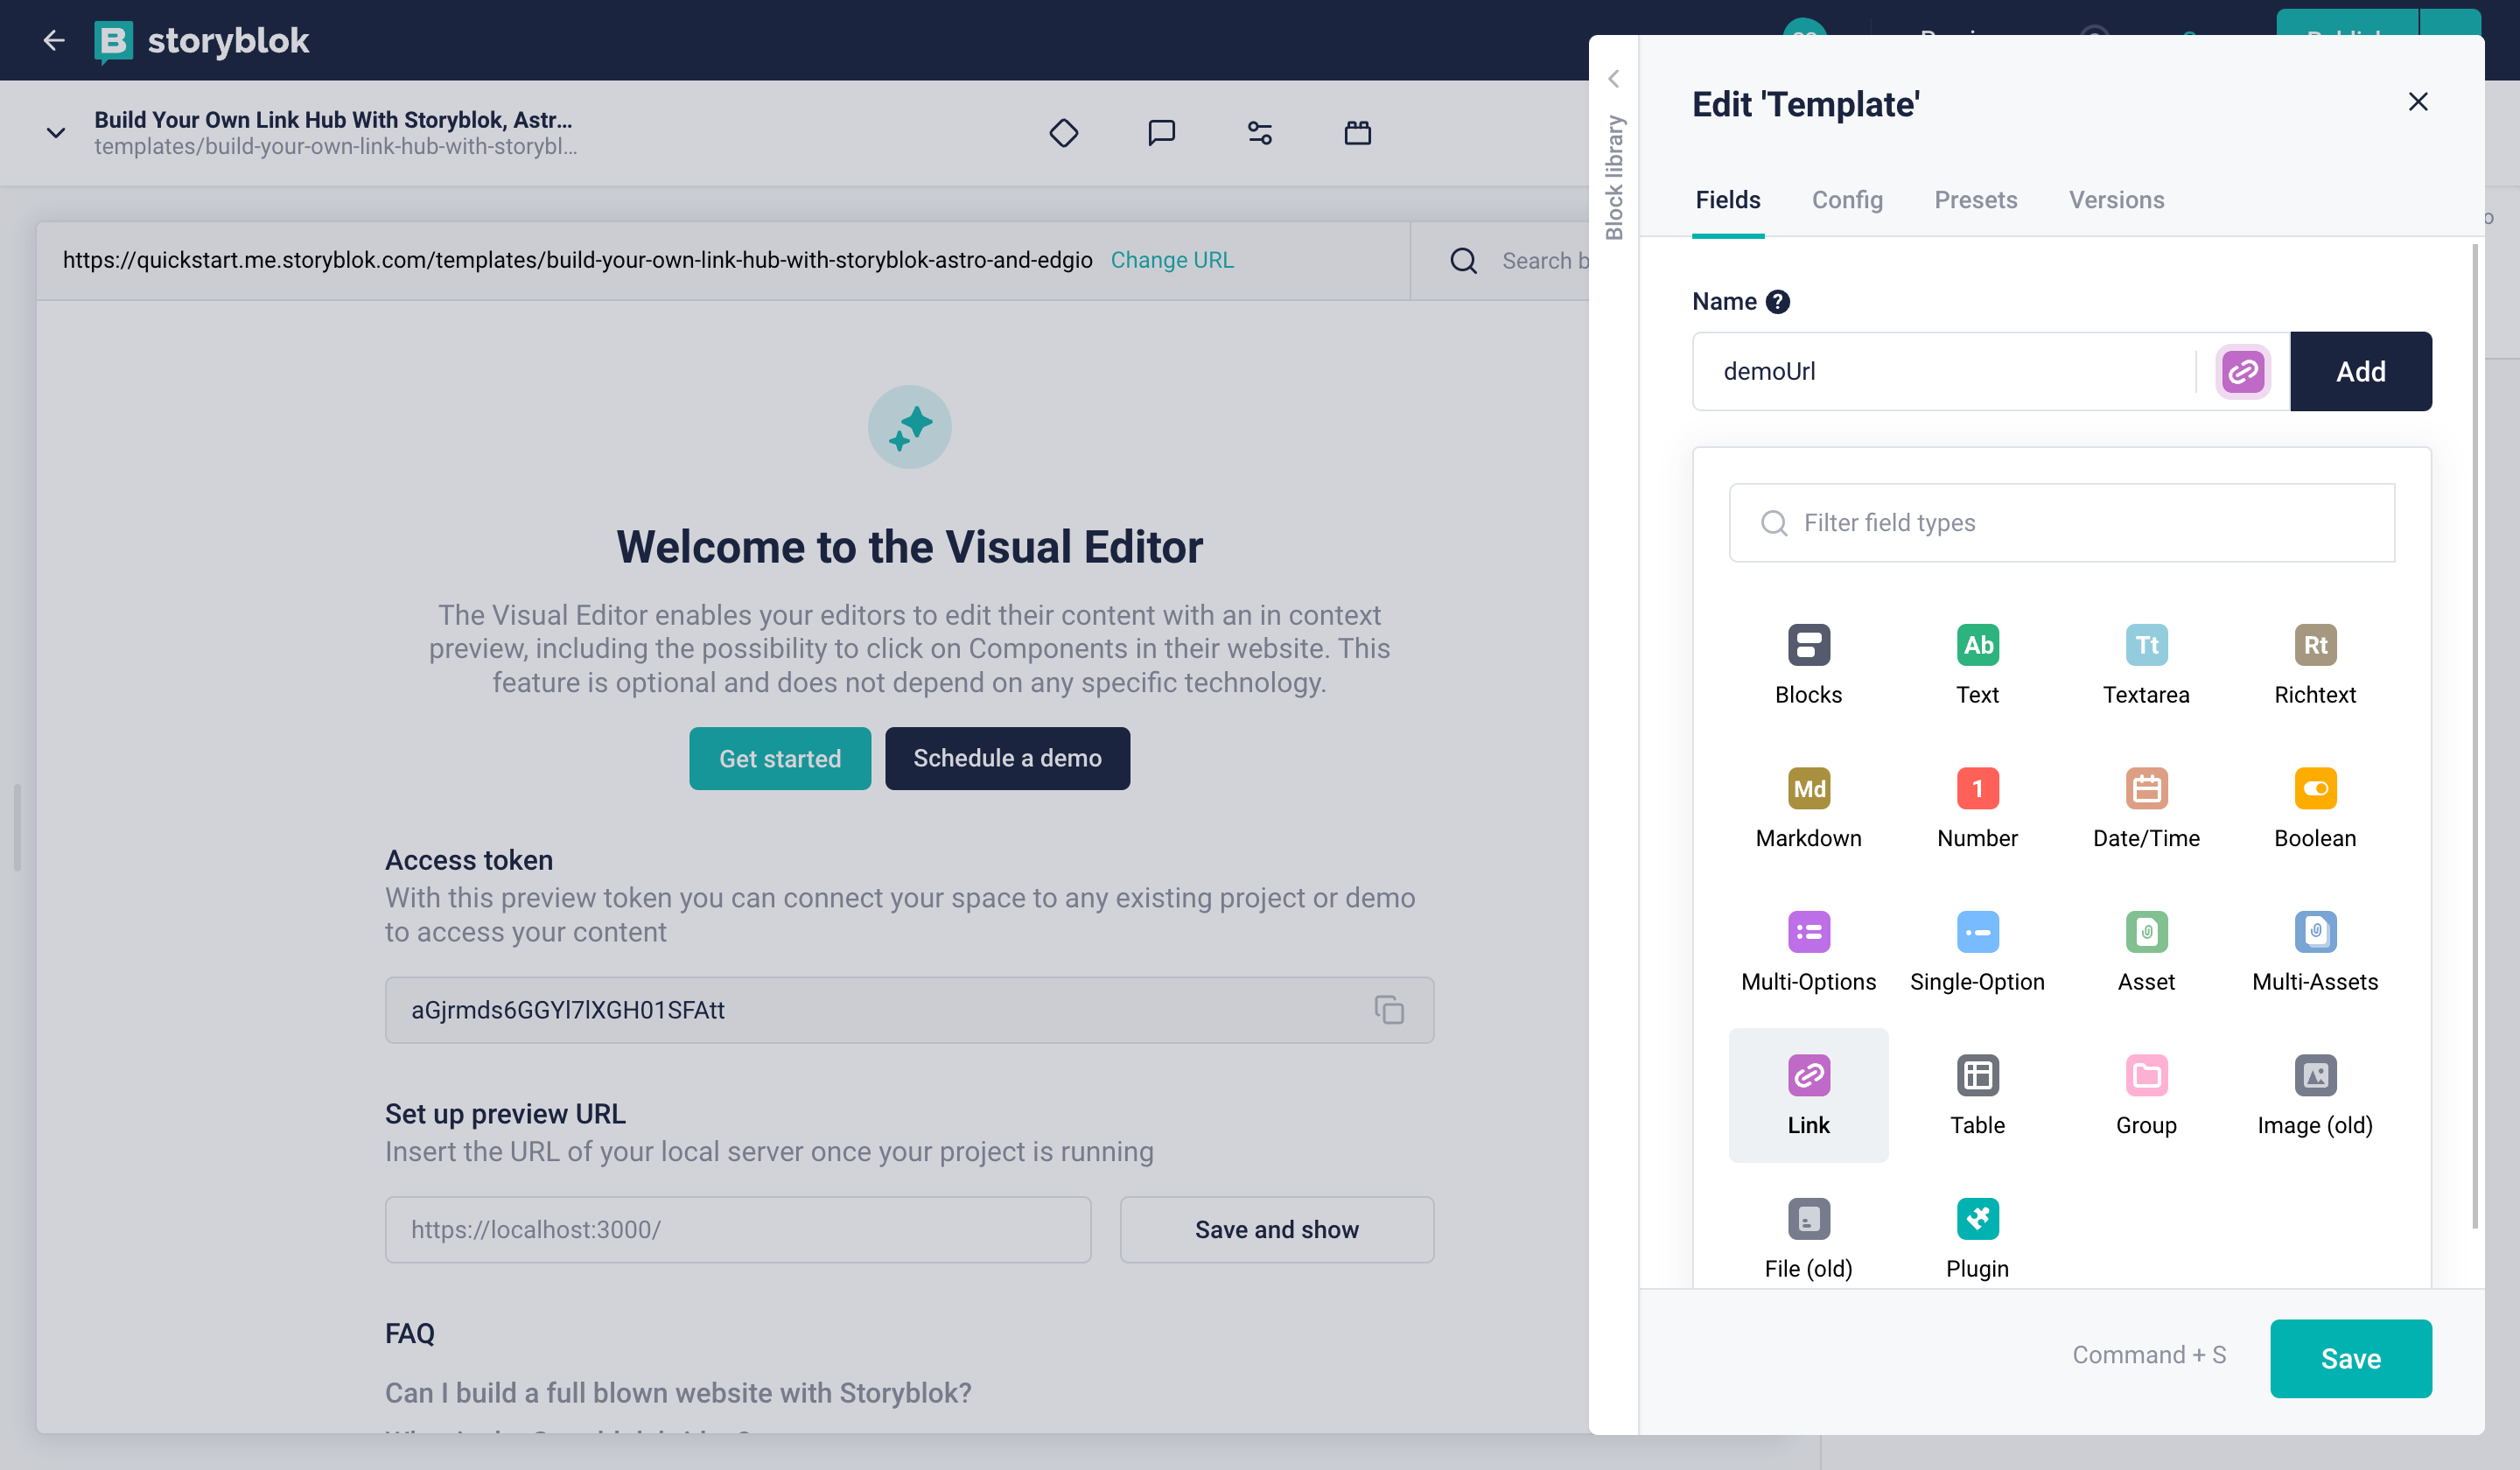
Now, type in demoUrl that’d be associated with a template and click on the icon near it. Change the item to being a Link.
Add overview field to the schema as Markdown type
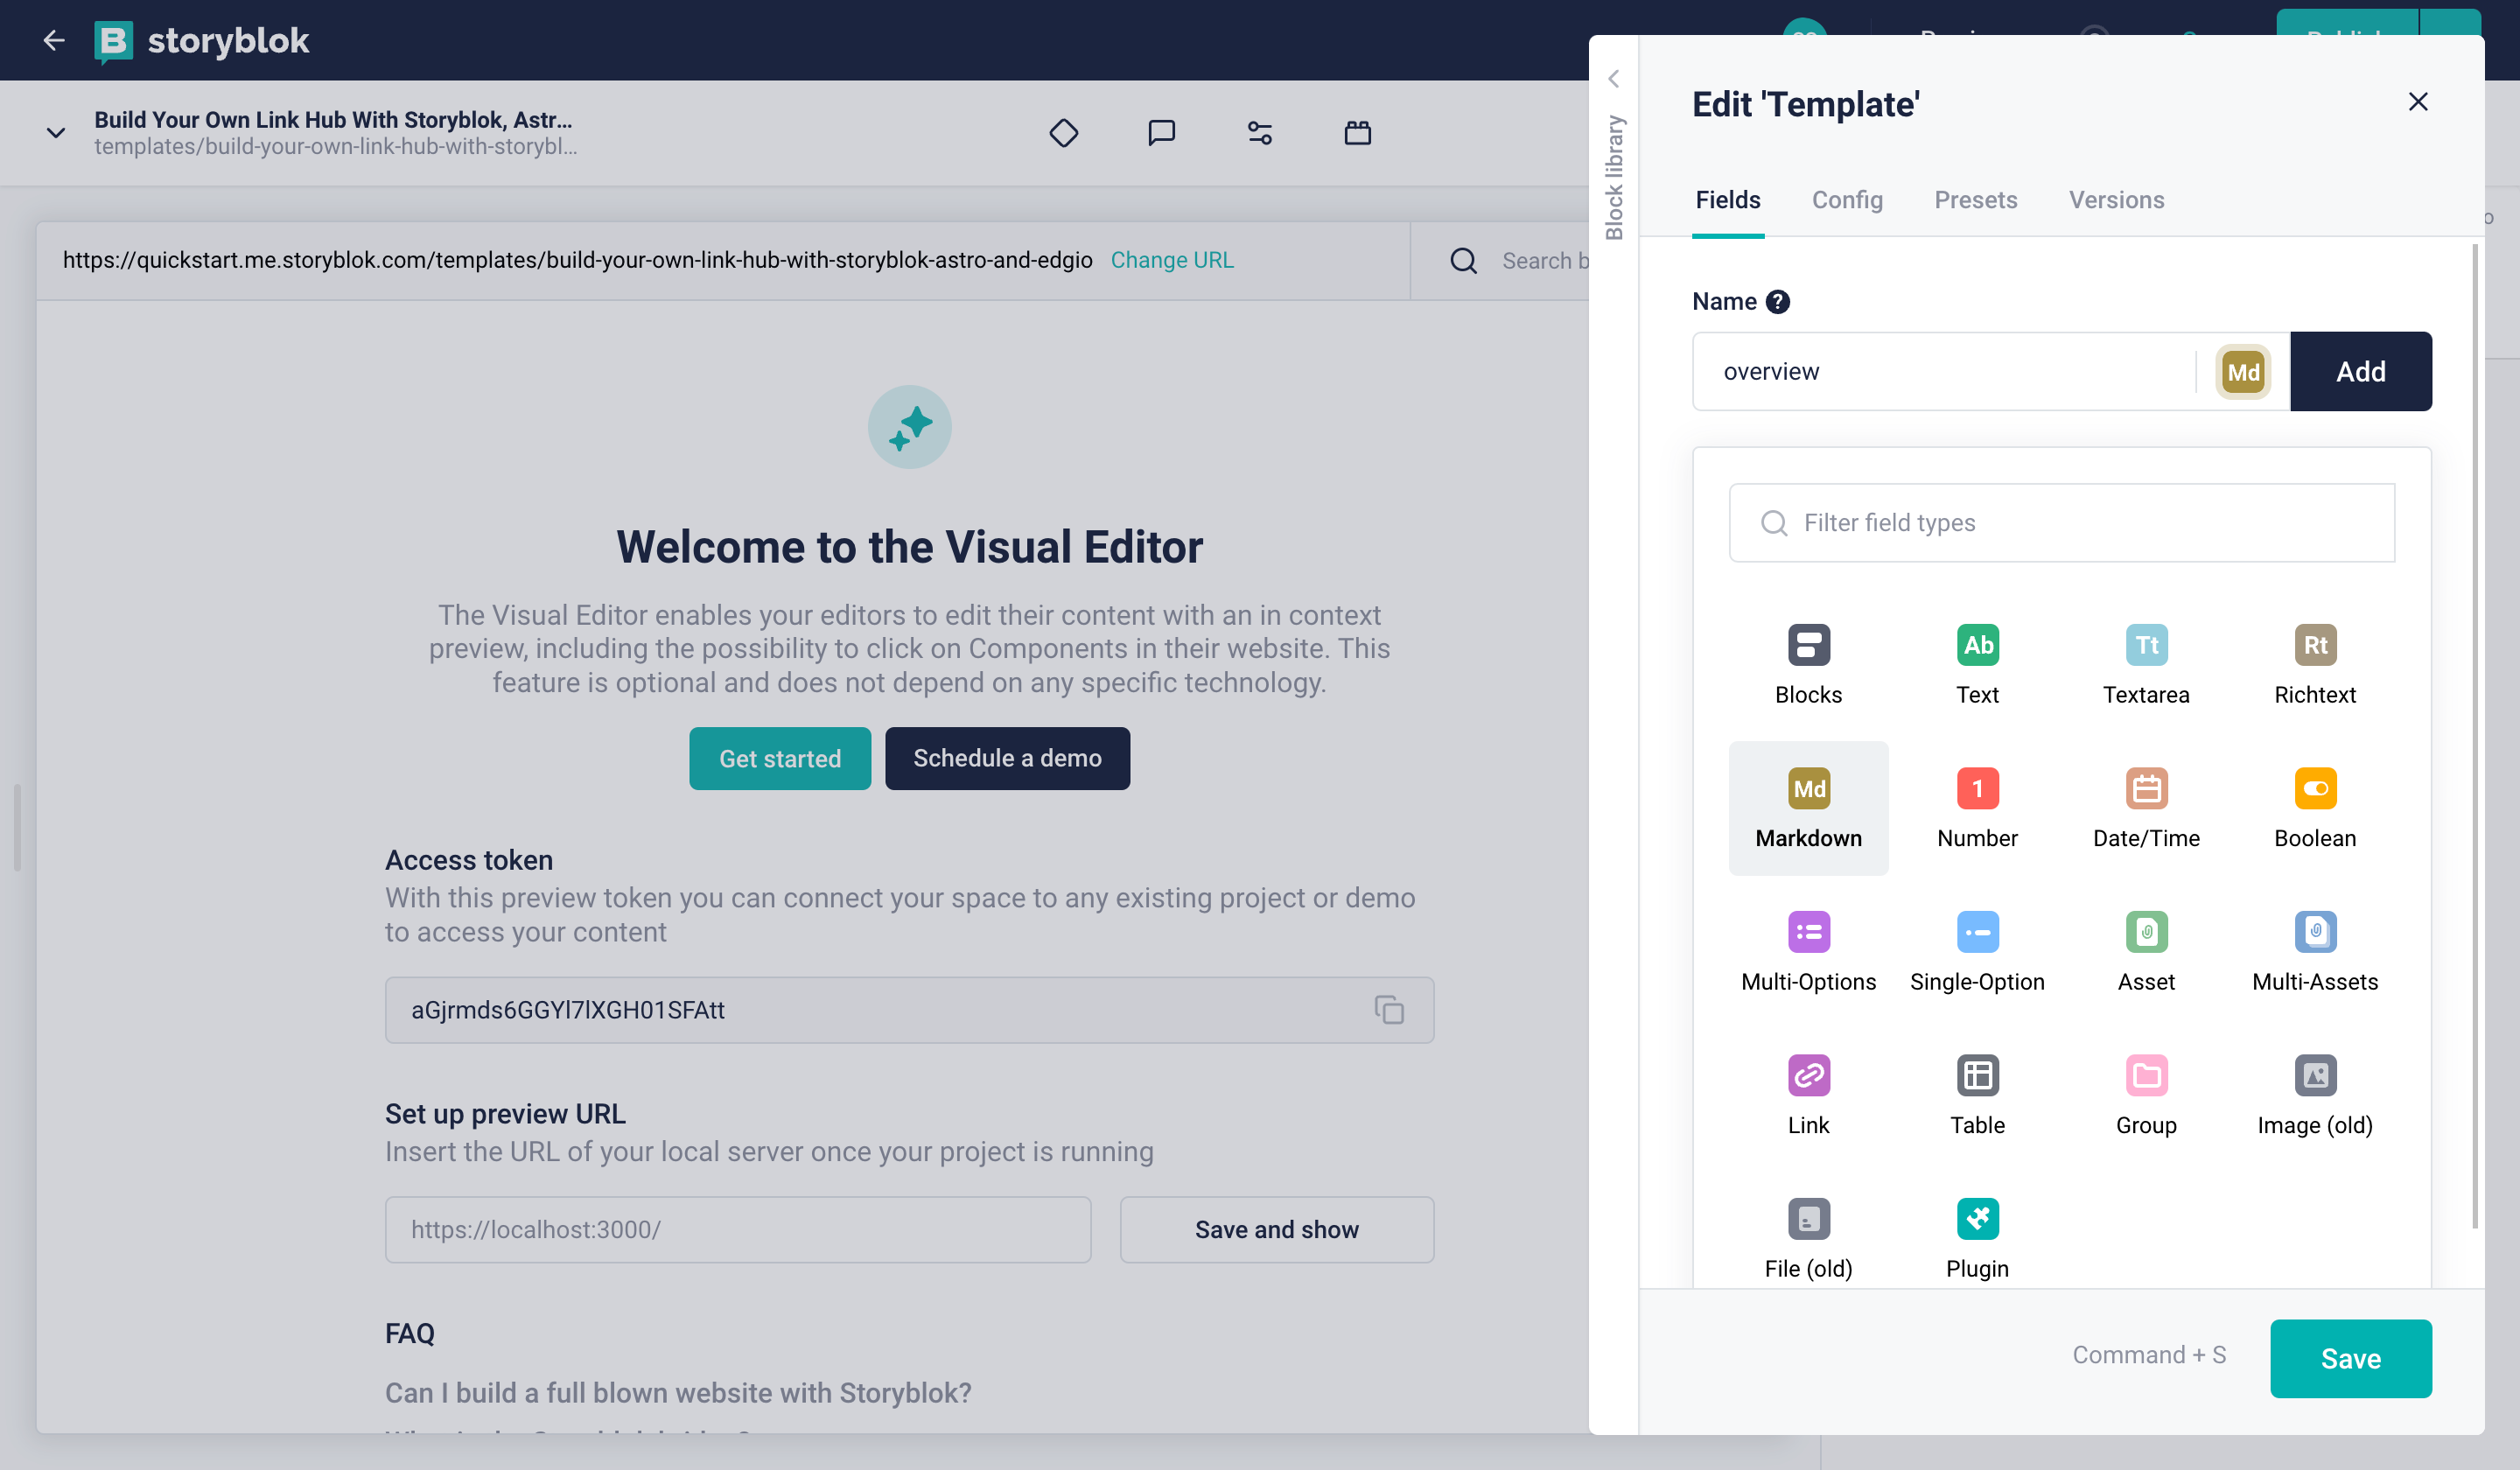
Now, type in overview that’d be associated with a template and click on the icon near it. Change the item to a Markdown.
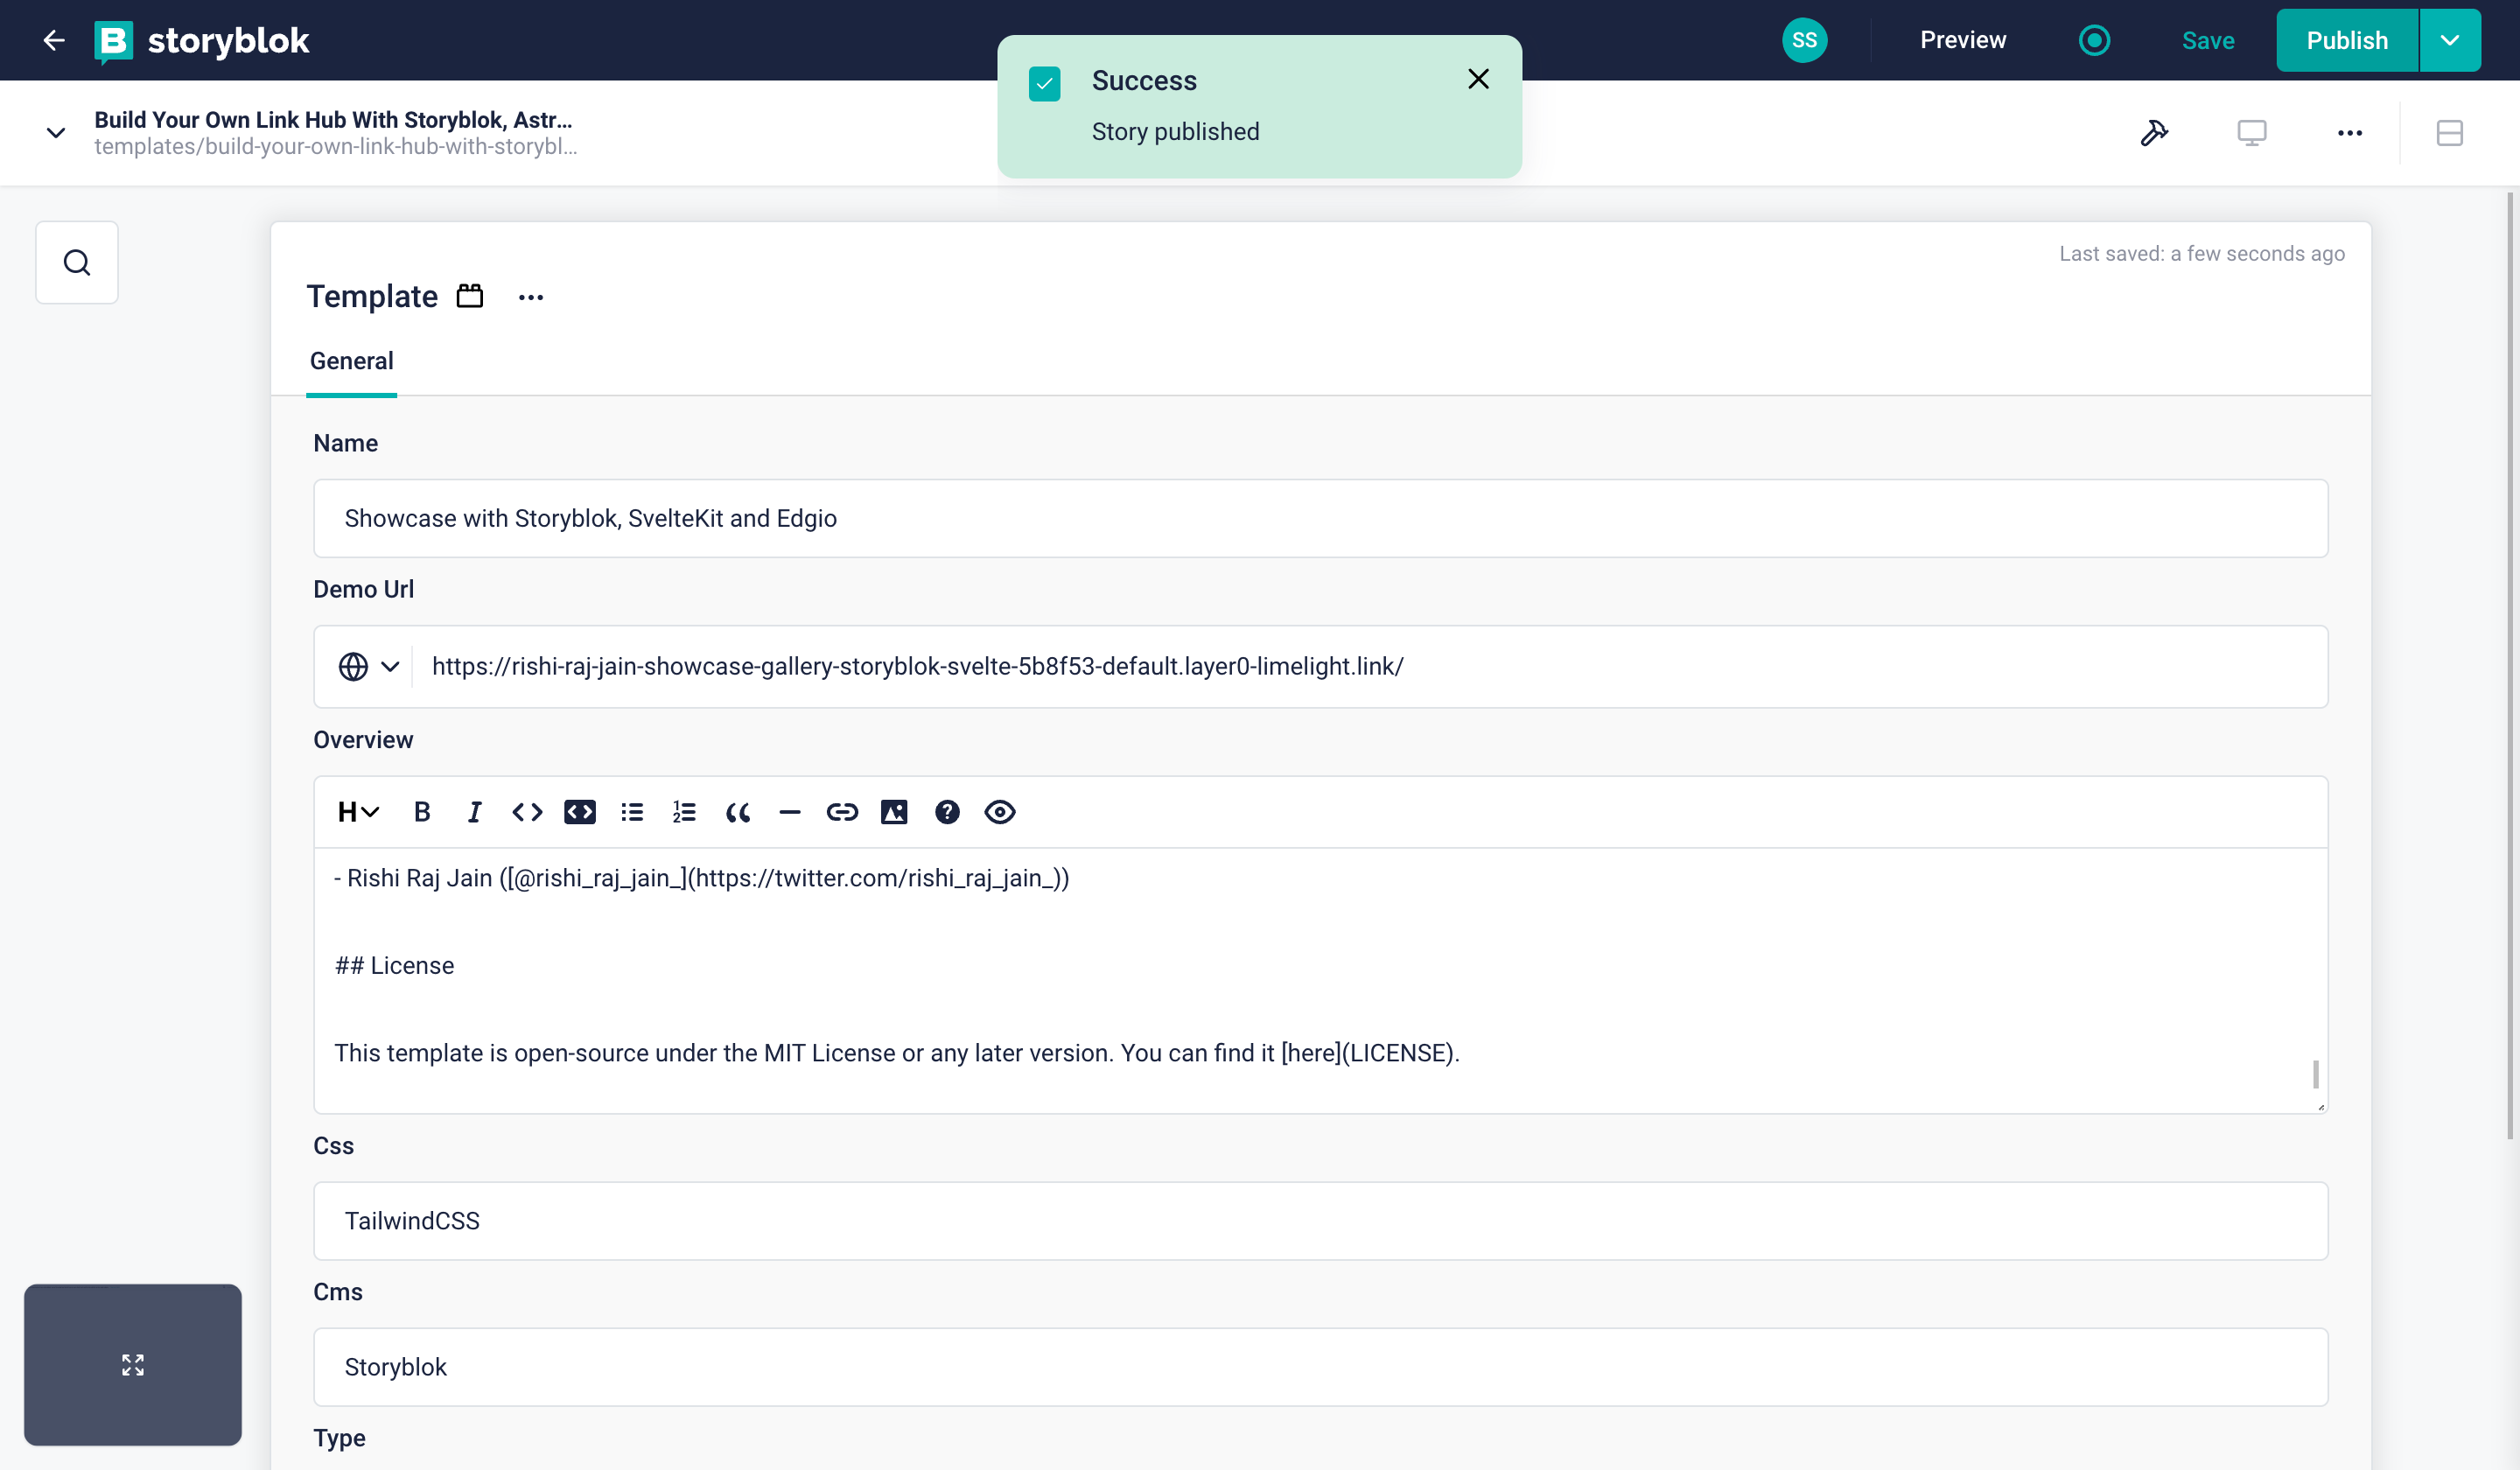
After clicking and save filling the information, this is how it looks once filled in:
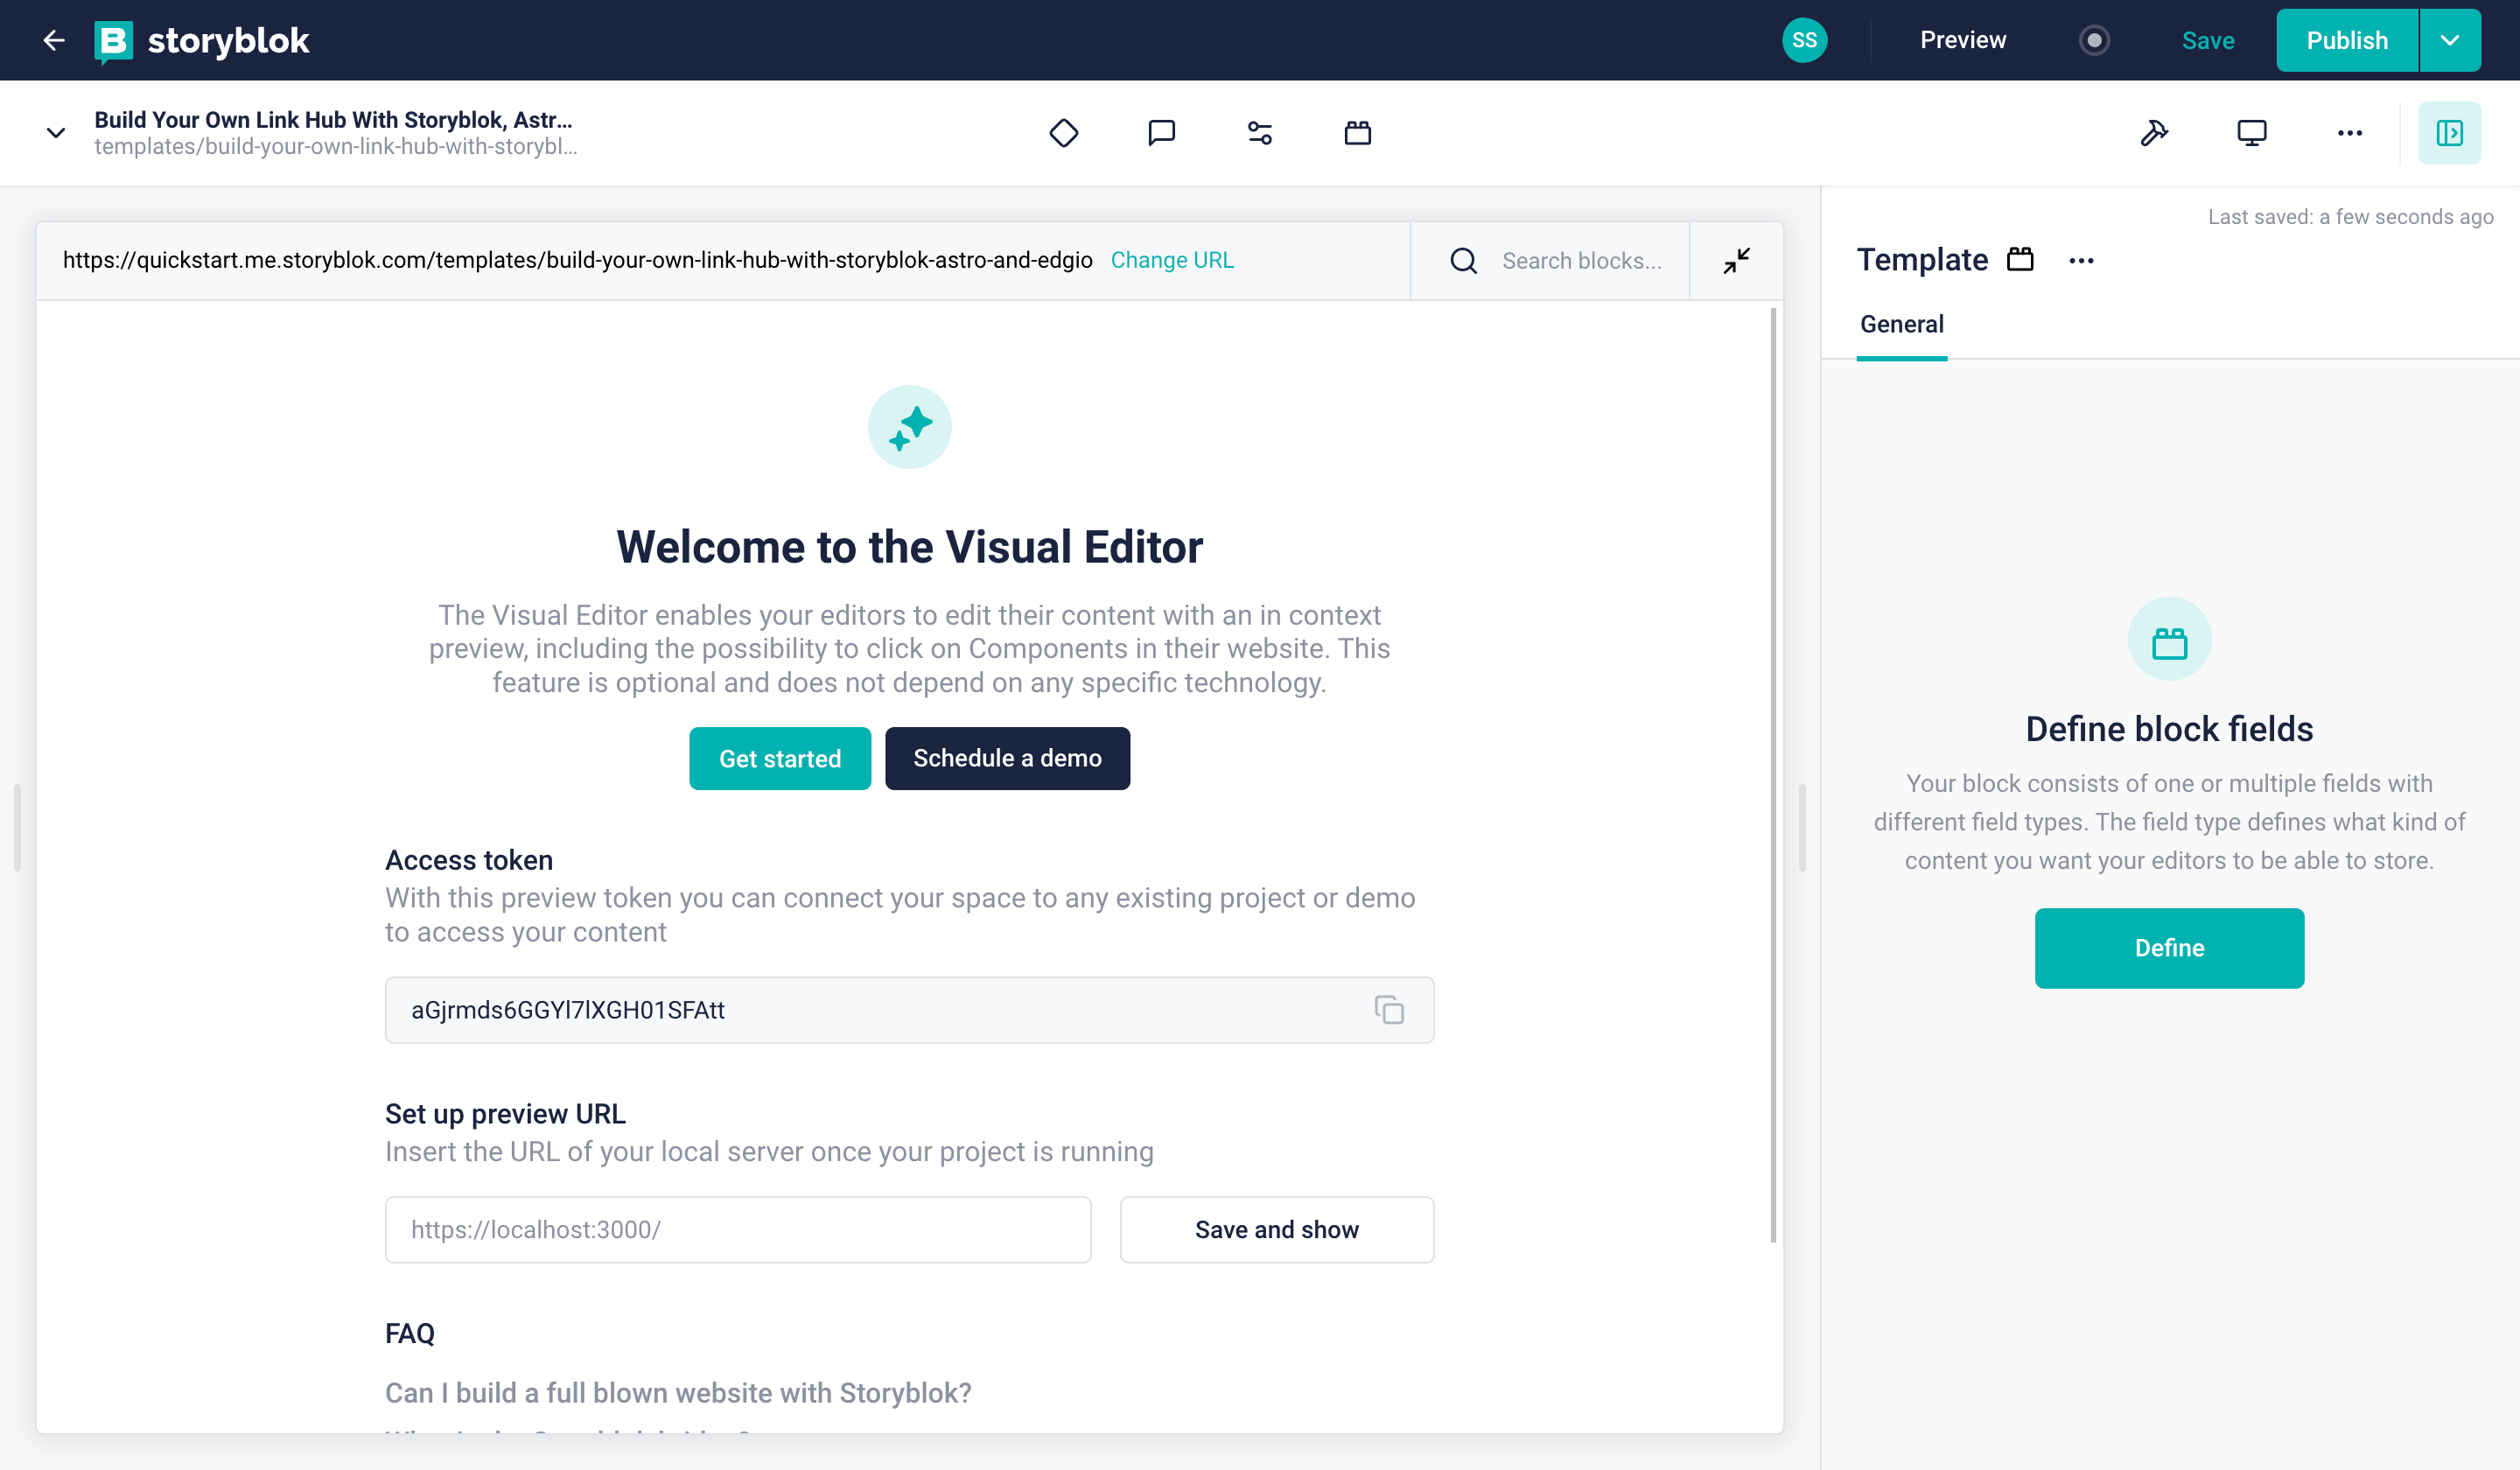
Next, obtain the preview API key (further referred to as STORYBLOK_API_KEY) shown in the tab Access Tokens of Settings. Obtain the token from the list as STORYBLOK_API_KEY.
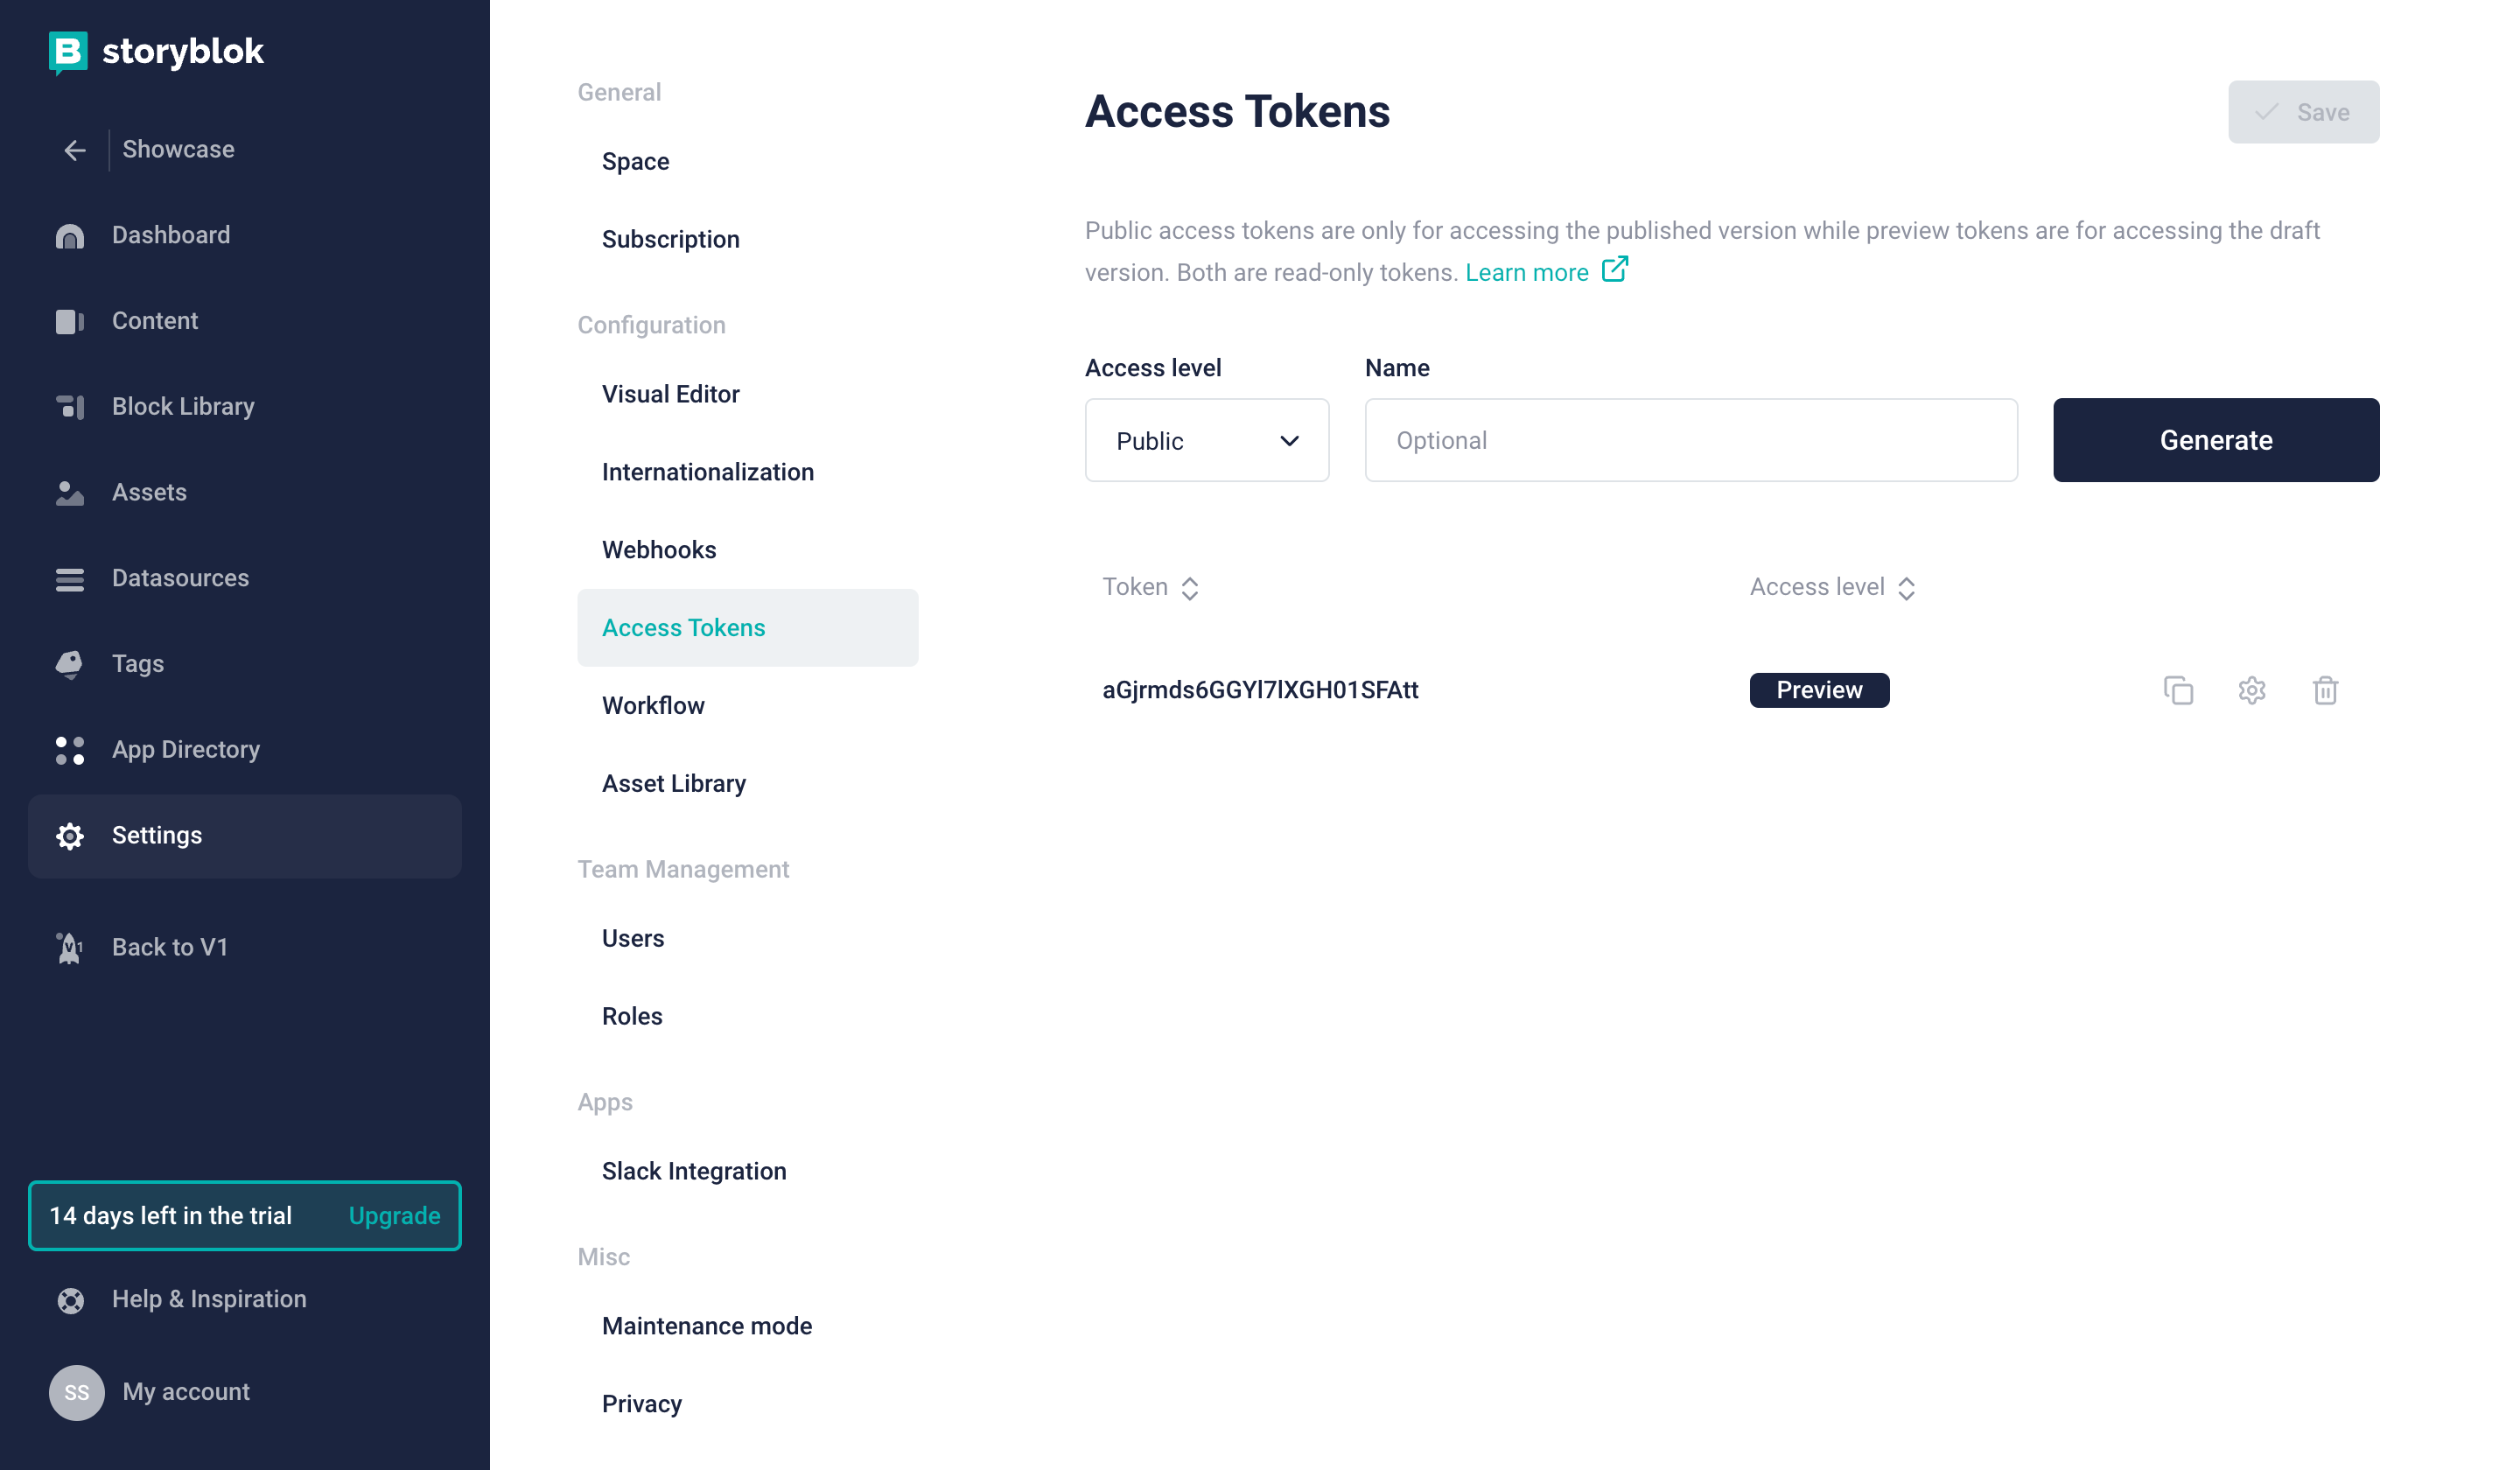
Finally, with that done, obtain the preview token to be used in your code
Next, hit up the Visual Editor tab and set the Location (default environment) to https://localhost:3000
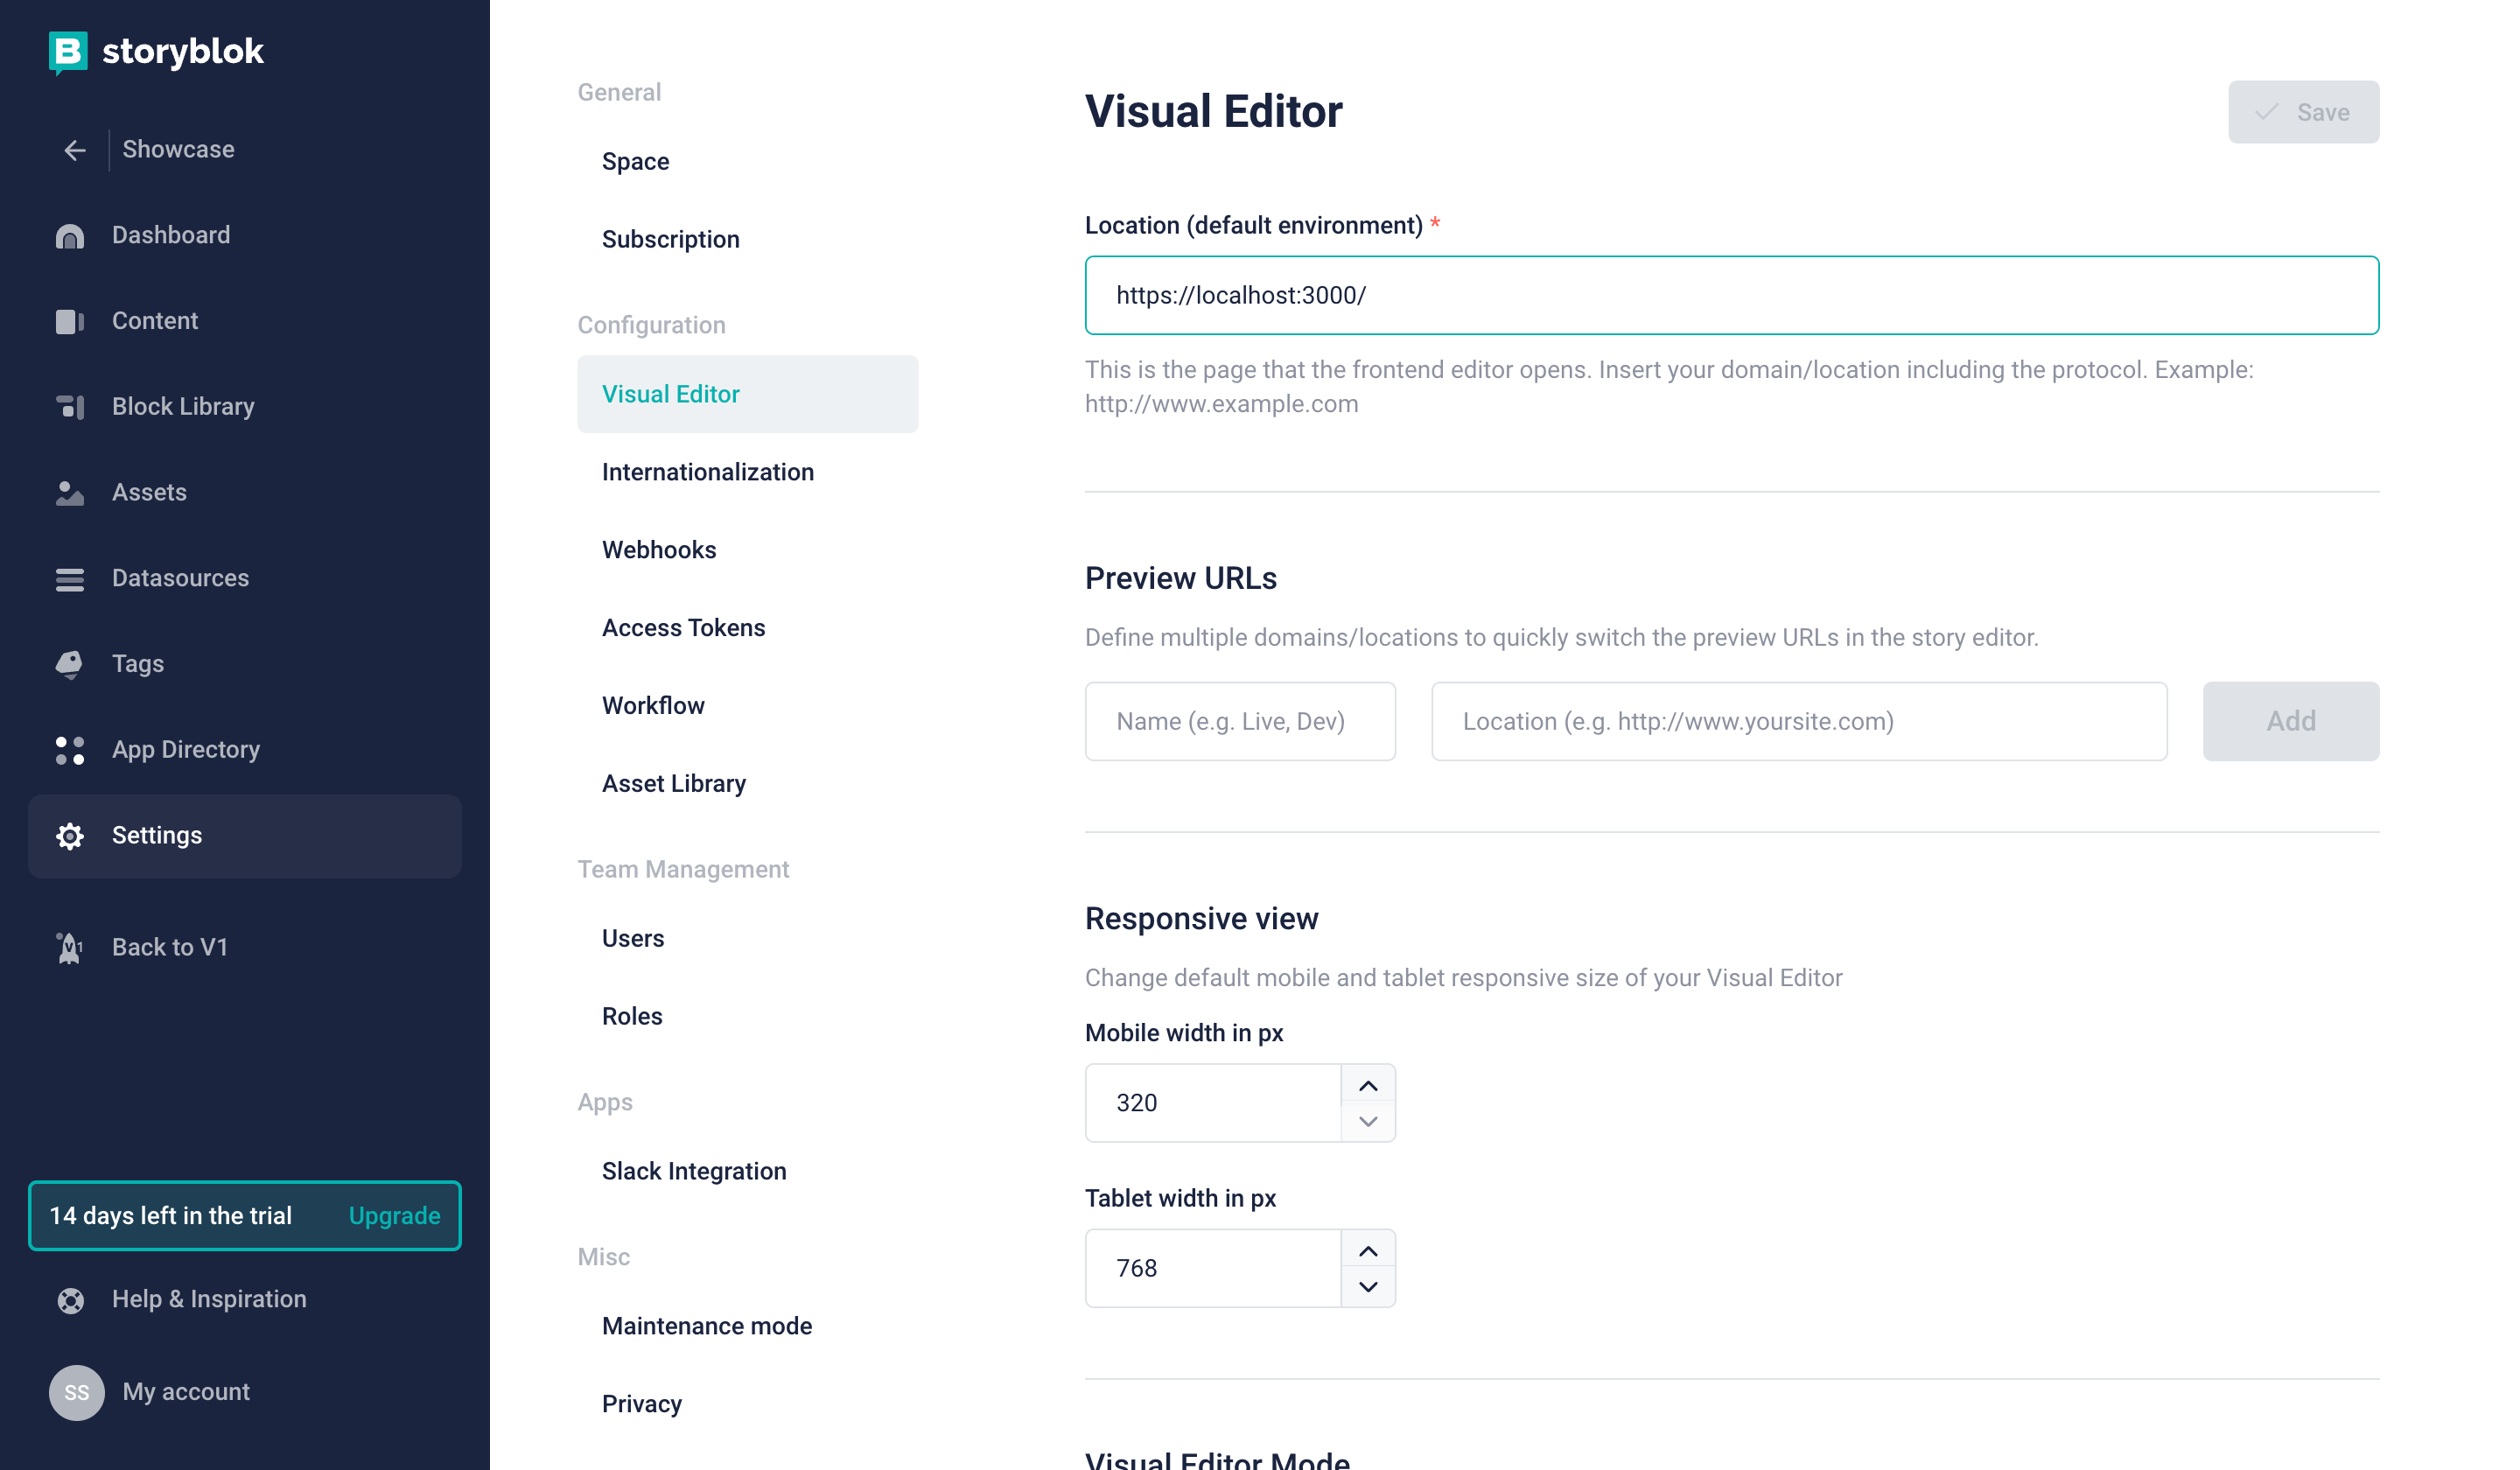
Next, set the Location for Visual Editor
Set up SvelteKit with Edgio
To set up, just clone the app repo and follow this tutorial to learn everything that's in it. To fork the project, run:
git clone https://github.com/rishi-raj-jain/showcase-gallery-storyblok-sveltekit-edgio-starter
cd showcase-gallery-storyblok-sveltekit-edgio-starter
yarn install
After these steps, you should be able to start the local environment using the following command:
yarn run edgio:devCreate a file named .env that’ll contain the STORYBLOK_API_KEY as retrieved in the steps above, and shall look like the following:
# .env

STORYBLOK_API_KEY=token-received-above
With this done, let’s click on the window at the bottom left corner that brings up the Visual Editor and see the live preview.
.png) Preview your site with that entry once path is set](https://a.storyblok.com/f/88751/2880x1680/b6d7a1f112/14-showcase-gallery.png)
Preview your site with that entry once path is set
Integrating Storyblok with SvelteKit
To learn how Storyblok’s @storyblok/svelte package is used to fetch templates in this project, let’s open up src/storyblok.ts which contains the following:
// File: src/storyblok.ts

// Loads up the STORYBLOK_API_KEY from the environment configuration
import { STORYBLOK_API_KEY } from '$env/static/private'

import { storyblokInit, apiPlugin, useStoryblokApi } from '@storyblok/svelte'

// Initialize Storyblok API Plugin instance
storyblokInit({
	accessToken: STORYBLOK_API_KEY,
	use: [apiPlugin]
})

// Export the apiWrapper to use it directly in SvelteKit's load/SSR function(s)
export const storyblokApi = useStoryblokApi()
Minifying HTML Output To Reduce Page Size in SvelteKit
To minify the HTML response generated via code in your pages, we use SvelteKit Hooks to check if the response is an HTML / page chunk and then use html-minifier on the server to minify the response:
// File: src/hooks.server.ts

import { minify } from 'html-minifier'
import { dev } from '$app/environment'

// Ensure that these are in sync with what's advised on
// https://kit.svelte.dev/docs/migrating#integrations-html-minifier
// The following is a safe subset of the options provided in the link
const minification_options = {
  minifyCSS: true,
  decodeEntities: true,
  useShortDoctype: true,
  collapseWhitespace: true,
  trimCustomFragments: true,
  collapseBooleanAttributes: true,
  removeRedundantAttributes: true,
  processConditionalComments: true,
}

/** @type {import('@sveltejs/kit').Handle} */
export async function handle({ event, resolve }) {
  let page = ''
  return resolve(event, {
    transformPageChunk: ({ html, done }) => {
      page += html
      if (done) {
        return dev ? page : minify(page, minification_options)
      }
    },
  })
}
Generating Image Placeholders for Optimal UX in SvelteKit
Heavily inspired by Next.js Gallery, image(s) associated with their showcase template(s) are provided with blur images that show up as soon as the page loads, and waits for the complete image to load meanwhile. As we already know that the images are going to be not hosted with the app itself, we serve the images resized and compressed from Edgio’s Image Optimizer before generating an image’s base64 string version.
// File: src/image.ts
import sharp from 'sharp'
import sizeOf from 'buffer-image-size'

export async function getBase64ImageUrl(imageUrl: string, width: number = 100) {
  const upstreamImage = new URL('/', 'https://opt.moovweb.net')
  if (imageUrl) upstreamImage.searchParams.set('img', imageUrl)
  if (width) upstreamImage.searchParams.set('width', width.toString())
  const response = await fetch(upstreamImage.toString())
  const buffer = await response.arrayBuffer()
  const imageBuffer = await sharp(buffer).blur().toBuffer()
  const { width: imageWidth, height } = sizeOf(imageBuffer)
  const base64 = imageBuffer.toString('base64')
  return {
    width: imageWidth,
    height,
    image: `data:image/jpeg;base64,${base64}`,
  }
}
While Next.js offers a built-in support to blurDataURLs, in SvelteKit the same is achieved by adding some TailwindCSS classes (i.e. will-change-auto, transform-gpu, and transition) and referencing the blurDataURL from the function as above as the background-image of that img element.
<!-- File: src/components/Card.svelte -->

<img
alt={item.name}
src={getScreenshotLoader(item.demoUrl)}
class="aspect-video w-full transform-gpu object-cover transition will-change-auto"
style={item.blurDataURL && `background-image: url(${item.blurDataURL}); background-repeat: no-repeat; background-position: 50% 50%; background-size: cover;`}
/>
Generating Loading Placeholders During Navigation For Instant Feedback in SvelteKit
The entry point of the app’s layout src/routes/+layout.svelte is where you can conditionally figure out when to display the loading placeholders during navigation via the navigation module in SvelteKit stores. The following code figures out if user is navigating and satisfies some path based condition to which it’s navigating to, the user is displayed with a loading placeholder until data JSONs are entirely fetched from the server. This ensures that the user action of navigation is acknowledged, and is displayed with a similar skeleton to what’ll look when it’s done navigating.
<!-- File: src/routes/+layout.svelte -->

<script lang="ts">
import '@/src/app.css'
import { navigating } from '$app/stores'
import Detail from '@/src/components/Loading/Detail.svelte'
import Listing from '@/src/components/Loading/Listing.svelte'
</script>

{#if Boolean($navigating) && $navigating?.to?.url.pathname.includes('/templates/')}
<Detail />
{:else if Boolean($navigating) && $navigating?.from?.url.pathname !== '/' && $navigating?.to?.url.pathname === '/'}
<Listing />
{:else}
<slot />
{/if}
Implementing Showcase Data Fetching and Revalidation
In this section, we'll be diving deep into how the data fetching and revalidation for the showcase gallery is done. We make constant use of Stale While Revalidate on the Edge to achieve 100% cache hit rates, and @storyblok/svelte to fetch and display data on-demand.
Fetching Showcase Items on the Listing Page
The homepage (aka Listing Page) shows the filters and the items for the gallery. All of the items are fetched and filtered from (inside src/routes/+page.server.ts), and then the HTML response is sent from the server to the client. To fetch up to 20 templates on the server side from Storyblok, the following code helps us get all the relevant showcase items. If no showcase items are found, a user is redirected to a 404 page.
// File: src/routes/+page.server.ts

/** @type {import('./$types').PageServerLoad} */
export const load = async ({ url }) => {
  // Append cdn/stories/ before your full slug path
  // SSR only 20 stories, late populate the remaining stories
  const { data } = await storyblokApi.get(`cdn/stories/`, {
    per_page: 20,
    starts_with: 'templates/',
  })

  if (!data || !data.stories) throw redirect(307, '/404')
}
After all the showcase items are collected, based on the keyName and the search query param, the list is filtered and then dispatched to the browser. As the filters can vary between multiple keys containing multiple values, the following code iterates over and filters accordingly:
// File: src/routes/+page.server.ts

// If searchParam is present, filter the items
// if that text is present in name or description of the item
// Example: ?search=SvelteKit
// Search for SvelteKit in name and description
if (searchParam) {
  filteredTemplates = filteredTemplates.filter(
    (i) => i.name.includes(searchParam) || i.description.includes(searchParam)
  )
}

// If keyNameParam is present, filter the items
// by iterating over each value and see if
// it exists inside the item's value of the param
// Example: ?keyName={ css: ['TailwindCSS'], framework: ['Next.js'] }
// Filter all the templates by their css attribute and if that contains
// TailwindCSS OR their framework attribute if that contains Next.js
if (keyNameParam) {
  const keys = Object.keys(keyNameParam)
  keys.forEach((i) => {
    if (keyNameParam[i]?.length < 1) delete keyNameParam[i]
  })
  if (Object.keys(keyNameParam).length > 0) {
    filteredTemplates = filteredTemplates.filter((i) => {
      for (const j of Object.keys(keyNameParam)) {
        if (i[j] && i[j].length > 0) {
          for (const eachAttr of i[j]) {
            if (keyNameParam[j].includes(eachAttr)) {
              return true
            }
          }
        }
      }
      return false
    })
  }
}

return {
  templates: filteredTemplates,
}
Fetching Showcase Item on the Display Page
Showcase Item Page (aka Display Page) displays all the relevant information to that particular item in the gallery. All of the details are fetched (inside src/routes/templates/[slug]/+page.server.ts), and then the HTML response is sent from the server to the client. In case no showcase item is found, a user is redirected to the home page. This all is done via the following code:
// File: src/routes/templates/[slug]/+page.server.ts

/** @type {import('./$types').PageServerLoad} */
export const load = async ({ url, params }) => {
  let findTemplate

  const slug = params.slug

  // Append cdn/stories/ before your full slug path
  const { data } = await storyblokApi.get(`cdn/stories/templates/${slug}`)

  if (data?.story) {
    findTemplate = data.story
  }

  // If such a template data exists, otherwise redirect to home page
  if (!findTemplate || !findTemplate.content) throw redirect(307, '/')

  // Create the template data
  const template = {
    name: findTemplate.content.name,
    demoUrl: findTemplate.content.demoUrl.url,
    framework: findTemplate.content.framework,
    publisher: findTemplate.content.publisher,
    githubUrl: findTemplate.content.githubUrl.url,
    description: findTemplate.content.description,
    ...(findTemplate.content.cms && { cms: findTemplate.content.cms }),
    ...(findTemplate.content.css && { css: findTemplate.content.css }),
    ...(findTemplate.content.type && { type: findTemplate.content.type }),
    ...(findTemplate.content.overview && {
      overview: await toHTML(findTemplate.content.overview),
    }),
  }

  return {
    template,
  }
}
Stale While Revalidate on the Edge for Page(s) and Navigation JSON(s)
The following code describes how to use the concept of Stale While Revalidate to achieve 100% cache hit rates. In the code (in routes.js), the router.match function is used to match all the showcase pages (that start with /templates/).
Inside the cache method, we prevent caching the page in the browser and enable only edge caching to always serve users fast and with the latest content, while allowing navigation JSONs to stay fresh in the browser for only 60 seconds. The edge option is set to maxAgeSeconds: 3600 to ensure that the data is cached for an hour and is revalidated thereafter. The staleWhileRevalidateSeconds option is set to a year to allow the data to be served directly from the cache while the cache is being refreshed.
Also, with the custom cache key method, we can extend the cache to serve the same response until a new keyName or search query param is received in the URL. This allows to serve of different versions of the SSR’d pages directly from the cache instead of deferring into serverless for each request.
// File: routes.cjs

import { Router } from '@edgio/core/router'
import CustomCacheKey from '@edgio/core/router/CustomCacheKey'

// Showcase Path(s)
router.match(
  '/templates/:path',
  ({ renderWithApp, removeUpstreamResponseHeader, cache }) => {
    removeUpstreamResponseHeader('cache-control')
    cache({
      edge: {
        maxAgeSeconds: 60 * 60,
        staleWhileRevalidateSeconds: 60 * 60 * 24 * 365,
      },
      key: new CustomCacheKey().excludeAllQueryParametersExcept(
        'keyName',
        'search'
      ),
    })
    renderWithApp()
  }
)

router.match(
  '/templates/:path/__data.json',
  ({ renderWithApp, removeUpstreamResponseHeader, cache }) => {
    removeUpstreamResponseHeader('cache-control')
    cache({
      browser: {
        serviceWorkerSeconds: 60,
      },
      edge: {
        maxAgeSeconds: 60 * 60,
        staleWhileRevalidateSeconds: 60 * 60 * 24 * 365,
      },
      key: new CustomCacheKey().excludeAllQueryParametersExcept(
        'keyName',
        'search'
      ),
    })
    renderWithApp()
  }
)
Creating OG Images With Satori and SvelteKit
Heavily inspired by Next.js OG Image at the Edge, the route src/routes/og/+server.ts takes care of creating a templated OG Images for each showcase item page. The following GET endpoint of the og routes accepts text, description and image URL query params to generate OG Images dynamically.
import { componentToPng } from '@/src/image'
import Image from '@/src/components/OG/Image.svelte'

/** @type {import('./$types').RequestHandler} */
export async function GET({ url }) {
  const width = 1200
  const height = 630
  const query = url.searchParams
  const text = decodeURIComponent(query?.get('text'))
  const image = decodeURIComponent(query?.get('image'))
  const description = decodeURIComponent(query?.get('description'))
  return componentToPng(
    Image,
    { text, image, width, height, satori: true, description },
    height,
    width
  )
}
The above code converts Image component to png and returns it directly from the server. The Image component is a Svelte Component which is gonna shape how that OG Image looks like when rendered in HTML. For example, the following creates two columns: 1. that displays the name and description of the template and 2. that displays the screenshot of the demoUrl of that showcase item:
<script lang="ts">
	export let text: string
	export let width: number
	export let image: string
	export let height: number
	export let description: string
</script>

<div style={`width: ${width}px; height: ${height}px; display: flex; flex-direction: row; background: white;`}>
	<div style="width: 50%; height: 100%; border-right: 1px solid #C1C1C150; display: flex; flex-direction: column; justify-content: center; padding-left: 75px;">
		<span>Showcase</span>
		<span style="margin-top: 25px; font-size: 30px; font-weight: 800;">
			{text}
		</span>
		<span style="margin-top: 15px; font-size: 20px; padding-right: 25px; line-height: 30px;">
			{description}
		</span>
	</div>
	<img alt={text} src={image} style="height: 100%; width: 50%; object-fit: contain;" />
</div>
That Image component then renders the props passed in the componentToPng function. Make sure that you’ve included a font in your server side bundle (this is handled in the github starter for you):
import fs from 'fs'
import sharp from 'sharp'
import satori from 'satori'
import { join } from 'path'
import { Resvg } from '@resvg/resvg-js'
import { html as toReactNode } from 'satori-html'

export async function componentToPng(
  component: any,
  props: SvelteAllProps,
  height: number,
  width: number
) {
  const appDir = process.cwd()
  const result = component.render(props)
  const markup = toReactNode(`${result.html}<style>${result.css.code}</style>`)
  const svg = await satori(markup, {
    height: +height,
    width: +width,
    fonts: [
      {
        weight: 400,
        name: 'Inter',
        data: fs.readFileSync(
          join(appDir, 'static', 'fonts', 'Inter-Regular.otf')
        ),
      },
    ],
  })
  const resvg = new Resvg(svg, {
    fitTo: {
      mode: 'width',
      value: +width,
    },
  })
  const png = resvg.render()
  return new Response(png.asPng(), {
    headers: {
      'content-type': 'image/png',
    },
  })
}
To avoid redundant requests that contain any of the required query params, we use EdgeJS to filter only the requests that contain required query params, and cache the requests if they don’t come with unique values of those params, via the following code in routes.cjs:
// Only match requests to the /og which contain text, image and description
router.match(
  {
    path: '/og',
    // Evaluates if text, image and description
    // Have length atleast 1
    query: {
      text: /^.{1,}$/,
      image: /^.{1,}$/,
      description: /^.{1,}$/,
    },
  },
  ({ renderWithApp, removeUpstreamResponseHeader, cache }) => {
    removeUpstreamResponseHeader('cache-control')
    cache({
      browser: {
        maxAgeSeconds: 60,
      },
      edge: {
        maxAgeSeconds: 60 * 60 * 24 * 365,
      },
      // Serve same responses for all requests that don't contain unique
      // values of width OR height OR text OR description OR image
      key: new CustomCacheKey().excludeAllQueryParametersExcept(
        'width',
        'height',
        'text',
        'description',
        'image'
      ),
    })
    // Forward the request to SvelteKit in serverless
    renderWithApp()
  }
)
An example of how the OG Card would appear on Facebook for the link:
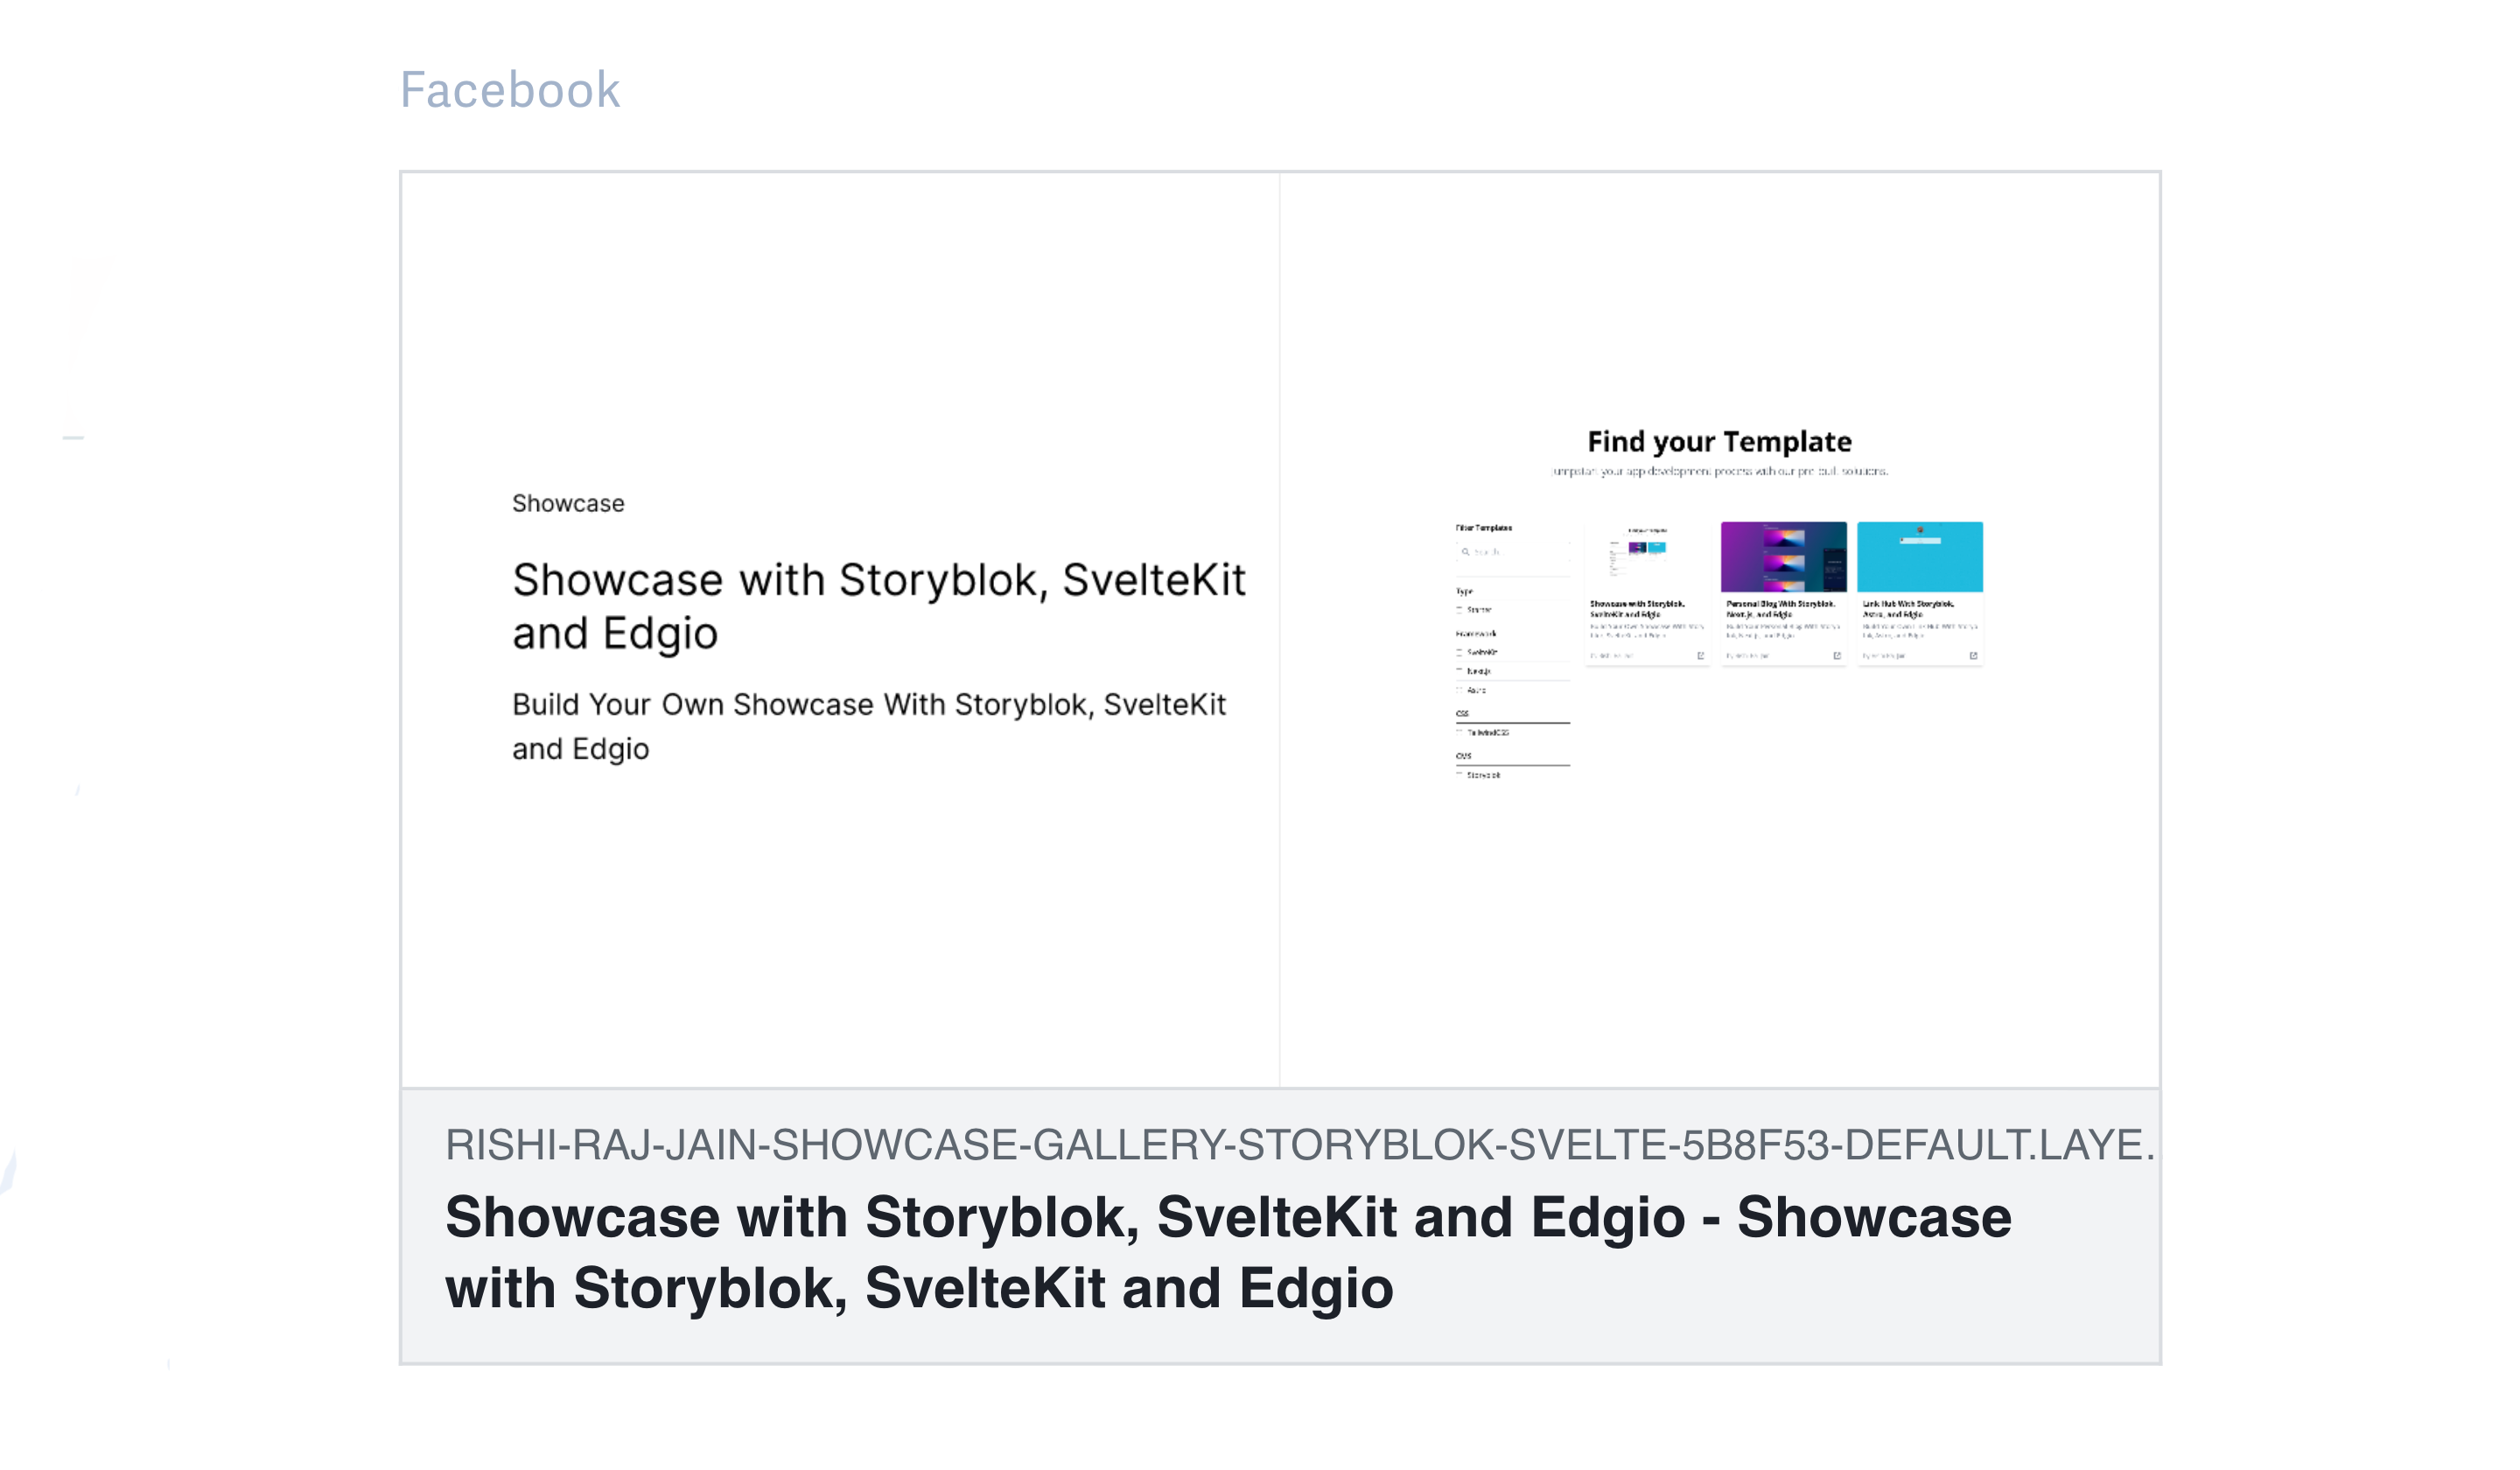
How OG Image generated will look when link in shared on Facebook
Deploy from CLI
You can do a production build of your app and test it locally using:
yarn run edgio:build && yarn run edgio:productionDeploying requires an account on Edgio. Sign up here for free. Once you have an account, you can deploy to Edgio by running the following command in the root folder of your project:
yarn run edgio:deployGo ahead! Publish more content on Storyblok, and browse the /templates/slug route of your website to look for changes.
But does all this get me a great performance?
All the tech decisions behind the curation of this, i.e. Caching, Server Side Rendering, Loading Placeholders, Blur Image Placeholders, Minifying HTML, Brotli Compression, etc. etc. (more can be found inside the GitHub repo code), have led to great performance numbers! Have a look for yourself:
Performance: Test Configuration with SpeedVitals
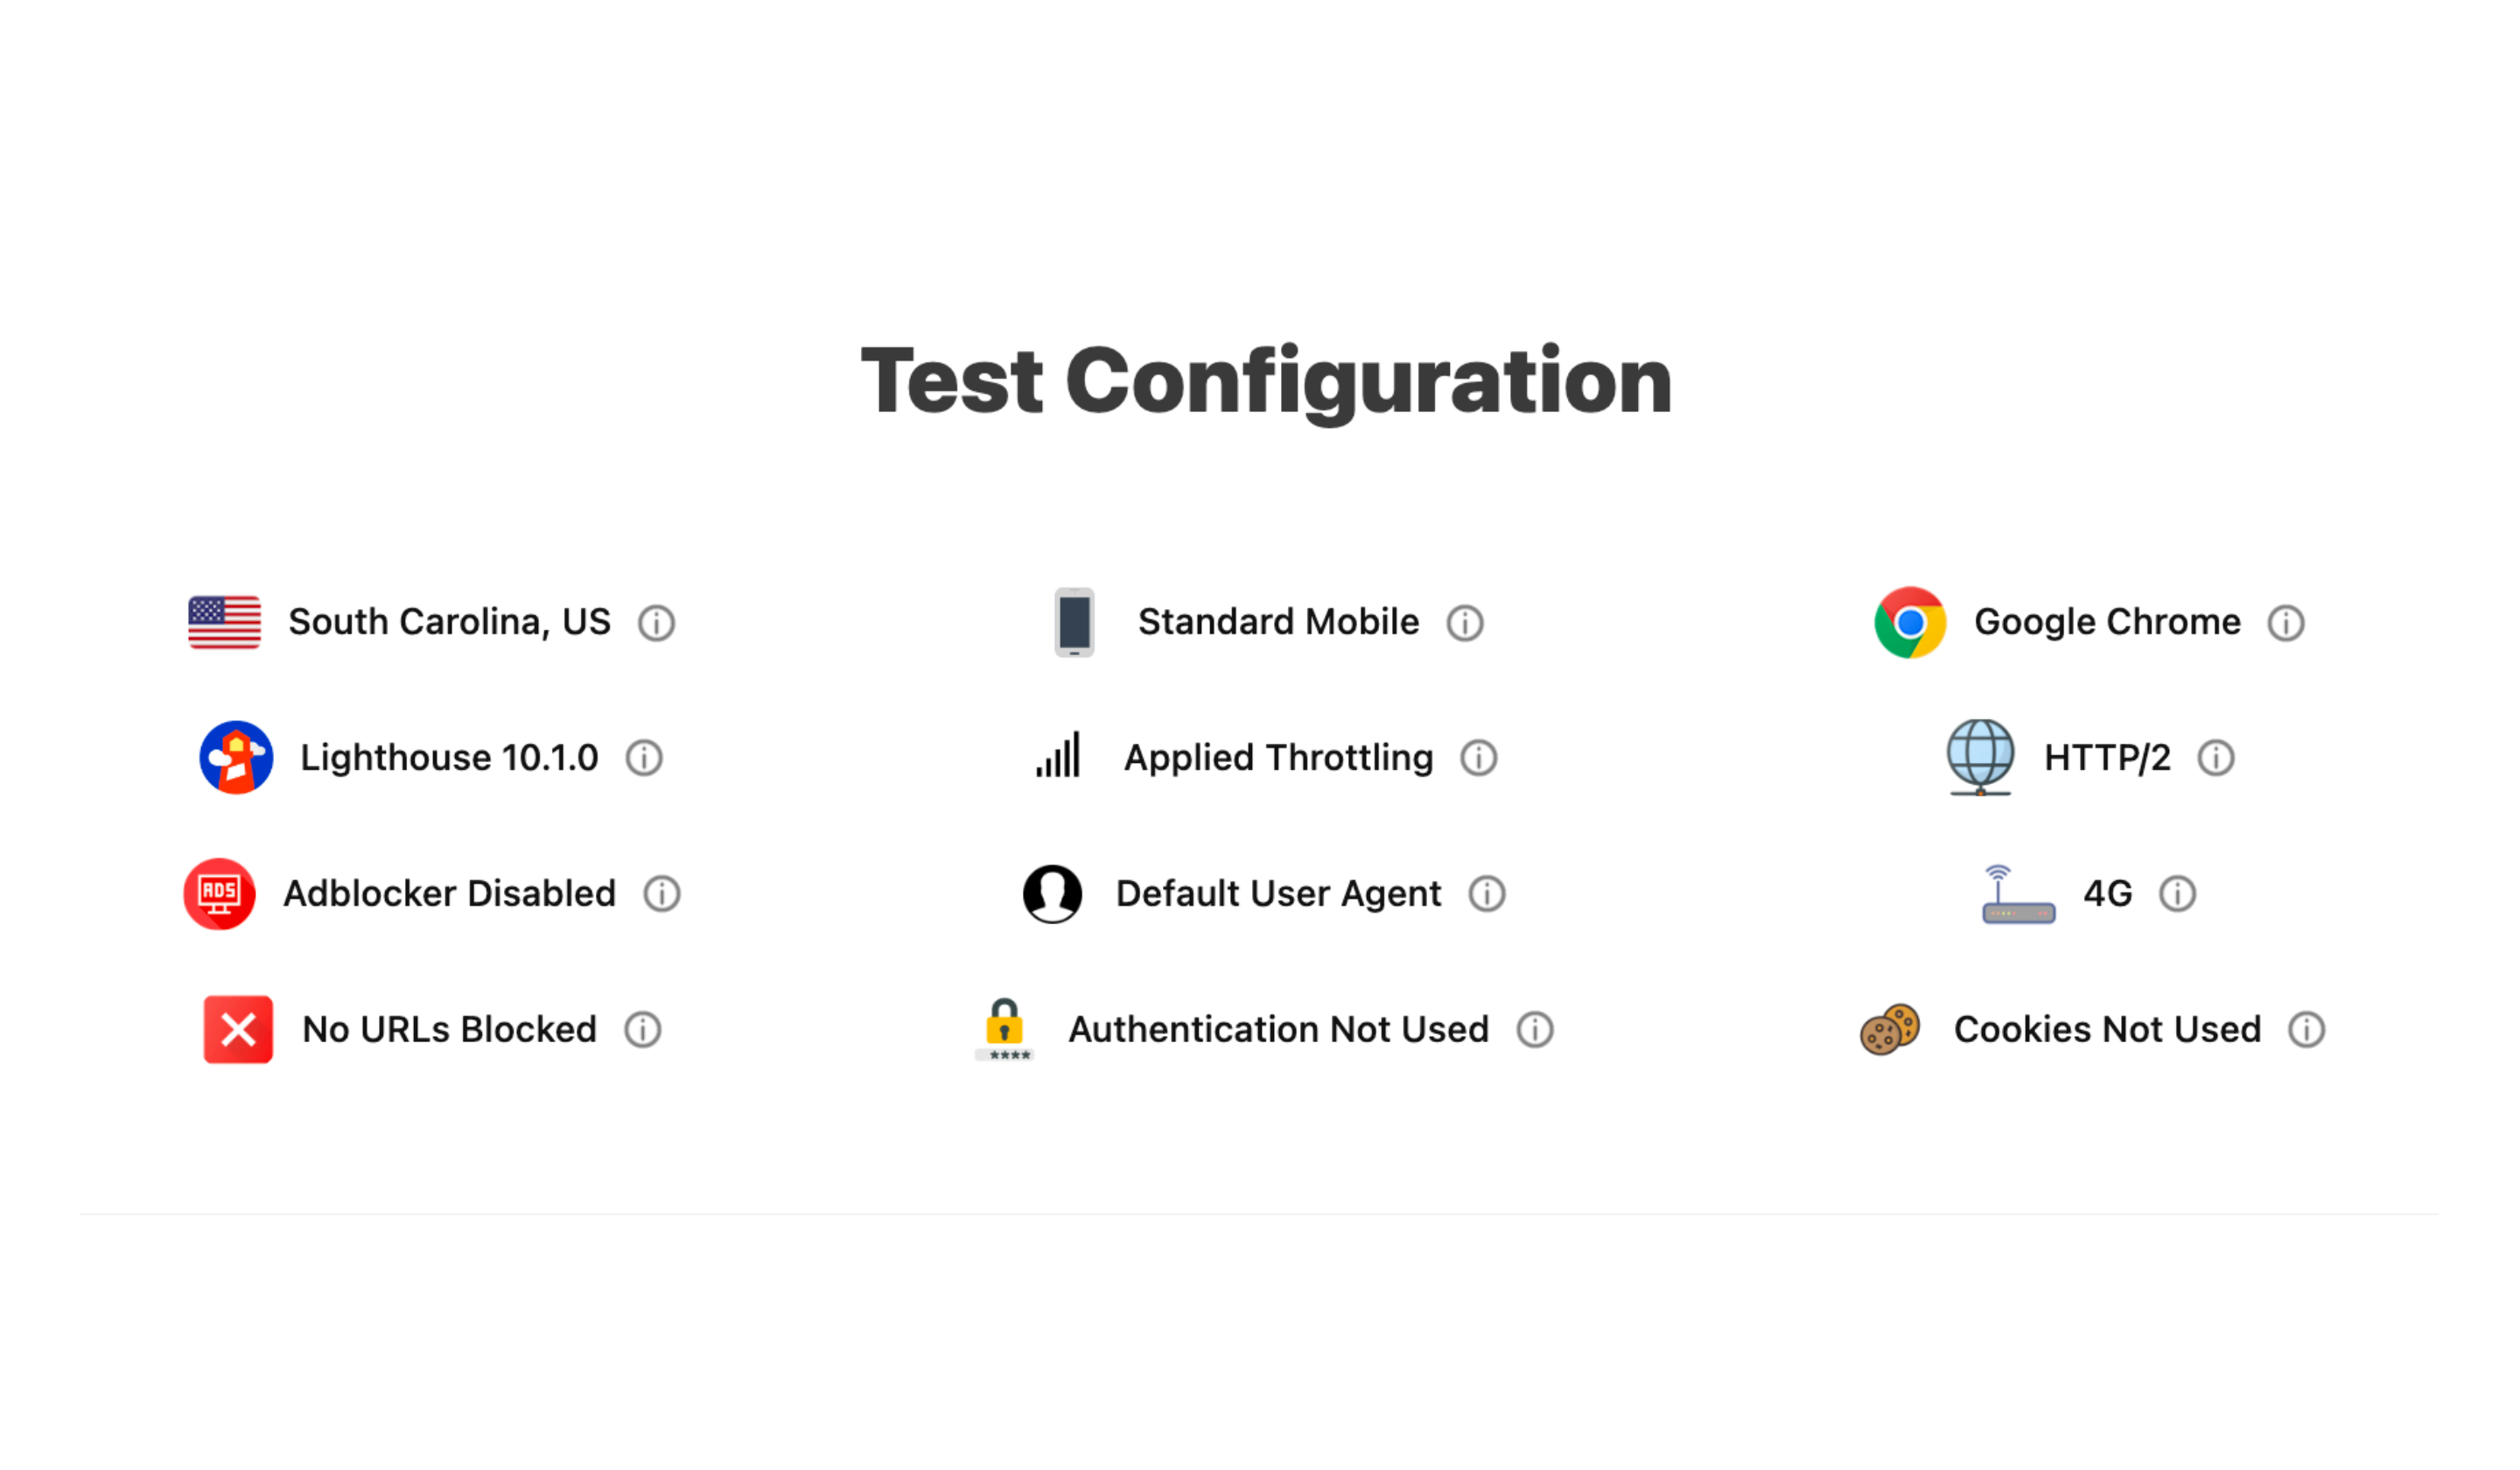
Test Configuration of the website tests with SpeedVitals
Performance: Homepage aka Listing Page
OMG, for the whole world, the homepage is godly super fast! Report Link
Page: https://rishi-raj-jain-showcase-gallery-storyblok-svelte-5b8f53-default.edgio.link/
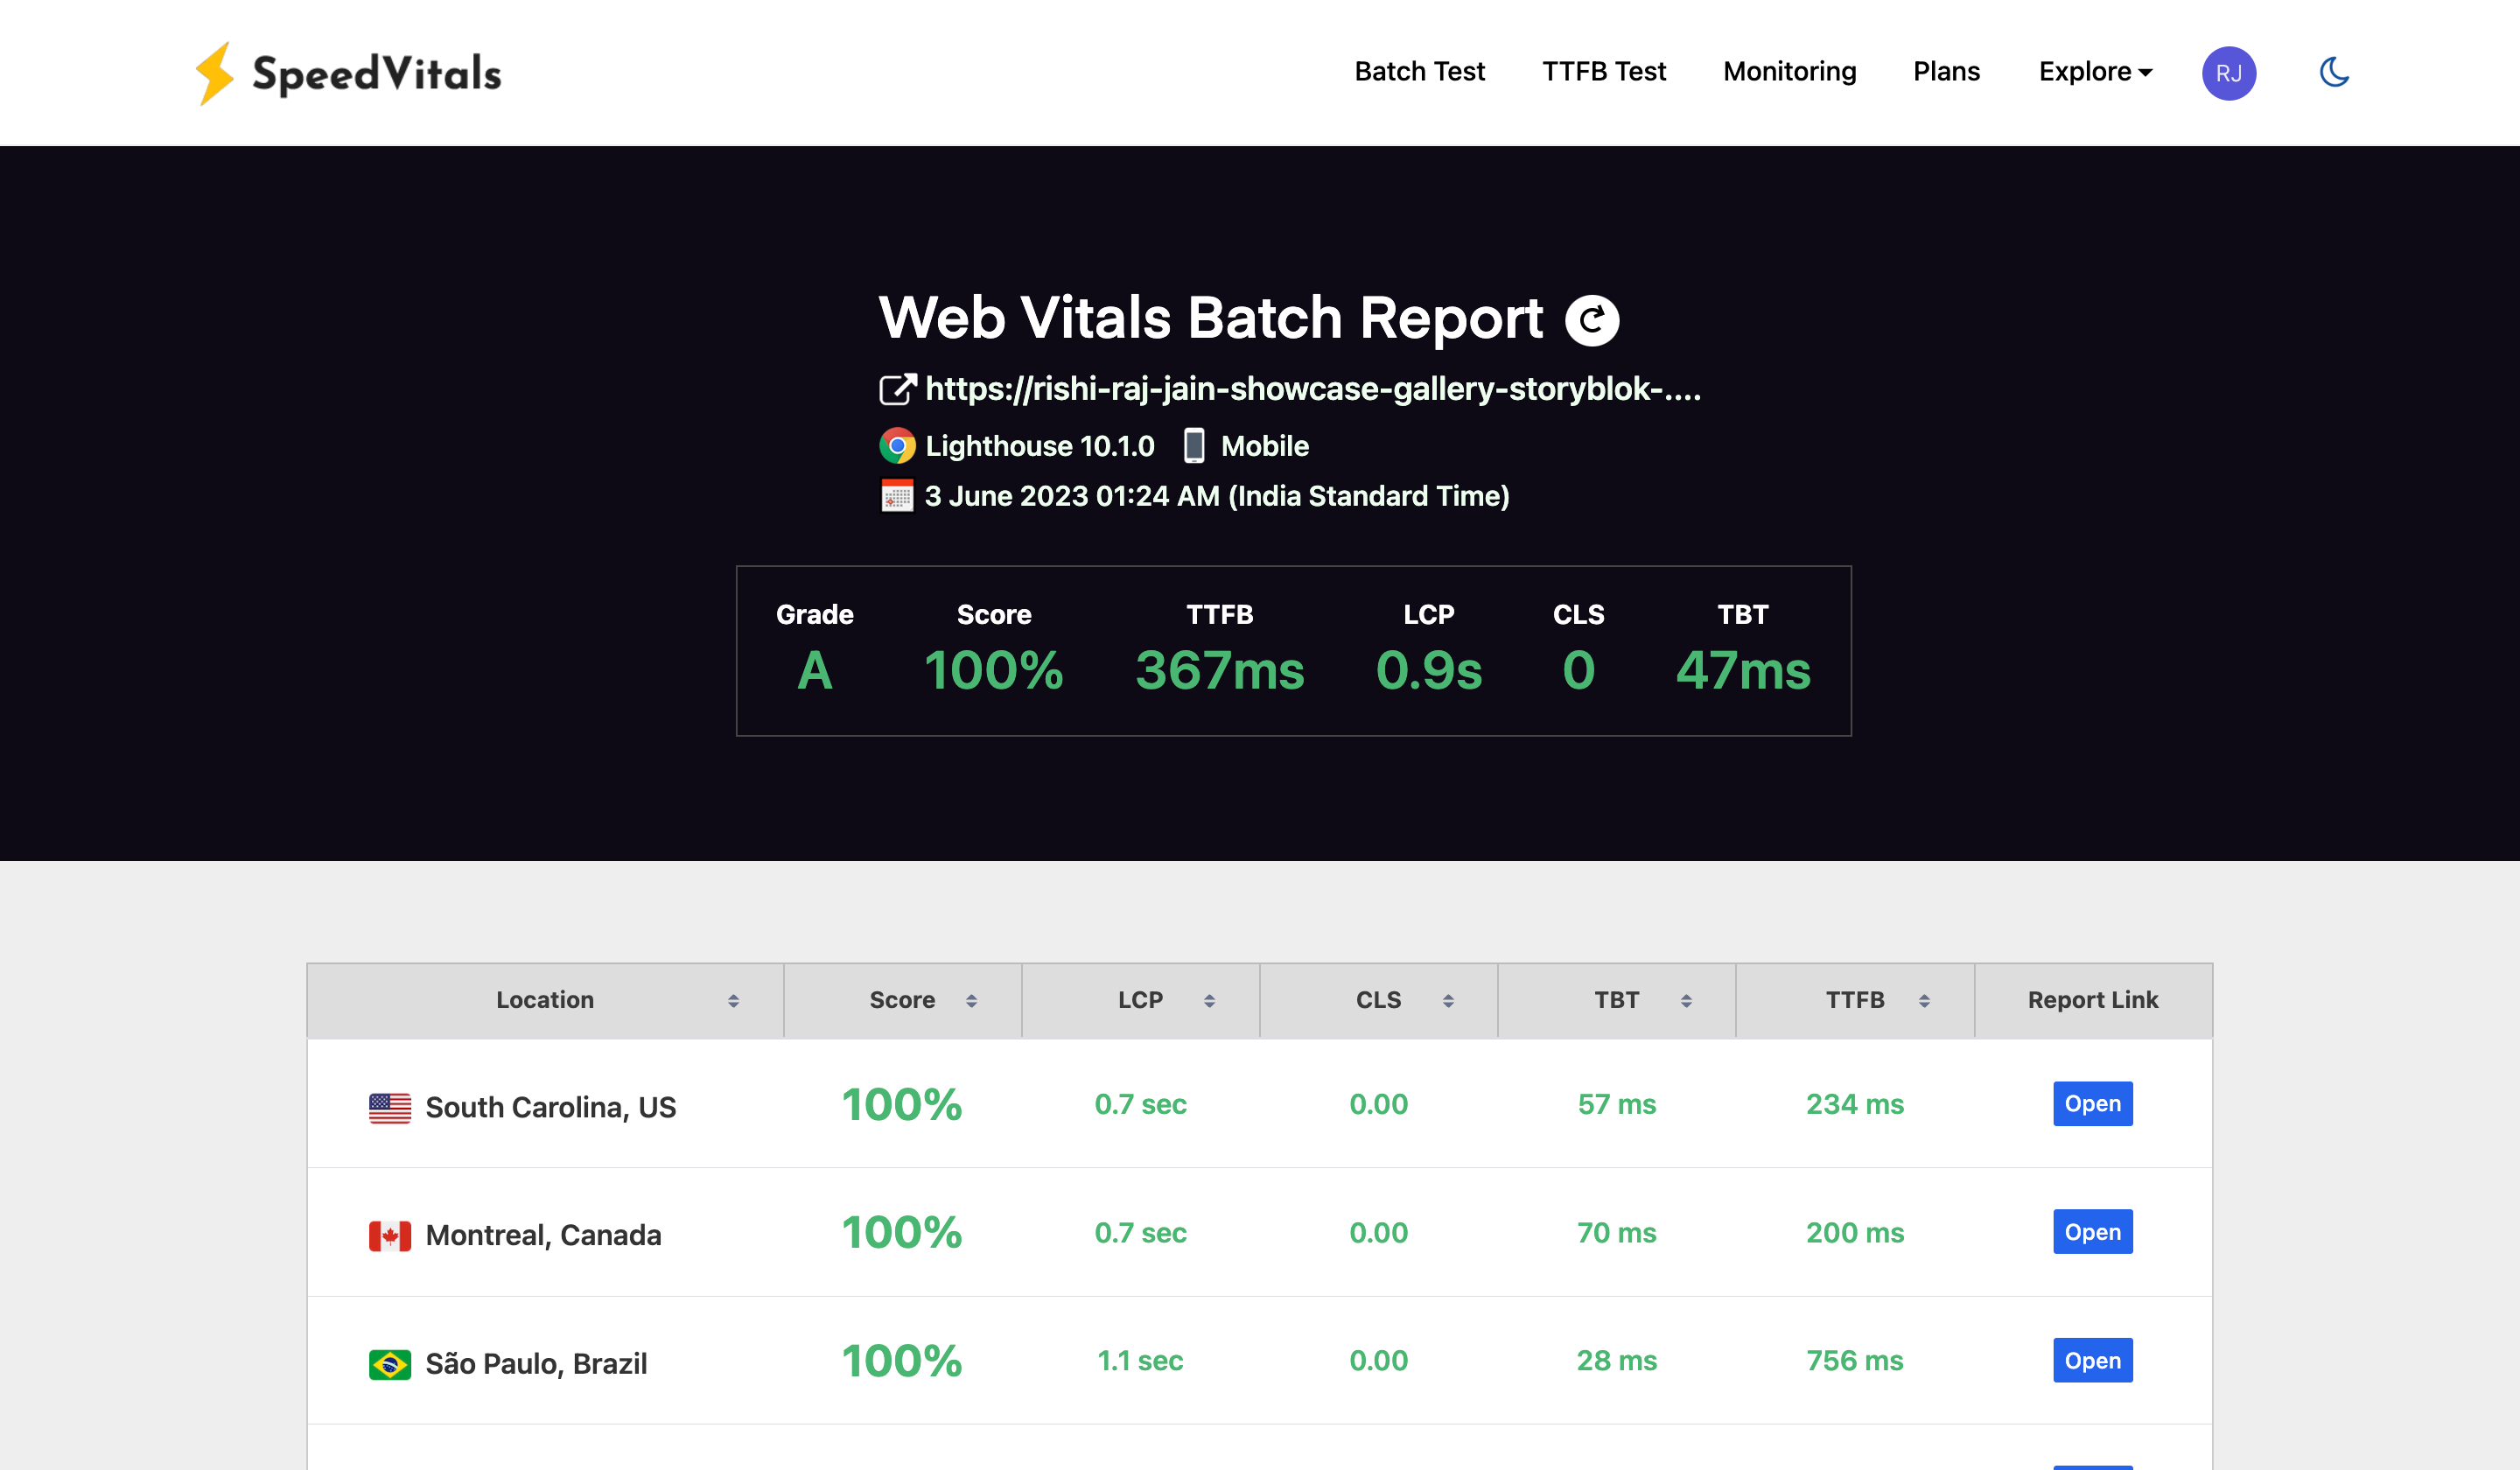
Website Speed Test Results for the Showcase Gallery Page
Performance: Showcase Item Page aka Display Page
Ma Ma Mia, the items pages too load super fast across the globe! Report Link
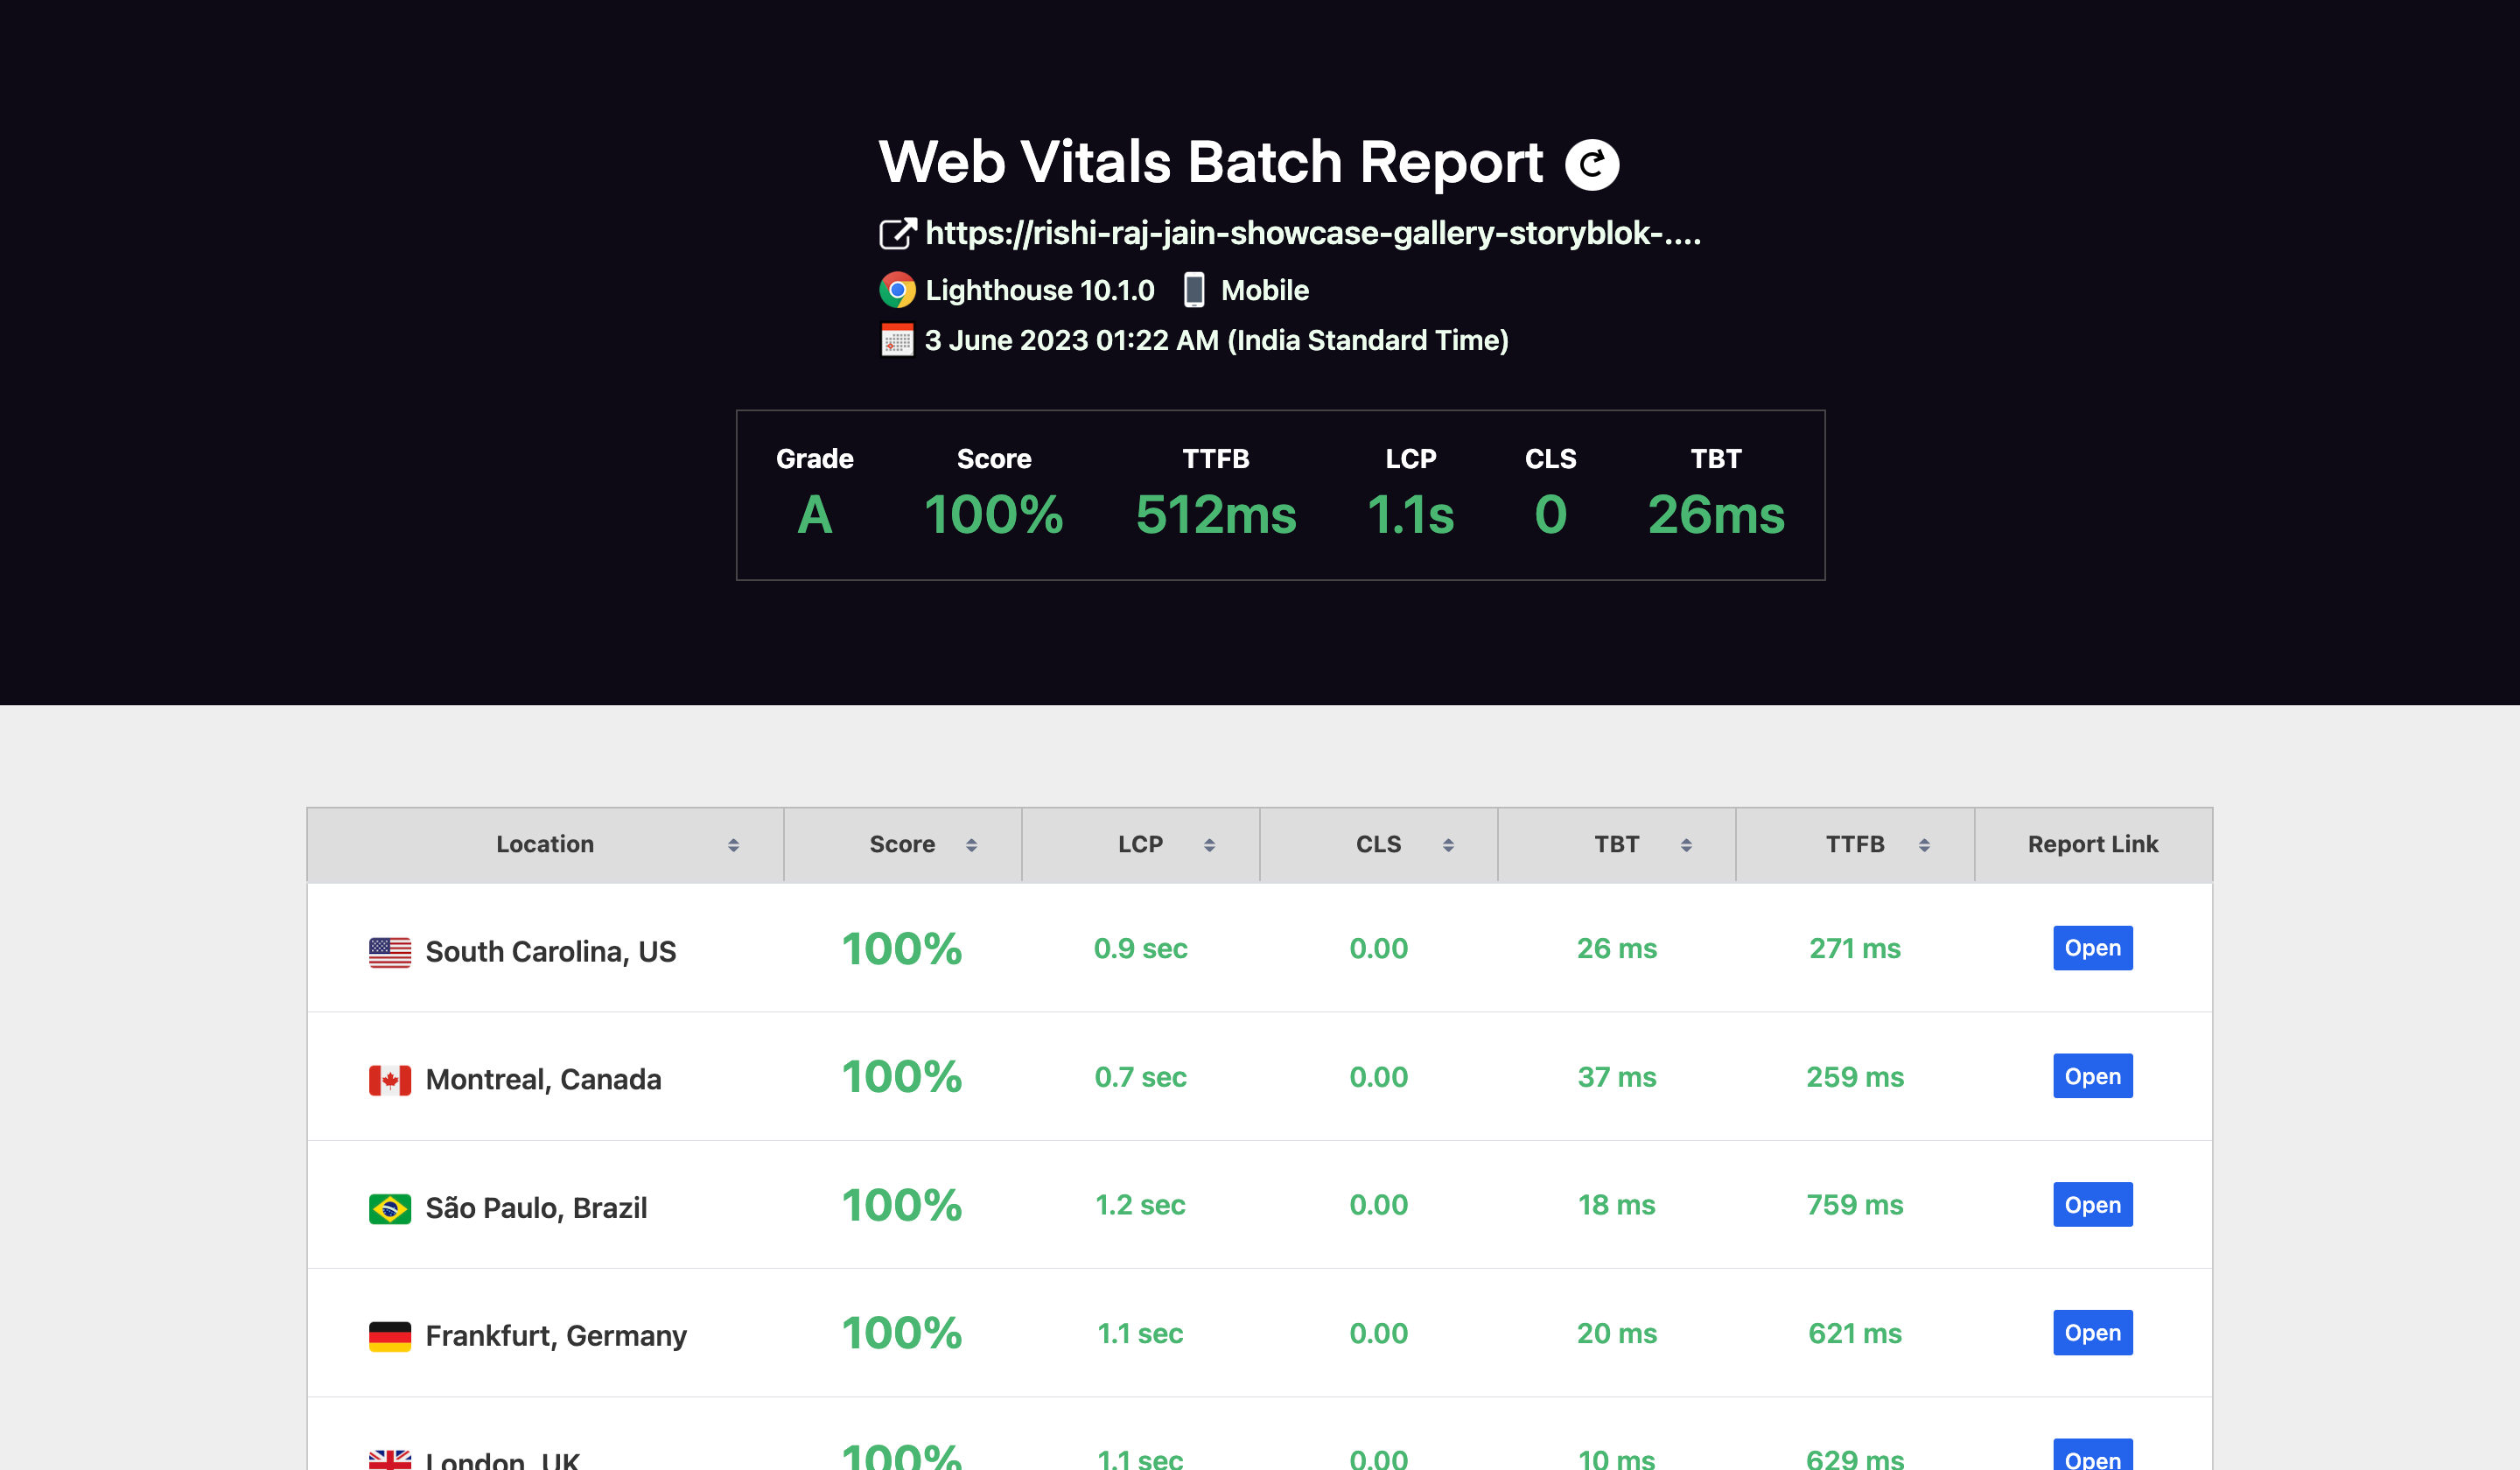
Website Speed Test Results for the Showcase Template Page
Summary
In this tutorial, we learned how to build our own Showcase Gallery with Storyblok CMS in a SvelteKit project and deploy it to Edgio.
| Resource | Link |
|---|---|
| Github Example Repo | https://github.com/rishi-raj-jain/showcase-gallery-storyblok-sveltekit-edgio-starter/ |
| SvelteKit Data Fetching | https://kit.svelte.dev/docs/load |
| Edgio Caching | https://docs.edg.io/guides/v7/performance/caching |
| Storyblok | https://www.storyblok.com/ |
| Storyblok SDK for Svelte | https://github.com/storyblok/storyblok-svelte |
| Storyblok in the Svelte Docs | https://www.storyblok.com/tc/sveltekit |
| Storyblok APIs | https://www.storyblok.com/docs/api |
