How to use Storyblok's GraphQL endpoint with React and Apollo
Storyblok is the first headless CMS that works for developers & marketers alike.
In this article, you’ll learn how to use the Storyblok GraphQL API in React Apps. We'd also be using Apollo Client (opens in a new window), so you’ll learn how to set it up as well.
Requirements
The following are required for this tutorial:
- Basic knowledge of React
- Node, yarn (or npm), and npx installed
- An account on Storyblok (opens in a new window) to manage content
Setup React project
Let’s get started by generating a new React app with create-react-app (opens in a new window).
npx create-react-app storyblok-graphqlAfter that, navigate into the project folder and start the dev server with the code below.
cd storyblok-graphql
npm start
Next, let’s install the GraphQL packages we will be using in the project.
npm install @apollo/client graphqlCreate a Storyblok Space
Create a Storyblok space for this project. If you don’t know how to, you can follow these guidelines (opens in a new window).
Initialize the GraphQL client
Go to src/index.js, we will initialize the Apollo Client with Storyblok’s GraphQL endpoint https://gapi.storyblok.com/v1/api (opens in a new window) and the Preview token from our Stoyblok space.
After creating the space, go to Settings {1} > Access Tokens {2}, and copy the Preview access token.
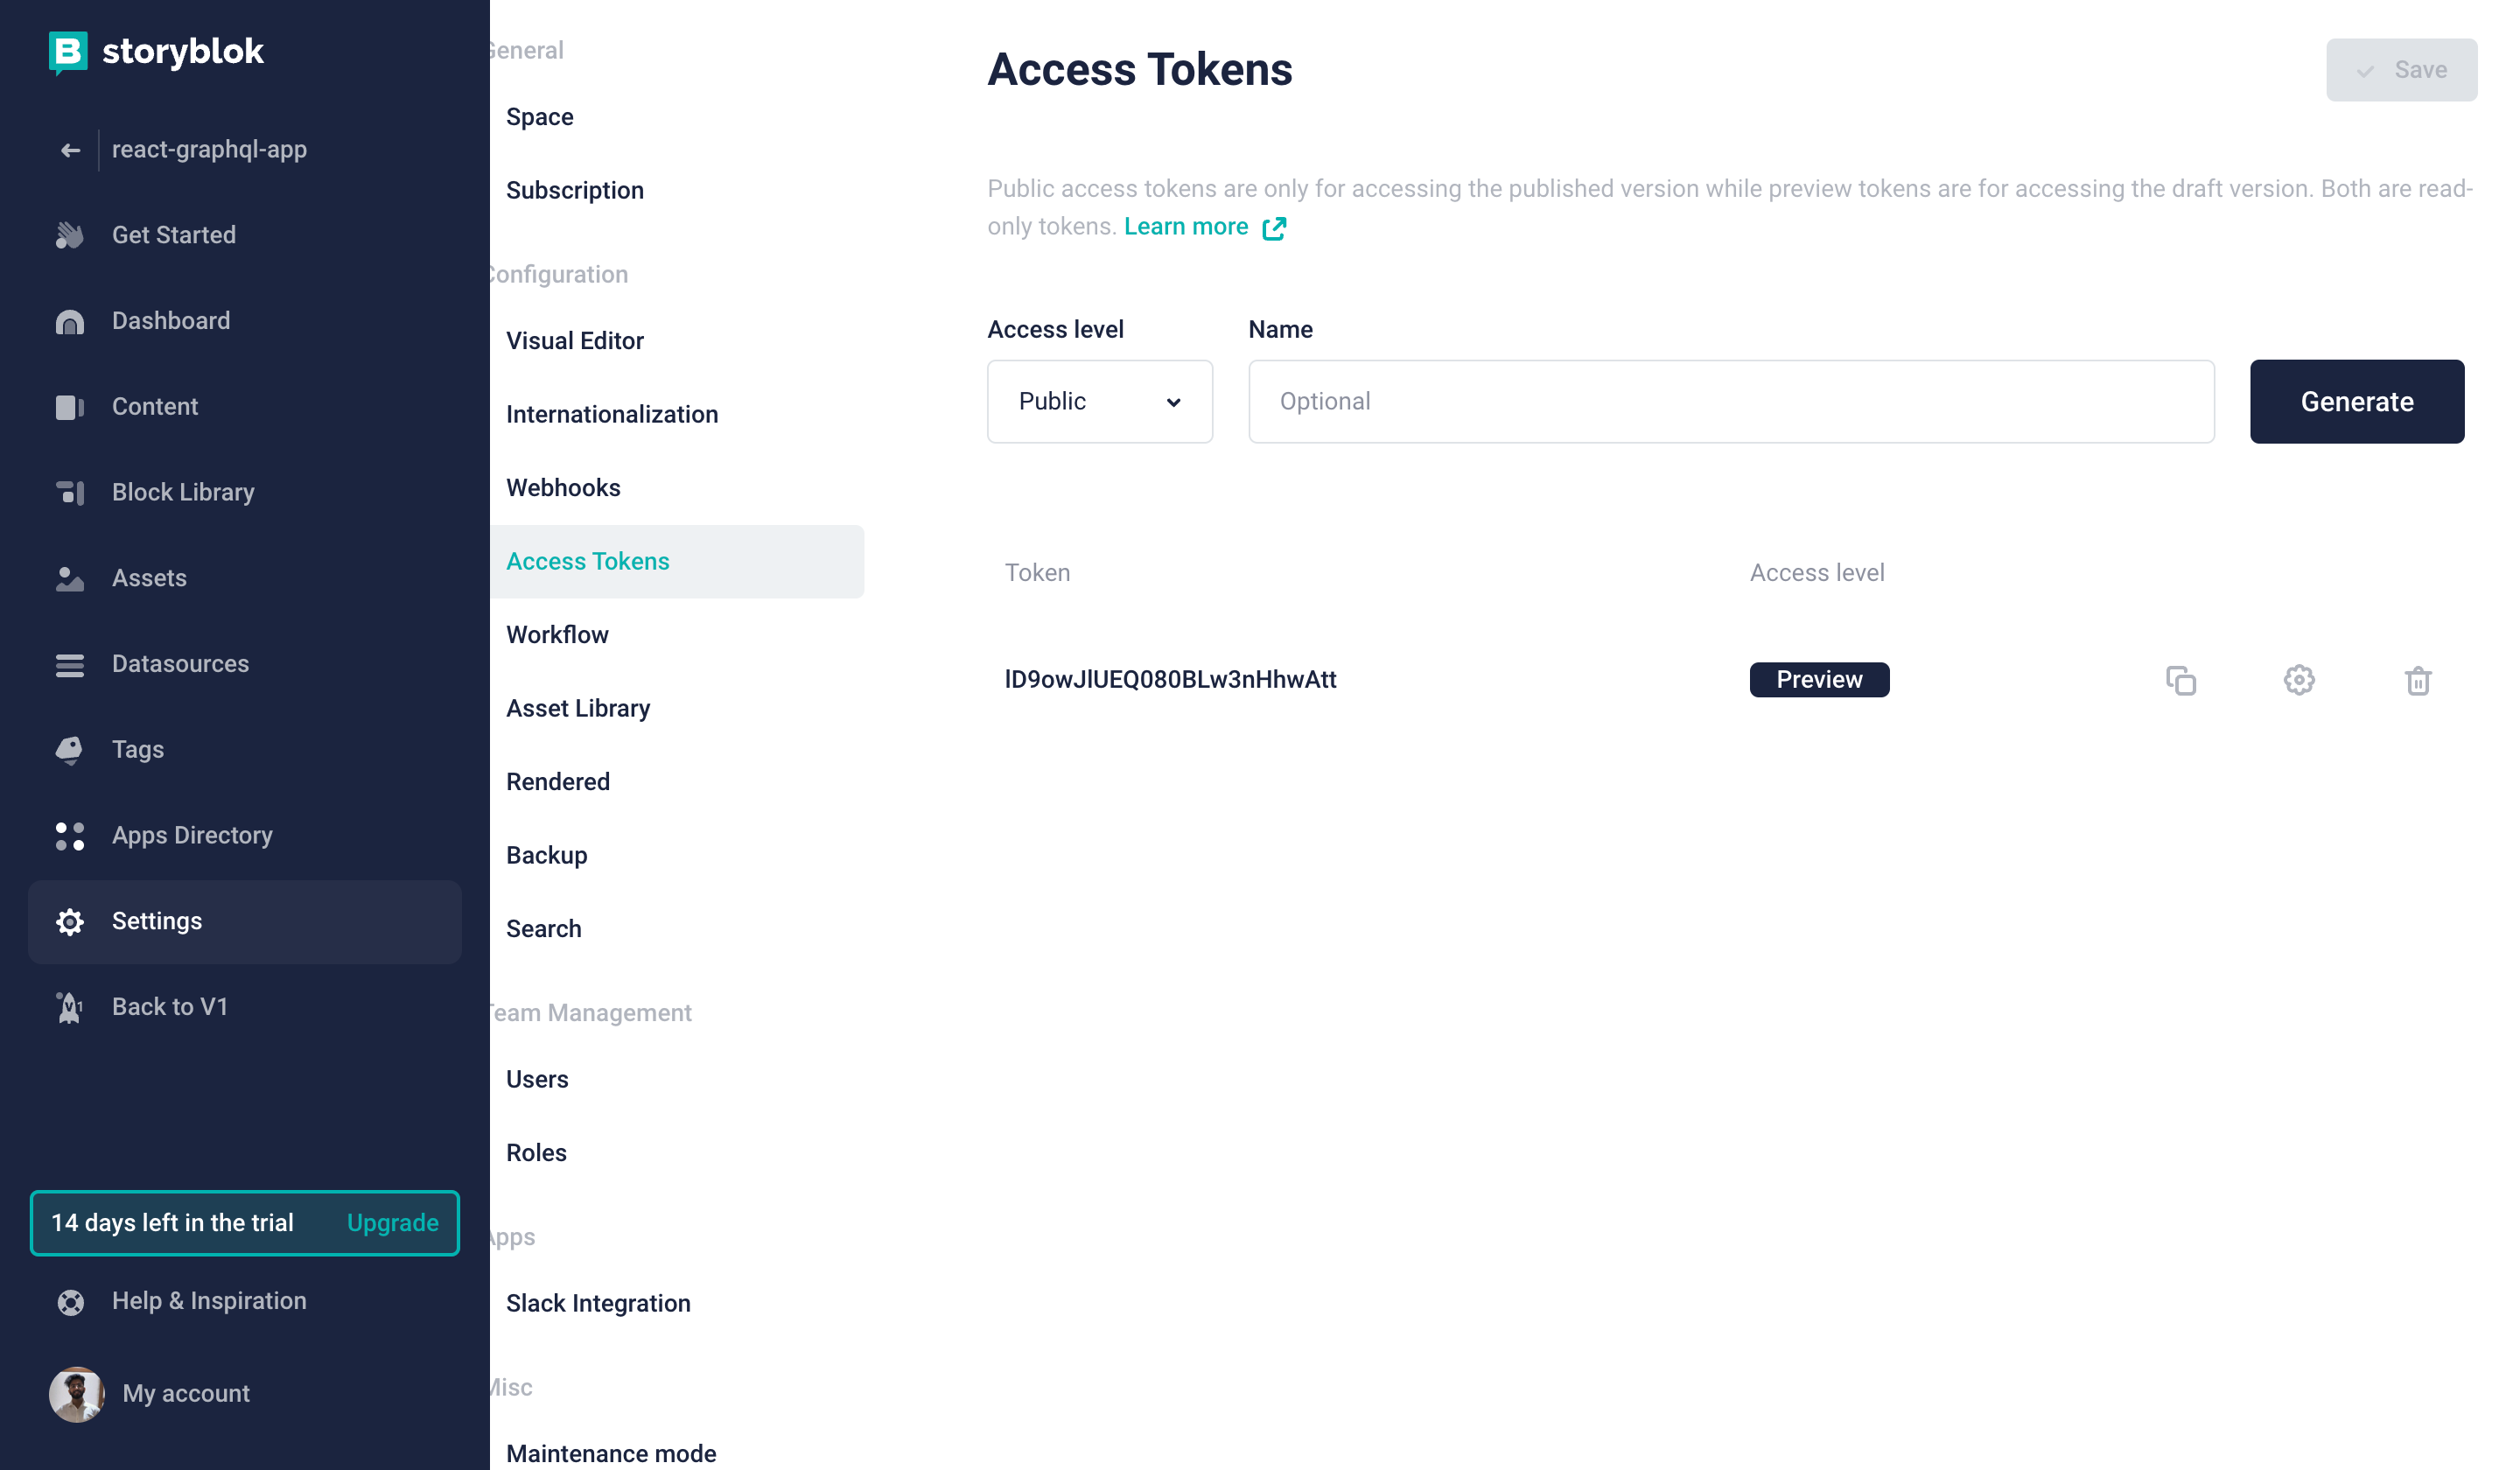
Getting Access Token
Create a new file src/.env.local and save the token there.
REACT_APP_PREVIEW_TOKEN={YOUR_PREVIEW_TOKEN}Now, let’s initialize the Apollo client and complete the setup. Go to src/index.js and update it to look like this:
import React from "react";
import ReactDOM from "react-dom";
import {
  ApolloClient,
  InMemoryCache,
  ApolloProvider,
  ApolloLink,
  concat,
  HttpLink,
} from "@apollo/client";
import "./index.css";
import App from "./App";

const httpLink = new HttpLink({ uri: "https://gapi.storyblok.com/v1/api" });

const authMiddleware = new ApolloLink((operation, forward) => {
  operation.setContext(({ headers = {} }) => ({
    headers: {
      ...headers,
      token: process.env.REACT_APP_PREVIEW_TOKEN,
      version: "draft",
    },
  }));
  return forward(operation);
});

const client = new ApolloClient({
  cache: new InMemoryCache(),
  link: concat(authMiddleware, httpLink),
});

ReactDOM.render(
  <ApolloProvider client={client}>
    <App />
  </ApolloProvider>,
  document.getElementById("root")
);
Above, we created a client object using the GraphQL API URL and our Storyblok space token. With this, the token will be used in all our requests in this app.
Make your first GraphQL query
Storyblok’s GraphQL schema is generated from your content types. For every content type, Storyblok generates two fields:
- One for receiving a single item: [Humanized Name]Item
- And one for receiving multiple items: [Humanized Name]Items
If you have created a content type with the name Page, you will have the fields PageItem and PageItems in GraphQL.
To get the documented schema definition of your content type we created a GraphQL playground. Exchange the token (YOUR_TOKEN) with your Preview token and open the link: http://gapi-browser.storyblok.com/?token=YOUR_TOKEN
Below, we will query the home content item and output the page name. To do this, Update src/App.jsx with the code below:
import { useQuery, gql } from "@apollo/client";

const query = gql`
  {
    PageItem(id: "home") {
      name
    }
  }
`;

const App = () => {
  const { loading, error, data } = useQuery(query);

  return (
    <>
      {loading ? (
        <p className="loading">loading...</p>
      ) : error ? (
        <p className="loading">{error?.message}</p>
      ) : (
            <div className="app">{data?.PageItem?.name}</div>
      )}
    </>
  );
};

export default App;
How to render nested components
With Storyblok you can easily create advanced layouts and nest components inside each other.
In the next step, we will create a few React components to render the demo content that you get when you create a new Storyblok space. We will create 4 components that will dynamically get data from the Storyblok space.
Before doing that, let's install the official Storyblok React SDK (opens in a new window). With it, we get some tools and functions that will help us to connect to Storyblok and use the Visual Editor. We also need axios (opens in a new window) which work behind the scenes with the SDK.
npm install @storyblok/react axiosLet's create a components folder in src. Now create Feature.jsx in src/components and add the code block below inside.
const Feature = ({ blok }) => {
  return (
    <div className="column feature">
      {blok?.name}
    </div>
  );
};

export default Feature;
Create a Teaser.jsx file in src/components and add the code block below.
const Teaser = ({ blok }) => {
  return (
    <div className="teaser">
      {blok?.headline}
    </div>
  );
};

export default Teaser;
Now, create a Grid.jsx file in src/components and add the code block below.
import { StoryblokComponent } from "@storyblok/react";

const Grid = ({ blok }) => (
  <div className="grid">
    {blok?.columns.map((nestedBlock) => (
      <StoryblokComponent blok={nestedBlock} key={nestedBlock._uid} />
    ))}
  </div>
);

export default Grid;
You can see that we're importing and using a StoryblokComponent feature from @storyblok/react . This React component allows us to render any component linked to a Storyblok block. So, in the case that we don't know which exact component needs to be rendered, we can use this generic component. In this case, we use it because grid's columns can be any component type.
Create a Page.jsx file in src/components and add the code block below. You can see that we are also using the StoryblokComponent here since the body of the page can contain any component.
import { StoryblokComponent } from "@storyblok/react";

const Page = ({ blok }) => (
  <div>
    {blok?.body?.map((nestedBlok) => (
      <StoryblokComponent blok={nestedBlok} key={nestedBlok._uid} />
    ))}
  </div>
);

export default Page;
In order to link our React components with their representation in the Storyblok space, to make StoryblokComponent to work and, later, to enable the Visual Editor, we need to init the connection with Storyblok.
Go back to src/index.js and add this piece of code:
...

import { storyblokInit } from "@storyblok/react";

import Feature from "./components/Feature";
import Grid from "./components/Grid";
import Page from "./components/Page";
import Teaser from "./components/Teaser";

const components = {
  feature: Feature,
  grid: Grid,
  page: Page,
  teaser: Teaser,
};

storyblokInit({
  accessToken: process.env.REACT_APP_PREVIEW_TOKEN,
  components,
});

...
Let’s also include StoryblokComponent in src/App.jsx. We will also update our query to fetch other properties from our Storyblok space.
import React from "react";
import { gql, useQuery } from "@apollo/client";
import { StoryblokComponent } from "@storyblok/react";

const App = () => {
  const { data } = useQuery(query);

  let story = data?.PageItem;

  if (!story?.content) {
    return <div>Loading...</div>;
  }

  return <StoryblokComponent blok={story.content} />;
};

const query = gql`
  {
    PageItem(id: "home") {
      id
      slug
      content {
        _uid
        component
        body
      }
    }
  }
`;

export default App;
The app should look like this now
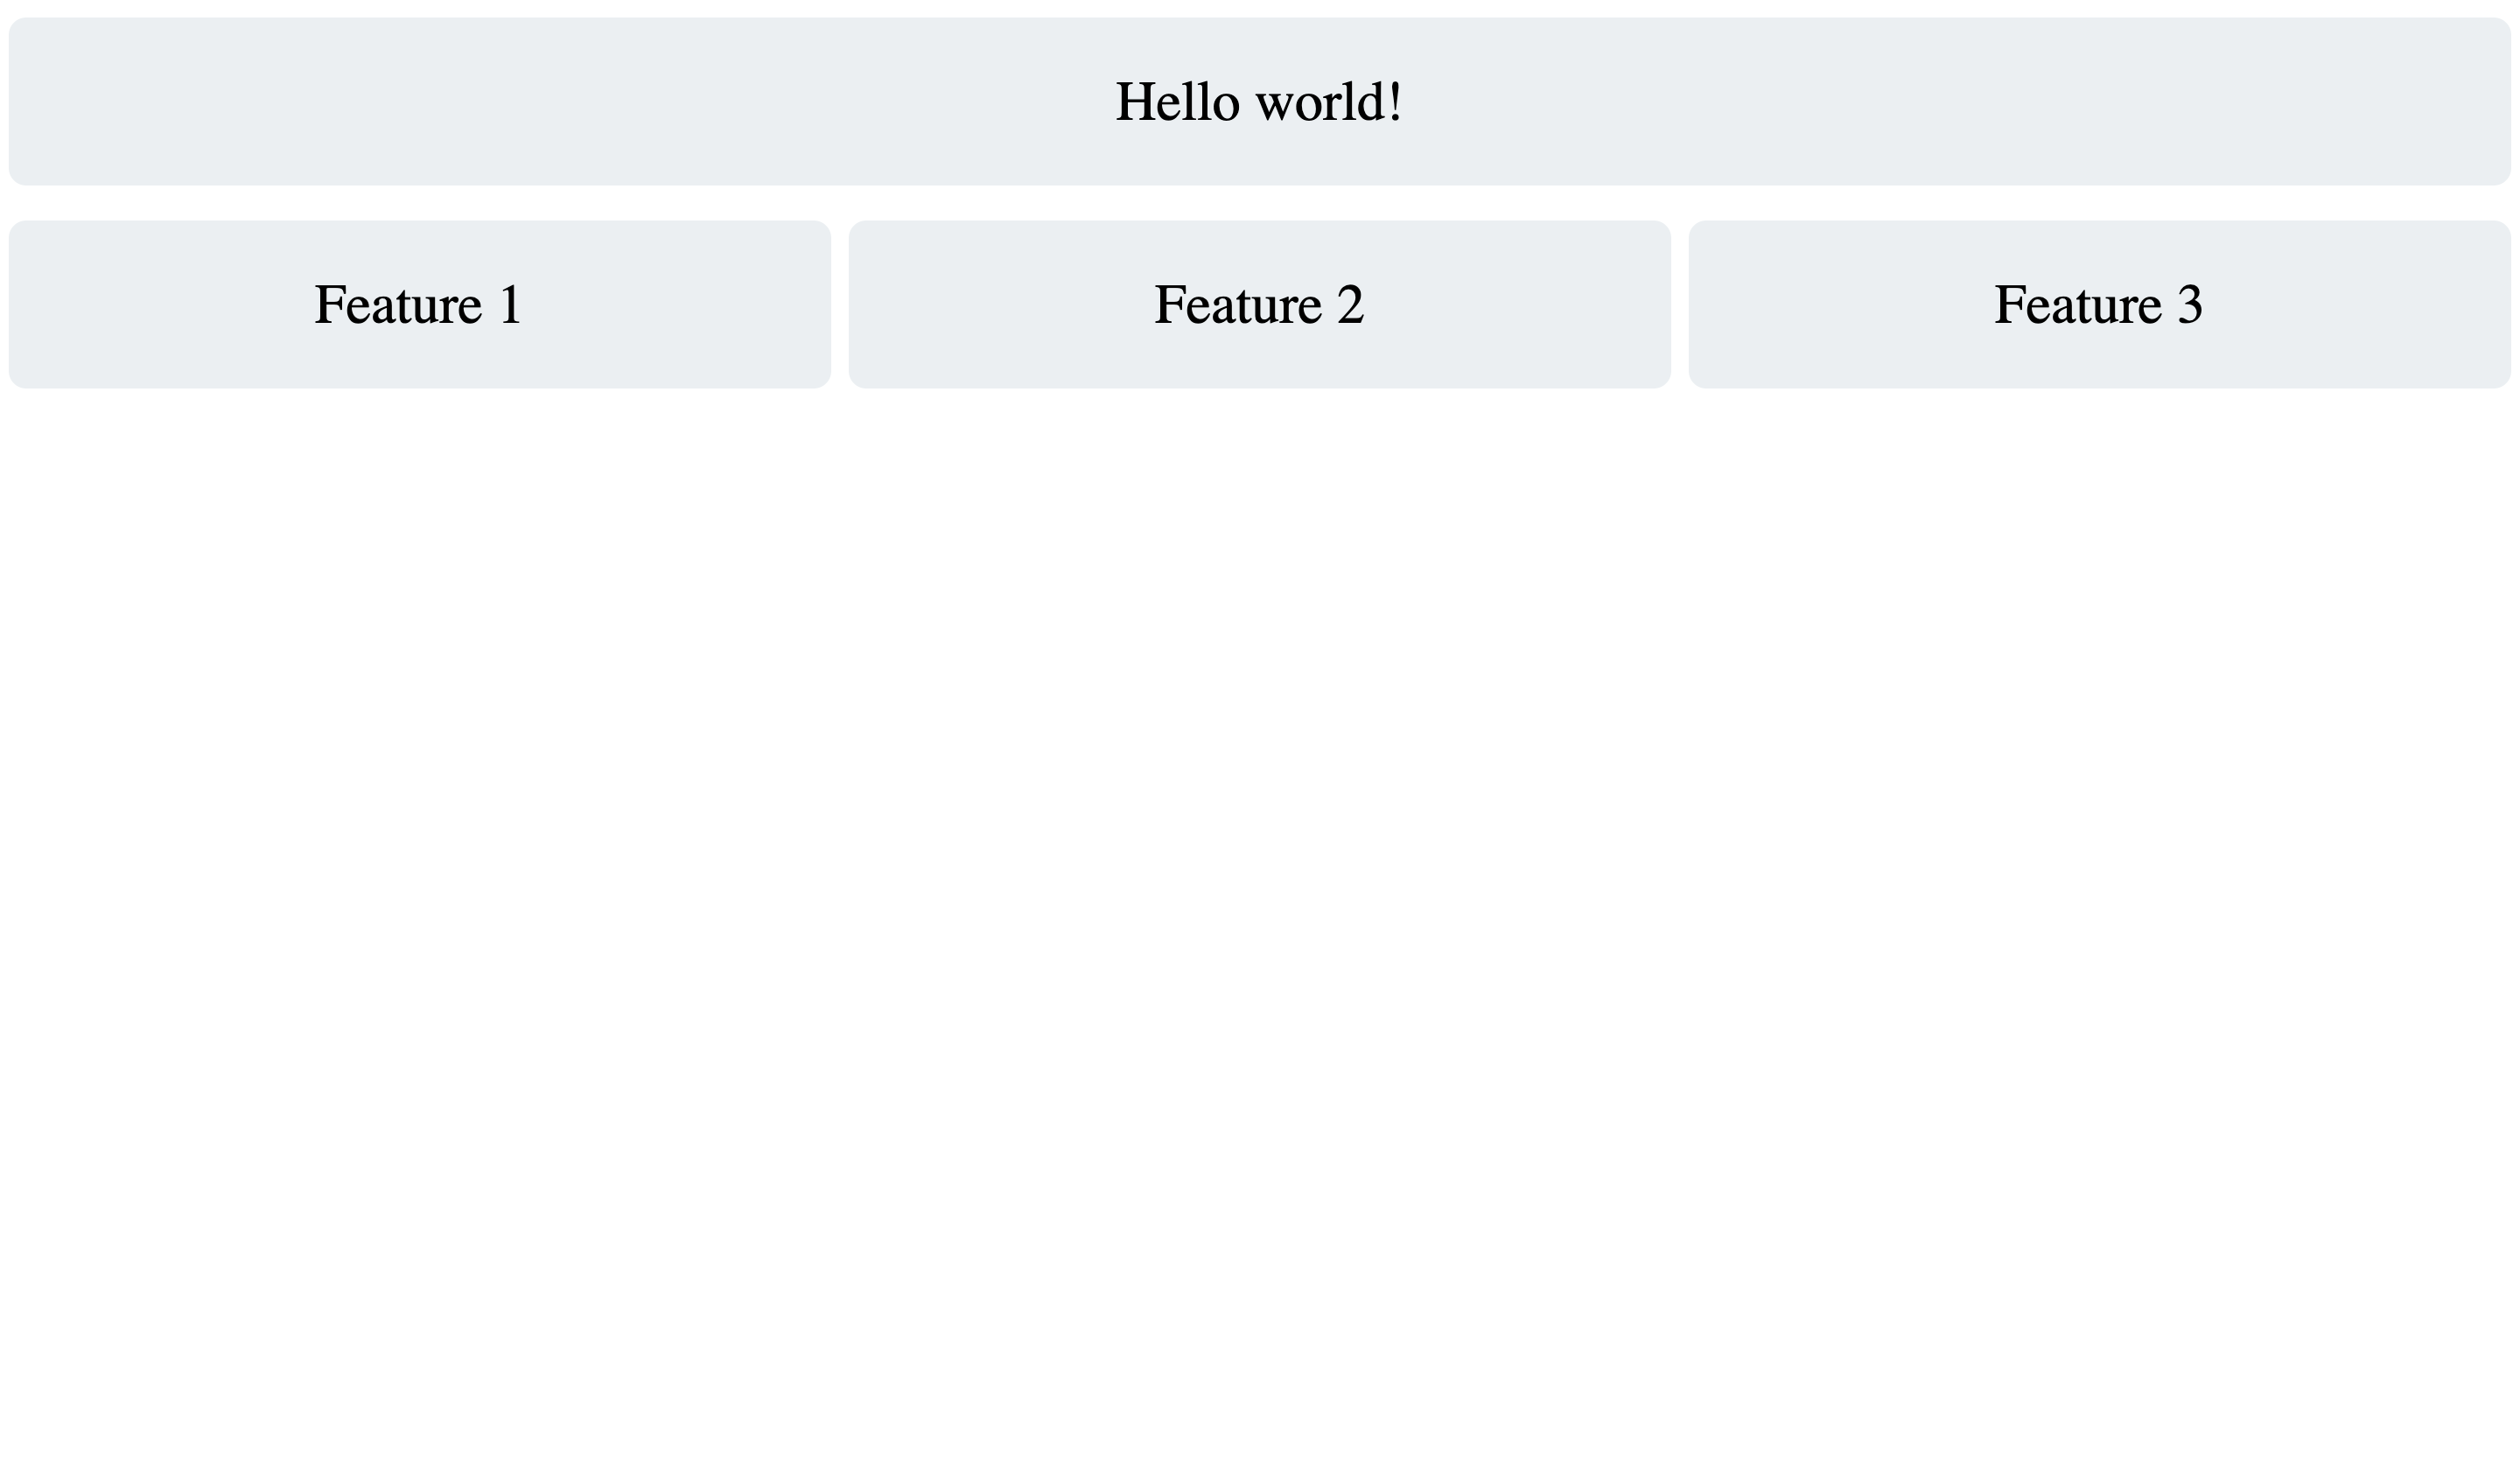
Feature app
With Storyblok GraphQL API you can pick just the fields you want from a content type but if you have a blocks field you won't be able to filter deeper, you'll need to get all the fields from the components inside that field
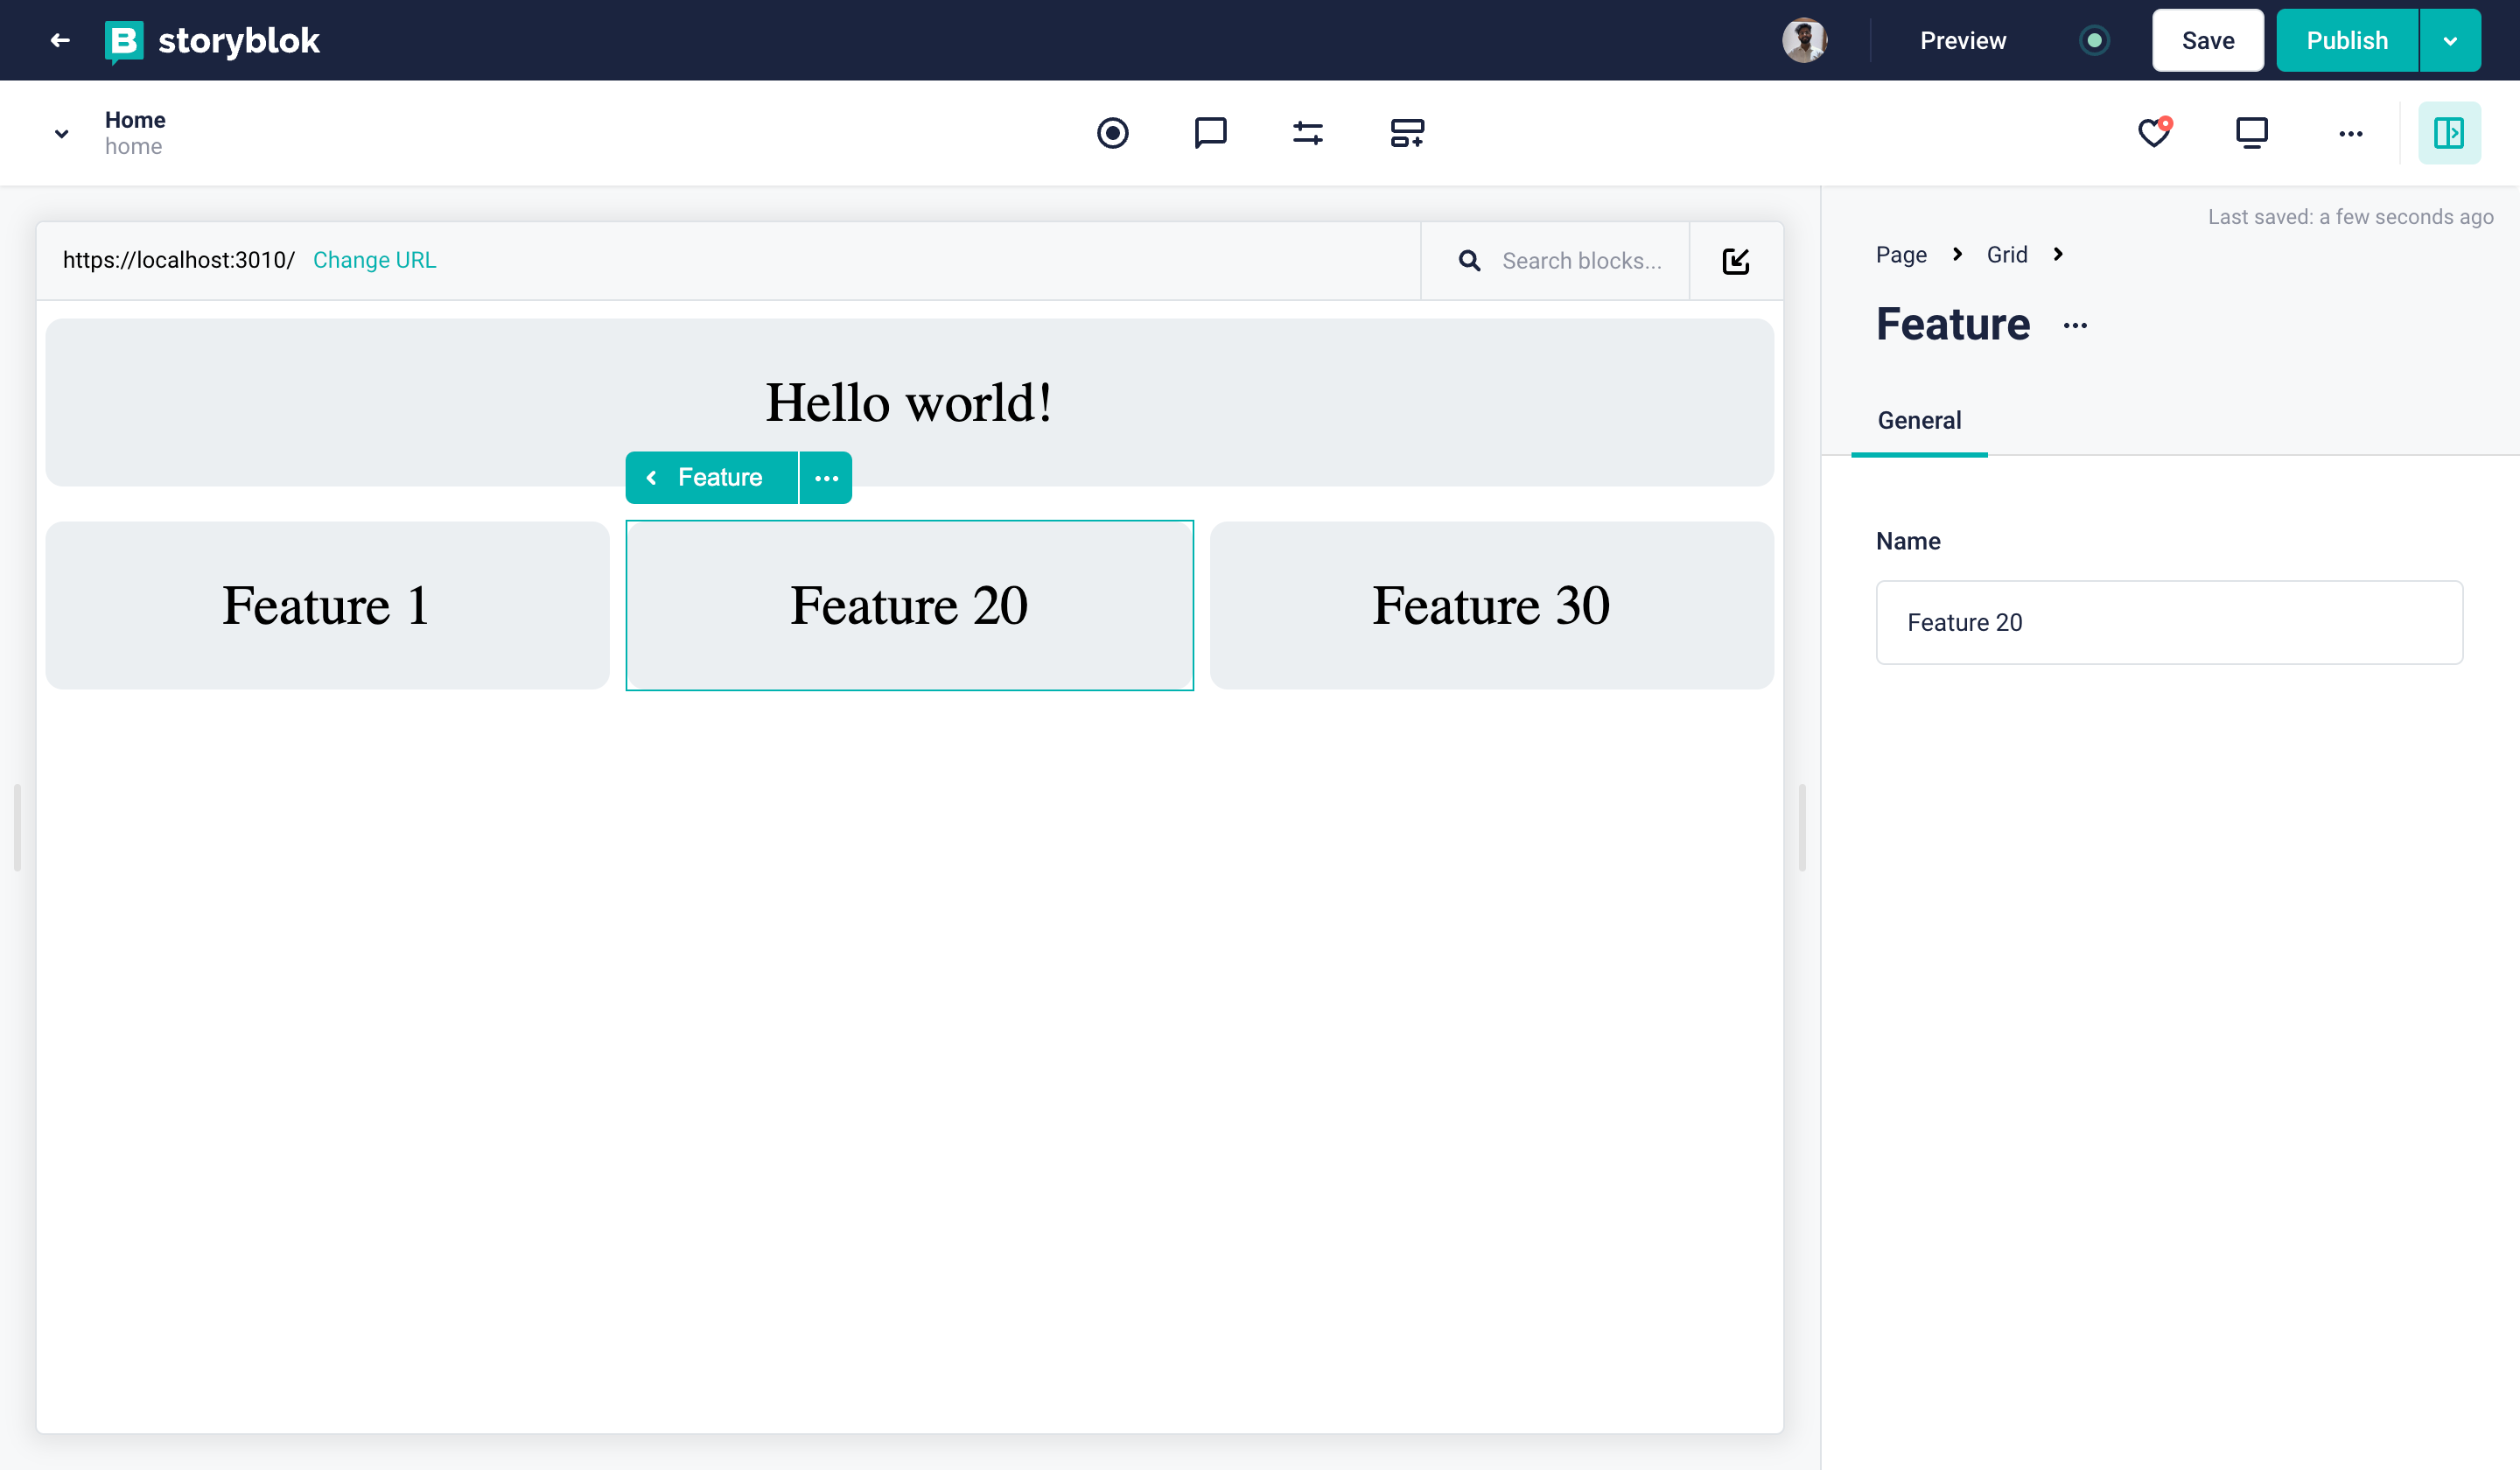
If you’re using Storyblok V2, you will need to setup the dev server with an HTTPS proxy. We will use port 3010, so the url to access the website will become https://localhost:3010/
If you don't know how to setup an HTTPS proxy on macOS, read this guide.
How to add Storyblok’s Visual Editor
Let’s add Storyblok’s visual editing (opens in a new window) capability so that we can edit content visually in our Storyblok space. We already did part of the job: Executing the storyblokInit function in our src/index.js we are initializing the Storyblok Bridge (opens in a new window).
Now we need to make our components editable. In order to do that, we should call the storyblokEditable function for each one of our components.
import { storyblokEditable } from "@storyblok/react";

const Teaser = ({ blok }) => {
  return (
    <div {...storyblokEditable(blok)} className="teaser">
      {blok?.headline}
    </div>
  );
};

export default Teaser;
We just made the Teaser component editable by passing its content to storyblokEditable and spreading its content to the component. You can go ahead and update the 3 other components to make them editable.
Now, to make our app respond to changes made in the Storyblok Visual Editor, we need to update src/App.jsx to look like this:
import React from "react";
import { gql, useQuery } from "@apollo/client";
import { useStoryblokState, StoryblokComponent } from "@storyblok/react";

const App = () => {
  const { data } = useQuery(query);

  let story = useStoryblokState(data?.PageItem);

  if (!story?.content) {
    return <div>Loading...</div>;
  }

  return <StoryblokComponent blok={story.content} />;
};

const query = gql`
  {
    PageItem(id: "home") {
      id
      slug
      content {
        _uid
        component
        body
      }
    }
  }
`;

export default App;
Above, we updated our app to listen for events using the useStoryblokState hook included in @storyblok/react. With this, we’ve enabled visual editing for this app.
You can go ahead and test it in your space to see how it works.
Live Preview
You can test Storyblok GraphQL API using our explorer and setting your preview token in the query string, you can also use Storyblok API explorer to play with GraphQL requests.
| Resources | Link |
|---|---|
| GitHub repository for tutorial | https://github.com/storyblok/storyblok-graphql-react-apollo |
| Storyblok visual editor | https://www.storyblok.com/docs/concepts/visual-editor |
| Apollo Client React | https://www.apollographql.com/docs/react |
| Storyblok React SDK | https://github.com/storyblok/storyblok-react |
| Storyblok React Hub | https://www.storyblok.com/tc/react |

