How to create Embedded Blocks as a way of integration
Storyblok is the first headless CMS that works for developers & marketers alike.
In this tutorial, we'll walk through the process of creating a block component that enables us to embed any type of content such as:
- Stackblitz projects
- GitHub issues.
- Youtube videos
- Spotify
For the sake of simplicity, we are going to integrate a Stackblitz project using the official @stackblitz/sdk on a Nuxt website, although this can be replicated with any other technology.
You can read more about the @stackblitz/sdk here.
By the end of this article, you'll have a versatile and powerful component that can be used to enhance your website's functionality and engage your audience in new and exciting ways. So, let's get started!
StackBlitz
StackBlitz (opens in a new window) is a revolutionary full-stack web IDE for the web ecosystem powered by WebContainers. You can create zero-overhead, live templates of your projects and then embed them anywhere with the SDK.
Embed external content
Embedding web context means displaying or integrating content from one website or web application into another. This allows users to view or interact with content from another source without having to leave the current website or application. For example, embedding a YouTube video on a website allows visitors to view the video without having to navigate away from the website
Creating new Block
Let’s jump into the Block Library {1} section inside our space and then click on New Block.
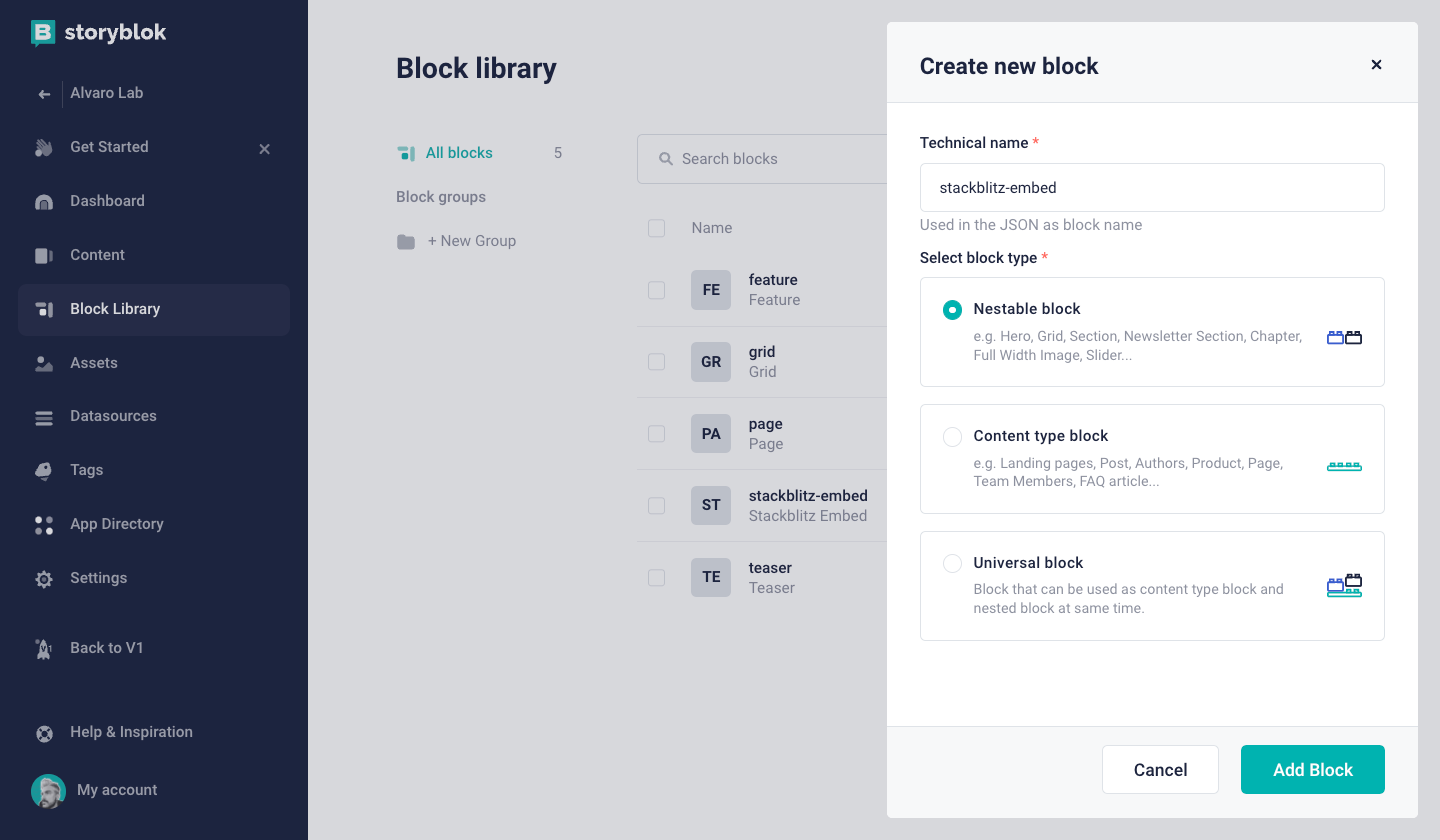
Add a Technical name {2} for your new block (e.g. stackblitz-embed), then select Nestable block as block type.
Optionally, you could also create a Block Group if you plan to build more Embed Blocks to maintain things in order. Click on Add Block {3} and voilá.
Adding fields
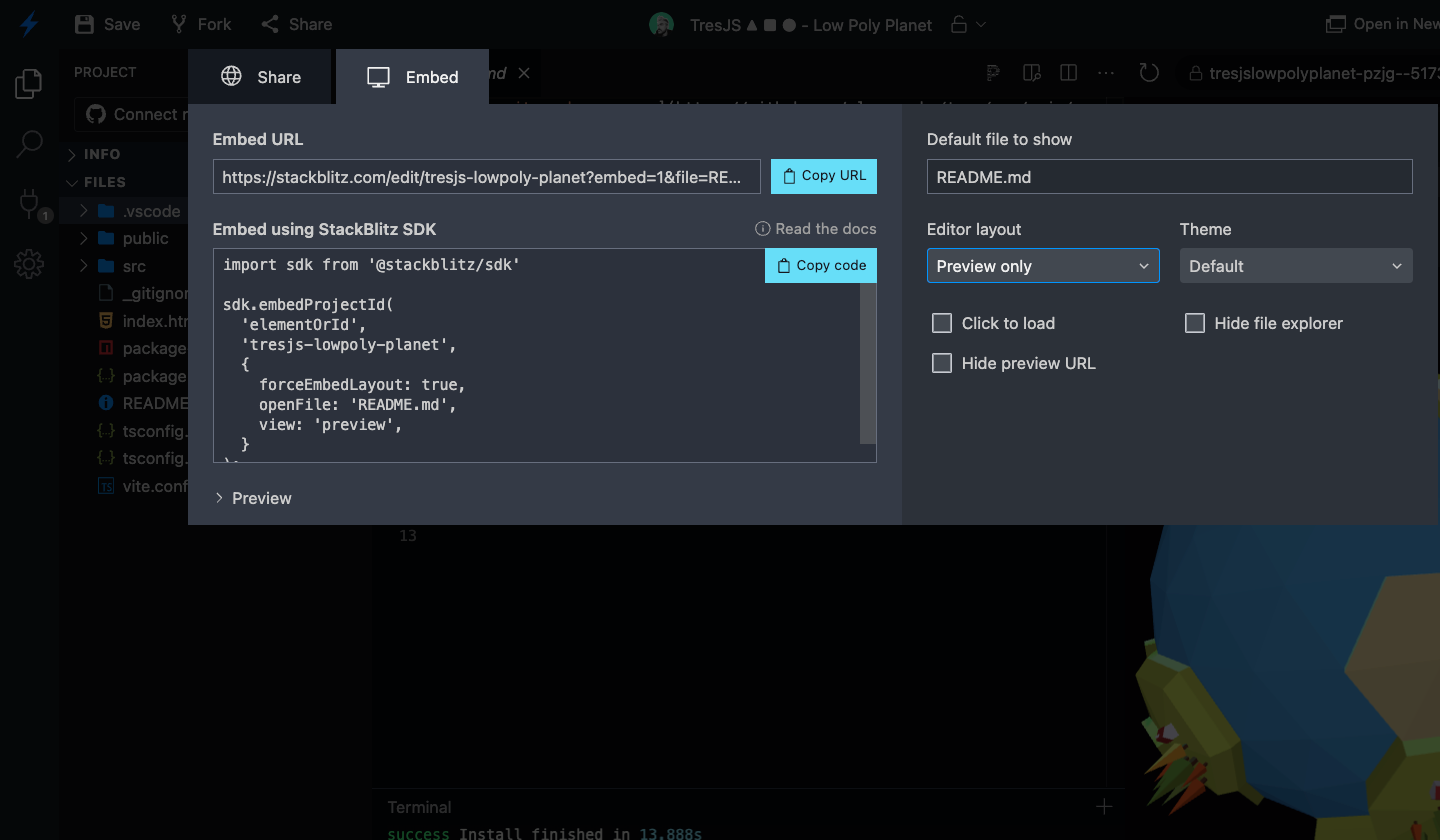
StackBlitz offers a wide set of parameters to identify and customize the embed project such as:
projectId{1}openFile{2}view(You can set it topreviewonly) {3}
Now that we have created the block, let's add the fields based on the parameters above. As a good practice for naming conventions, use underscores (_) to separate the words when naming the field.
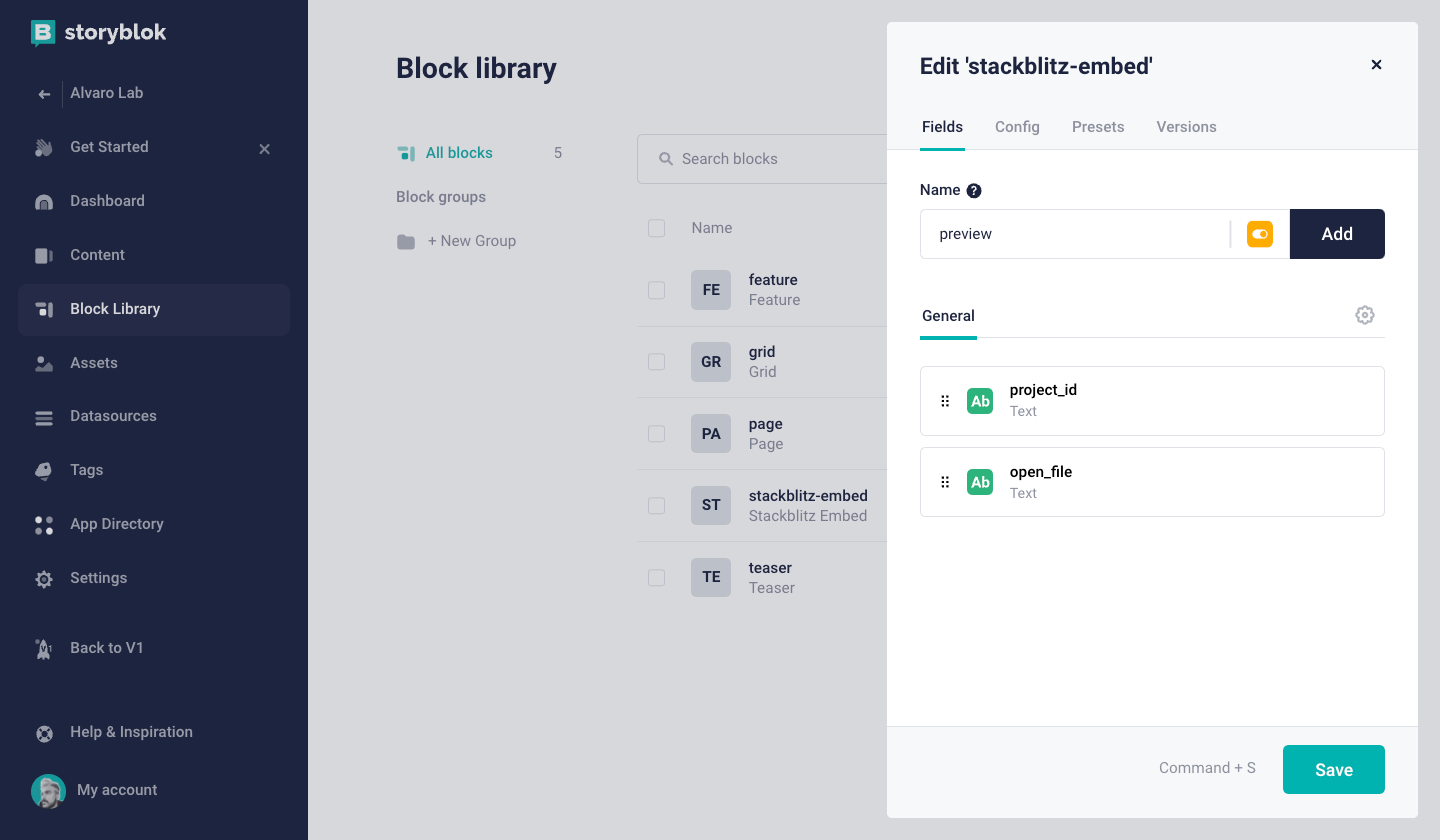
For the view parameter we can define a field called preview {1} as a boolean, this will add a Checkbox to toggle the preview-only view.
Click the Save button {2} to finish editing your new Block fields.
StackBlitzEmbed component
Now the most fun part, creating the actual component on the front end. As mentioned in the beginning, we are going to use Nuxt for this tutorial.
If you want to learn how to set up a new project with Storyblok + Nuxt please refer to our Nuxt Ultimate Tutorial.
Let's begin by installing the StackBlitz SDK package:
npm install @stackblitz/sdk
Once installed, create a StackblitzEmbed.vue component under the storyblok/ directory so the Nuxt SDK will auto-import it. Learn more about this feature in this article (opens in a new window).
<script setup lang="ts">
const props = defineProps({
  blok: {
    type: Object,
    required: true,
  },
})

const embed = ref(null)

</script>

<template>
  <div ref="embed" class="stackblitz-embed">
  </div>
</template>
As usual, we define the prop blok to pass the data related to the component from Storyblok. Then we use a Template Ref const embed = ref(null) to make sure we initialize the SDK only if the DOM element is available.
Now, we can add the Stackblitz SDK to our component:
import sdk, { EmbedOptions } from '@stackblitz/sdk'
For the next step, we are gonna use Vue's watch or watchEffect to load the SDK only when the DOM element is available and pass it.
watchEffect(() => {
  if (embed.value) {
    sdk.embedProjectId(embed.value, props.blok.project_id)
 }
})
We use the embedProjectId method to pass the DOM element we want to inject the project on and the project_id to identify it.
Options
Now let's add the final touch, let's initialize the SDK with the options coming from the component props.
watchEffect(() => {
  if (embed.value) {
    const options: EmbedOptions = { openFile: '', forceEmbedLayout: true, width: '100%', height: 600 }

    // Setting the openFile option will open the file in the editor
    if (props.blok.file) {
      options.openFile = props.blok.open_file
    }

    // Setting the view option will open the project in the editor or preview mode
    if (props.blok.preview) {
      options.view = 'preview'
    }
    sdk.embedProjectId(embed.value, props.blok.project_id)
    sdk.embedProjectId(embed.value, props.blok.project_id, options)
  }
})
We initialize the options with default values and depending on the props we map to the SDK properties, then we pass the options as a third parameter for the embedProjectId .
Adding the Block to a Page
Let's see if our component actually works. On the Storyblok dashboard go to your Home page in the Content section and add your Block to the page with the Visual Editor.
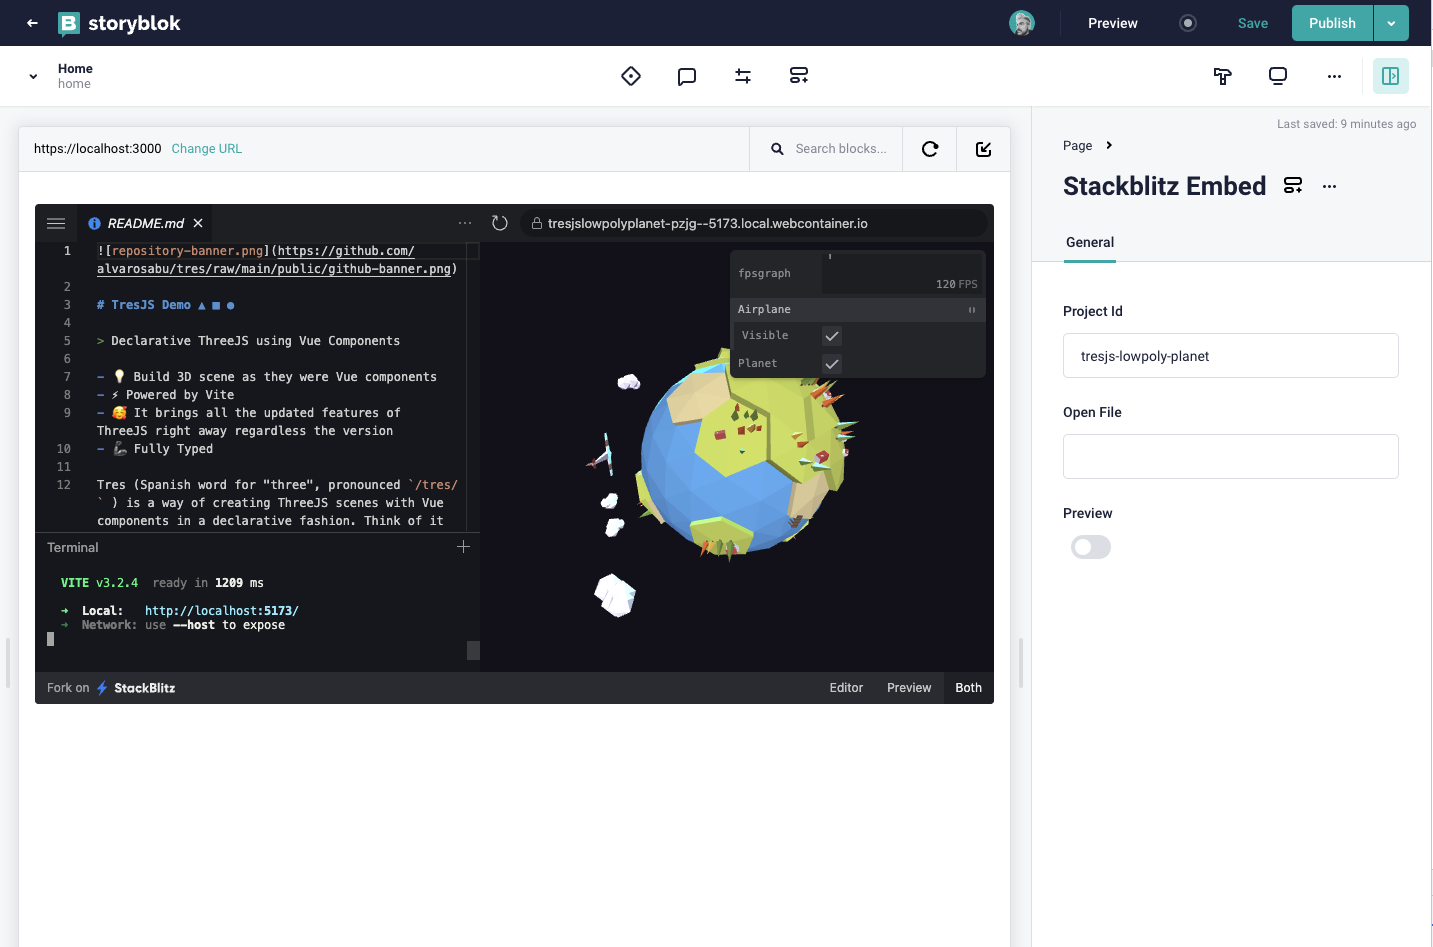
Add the projectId from StackBlitz {1} and try to toggle the preview mode {2}.
Oops, something is not right, the component is not reacting to changes in the visual editor.
That is because the SDK overwrites the DOM element with an iframe and then is no longer available for a re-insertion.
But don't worry, we can fix it right away.
Fixing the visual feedback
Go to your component file and modify the following code inside of the watchEffect :
embed.value.appendChild(document.createElement('div'))

 sdk.embedProjectId(embed.value, props.blok.project_id, options)
 sdk.embedProjectId(embed.value.children[0], props.blok.project_id, options)
The trick is to create an empty DOM element inside of our previous one and use it for the SDK. And voilá, now the component is editable in real-time
Wrapping up
Congratulations, we have created a Block capable of inserting a StackBlitz embed project into your website. You can use it as a starting point to create other Embedded Blocks and offer your users a universe of possibilities.
| Resource | Link |
|---|---|
| Add a headless CMS to Nuxt 3 in 5 Minutes | https://www.storyblok.com/docs/guides/nuxt |
| StackBlitz SDK | https://developer.stackblitz.com/platform/api/javascript-sdk |
