Create Dynamic Menus in Storyblok and Remix
Storyblok is the first headless CMS that works for developers & marketers alike.
In this part of the tutorial series, we'll make the menu in our header dynamic, so that we can manage it directly through Storyblok!
If you’re in a hurry, you can take a look at our demo in source code on GitHub! and take a look at the live version on Netlify.
Requirements
This tutorial is part 3 of the Ultimate Tutorial Series for Remix (opens in a new window)! We recommend that you follow the previous tutorials before starting this one.
Setup in Storyblok
First, we will have to create a new content type component wherein our menu entries can be stored. In order to do that, go to the Block Library {1} and create a New block {2}.
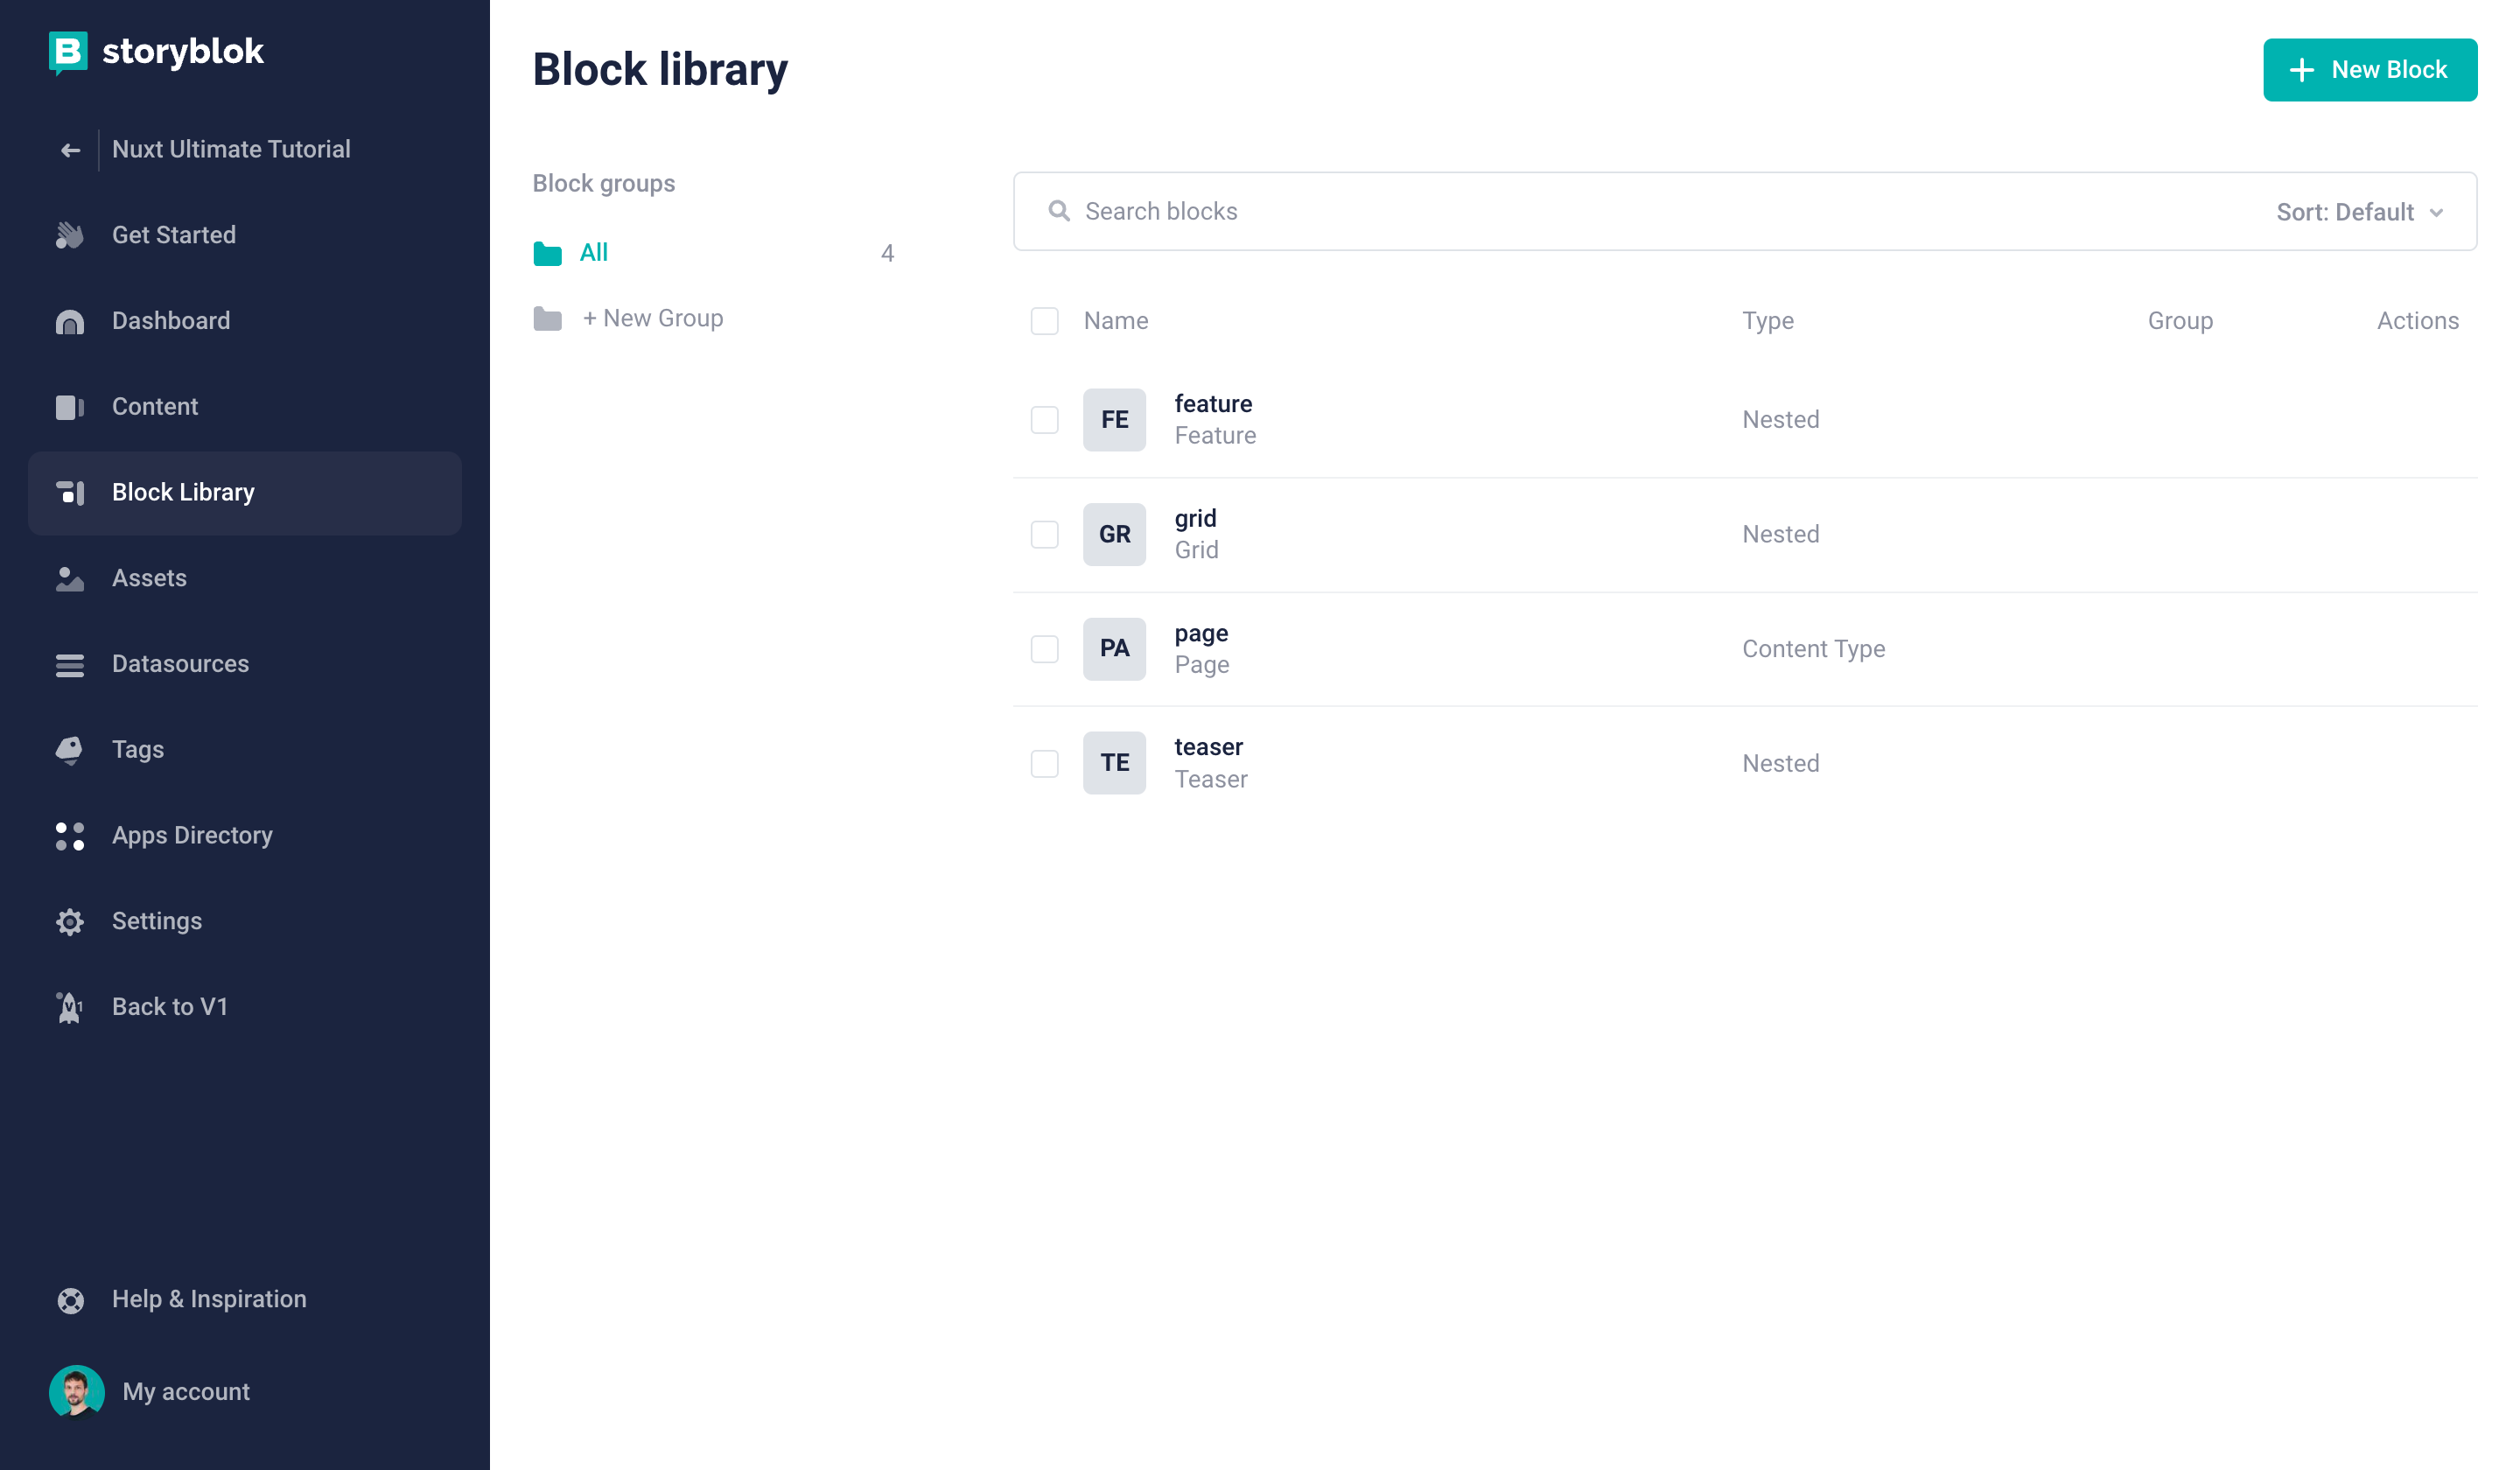
Creating a new block in the Block Library
Enter the name config {1} and choose Content type block {2}.
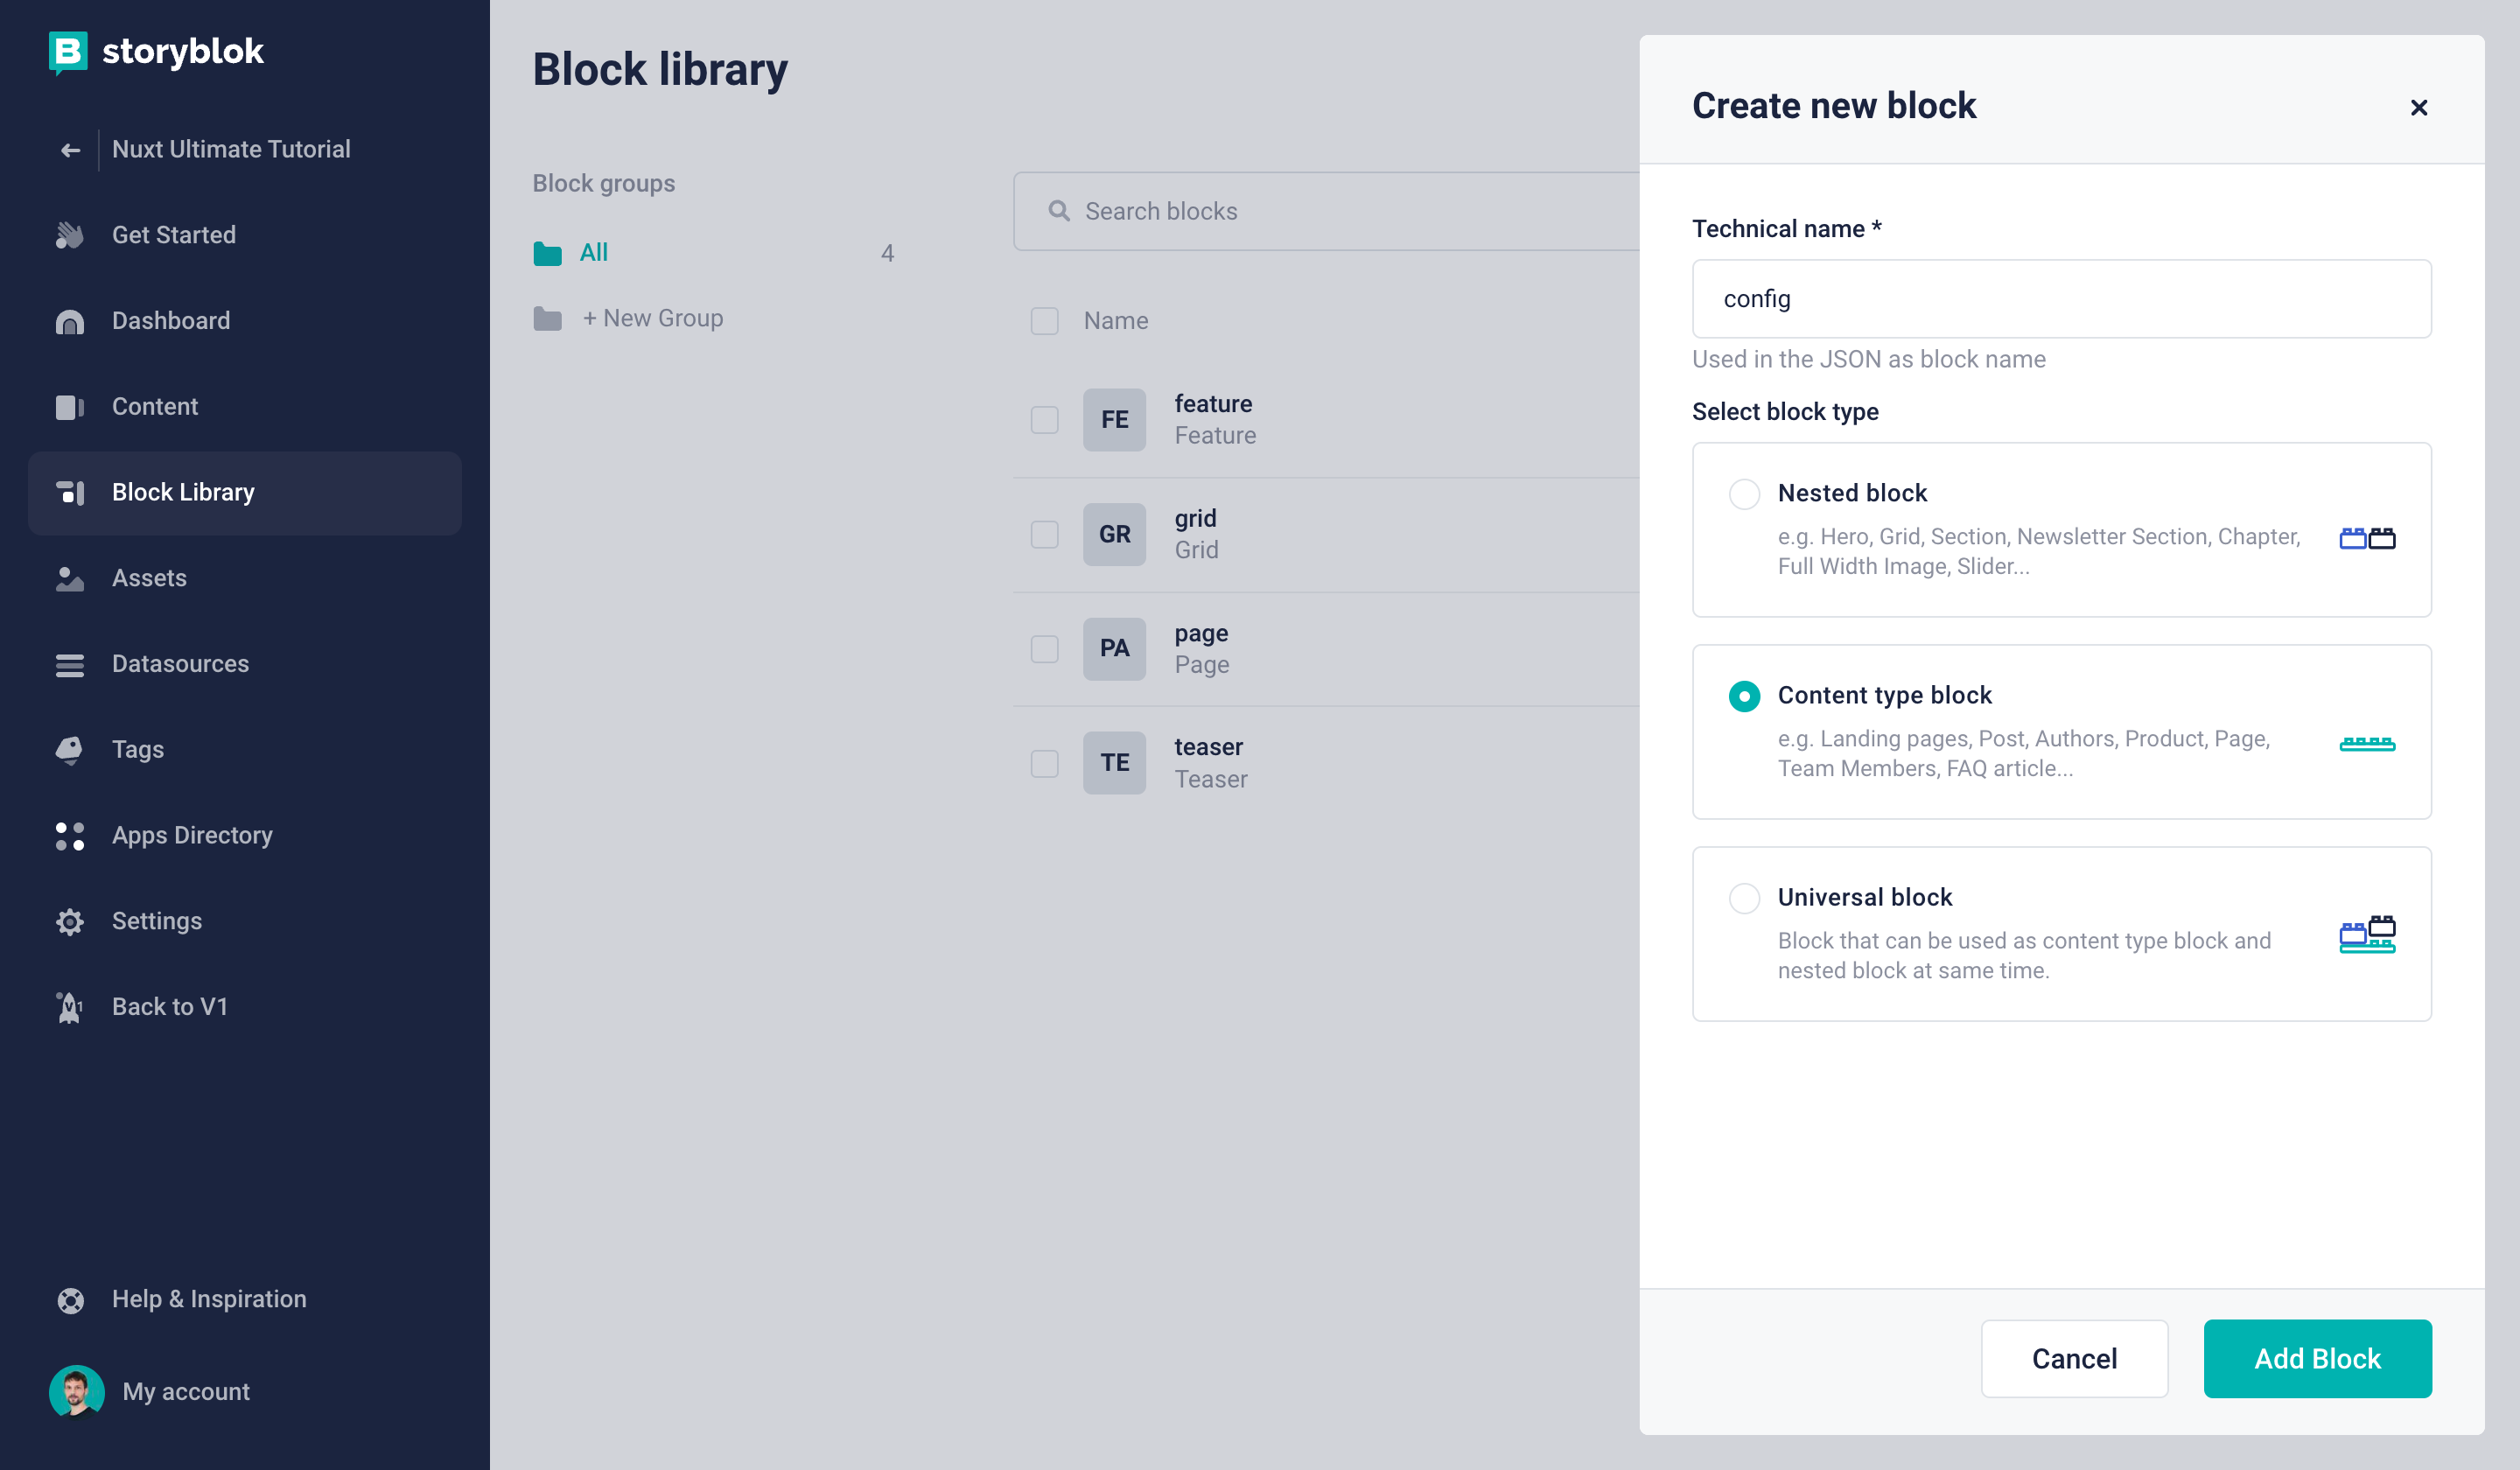
Creating a content type block
Now you can create a new field with the name header_menu {1} and choose the field type Blocks {2}.
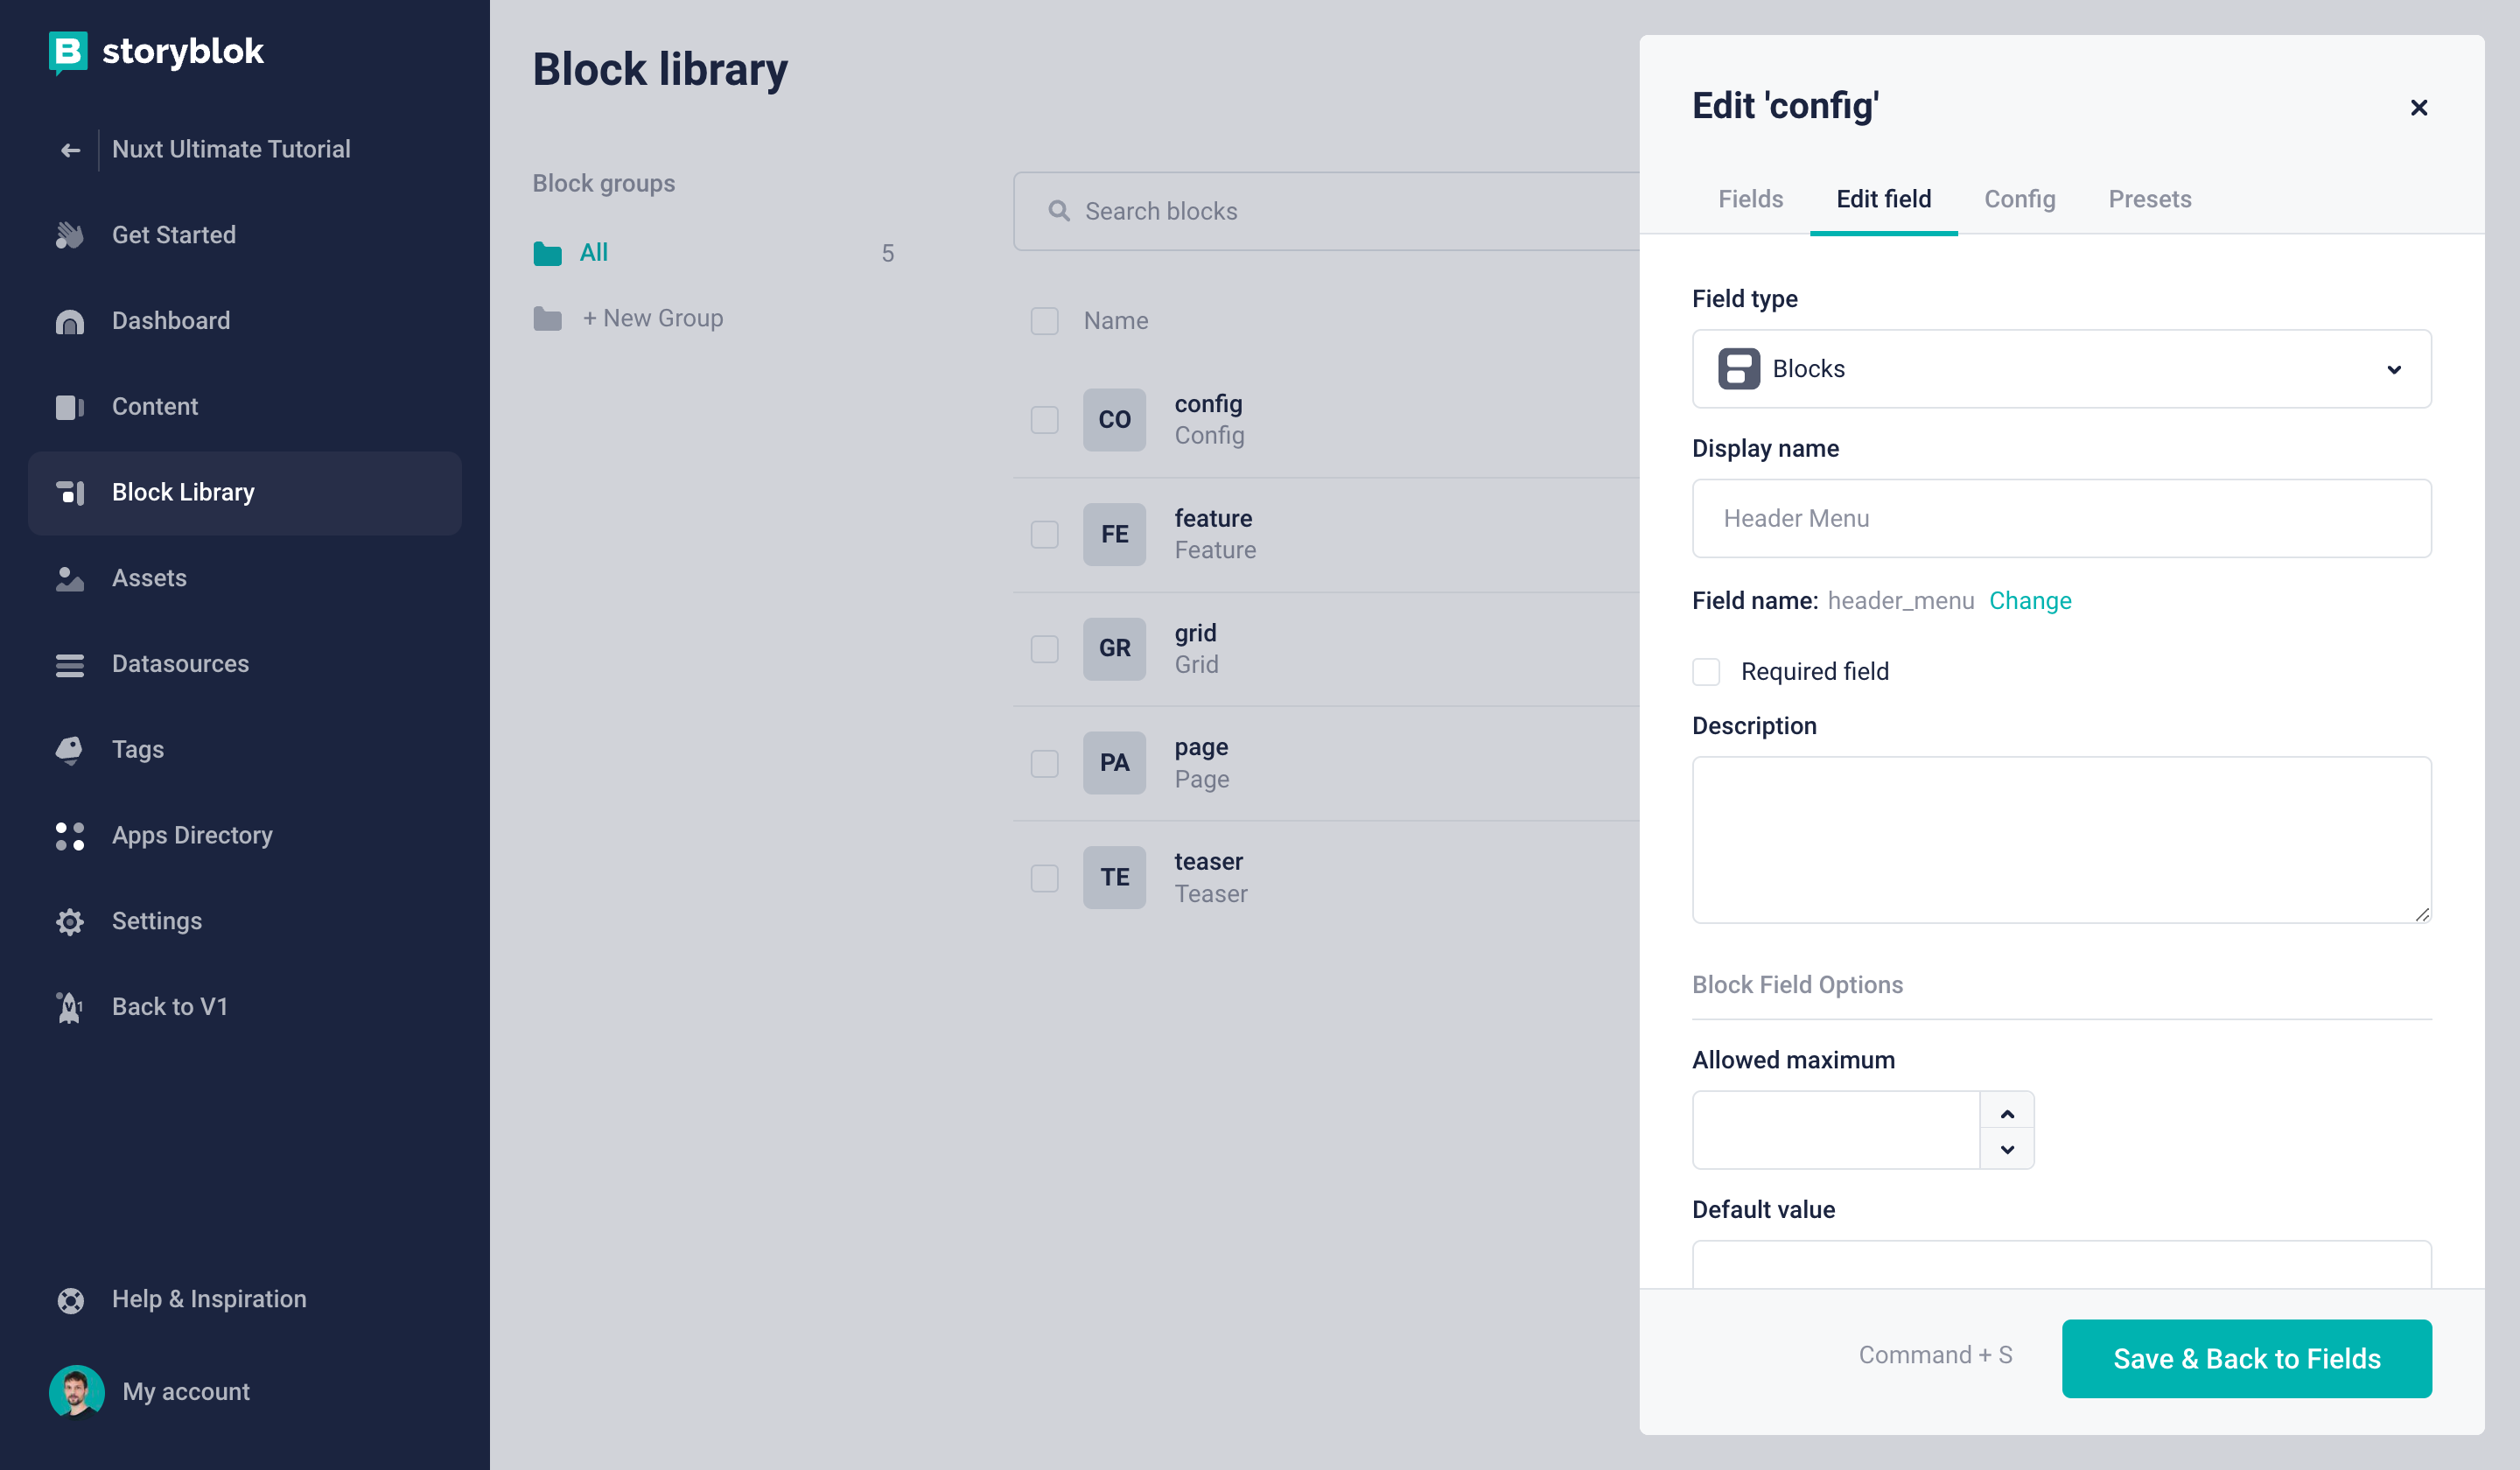
Creating a field for the header menu
In this field, we would like to provide the possibility to add menu links as nested blocks. To accomplish that, let’s create another new block. This time it should be a Nested block {1} with the name menu_link {2}.
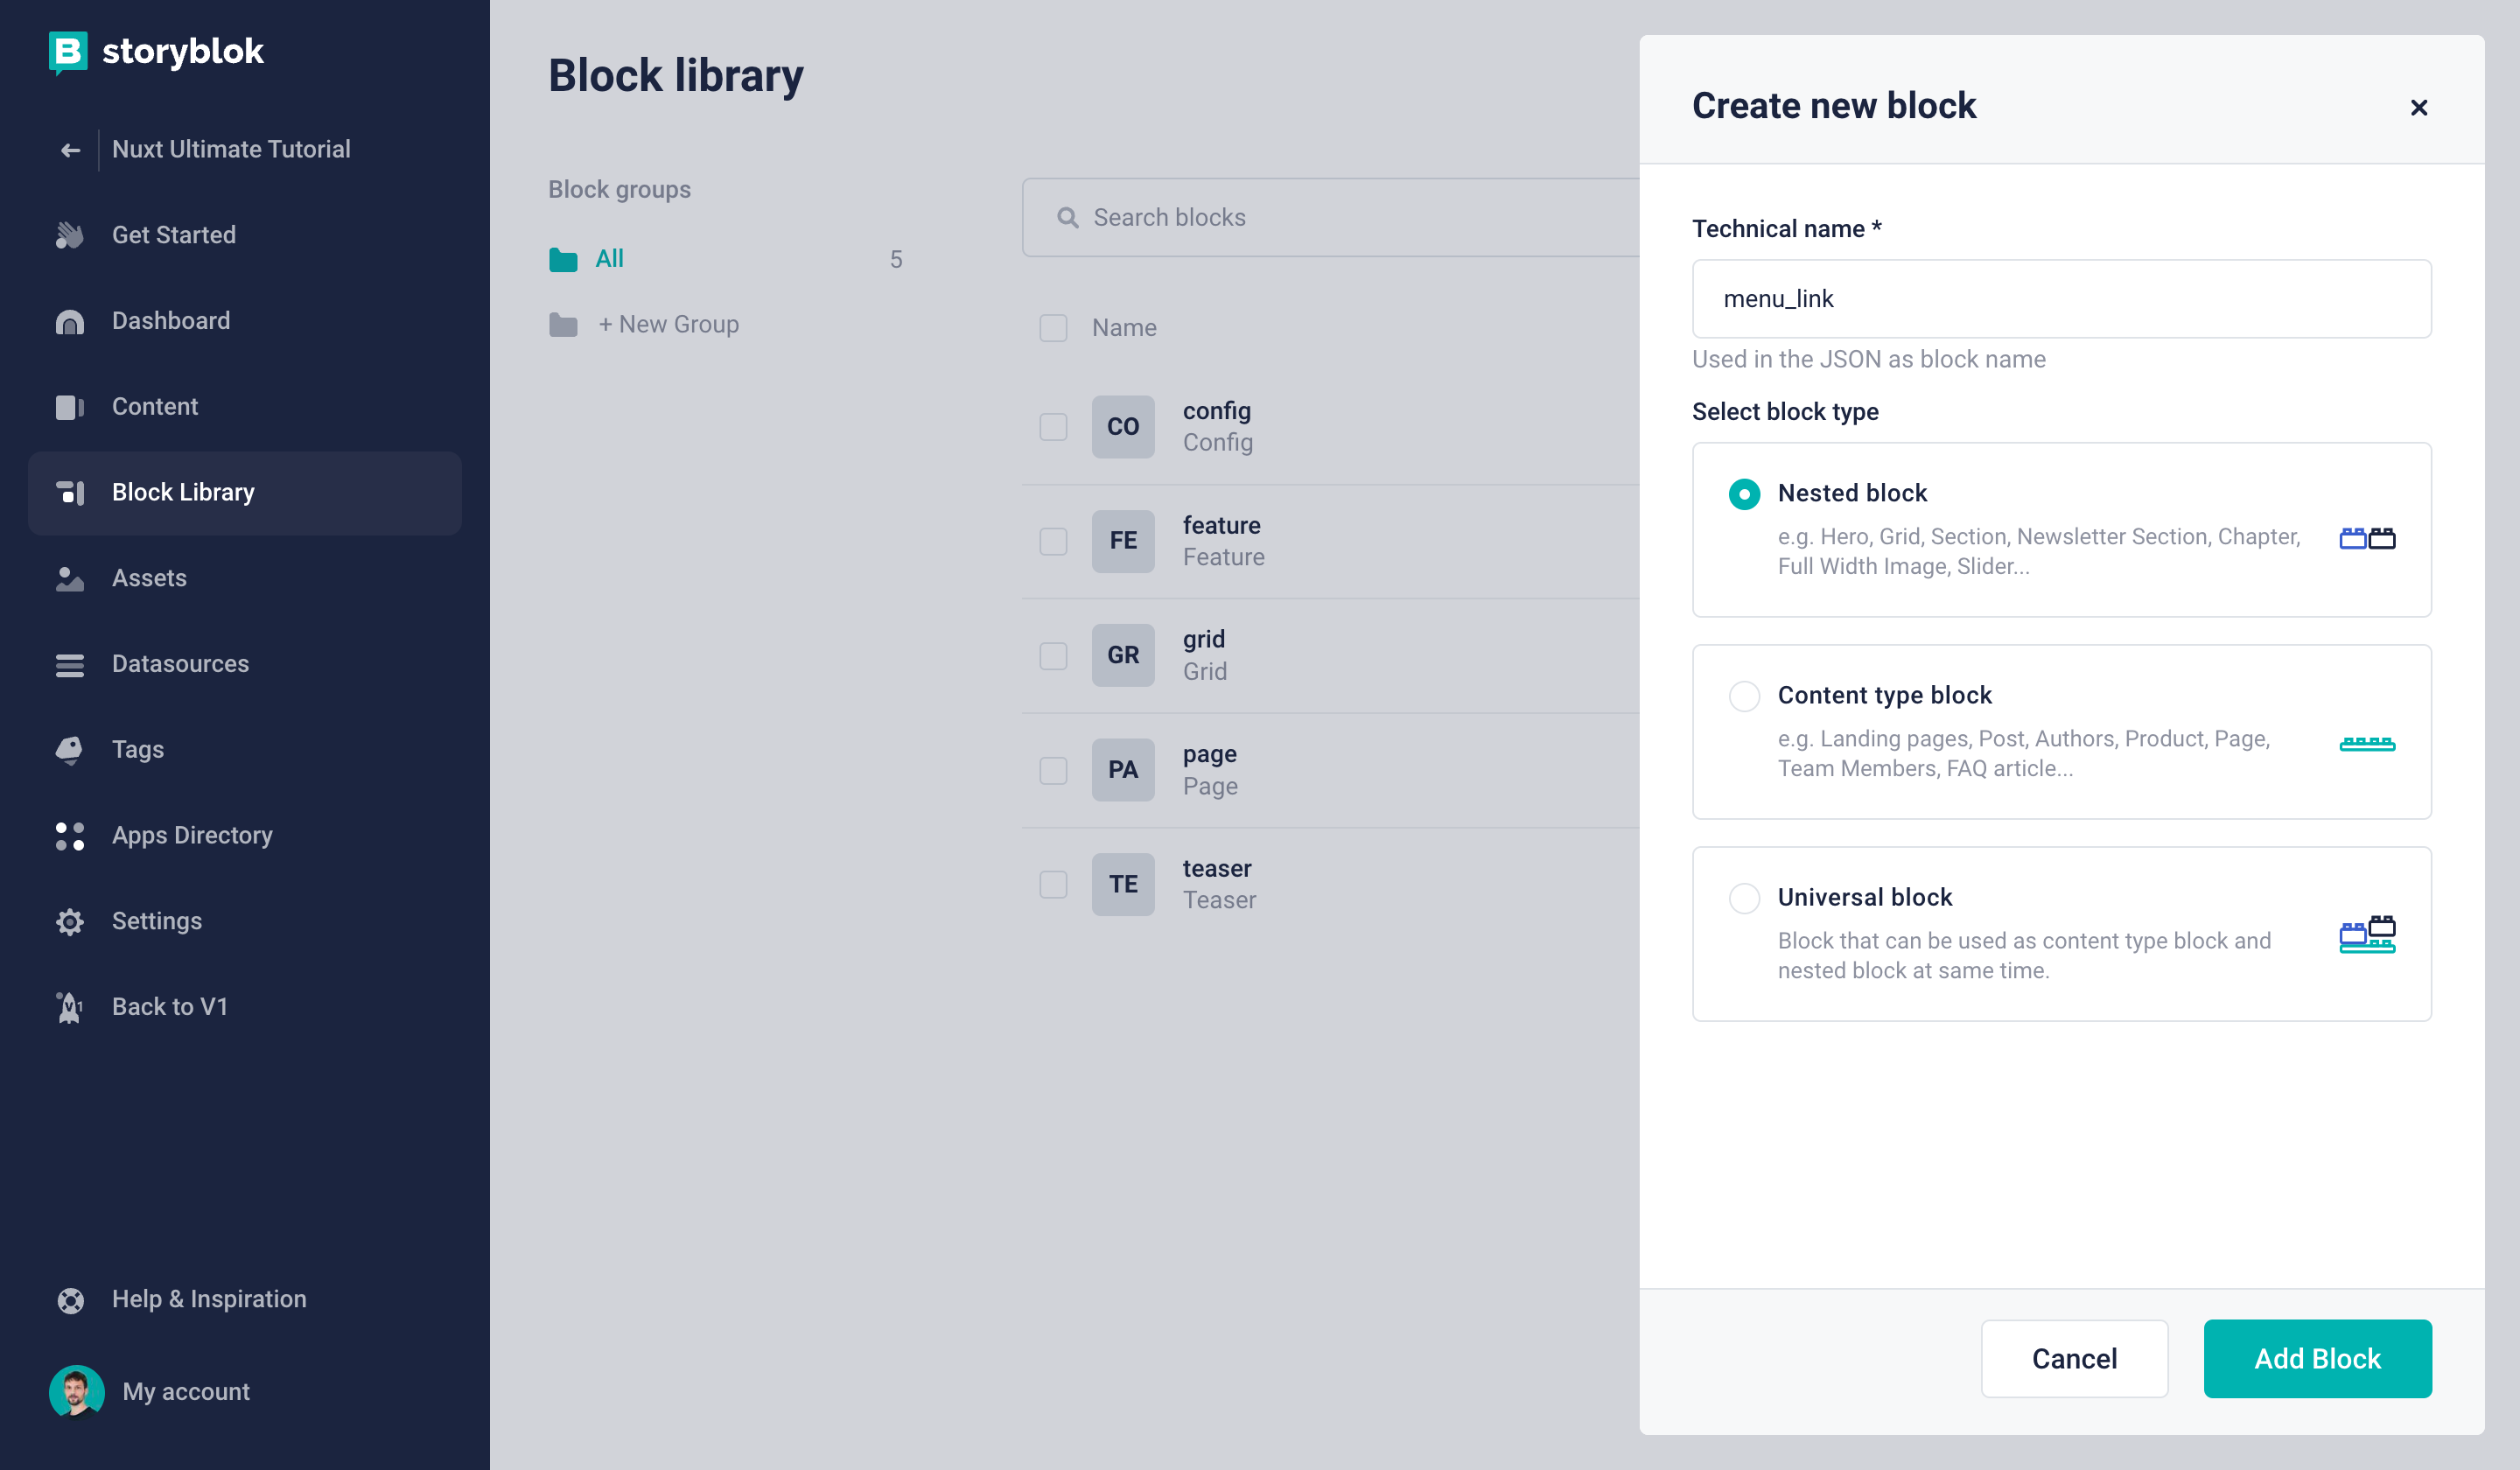
Creating a nested block
Now we can add a new field called link in this newly created block and choose Link as the field type.
Alright, our component schemas are almost done! Just one more step: to avoid that just any block could be nested in our header_menu, we want to make sure that only specific components can be inserted {1}. Now you can choose the menu_link block in the whitelist {2}.
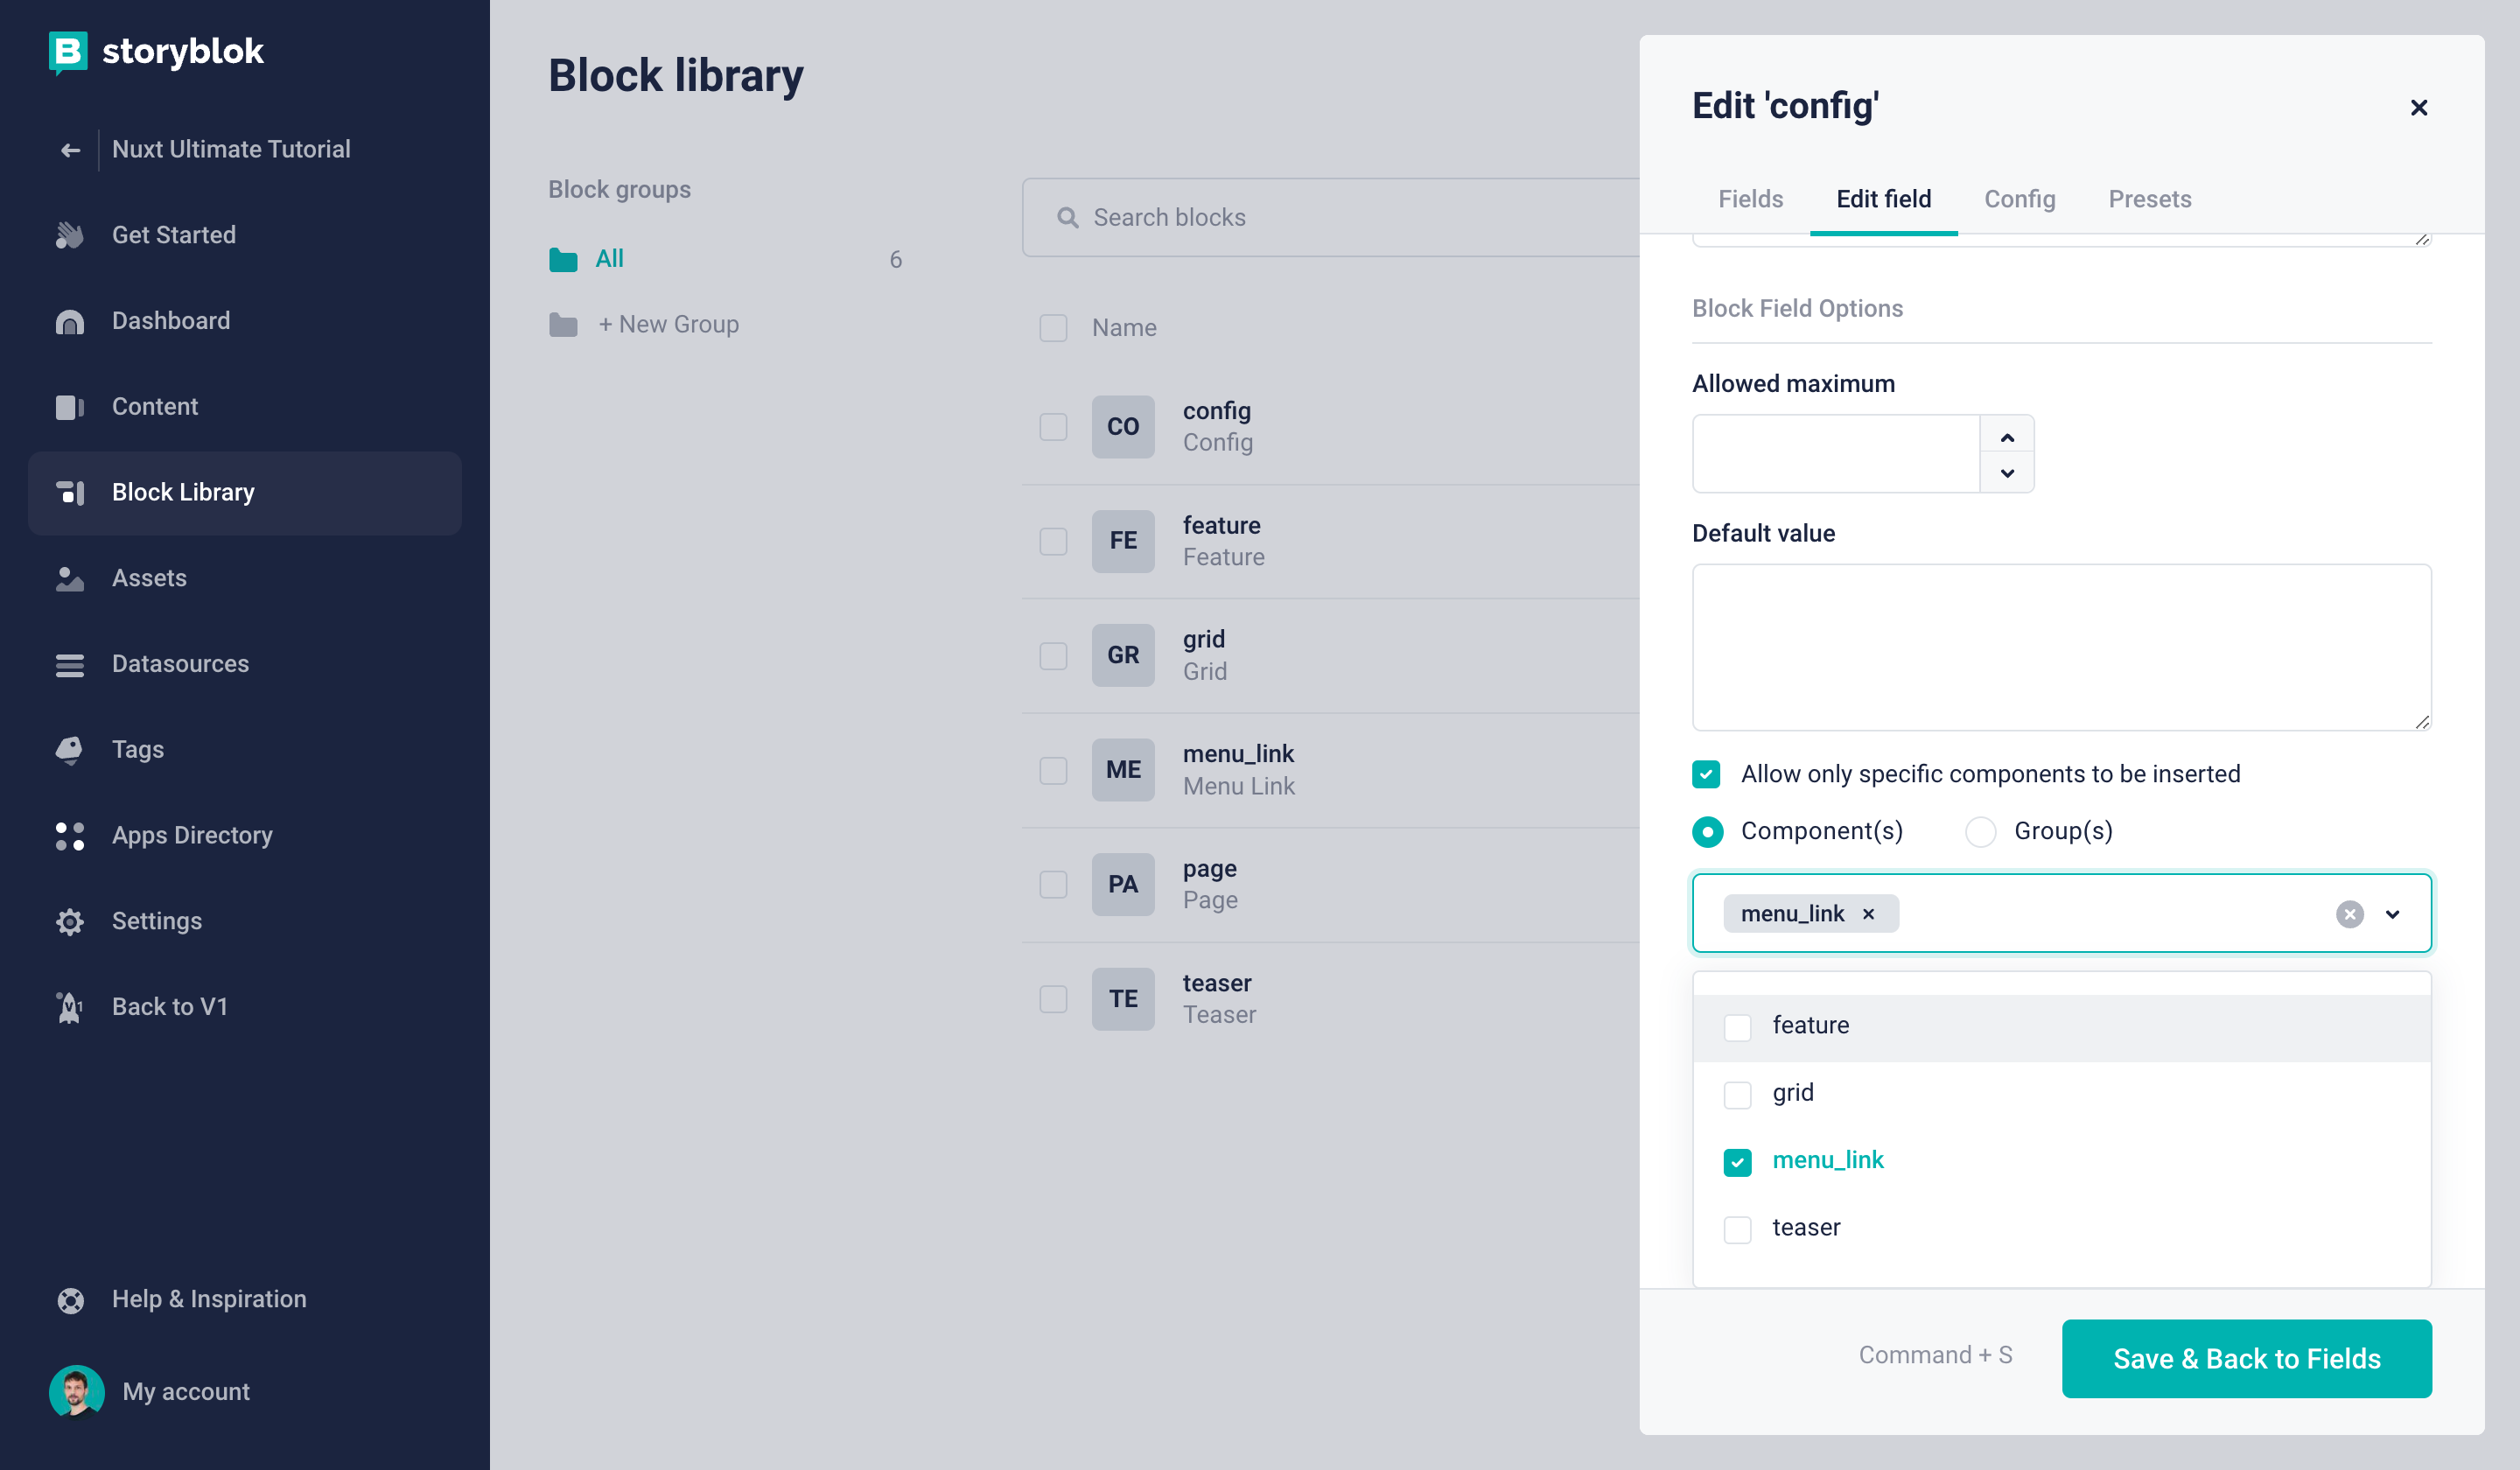
Allowing only specific components to be inserted
With that out of the way, we can now go to the Content section of our Storyblok space. Here, we want to create a new story with the name Config {2}, using our recently created content type Config {3}.
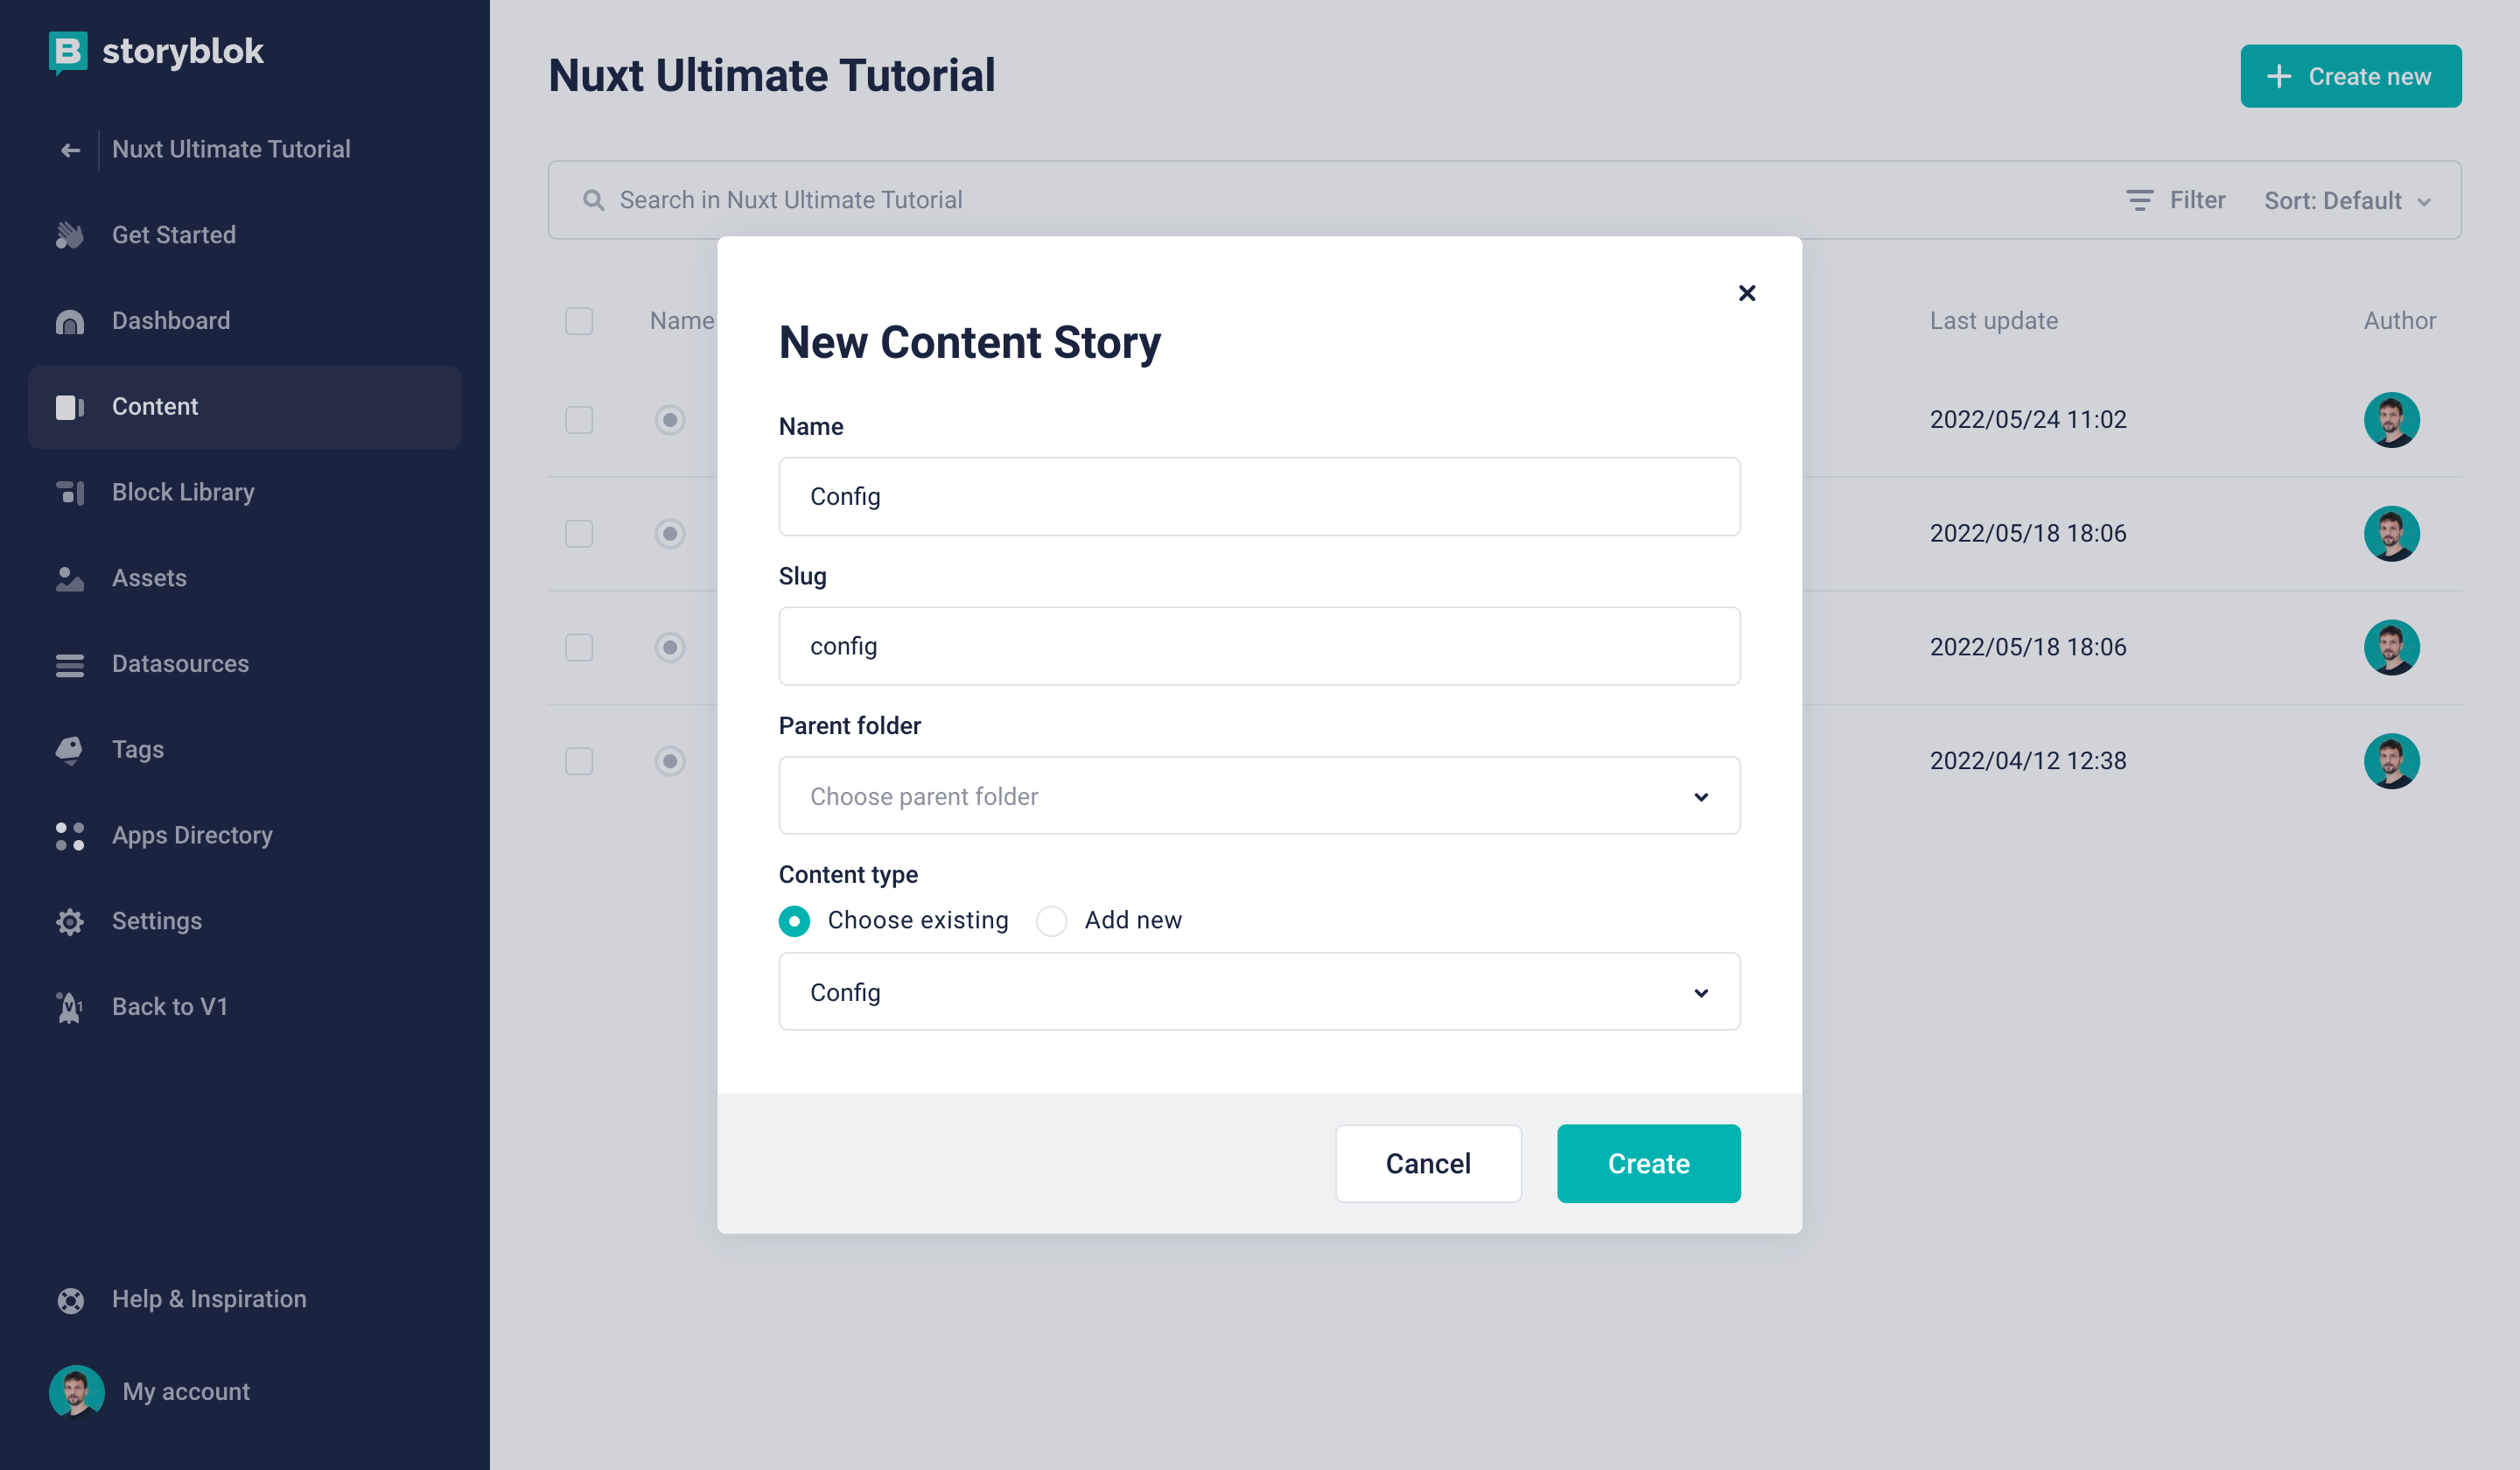
Creating a new Config story
If you open this newly created Config story, you can now {1} add/nest as many menu_link blocks in the header_menu field as you would like. For now, let’s add our {2} About and {3} Blog page.

Rendering the Menu in Remix
Now, let's create the code that will render our menu in the frontend of our application. First, let’s review what our imports from the Storyblok React SDK (opens in a new window) -- storyblokEditable and StoryblokComponent-- do:
storyblokEditablemakes our components editable in our Real-Time Visual Editor.StoryblokComponentsets up our page for our Storyblok components.
Then, let's set our components: MenuLink.jsx component to match the one created in Storyblok.
import { NavLink } from "@remix-run/react";
import { storyblokEditable } from "@storyblok/react";
NavLink;
const MenuLink = ({ blok }) => {
  return (
    <NavLink
      to={blok.link.cached_url}
      prefetch="intent"
      className="text-base font-medium text-gray-500 hover:text-gray-900"
      {...storyblokEditable(blok)}
    >
      {blok.link.story.name}
    </NavLink>
  );
};
export default MenuLink;
Let’s make sure those components render.
In root.jsx, add your components:
import MenuLink from "./components/MenuLink";
...
const components = {
  ...
  menu_link: MenuLink,
};
To ensure the headerMenu has the necessary data, we'll use a loader function (opens in a new window) in the root.jsx file. This approach will globally load the data from the server
add the following code in root.jsx:
import { json } from "@remix-run/node";
...
export const loader = async () => {
  const { data } = await getStoryblokApi().get("cdn/stories/config", {
    version: "draft",
    resolve_links: "url",
  });

  return json({
    headerMenu: data.story.content.header_menu,
  });
};
Next, let's update our Navigation.jsx component. By using useLoaderData (opens in a new window), we can fetch the headerMenu data directly from the server.
This allows us to replace the hardcoded links with dynamic ones sourced from this data.
import { useState } from "react";
import { Link, useLoaderData } from "@remix-run/react";
import { StoryblokComponent } from "@storyblok/react";

const Navigation = () => {
  const [openMenu, setOpenMenu] = useState(false);
  const { headerMenu } = useLoaderData();

  return (
    <div className="relative bg-white border-b-2 border-gray-100">
      <div className="max-w-7xl mx-auto px-4 sm:px-6">
        <div className="flex justify-between items-center  py-6 md:justify-start md:space-x-10">
          <div className="flex justify-start lg:w-0 lg:flex-1">
            <Link prefetch="intent" to="/">
                <span className="sr-only">Storyblok</span>
                <img
                  className="h-20 w-auto sm:h-10 hidden sm:block"
                  src="https://a.storyblok.com/f/88751/251x53/0d3909fe96/storyblok-primary.png"
                  alt="Storyblok"
                />
                <img
                  className="h-20 w-auto sm:h-10 sm:hidden"
                  src="https://a.storyblok.com/f/88751/92x106/835caf912a/storyblok-logo.png"
                  alt="Storyblok"
                />
            </Link>
          </div>
          <div className="-mr-2 -my-2 md:hidden">
            <button
              type="button"
              onClick={() => setOpenMenu(true)}
              className="bg-white rounded-md p-2 inline-flex items-center justify-center text-gray-400 hover:text-gray-500 hover:bg-gray-100 focus:outline-none focus:ring-2 focus:ring-inset focus:ring-indigo-500"
              aria-expanded="false"
            >
              <span className="sr-only">Open menu</span>
              {/* <!-- Heroicon name: outline/menu --> */}
              <svg
                className="h-6 w-6"
                xmlns="http://www.w3.org/2000/svg"
                fill="none"
                viewBox="0 0 24 24"
                stroke="currentColor"
                aria-hidden="true"
              >
                <path
                  strokeLinecap="round"
                  strokeLinejoin="round"
                  strokeWidth="2"
                  d="M4 6h16M4 12h16M4 18h16"
                />
              </svg>
            </button>
          </div>
          <div className="hidden md:flex items-center justify-end md:flex-1 lg:w-0 space-x-10">
            {headerMenu?.map((nestedBlok) => (
              <StoryblokComponent
                className=""
                blok={nestedBlok}
                key={nestedBlok._uid}
              />
            ))}
          </div>
        </div>
      </div>

      {/* <!--
        Mobile menu, show/hide based on mobile menu state.
      --> */}
      {openMenu && (
        <div className="absolute top-0 inset-x-0 p-2 transition transform origin-top-right md:hidden">
          <div className="rounded-lg shadow-lg ring-1 ring-black ring-opacity-5 bg-white divide-y-2 divide-gray-50">
            <div className="pt-5 pb-6 px-5">
              <div className="flex items-center justify-between">
                <div>
                  <img
                    className="h-8 w-auto"
                    src="https://a.storyblok.com/f/88751/92x106/835caf912a/storyblok-logo.png"
                    alt="Storyblok"
                  />
                </div>
                <div className="-mr-2">
                  <button
                    type="button"
                    onClick={() => setOpenMenu(false)}
                    className="bg-white rounded-md p-2 inline-flex items-center justify-center text-gray-400 hover:text-gray-500 hover:bg-gray-100 focus:outline-none focus:ring-2 focus:ring-inset focus:ring-indigo-500"
                  >
                    <span className="sr-only">Close menu</span>
                    {/* <!-- Heroicon name: outline/x --> */}
                    <svg
                      className="h-6 w-6"
                      xmlns="http://www.w3.org/2000/svg"
                      fill="none"
                      viewBox="0 0 24 24"
                      stroke="currentColor"
                      aria-hidden="true"
                    >
                      <path
                        strokeLinecap="round"
                        strokeLinejoin="round"
                        strokeWidth="2"
                        d="M6 18L18 6M6 6l12 12"
                      />
                    </svg>
                  </button>
                </div>
              </div>
              <div className="mt-6">
                <nav className="grid gap-y-8">
                  {headerMenu?.map((nestedBlok) => (
                    <StoryblokComponent
                      className=""
                      blok={nestedBlok}
                      key={nestedBlok._uid}
                    />
                  ))}
                </nav>
              </div>
            </div>
          </div>
        </div>
      )}
    </div>
  );
};

export default Navigation;
Now, if you go back to your Storyblok Visual Editor, you should be able to see your menu being rendered! You can add more links, remove them, or even reorder them if you like.

Continue reading and Create Custom Components in Storyblok and Remix
| Resource | Link |
|---|---|
| Storyblok Remix Ultimate Tutorial | https://www.storyblok.com/tp/the-storyblok-remix-ultimate-tutorial |
| Github repository | https://github.com/storyblok/remix-ultimate-tutorial |
| Storyblok Technologies Hub | https://www.storyblok.com/technologies |
| Remix Technology Hub | https://www.storyblok.com/tc/remix |
| Storyblok React SDK | storyblok/storyblok-react |
