Conduct A/B Tests with Storyblok and Optimizely
Storyblok is the first headless CMS that works for developers & marketers alike.
The Optimizely app is based on Optimizely's Full Stack Experimentation, which is being deprecated. The functionality of this integration might not cover all Optimizely features.
When you install the Optimizely app mentioned above and use the field type, ensure to select optimizely-v2, as that is the version referenced in this article.
Ever wondered if putting different text on a button may lead to more sales? Storyblok provides an integration for the market leader Optimizely (opens in a new window) so you can conduct this kind of test as easily as possible. In this tutorial we will walk you through how to set up your space, what you need from Optimizely and finally put it all together in a NuxtJS application.
Before we get started, let's make sure we understand what Optimizely offers us in terms of A/B testing. Within Optimizely you can run different experiments. These experiments come in different flavors: A/B, feature or multivariant tests to name a few. We will focus on A/B tests in this article.
An A/B test contains variations of the same element. To decide who get's to see which variant, Optimizely provides extensive possibilities of audience forming, traffic allocation and more.
In the end we take these rules we set up, check them against the data we have about our user, show them the right variation and send a message back to Optimizely so that we can measure how the different variations perform with our users.
Configuring Content Structure
To setup A/B Testing with Storyblok and Optimizely we need an account with Optimizely..
We generate an OAuth token for Optimizely (opens in a new window) and proceed by installing the Optimizely app (opens in a new window) into our Storyblok space.
Now we create a nestable component called "abtest" in the components tab of our space. For the content that we want to present in the variation we need a field of type Blocks. In order to specify the experiment and variation we will utilize a field of type Plugin with the custom type optimizely-v2 which was provided by the app we installed beforehand.
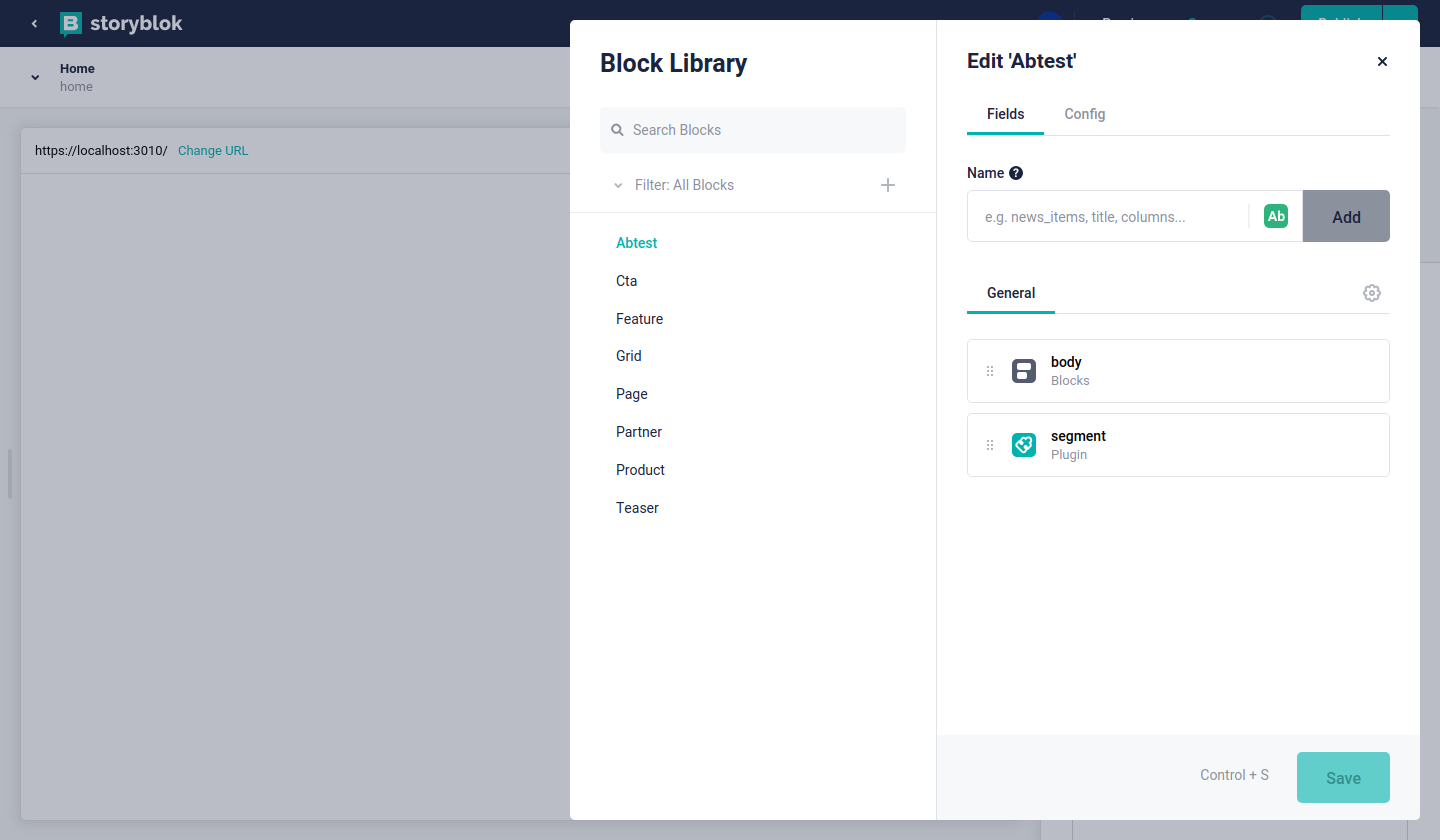
The schema of the abtest component containing two fields: one of type blocks for the content, one of type plugin/optimizely for the A/B test configuration.
Within this field we will set the options tokenand projectId to the values we obtained from Optimizely earlier.
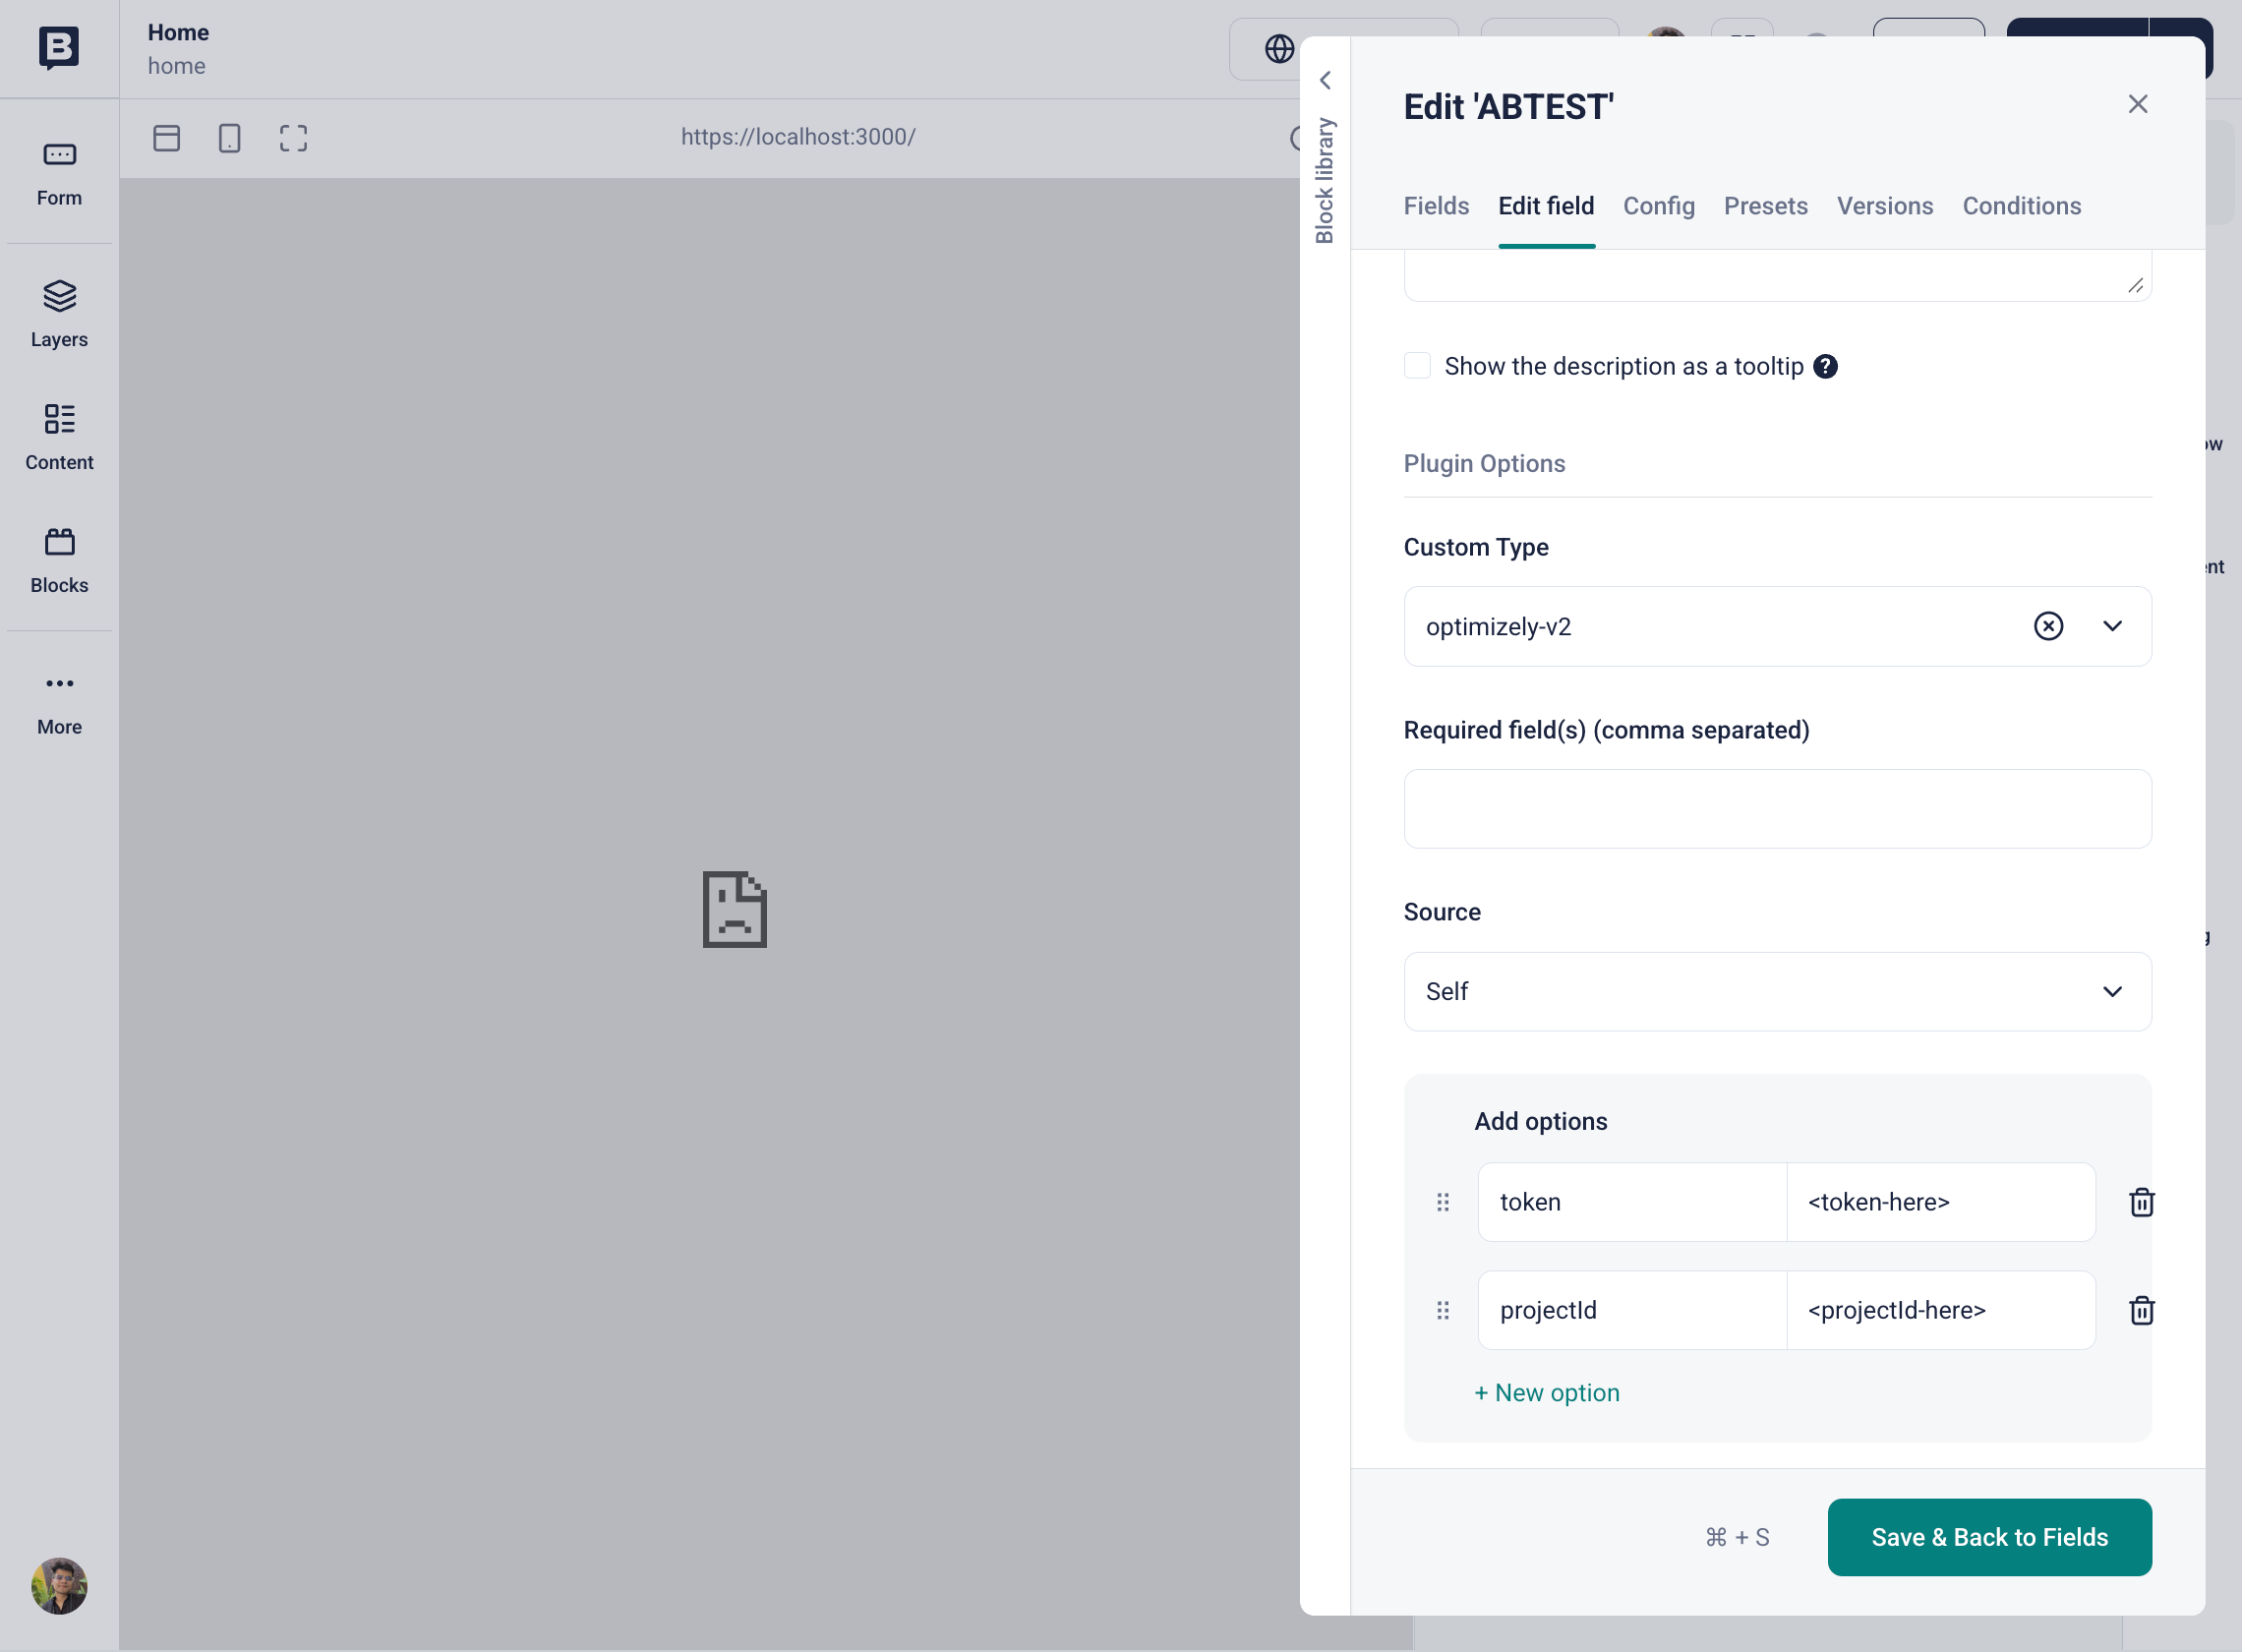
The field of type "Plugin" with the custom type "optimizely-v2" (1) needs to be configured with the token (2) from step 1 and the project id (3) from Optimizely.
Having completed the type definitions we can now start integrating the actual A/B test into our content. We locate the Story we want to conduct the A/B test on and make sure it has a field of type Blocks which we can use to place our A/B test components into.
We add two of them and configure each one of them by selecting the corresponding experiment and variation from the drop-down menus.
The final step is adding the actual content we want to display with each variation into the Blocks field we defined earlier.
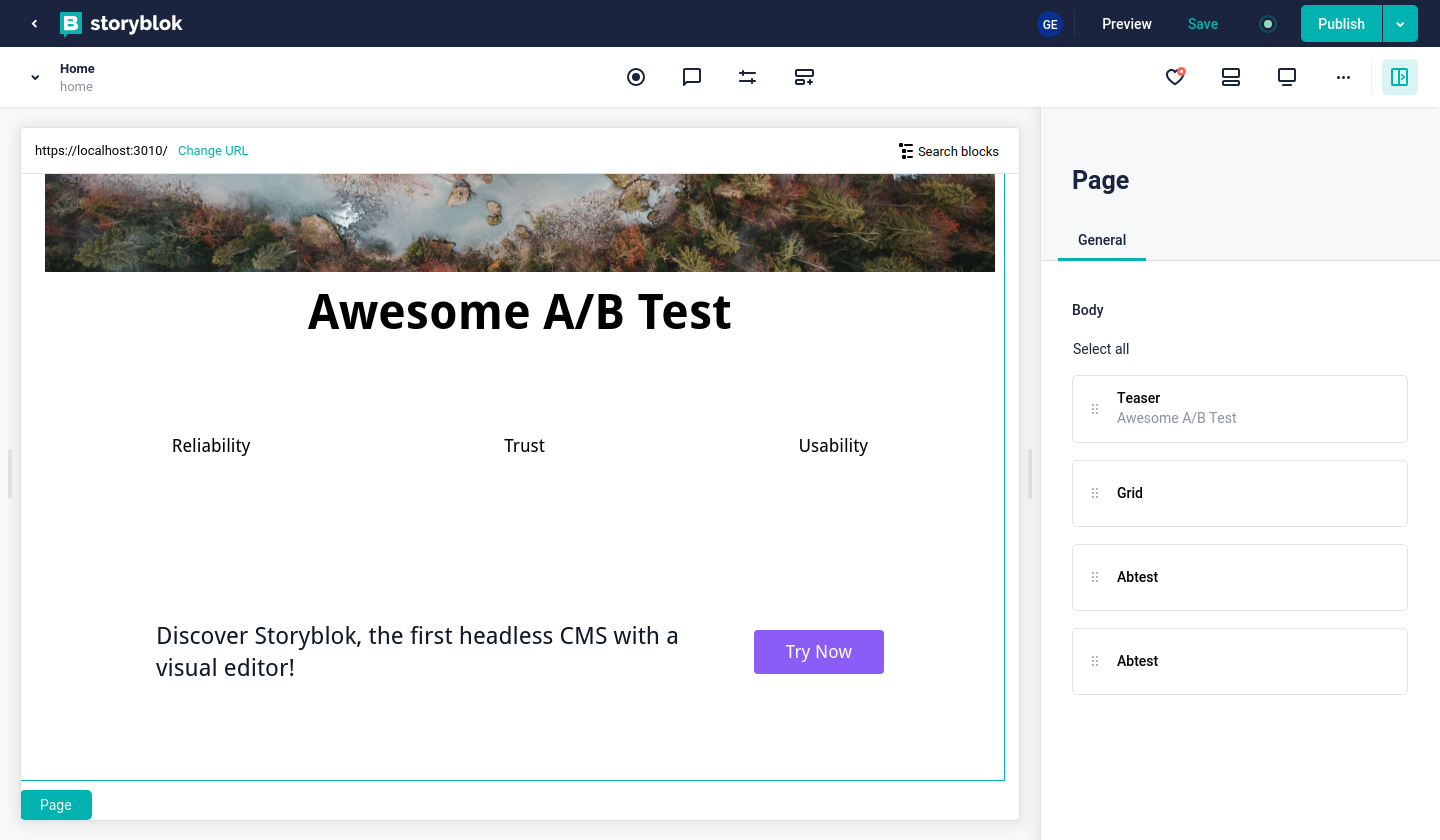
The page contains content unaffected by our test (1) and our two test components (2).
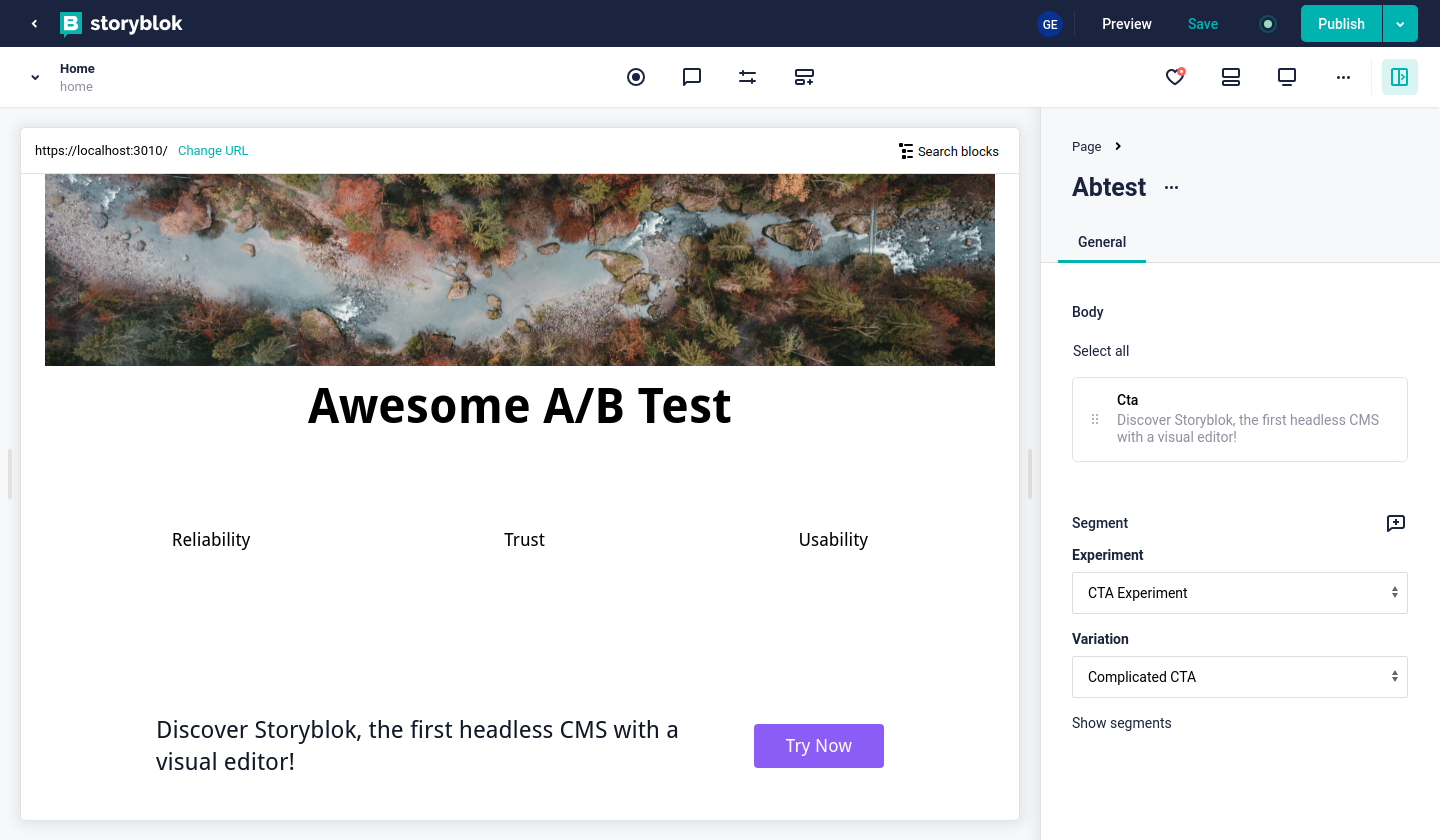
The varying content can be placed into the body (1) and the desired experiment (2) and variation (3) selected from the drop-down menus.
Now we just hit the save button on the top of the page and can proceed with the next steps. Awesome!
Conducting the Test
With the setup within Storyblok done, we can look at the draft JSON Storyblok provides us with, and should see two components with "plugin": "optimizely-v2", each of them holding the data we just configured. Here is how one of them could look like.
{
  "_uid": "2fd80b7a-65a9-45cf-ab28-5b06ea7ab2ca",
  "body": [
    {
      "_uid": "f041f1f2-c7bb-4df6-8c7f-49ac98a1535f",
      "link": {
        "more": "data",
        "url": "https://storyblok.com",
        "linktype": "url",
        "fieldtype": "multilink",
        "cached_url": "https://storyblok.com"
      },
      "text": "Try out Storyblok for free today!",
      "component": "cta",
      "button_text": "Sign Up",
      "_editable": "<!--#storyblok#{\"name\": \"cta\", \"space\": \"109536\", \"uid\": \"f041f1f2-c7bb-4df6-8c7f-49ac98a1535f\", \"id\": \"42999627\"}-->"
    }
  ],
  "segment": {
    "_uid": "c6a2fa60-63f1-45e3-b8e7-4a8808943239",
    "plugin": "optimizely-v2",
    "segments": [],
    "variation": "cta_simple",
    "experiment": "cta_experiment"
  },
  "component": "abtest",
  "_editable": "<!--#storyblok#{\"name\": \"abtest\", \"space\": \"109536\", \"uid\": \"2fd80b7a-65a9-45cf-ab28-5b06ea7ab2ca\", \"id\": \"42999627\"}-->"
}
The next step is for us to use one of Optimizely's SDKs and render the corresponding Block for the Segment that was assigned to your user by Optimizely.
We will use a Nuxt.JS application as an example.
Storyblok + Nuxt Setup
We will use the setup detailed in our 5 Minute Nuxt Tutorial (opens in a new window). You can either follow that tutorial or just grab the code from the repository (opens in a new window) where you only have to provide your access keys.
Rendering the Test Variations
Let's do a quick recap of what we need to conduct our A/B test with Optimizely:
- A datafile that defines what experiments and variations there are
- Components to render
- Information about our user so that the SDK can make the right decision which variation to show
Optimizely provides a great SDK for JavaScript, so we will let that one do the heavy lifting.
npm i @optimizely/optimizely-sdk
Let's start from the top: we could either download our datafile manually and ship it with the application, but since it changes pretty often, we'd rather not do that. The Optimizely SDK can help us here. The Optimizely control panel provides you with a SDK key. We only need to give that key to the SDK and it will get the datafile on it's own.
The key should be provided through the Nuxt runtime config.
We will do this in combination with the component which gives us a place to render the variation.
In a new component called AbTest we will make use of dynamic components.
<template>
  <div v-if="visible" v-editable="blok" class="px-6">
    <component :is="iblok.component" v-for="iblok in blok.body" :key="iblok._uid" :blok="iblok" />
  </div>
</template>

<script>
import { createInstance } from '@optimizely/optimizely-sdk'

export default {
  props: {
    blok: {
      type: Object,
      required: true,
    },
  },
  data() {
    return {
      activatedVariation: null,
    }
  },
  async fetch() {
    const optimizelyClientInstance = createInstance({
      sdkKey: this.$config.optimizelySdkKey,
    })
    await optimizelyClientInstance.onReady()
    this.activatedVariation = optimizelyClientInstance.activate(this.blok.segment.experiment, `user1`)
  },
  computed: {
    visible() {
      return this.blok.segment.variation === this.activatedVariation
    },
  },
}
</script>
Using Optimizely to render only the correct variations.
As you can see, we utilize the handy fetch method of Nuxt to get the datafile with the SDK key we spoke about and get the currently active variation for our user.
The blocks in the body of our Abtest component only get rendered if the active variation matches the one we selected in the Storyblok interface. We use the handy v-if directive and a computed property in order to achieve this.
Wrapping Up
Now there's only one step left to take which we can not do for you: identifying your users. The method optimizelyClientInstance.activate() takes 3 parameters, 2 of which are used to identify and assign users to specific variations. We recommend you take a look at Optimizely's great documentation (opens in a new window) on how to do this properly.
With that being done, we're now all set to learn how small changes affect things like click-through-rate, conversions and other nifty metrics.
| Resource | Link |
|---|---|
| Optimizely | https://www.optimizely.com/ |
| Optimizely Documentation | https://docs.developers.optimizely.com/full-stack/docs/activate-javascript-node |
| Example Repository | https://github.com/storyblok/optimizely-nuxt-example |
| NuxtJS Technology-Hub | https://www.storyblok.com/tc/nuxtjs/ |
