Personalize your projects using Next.js and a Headless CMS
Storyblok is the first headless CMS that works for developers & marketers alike.
"Personalization" is one of the hottest buzzwords in the development world these days. Marketers, developers, and content creators evaluate the possibilities and alternatives to handle custom scenarios while offering powerful experiences to the users. Let's talk about personalization and see how we can implement personalization strategies using Next.js and Storyblok.
If you are in a hurry, you can take a look at the whole source code of the project on GitHub.
Requirements
In this guide, we assume that you meet these requirements:
- Basic understanding of Next.js. If you want a beginner guide about Next.js & Storyblok, you should take a look at our Add a headless CMS to Next.js in 5 minutes (opens in a new window) guide.
- Node.js LTS version.
- A Storyblok (opens in a new window) account to manage content.
What is personalization?
When we talk about personalization, we refer to the act of offering an exclusive experience to the users of our application or the visitors of our website. The experience is customized based on details we get from the user, such as past purchases, geography, interactions with the elements of our website, etc.
The idea of personalizing the content is to offer our users a better and superior experience to improve our performance from a business point of view: Longer visit duration, lower bounce rate, more purchases, higher customer satisfaction, an improvement in our brand's reputation, etc.
If you are familiar with the Jamstack concept, you know that generating static content at build time is one of the principles we should follow when creating our project following this approach. So, if we try to generate as much static content as possible ahead of time, offering custom experiences to our end users can probably be a challenge. Let's see how we could implement personalization strategies using one of the latest features introduced by Vercel and the Next.js team: Edge Functions.
Edge Functions on Next.js
If we want to give our users a personalized experience, we can use server-side rendering and create dynamic content on each request to our website. The problem with this approach is that it is slower than loading static pages. The server processes each request separately, so the user has to wait for the content to be generated dynamically and is available to be consumed. Also, it is possible that a visitor of our website is far from the location of the data center that processes the request, so the data takes more time to be transferred.
Edge Functions (opens in a new window) are a new feature offered by Vercel to solve these issues. With them, we can create scripts and functions that execute server-side rendering code, with the possibility of deploying them on Vercel's Edge Network, closer to our users. Another good thing about them is that Edge Functions have zero cold start: We don't have to wait for the functions to boot up from scratch in order to use them.
In order to use Edge Functions in our application, we can deploy a Middleware (opens in a new window): It's an intermediate tier that executes custom logic and tasks before a request is processed.
Let's see these concepts implemented in a demo project.
Setting up the project
To show how to implement a personalization strategy using Edge Functions, we will create a prototype of an e-commerce website that offers products of two categories: Sportswear and Elegant. The website has a home page, and catalog pages where items of each category are displayed. It also has a "general" catalog page, showing all the items from all the categories. After a visitor of the website goes to one particular category catalog page, we will assume that the person is interested in that kind of product. So, after the first visit, the website will start showing exclusive content related to the category selected on the home page.
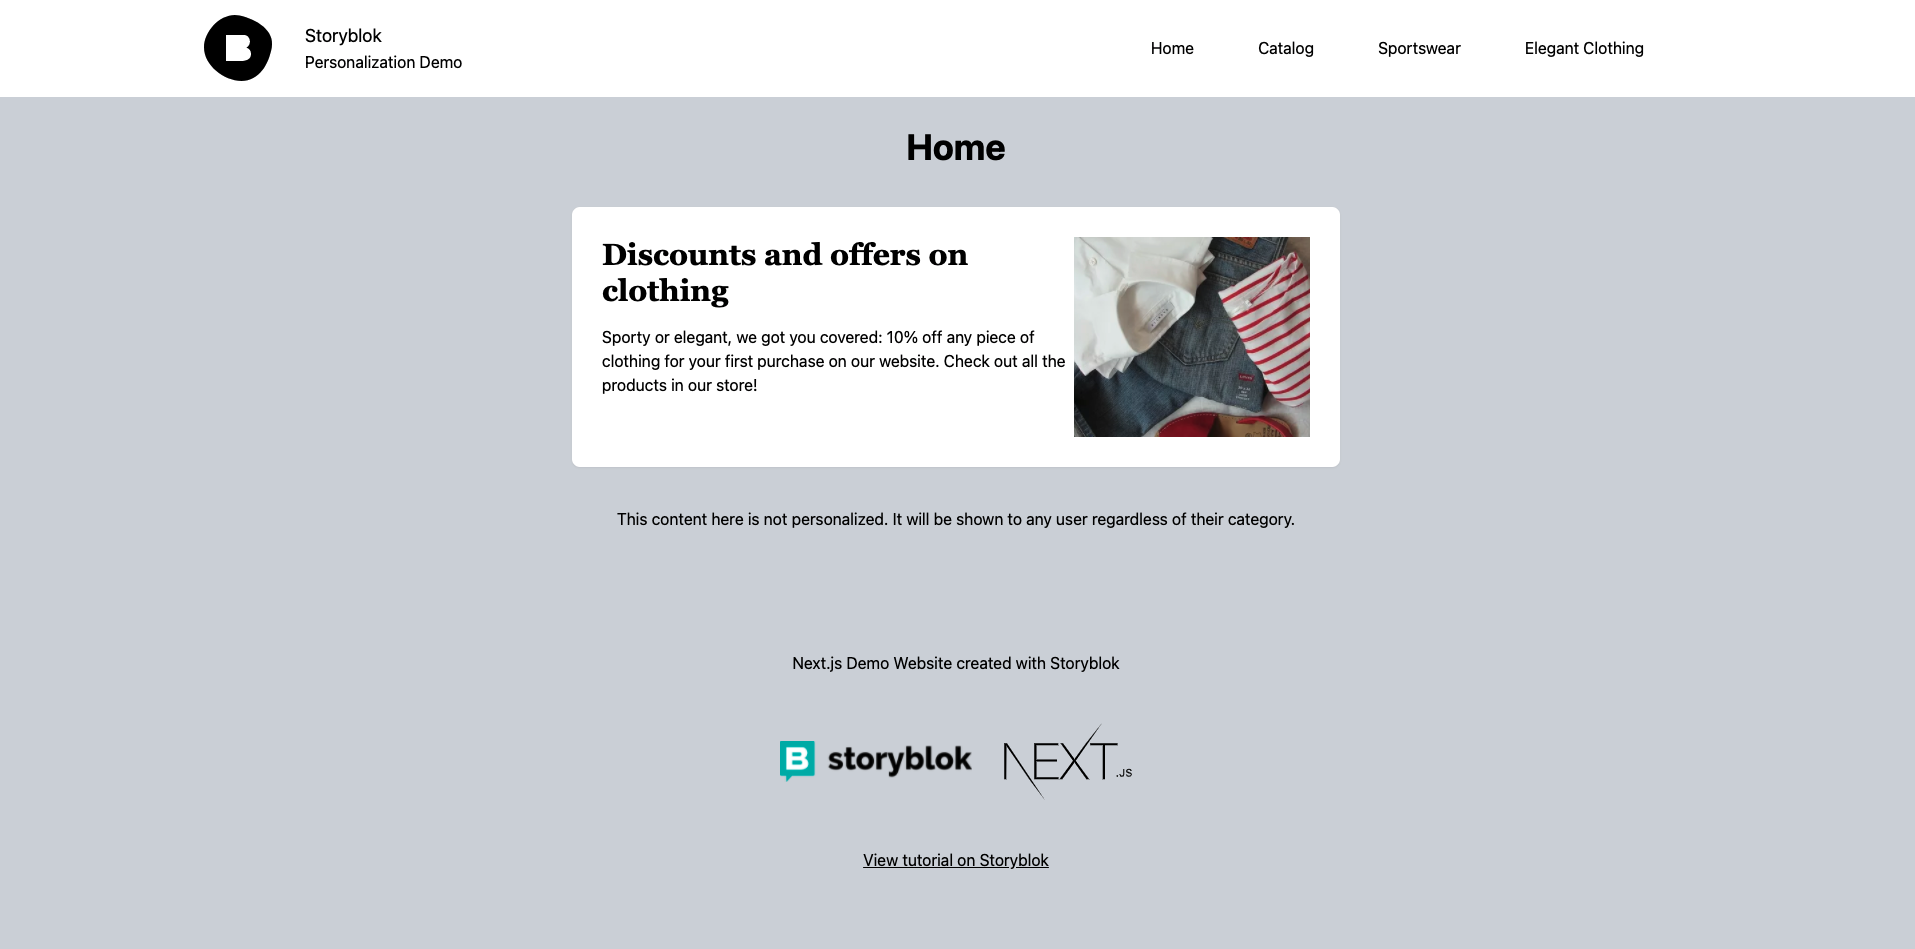
The home page of the website
Let’s start by running the following commands, so we clone the example repository for the shop website:
git clone https://github.com/storyblok/nextjs-personalization-demo.gitAfter that, we need our Storyblok space to manage the products and the content of our website. Click the following link to duplicate the example space:
https://app.storyblok.com/#!/build/136706 (opens in a new window)
This will clone the space with the necessary content structure already set up for the project.
Now, we need to set our Preview Url for our development server. Once you duplicated the space, click on the URL in the Visual Editor {1} and select "Add or change preview urls" {2}. Add https://localhost:3010/ as the location (default environment). Keep in mind that you need to start the "https" server in your localhost, and it should listen to the "3010" port.
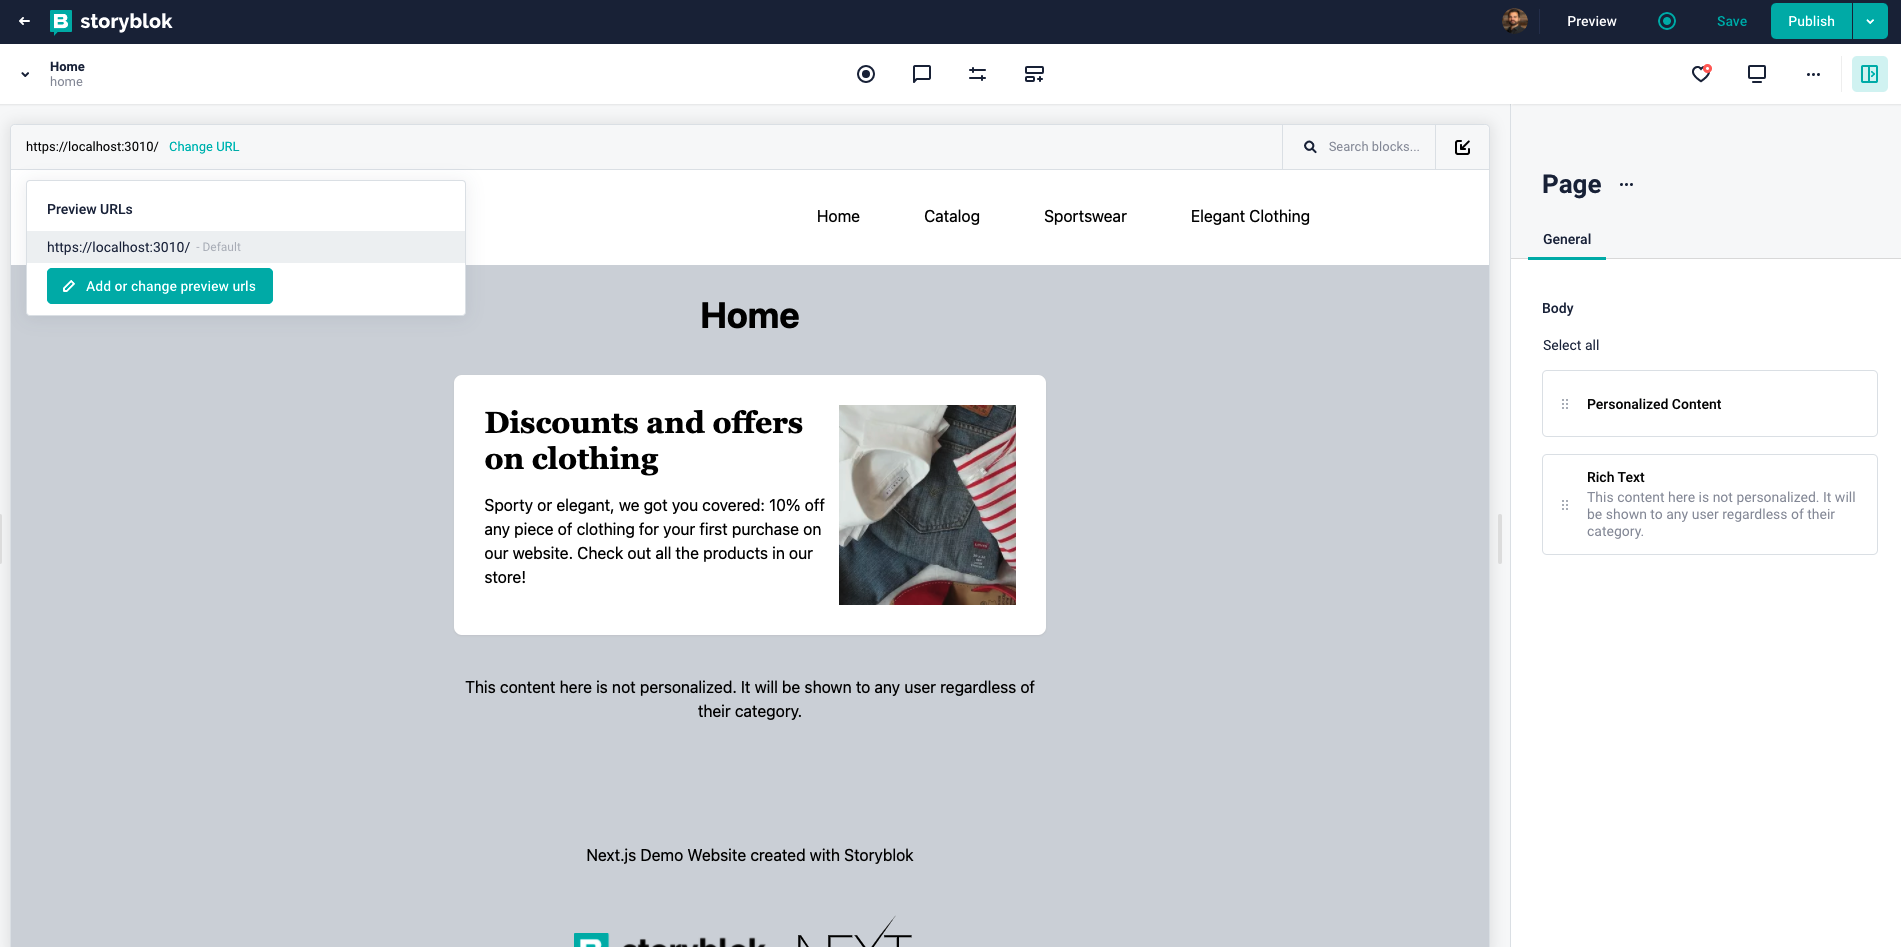
Preview URL
Go to the "Settings" menu of the Storyblok space and retrieve the "preview" token from the API Keys section. In the code base, go to pages/_app.js and replace the accessToken with the preview token you just retrieved.
We can now start the development server by running npm run dev, and see how our website works. Let’s dive into the main parts of the project to understand how the personalization process is implemented.
Define variants
In a personalization scenario, we call a variant to an alternative content item that is delivered to the user instead of the original version of it. We should evaluate the different variants that we will handle in our project, based on the different scenarios that we want to manage. In the example, we have a section of our home page that will vary depending on the preference of the visitor, based on past visits. So, we can say that we'll have a banner on the home page with three variants: General, Sportswear, and Elegant.
Content structure in Storyblok
If we go to the Storyblok space connected to the app, we can inspect the structure of the content that we are retrieving to generate the pages of our website. We have a "Home" story, for the home page, and two folders: "Catalog" and "Products".
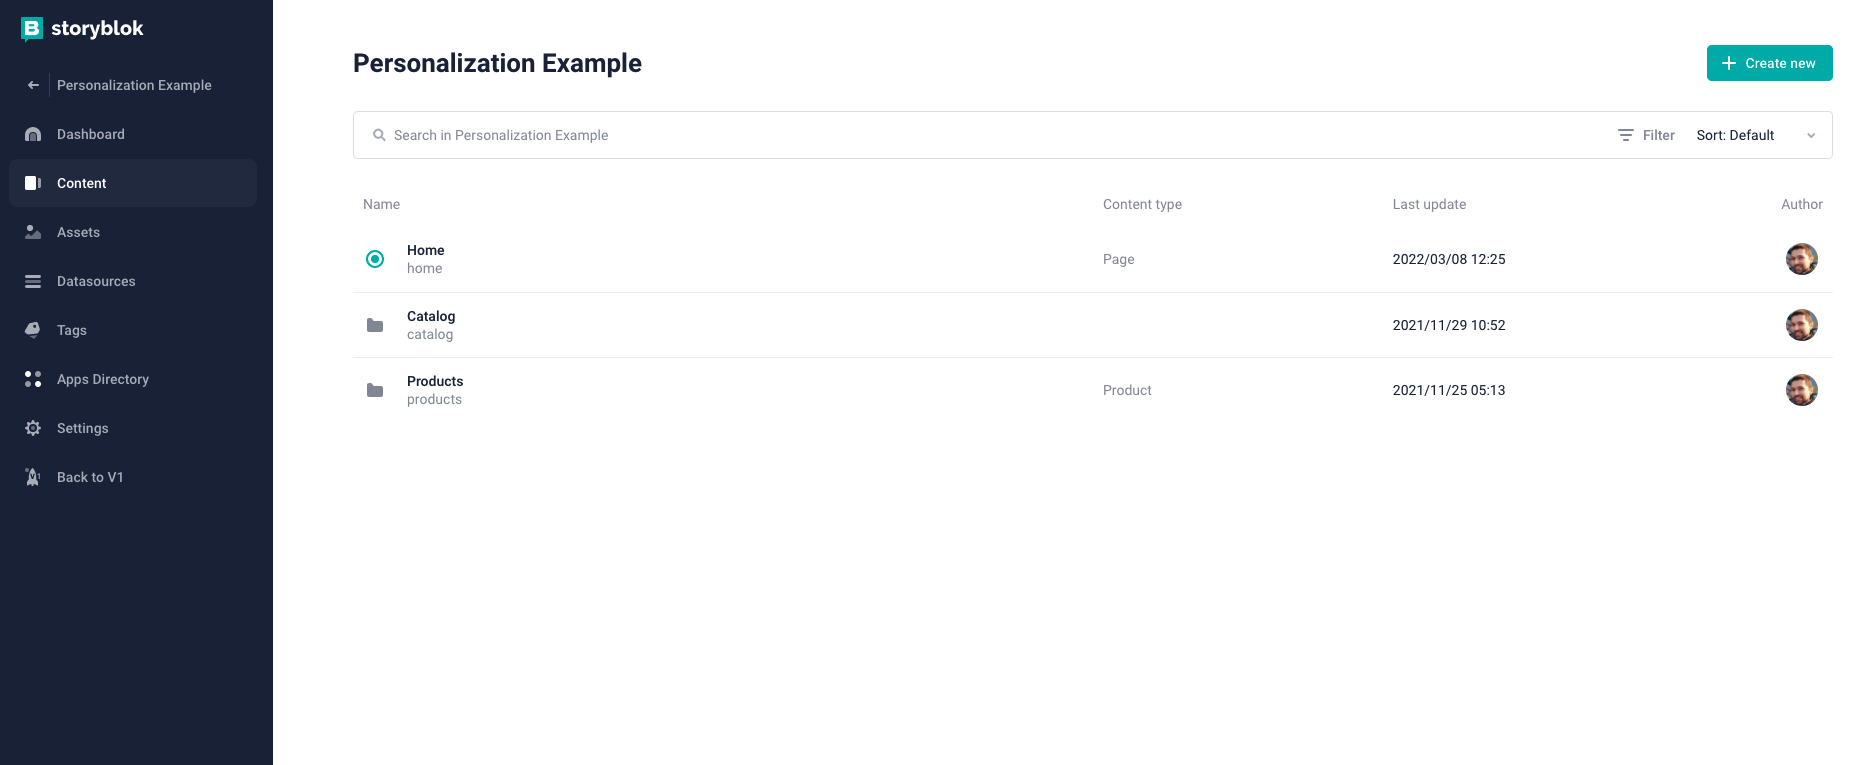
Content structure
The "Products" folder contains the list of stories that represent the products we offer on our website. As these stories don't have a visual representation, we will use the details of each one of them on the Catalog page.
The "Catalog" folder contains three stories for the three different catalog pages we will have: General Catalog, Sportswear, and Elegant. If we inspect each one of these stories we'll see they only contain one block with one field that determines which type of products the page will display. Programmatically, from the frontend, we will retrieve the products and the details depending on the selected "Category" value of each page.
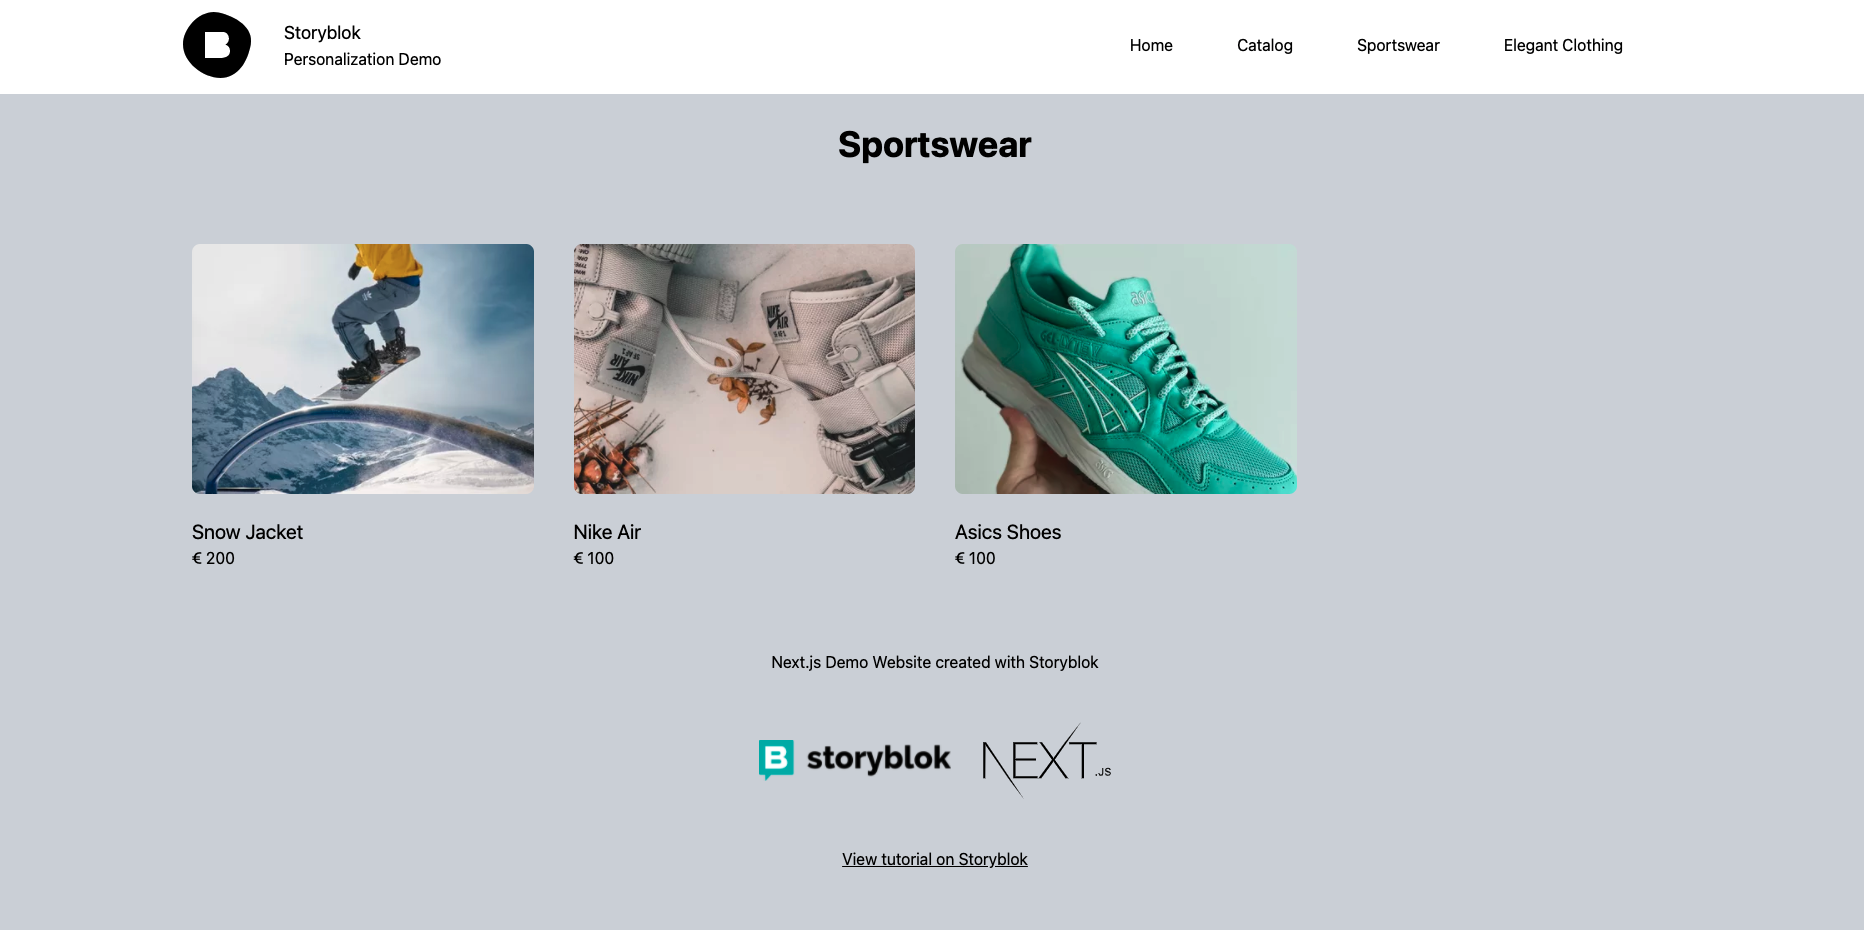
The "Catalog" page
The "Home" story has a RichText block for some general content and the "Personalized Content" block that contains the variants for each one of the scenarios we want to handle in our personalized experience. Inside that block, we have three "Content Variant" components, with a "User Type" property that defines the type of user that will see the content that is added in the "Content" property. So, we can link each one of the "Content Variant" blocks to each scenario/user type that we'll handle in our strategy, linked to the catalog pages that we'll have.
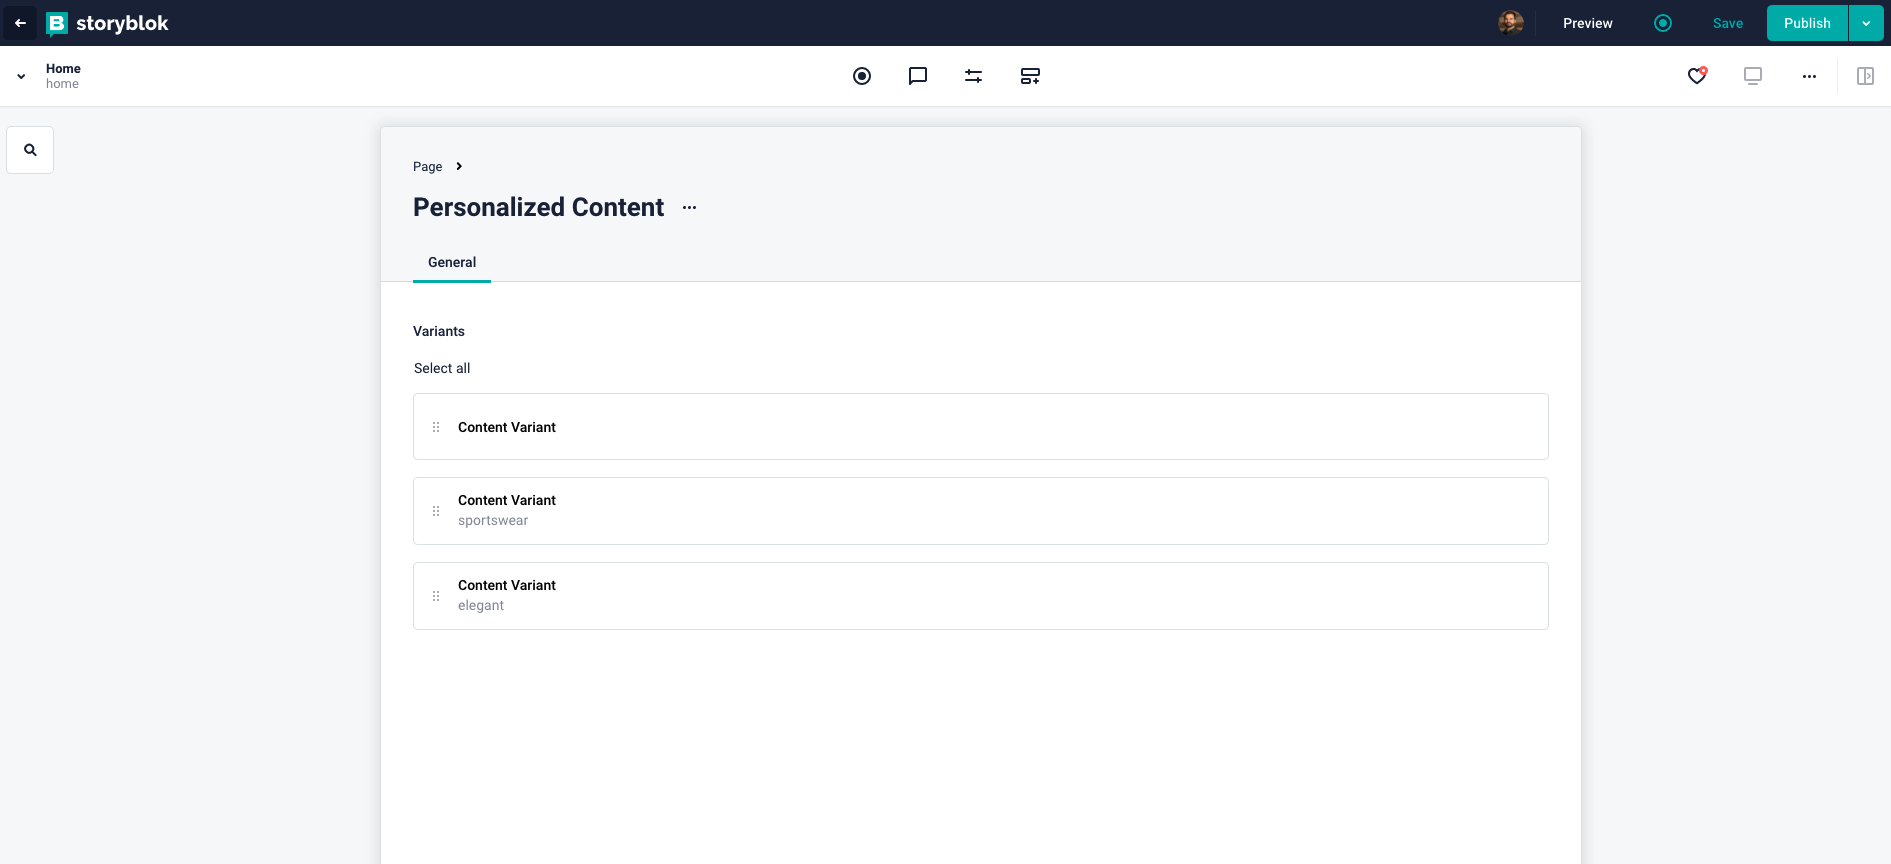
Personalized Content
It's important to keep in mind the structure of the folders/stories, because that's what will define the URLs and the content for the pages on our website.
Generate static pages
As we want to distribute the content as fast and efficiently as possible, we will use Next.js Static Site Generation to pre-generate all the needed pages for our website. As the only variants we need to handle are related to one banner on the home page, we can generate one static version of the page per variant. So, considering the structure of the content inside Storyblok, and all the possible variants we will handle, we need to generate pages that follow this list of URLs:
/→ Home page/catalog→ General catalog/catalog/sportswear→ Sportswear catalog/catalog/elegant→ Elegant catalog/-pers-sportswear→ Home page with the custom banner for Sportswear customers/-pers-elegant→ Home page with the custom banner for Elegant customers
How do we do that? Using another feature from Next.js: Dynamic Routes (opens in a new window). Inside the pages folder, create a file called [[...slug]].js.
...

export default function Page({ story }) {
  const storyData = story ? useStoryblokState(story) : null;

  if (!storyData) {
    return <div>Loading...</div>;
  }

  return (
    <Layout>
      <StoryblokComponent blok={storyData.content} />
    </Layout>
  );
}

...If you want to learn more about the useStoryblokState hook, the StoryblokComponent, how to connect your Next.js application to Storyblok, and configure the Real Time Visual Editor, we recommend you to read our guide about how to Add a headless CMS to Next.js in 5 minutes.
If we go to utils/data/get-static-data.js we can see the code of getStaticProps, the function that retrieves the content for each page from Storyblok and passes it to the function inside the dynamic route.
...

    let slug = params.slug?.join("/") || "/";

    if (typeof (params.slug === "string") && slug != "/") {
      slug = `/${slug}`;
    }

    let user_type = "";
    if (slug.includes("-pers-")) {
      user_type = slug.split("-pers-")[1];
      slug = slug.split("-pers-")[0];
    }
    const story = await storyblokService.getStory(slug);
    const path_data = await storyblokService.getPathSpecificData(slug);

    let props = {
      story,
      key: story?.id,
      settings: {},
      user_type,
      ...path_data,
    };

    return {
      props,
      revalidate: 1000,
    };

...
For each received URL from the list, getStaticProps gets the slug linked to the Storyblok story and, if it applies, the user_type that will be used to load the personalized content. Based on that, it calls two functions from storyblokService. getStory, as the name describes, brings all the content related to the story with the current slug, so we render it to generate the page.
On the other hand, getPathSpecificData will bring the list of product stories, with all the details, so we use it in the Catalog pages, the general and the specific ones.
In the file utils/data/path-data-mapping.js, you can see how the products are retrieved from Storyblok. You can also take a look at components/blocks/Catalog.js to see how the Catalog pages are rendered.
To generate the list of pages that we need to render, the getStaticPaths function from the same file calls storyblokService.getPaths() function from utils/storyblok/service.js.
Let's take a look at the getPaths function from the storyblokService helper:
...

  async getPaths() {
    const stories = await this.storyblokApi.getAll("cdn/links", {
      version: this.version,
    });

    const personalized_stories = await this.storyblokApi.getAll("cdn/stories", {
      version: this.version,
      search_term: "personalized_content",
    });

    const stories_out = [];
    let personalized_stories_out = {};

    stories
      .filter((s) => !s.real_path.includes("products"))
      .forEach((story) => {
        const story_path = story.real_path.replace(/^\//, "");
        const personalized_content = personalized_stories.find(
          (s) => s.uuid === story.uuid
        );
        const variants = [];

        if (personalized_content) {
          personalized_content.content.body
            .filter((block) => block.component === "personalized_content")
            .forEach((block) => {
              block.variants.forEach((v) => {
                if (!variants.includes(v.user_type) && v.user_type != "") {
                  variants.push(v.user_type);
                }
              });
            });
          variants.forEach((v) => {
            stories_out.push({
              params: { slug: `${story_path}-pers-${v}`.split("/") },
            });
          });
          personalized_stories_out[story.real_path] = variants.map(
            (v) => `${story.real_path}-pers-${v}`
          );
        }
        stories_out.push({ params: { slug: story_path.split("/") } });
      });

    fs.writeFileSync(
      "./public/personalized-paths.json",
      JSON.stringify(personalized_stories_out)
    );

    return stories_out;
  }

...
The function is bringing all the stories that are not a product from the Storyblok space. Also, it's bringing all the stories that contain a "Personalized Content" component in their structure (in our example, only the "Home" page meets this condition). getPaths will return the list of slugs retrieved from Storyblok and, for the "personalized" stories, one slug per variant, using the "-pers-[variant]" suffix.
After generating all the static pages for our website, we need to implement the logic that will display the personalized content to the users. To do that, we will use an Edge Function, running in a Middleware.
Configure Middleware
Finally, we need to create the code and logic that we'll use to manage the different user profiles, and delivery the right variant based on that. Based on the first visit to the catalog, we will identify the preferred category for each user, remember it (using cookies), and display the correct "-pers-[variant]" version of the home page.
Inside the pages folder, create a file called _middleware.js. That´s the filename Next.js uses to identify that a file contains Edge Functions that will be executed in a Middleware.
...

export async function middleware(req) {
  let res = NextResponse.next();
  const user_type = req.cookies["user_type"] || "";
  let personalized_paths = [];
  let personalized_data = {};
  let no_cache = false;

  // Fetching the personalized paths data
  try {
    const personalized_data_res = await fetch(
      `${req.nextUrl.origin}/personalized-paths.json`
    );
    personalized_data = await personalized_data_res.json();
    personalized_paths = Object.keys(personalized_data)
      .map((p) => personalized_data[p])
      .flat();
  } catch (e) {
    console.log(e);
  }

  // Special actions in case it's the catalog or a personalized path
  if (req.nextUrl.pathname.includes("catalog")) {
    const catalogs = ["/catalog/sportswear", "/catalog/elegant"];
    if (!req.cookies["user_type"] && catalogs.includes(req.nextUrl.pathname)) {
      res.cookie("user_type", req.nextUrl.pathname.replace("/catalog/", ""));
    } else {
      no_cache = true;
    }
  } else if (user_type) {
    const personalized_path = `${req.nextUrl.pathname}-pers-${user_type}`;
    if (personalized_paths.includes(personalized_path)) {
      res = NextResponse.rewrite(`${req.nextUrl.origin}${personalized_path}`);
    } else {
      no_cache = true;
    }
  } else if (Object.keys(personalized_data).includes(req.nextUrl.pathname)) {
    no_cache = true;
  }

  if (no_cache) {
    res.headers.set("x-middleware-cache", "no-cache");
  }

  return res;
}

...
The middleware uses some functions and objects provided by Next.js (middleware, NextResponse, NextRequest, etc.). Let's focus on the code starting from line 22:
- We evaluate the path of the page requested by the user.
- If the page is one of our three Catalog pages, we verify If user already has a
user_typecookie in the browser, defining the preferred category. If not, it means that it's the first time the user visits a Catalog page, so we define the current category as the favorite one, creating the cookie with its name. - If the user is visiting the Home page, and we already defined the
user_typecookie for the visitor, we load the personalized version of the home page, instead of the generic one.
Keep in mind that the Middleware will intercept all the requests related to the pages inside the folder where the _middleware.js file is. So, if you want to manage multiple Middlewares for different URLs, you will need to create copies of this file in different directories.
And that's it! We have our e-commerce website up and running, and offering a personalized experience to our users.
Wrapping up
In this article, we talked about personalization. We defined the project and mentioned some concepts that we should keep in mind in case we want to offer exclusive experiences to the users of our product. We also presented Edge Functions, and we saw how to create a personalization module in a demo project getting the advantages offered by this new feature of Next.js.
You can now go deeper, and investigate other ways of implementing personalization strategies in your project. We would love to know how you are doing it using Storyblok!
| Resources | Link |
|---|---|
| GitHub demo repository | https://github.com/storyblok/nextjs-personalization-demo |
| Next.js docs | https://nextjs.org/docs |
| Storyblok Next.js Technology Hub | https://storyblok.com/tc/nextjs |
| Vercel Edge Functions | https://vercel.com/features/edge-functions |
| Storyblok React SDK | https://github.com/storyblok/storyblok-react |
