How to Create a Custom App for Storyblok with Nuxt.js and Oauth2
Storyblok is the first headless CMS that works for developers & marketers alike.
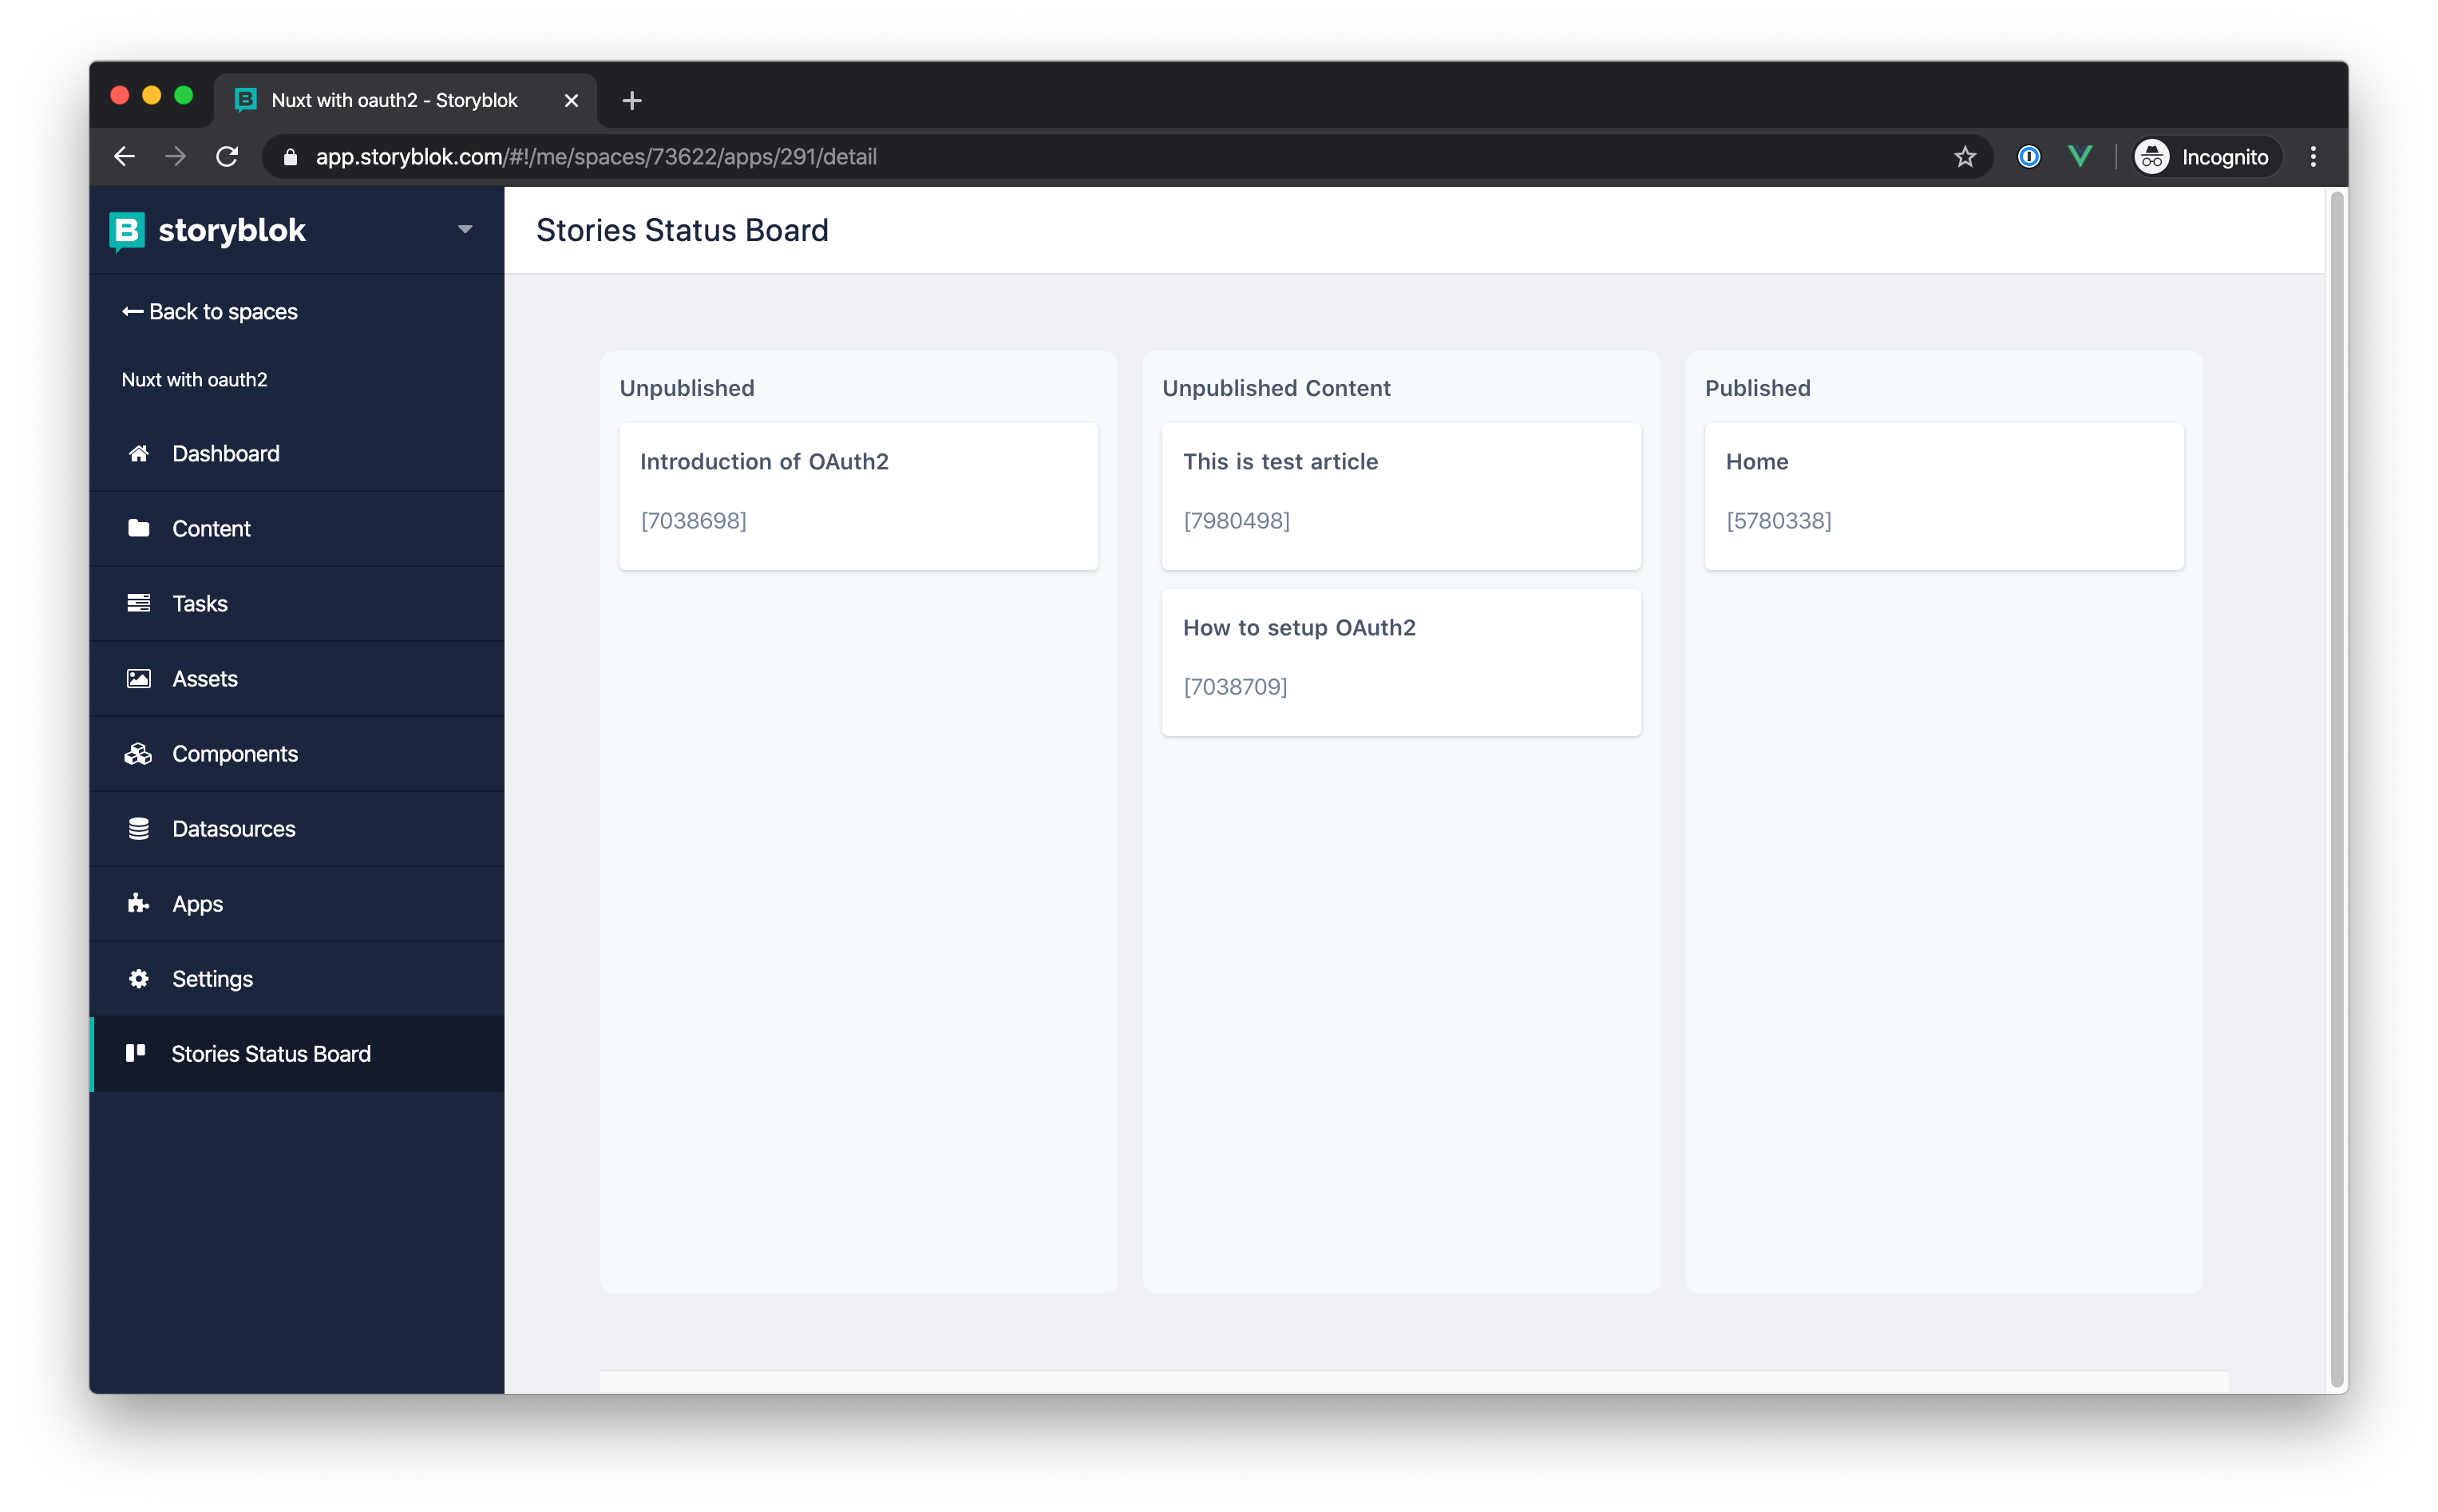
In this guide we explain how to create a custom application in the context of a Storyblok app using the Nuxt.js framework. Together, we will create a simple board that shows the status of stories in our space. Storyblok users can reach this board from the left action panel.
Requirements
- Basic knowledge of Vue.js & Nuxt.js
- Basic knowledge of TailwindCSS
- Be part of the Storyblok partner program
Setup
First, you need to create a new app in Storyblok and also create a single page application with Nuxt.js.
Creating an App in Storyblok
If you haven't already, you must join the Storyblok partner program (click here for more info). You should see Apps in the left action panel. Open the apps section and create a new app. You will land on the following screen where you can select Sidebar as the type of the app.
For now, fill only the name and slug of your application.

Create Nuxt.js App
Create a new Nuxt.js project using the create-nuxt-app package and choose one of the following setups:
- SPA mode
- Include TailwindCSS
- Include dotenv
Test your Nuxt.js application and make sure it is all working correctly.
Connect Nuxt.js App with Storyblok App
To connect and authenticate your Nuxt.js app with Storyblok, install the @storyblok/nuxt-auth module into Nuxt.js.
yarn add @storyblok/nuxt-authIf you checked the documentation of the @storyblok/nuxt-auth, you know we have to provide 3 environment variables. We highly recommend providing them using the dotenv file.
The modules array in nuxt.config.js should look like this. Don't forget to require the dotenv module require('dotenv').config() at the top.
modules: [
    // Doc: https://axios.nuxtjs.org/usage
    '@nuxtjs/axios',
    // Doc: https://github.com/nuxt-community/dotenv-module
    '@nuxtjs/dotenv',
    [
      '@storyblok/nuxt-auth',
      {
        id: process.env.CONFIDENTIAL_CLIENT_ID,
        secret: process.env.CONFIDENTIAL_CLIENT_SECRET,
        redirect_uri: process.env.CONFIDENTIAL_CLIENT_REDIRECT_URI,
        debug: true
      }
    ]
  ],
Your .env file should look like this.
BASE_URL=http://localhost:3000
CONFIDENTIAL_CLIENT_ID="copy from Storyblok"
CONFIDENTIAL_CLIENT_SECRET="copy from Storyblok"
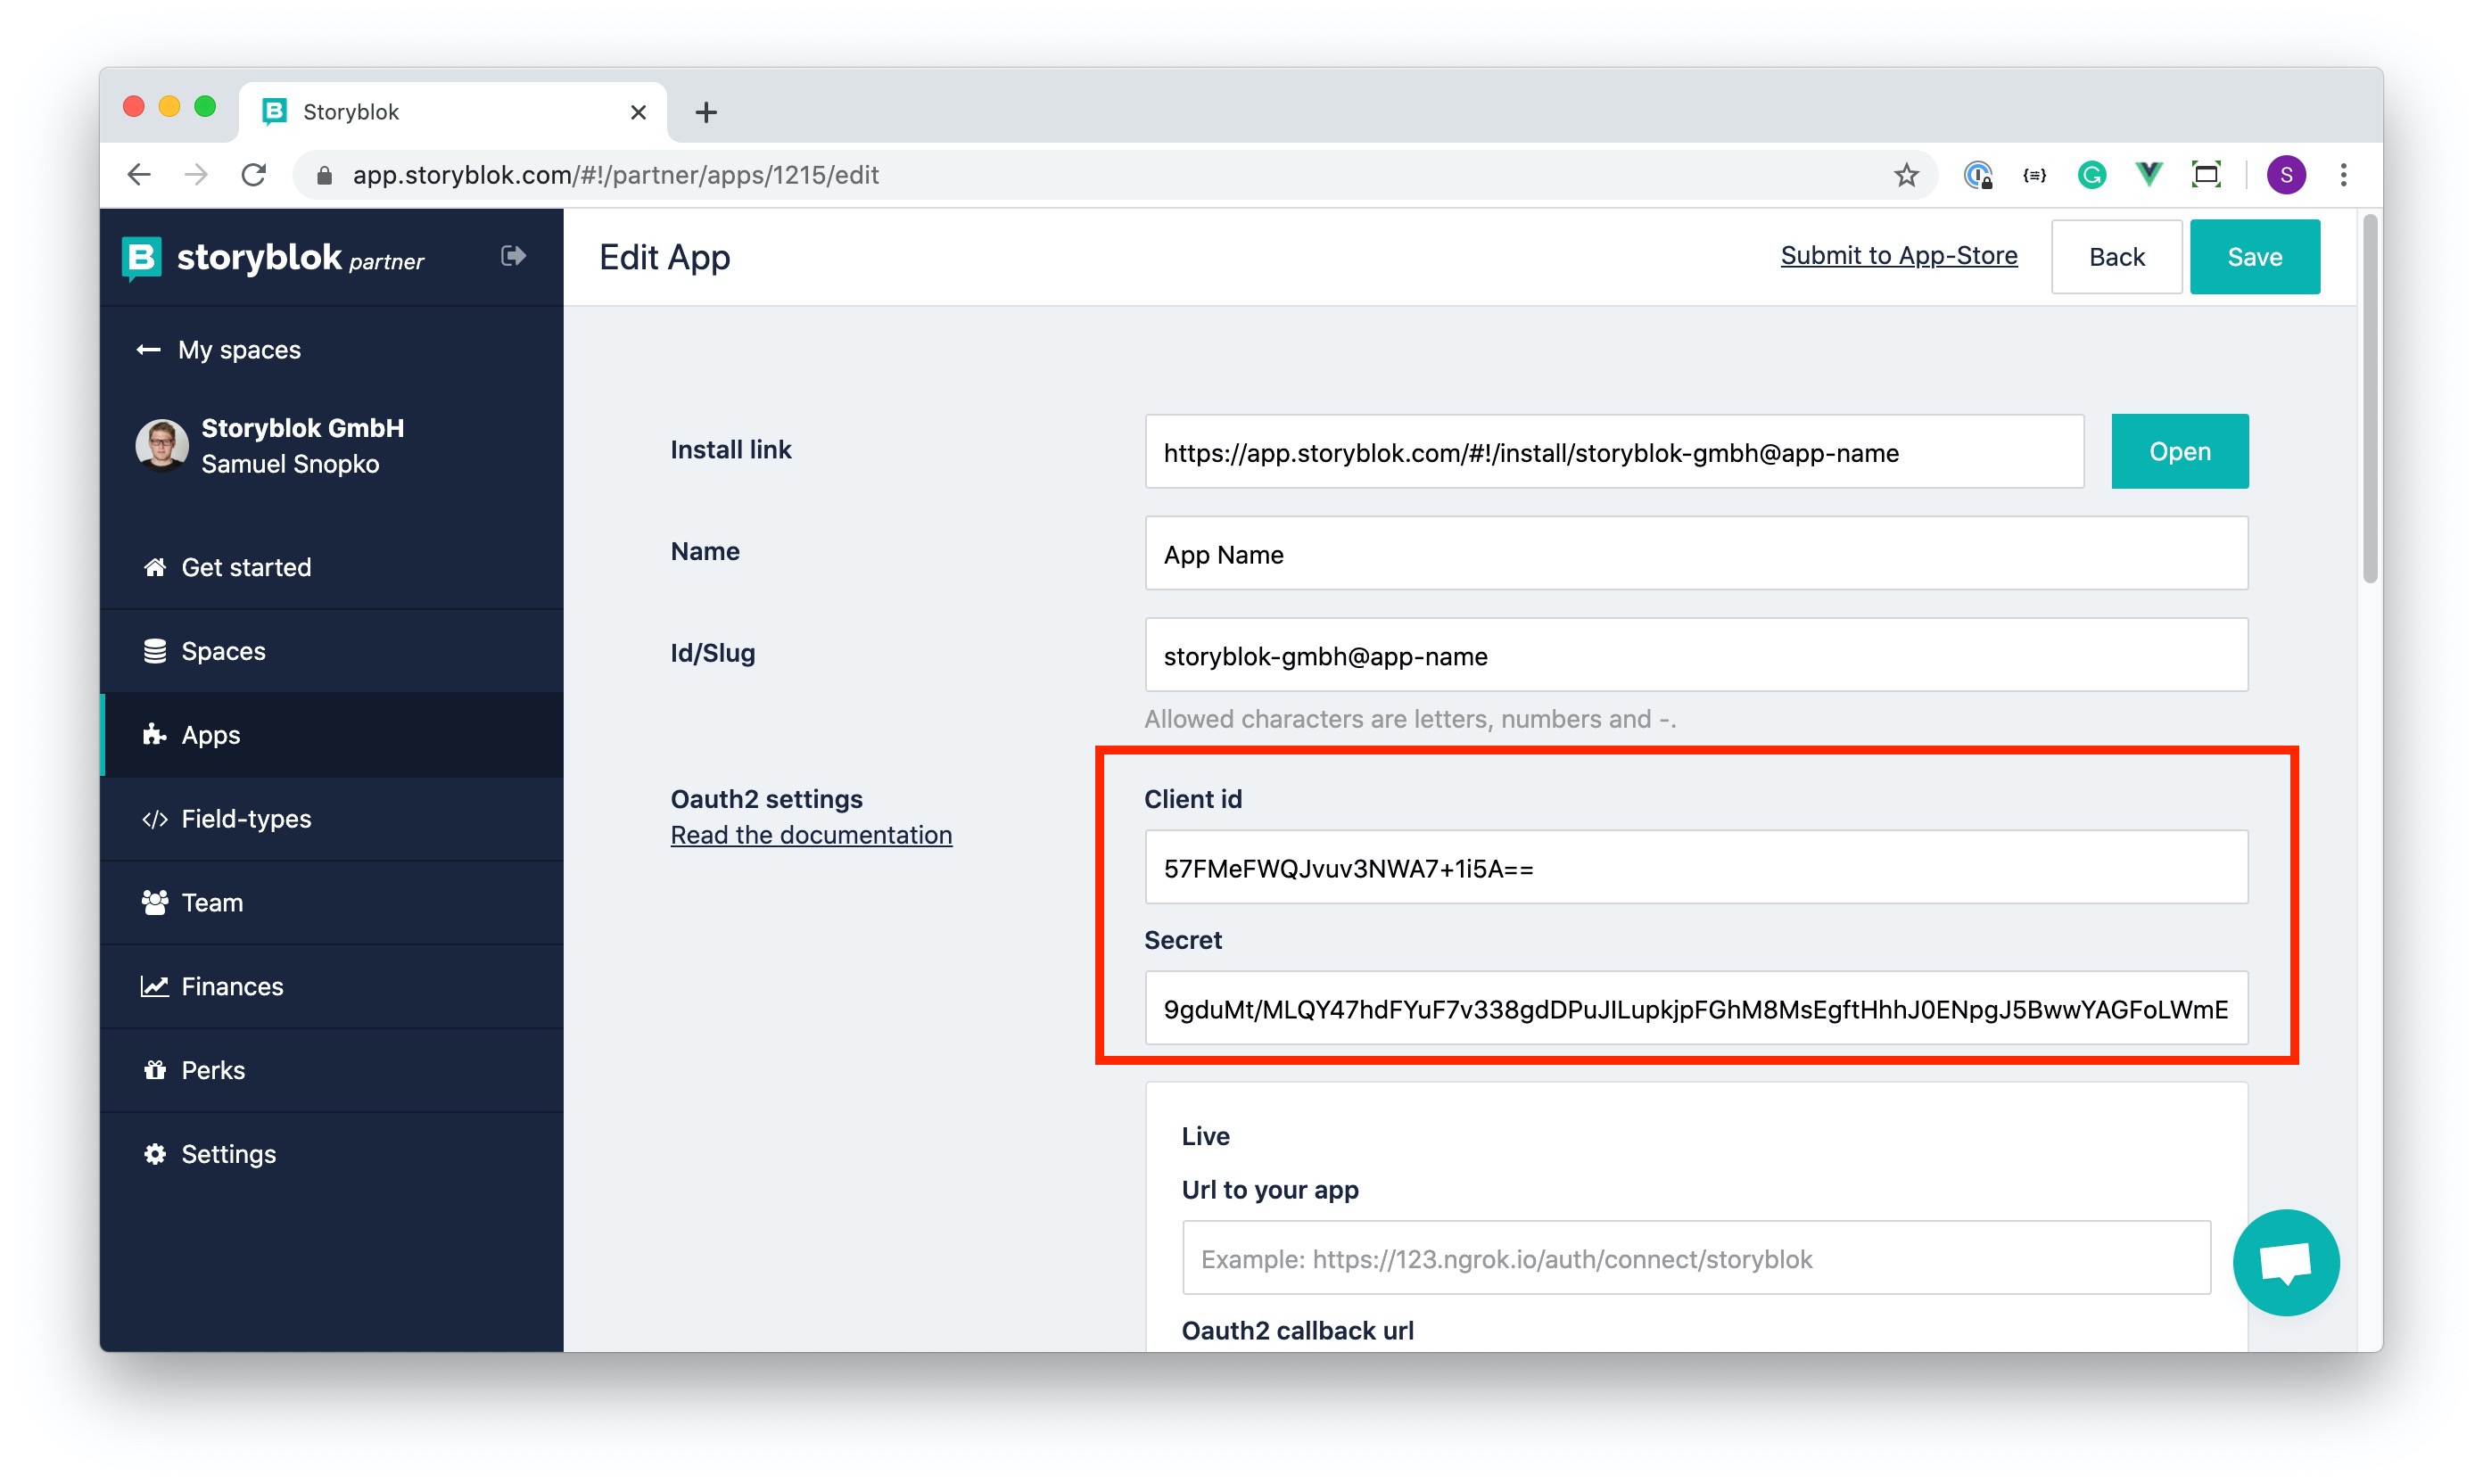
CONFIDENTIAL_CLIENT_REDIRECT_URI="{ngrok url}/auth/callback"Now fill inCONFIDENTIAL_CLIENT_ID and CONFIDENTIAL_CLIENT_SECRET. To get these values, go to the Apps section of the partner portal and open up your recently created app. Copy Client id and Secret values and paste them into the .env file for CONFIDENTIAL_CLIENT_ID and CONFIDENTIAL_CLIENT_SECRET.
Create NGROK Tunnel for Development
We are still missing the CONFIDENTIAL_CLIENT_REDIRECT_URI, which we will get using the NGROK service. If you are unfamiliar with this service, it creates a tunnel to your localhost and provides public URLs, which we can use in Storyblok.
Download and setup NGROK following their documentation. Then start your Nuxt.js application and create a tunnel using NGROK.
yarn dev // starts nuxt in dev mode on localhost:3000In the root folder start the NGROK service.
ngrok http 3000If NGROK starts successfully you should output like this.
ngrok by @inconshreveable                                                                  (Ctrl+C to quit)

Session Status                online
Account                       Samuel Snopko (Plan: Free)
Version                       2.3.35
Region                        United States (us)
Web Interface                 http://127.0.0.1:4040
Forwarding                    http://30ff0773.ngrok.io -> http://localhost:3000
Forwarding                    https://30ff0773.ngrok.io -> http://localhost:3000
You can see that https://30ff0773.ngrok.io points to http://localhost:3000. Your URL will look different, NGROK creates new URLs every time.
Paste the NGROK URL into CONFIDENTIAL_CLIENT_REDIRECT_URI according to the pattern: {ngrok https url}/auth/callback. Your .env file should look like this:
BASE_URL=http://localhost:3000
CONFIDENTIAL_CLIENT_ID="asdfgqwers=="
CONFIDENTIAL_CLIENT_SECRET="1fsfasgasgagvaf14fdfgas4fgPYRx24gFQtPw=="
CONFIDENTIAL_CLIENT_REDIRECT_URI="https://30ff0773.ngrok.io/auth/callback"
Show Your App in the Storyblok Sidebar
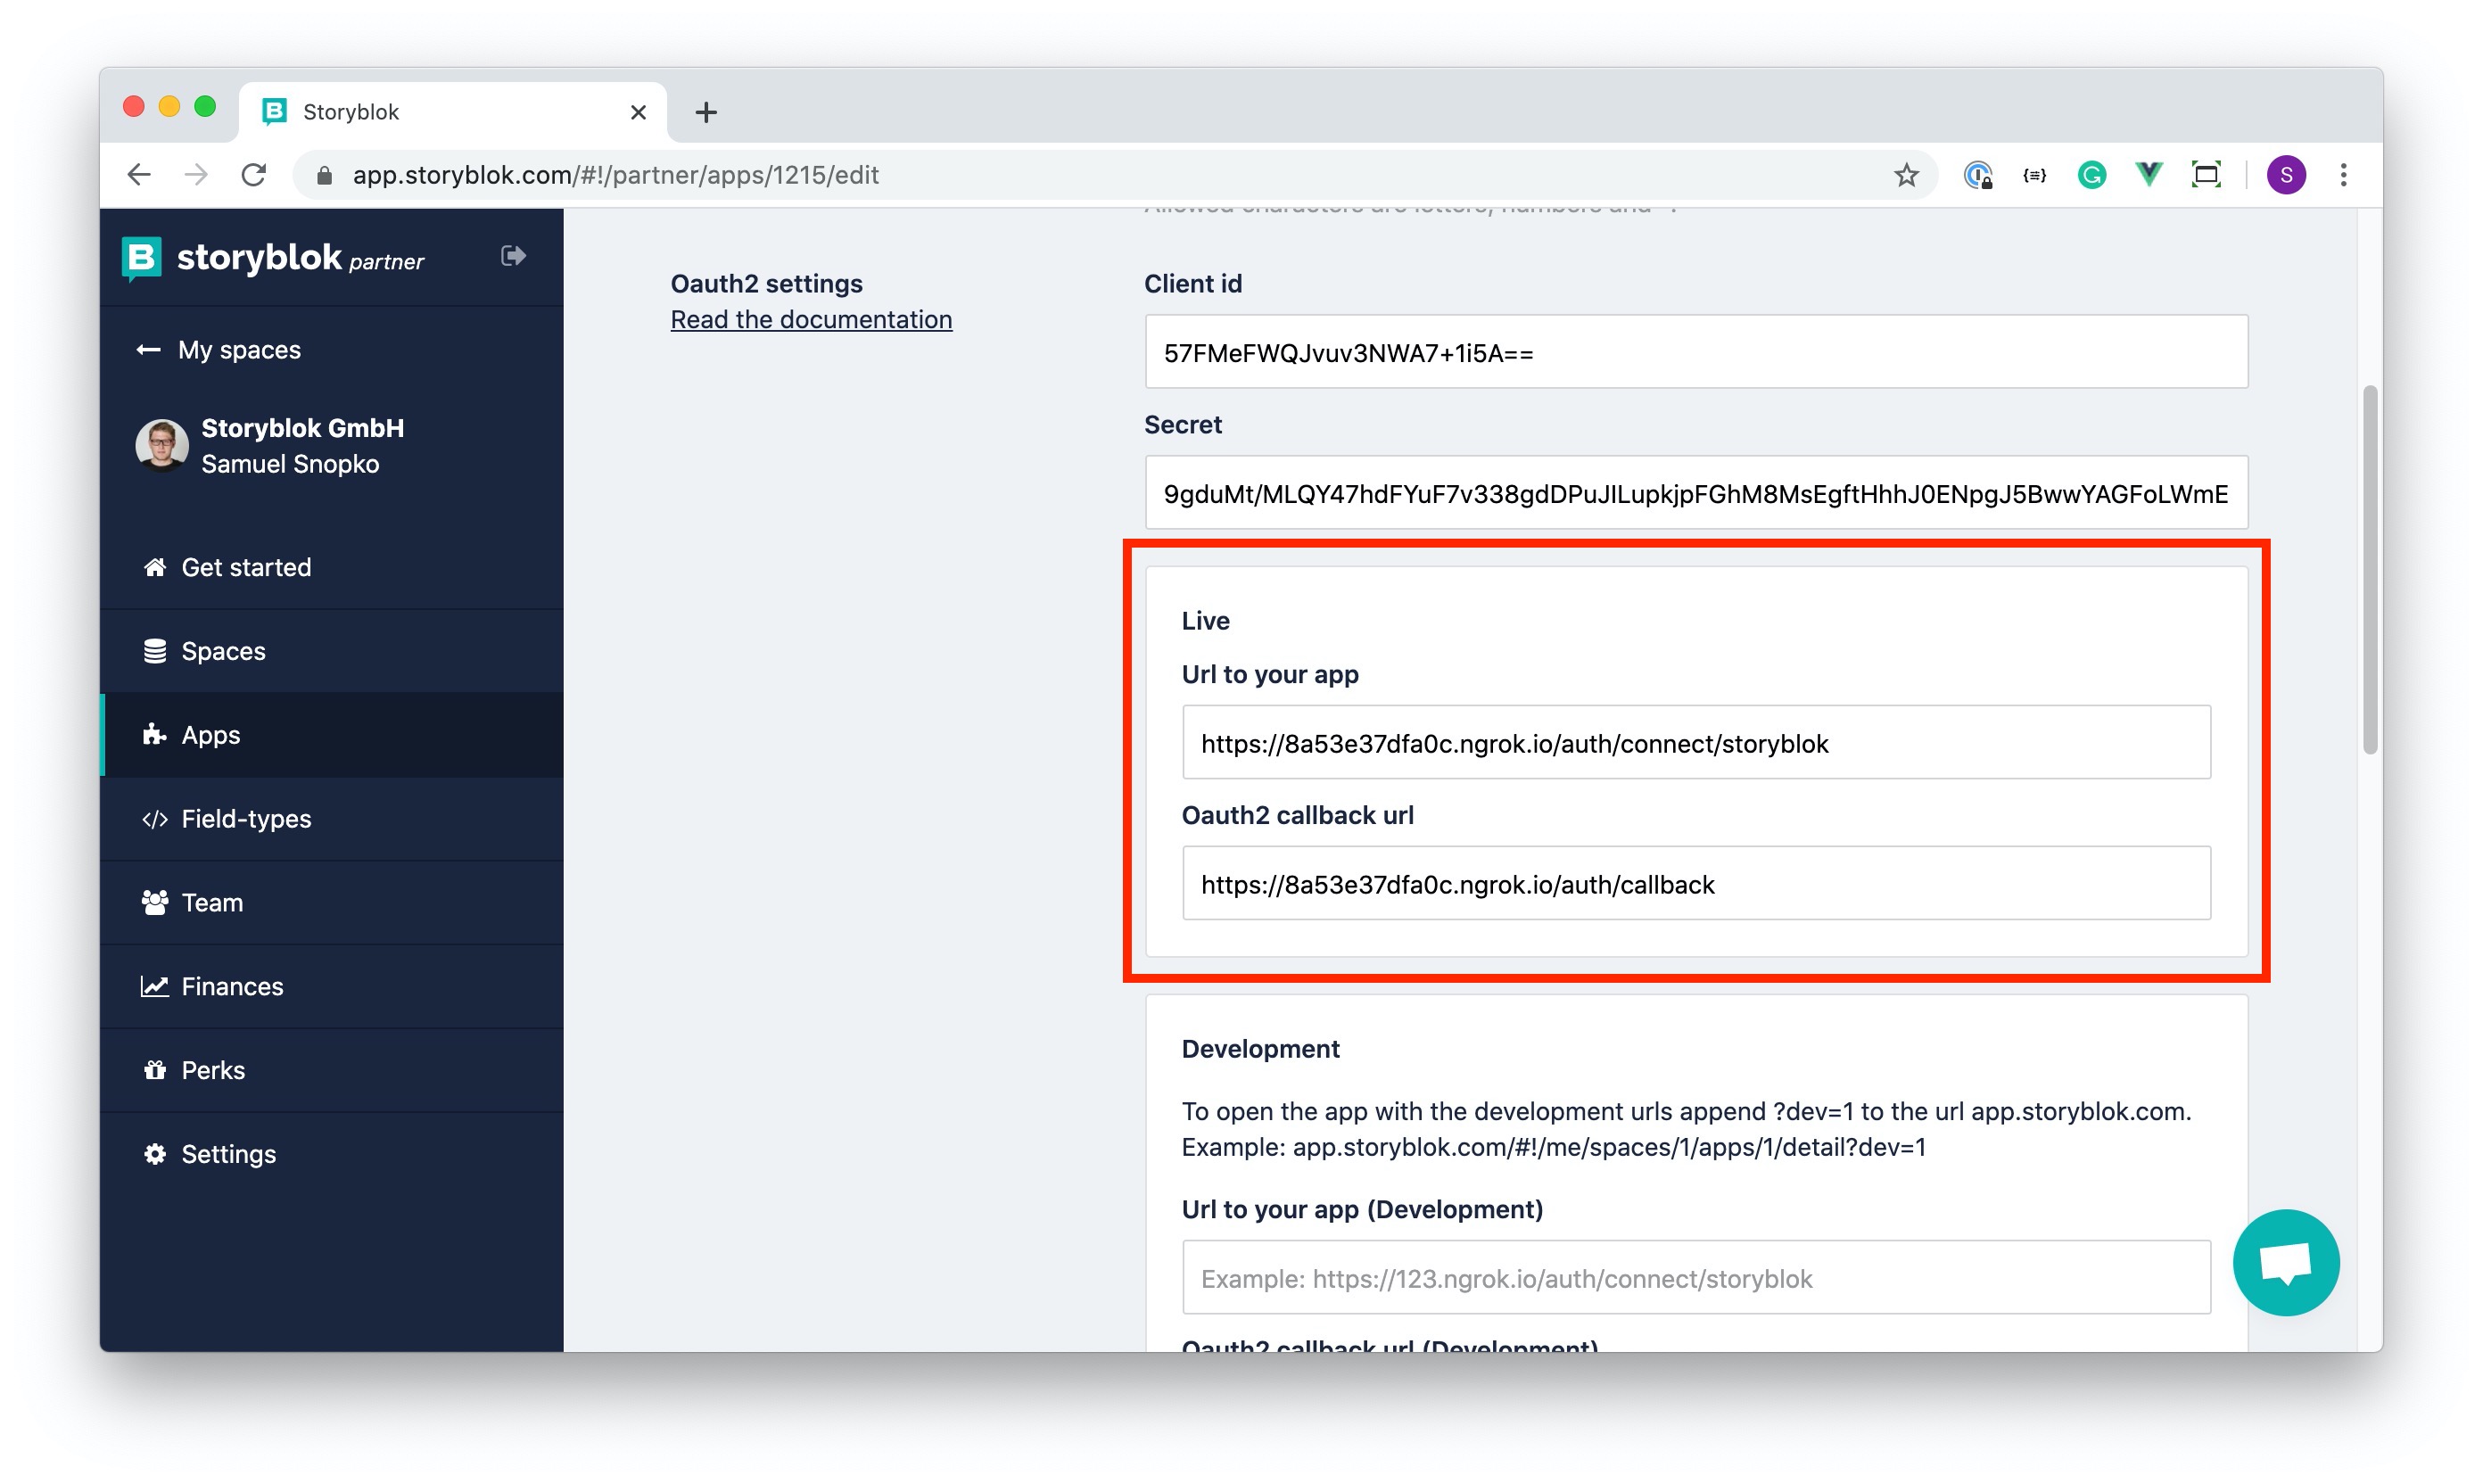
We want to show our Nuxt.js project as a sidebar app in Storyblok. In the app settings screen, fill in Url to your app and Oauth2 callback URL of the live environment. Just follow this pattern {ngrok https url}/auth/connect/storyblok and {ngrok https url}/auth/callback and fill in the fields. If you have an SVG icon right now, you can provide it, but it is not necessary for this example.
IMPORTANT
If you restart the NGROK service, you must refresh all NGROK URLs in .env file and in the app settings in Storyblok.
Install Custom App in Storyblok Space
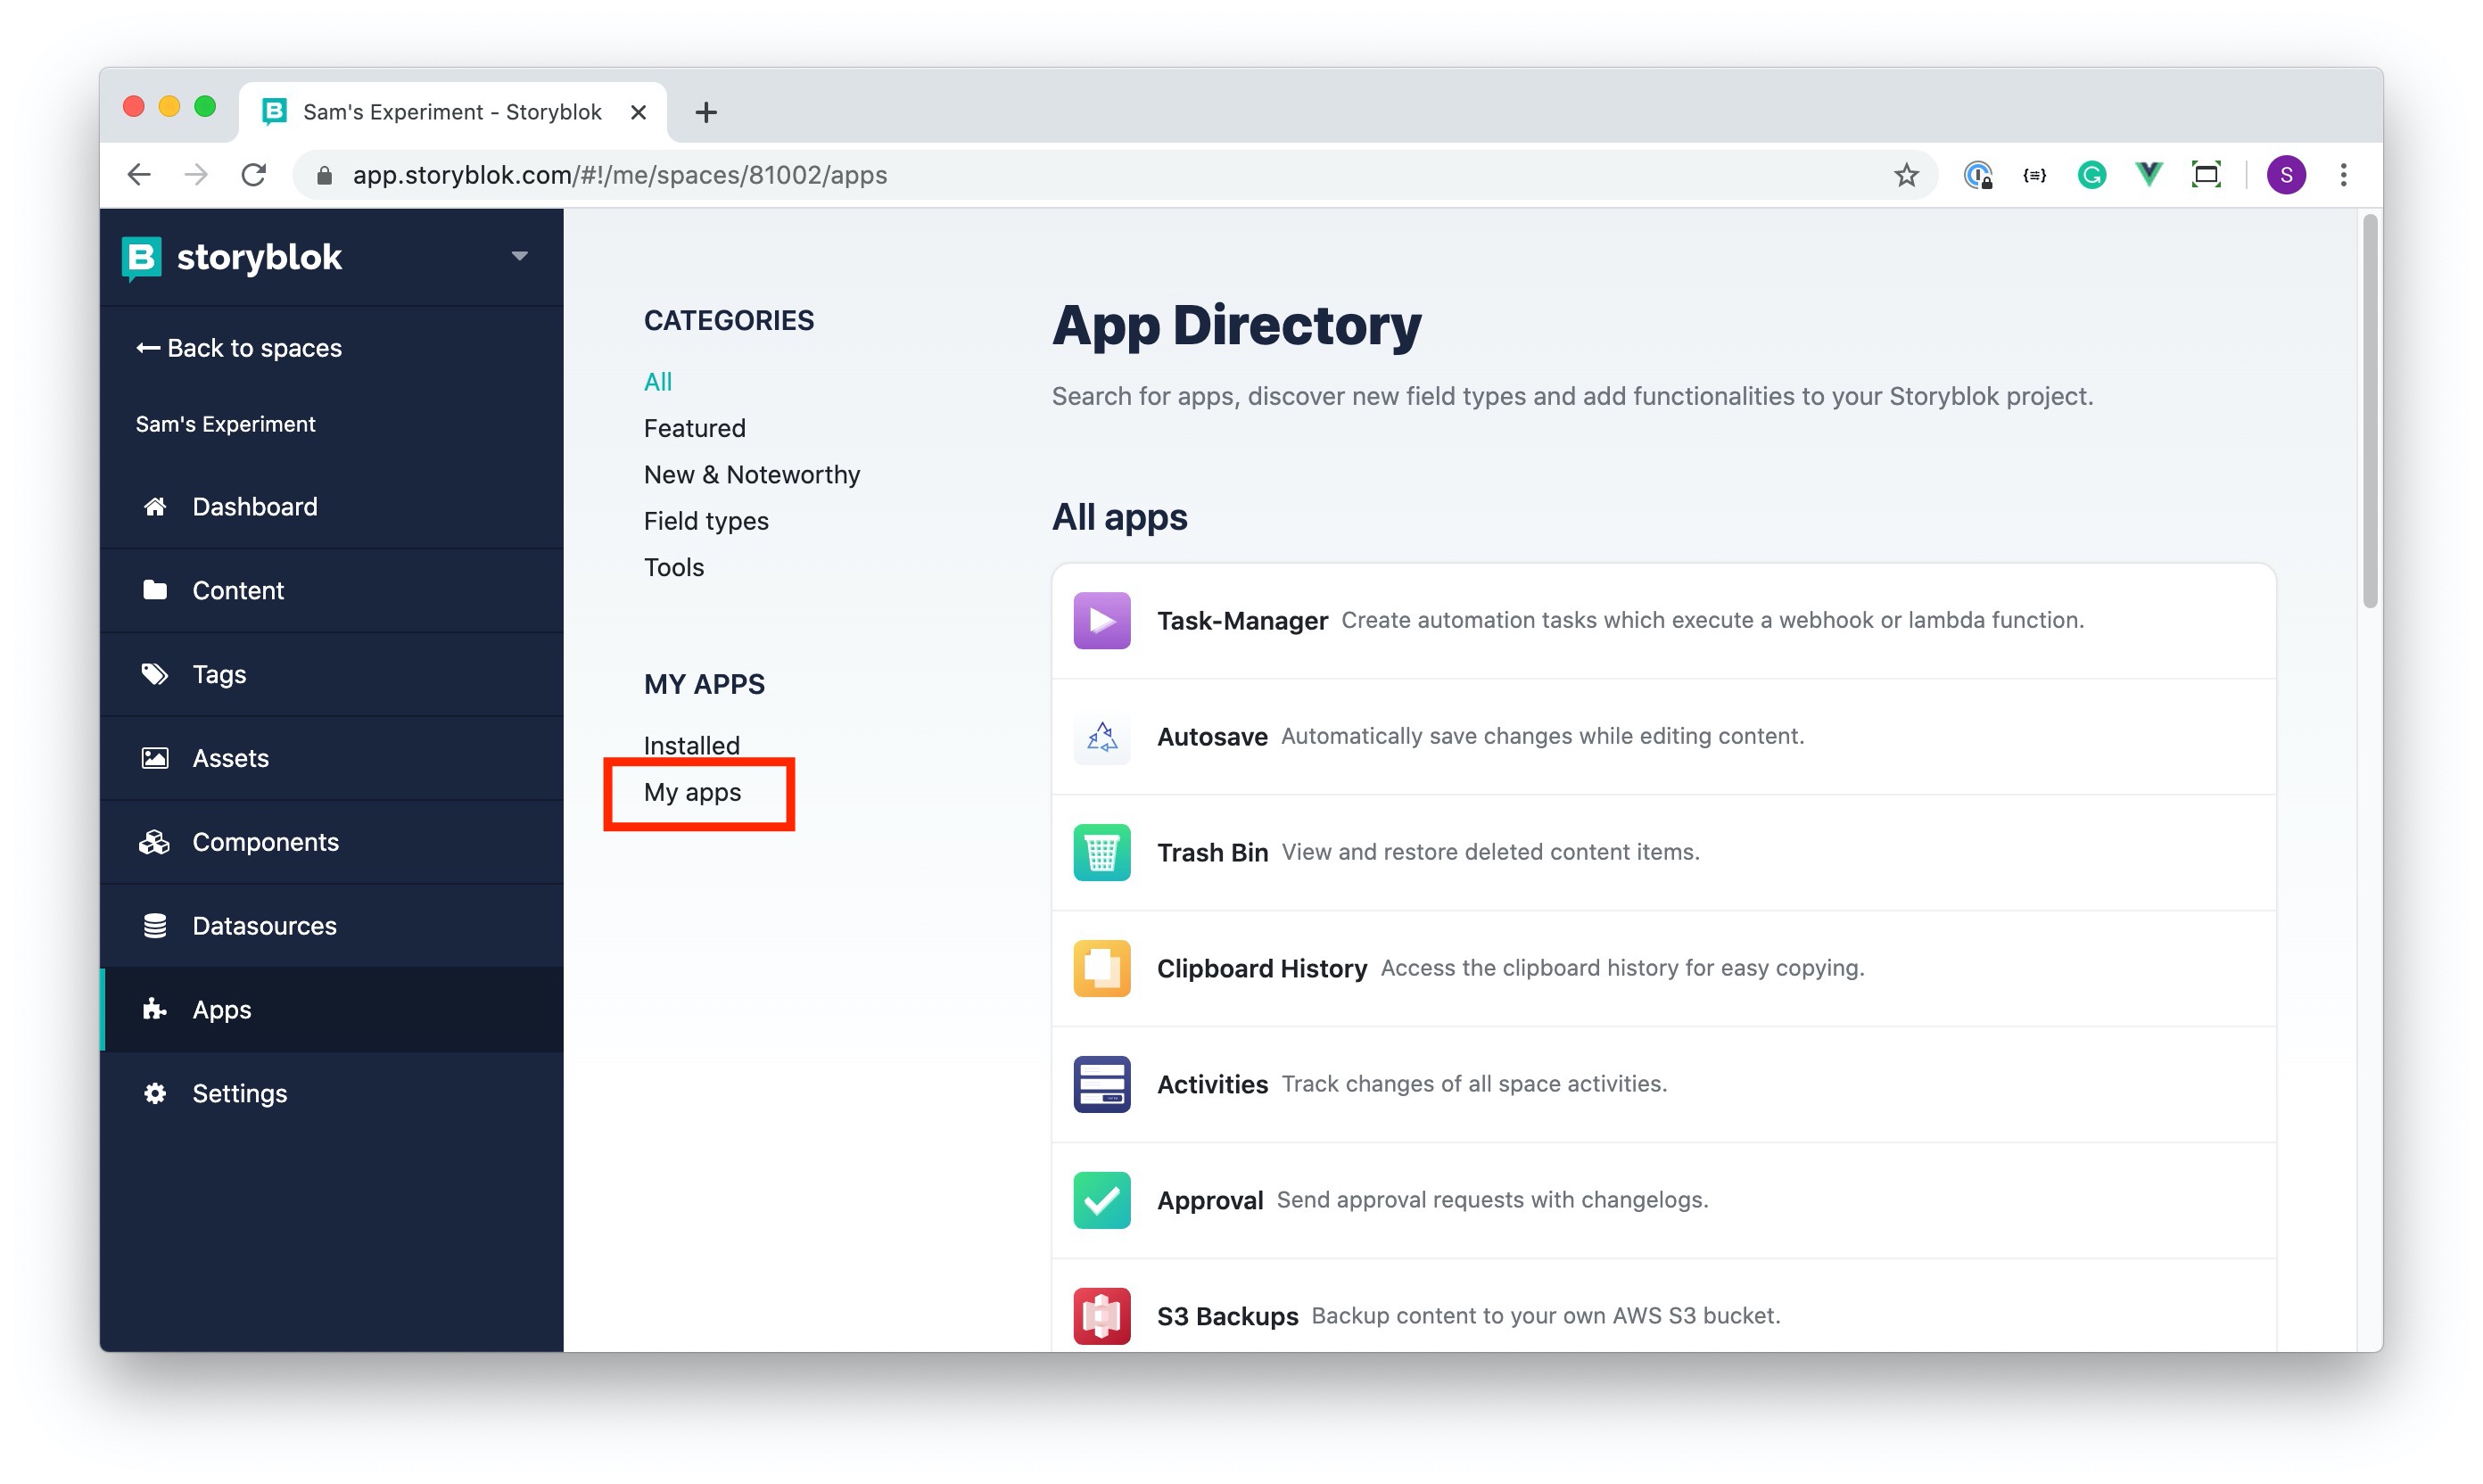
You can install your app like any other app in one of your spaces in Storyblok. Open the App Directory in your space and change the filter to show your custom apps. Open the details of your app and hit the install button.
Create a Simple App
At this point you should have the Nuxt.js app and the NGROK tunnel running and connected to the Storyblok app. Next we need to get some data and create a simple board. Replace your pages/index.vue with the following code:
<template>
  <div>
    <!-- <div>
      {{ stories }}
    </div> -->
    <div class="flex justify-center">
      <div class="min-h-screen flex overflow-x-scroll py-12">
        <div
          v-for="column in columns"
          :key="column.title"
          class="bg-gray-100 rounded-lg px-3 py-3 column-width rounded mr-4"
        >
          <p class="text-gray-700 font-semibold font-sans tracking-wide text-sm">{{column.title}}</p>
          <story-card
            v-for="(story) in column.stories"
            :key="story.id"
            :story="story"
            class="mt-3"
          />
        </div>
      </div>
    </div>
  </div>
</template>

<script>
import StoryCard from "~/components/StoryCard.vue";
import axios from 'axios'

export default {
  components: {
    StoryCard
  },
  data() {
    return {
      story: {},
      stories: [],
      columns: [
        {
          title: "Unpublished",
          stories: []
        },
        {
          title: "Unpublished Content",
          stories: []
        },
        {
          title: "Published",
          stories: []
        }
      ]
    }
  },
  mounted() {
    if (window.top == window.self) {
      window.location.assign('https://app.storyblok.com/oauth/app_redirect')
    } else {
      this.loadStories()
    }
  },
  methods: {
    loadStories() {
      axios.get(`/auth/explore/spaces/${this.$route.query.space_id}/stories`)
        .then((res) => {
          this.stories = res.data.stories

          for (const story of res.data.stories) {
            const compStory = {
              title: story.name,
              published: story.published,
              unpublished_changes: story.unpublished_changes,
              id: story.id
            }
            if (compStory.published) {
              this.columns[0].stories.push(compStory)
            } else if (compStory.unpublished_changes) {
              this.columns[1].stories.push(compStory)
            } else {
              this.columns[2].stories.push(compStory)
            }
          }
        })
    },
    loadStory() {
      axios.get(`/auth/explore/spaces/${this.$route.query.space_id}/stories/7038709`)
        .then((res) => {
          this.story = res.data.story
        })
    }
  }
}
</script>

<style>
.container {
  margin: 0 auto;
  min-height: 100vh;
  display: flex;
  justify-content: center;
  align-items: center;
  text-align: center;
}

.title {
  font-family: 'Quicksand', 'Source Sans Pro', -apple-system, BlinkMacSystemFont,
    'Segoe UI', Roboto, 'Helvetica Neue', Arial, sans-serif;
  display: block;
  font-weight: 300;
  font-size: 100px;
  color: #35495e;
  letter-spacing: 1px;
}

.subtitle {
  font-weight: 300;
  font-size: 42px;
  color: #526488;
  word-spacing: 5px;
  padding-bottom: 15px;
}

.links {
  padding-top: 15px;
}
</style>
Create a components/StoryCard.vue file:
<template>
  <div class="bg-white shadow rounded px-3 pt-3 pb-5 border border-white" style="min-width: 300px;">
    <div class="flex justify-between">
      <p class="text-gray-700 font-semibold font-sans tracking-wide text-sm">{{story.title}}</p>
    </div>
    <div class="flex mt-4 justify-between items-center">
      <span class="text-sm text-gray-600">[{{story.id}}]</span>
    </div>
  </div>
</template>

<script>
export default {
  props: {
    story: {
      type: Object,
      default: () => ({})
    }
  }
};
</script>
Then navigate to the space where you installed your app. If you click on it in the sidebar you will be redirected to the authentification screen.

At first it will take some time to load your app through the NGROK tunnel, but future changes in Nuxt.js will be much faster. Finally, you should see a screen similar to this one. If you didn't previously create any other content, you will see only one story Home on the board. You can do it now!

Conclusion
This guide showcased an example of creating custom apps in Storyblok. Using these techniques you can create your own apps and host them for authenticated users using technologies you're most comfortable with. This opens the door for you to create custom apps and features to solve your users' problems. Using our Management API you are better able to handle the content of your space.
Next step
If you are interesting in creating your own custom Nuxt.js app, you should check the Storyblok's Nuxt-Auth module out and try out our Workflow App example (fully draggable board) built with this technology stack.
| Topic | Link |
|---|---|
| Basic documentation of the authentication | https://www.storyblok.com/docs/authentication-apps |
| Storyblok Nuxt-Auth Module | https://www.npmjs.com/package/@storyblok/nuxt-auth |
| Repo of the Workflow App Example | https://github.com/storyblok/storyblok-workflow-app |
| Partner Progam Information | https://www.storyblok.com/partners |
