How to Build a Serverless Custom App with Netlify
Storyblok is the first headless CMS that works for developers & marketers alike.
Storyblok allows you to build custom applications or tools that enhance your editor with your custom functionality. For these custom applications to have access to your Storyblok content and to be able to change content with the Management API, we will first need to authenticate the application with an OAuth flow. You can do that with your own server, for example with frameworks like Express, Koa, Hapi, or Fastify, but there is also the option to do it without a server by making use of serverless functions. This allows you to deploy the application statically and authenticate the application with Storyblok through the serverless function. This tutorial will focus on how to use serverless functions to handle OAuth login flows for your Storyblok application. To enable sessions the tutorial uses the Supabase (opens in a new window) database to store the OAuth session information across serverless functions. For the OAuth flow, the Grant (opens in a new window) library with its AWS handler (opens in a new window) is used to simplify the OAuth process.
Since this tutorial uses the grant library for the OAuth flow, it requires cookies to be accessible in iframes. This is a problem in Safari since they started blocking third-party cookies this year. In order for the app to be functional in Safari, the Website Tracking setting in Safari must be enabled.
You can take a look at the code for the end result of this tutorial in the Github repository: serverless-custom-app-starter/tree/netlify
Creating a new Storyblok App
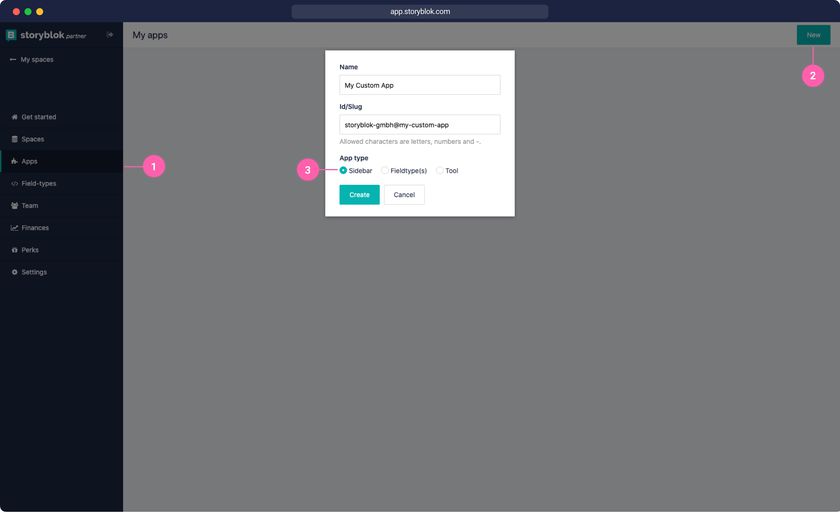
To create a new custom application you need to be signed up as a Partner. Head into the partner portal and click on Apps {1} and then click the New button {2}. As App type select Sidebar {3} and click Create {4}.
To get started we will clone the workflow app starter template: github.com/storyblok/storyblok-workflow-app. This is a basic Nuxt application that will show our logged in Storyblok user and workflow stages.
$ git clone https://github.com/storyblok/storyblok-workflow-app my-auth-app
$ cd my-auth-app
$ npm install
Let's also already install all the dependencies necessary for this tutorial
$ npm install --save
  @supabase/supabase-js
  qs
  axios
  lodash
  grant
  crypto-js
  uuid
  storyblok-js-client
Since our OAuth flow will be handled through serverless functions we can remove the @storyblok/nuxt-auth module in the nuxt.config.js file.
Creating a Serverless Function
To authenticate our application, we will need a serverless function that handles the OAuth authentication. You can create such functions on different providers like Vercel, Netlify, AWS Lambda, Azure Function, or Google Cloud Functions. We will choose Netlify for this tutorial, but any other provider should work similarly.
To create serverless functions with Netlify, we have to create an api folder in our project root. You can also call it differently, but in order for Netlify to deploy it as a serverless function, we need to set the folder inside the Netlify settings.
Open the Netlify app and either create a new site from a Github repository or use the Netlify CLI to deploy your local project. If you choose the manual local deploy the CLI will guide you through creating a new project.
# install CLI
npm install netlify-cli -g
# deploy inside of project folder
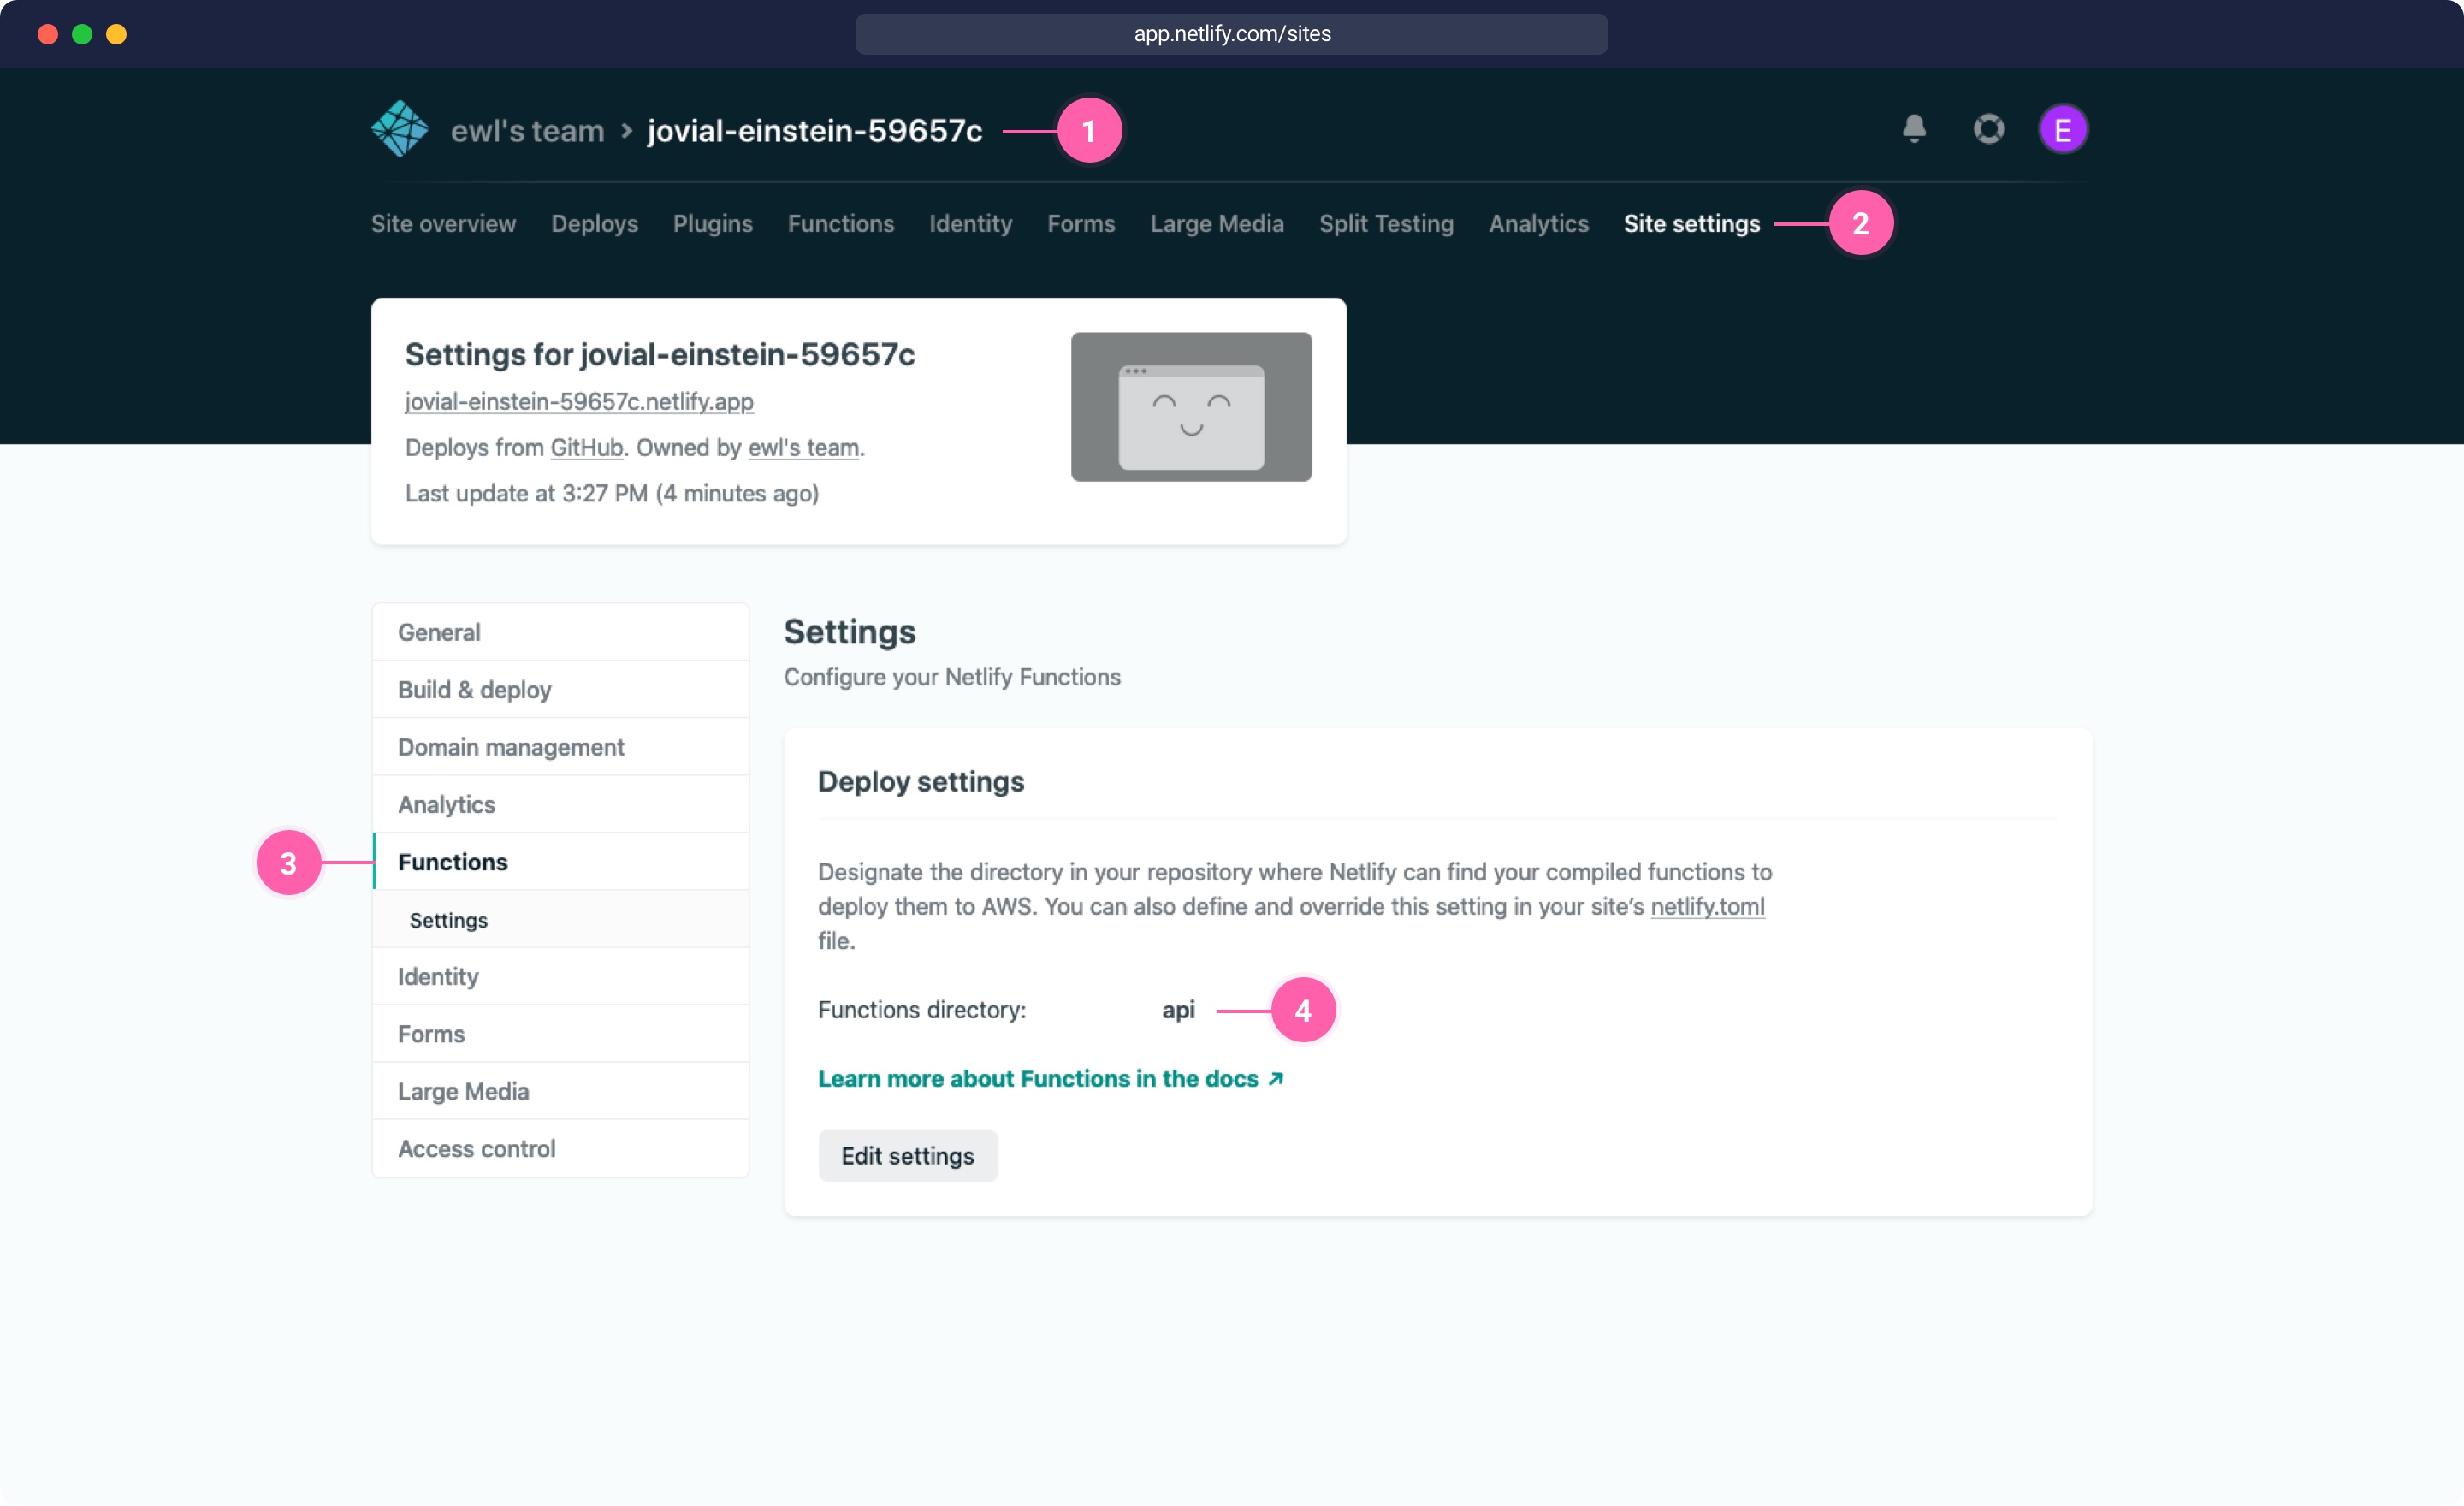
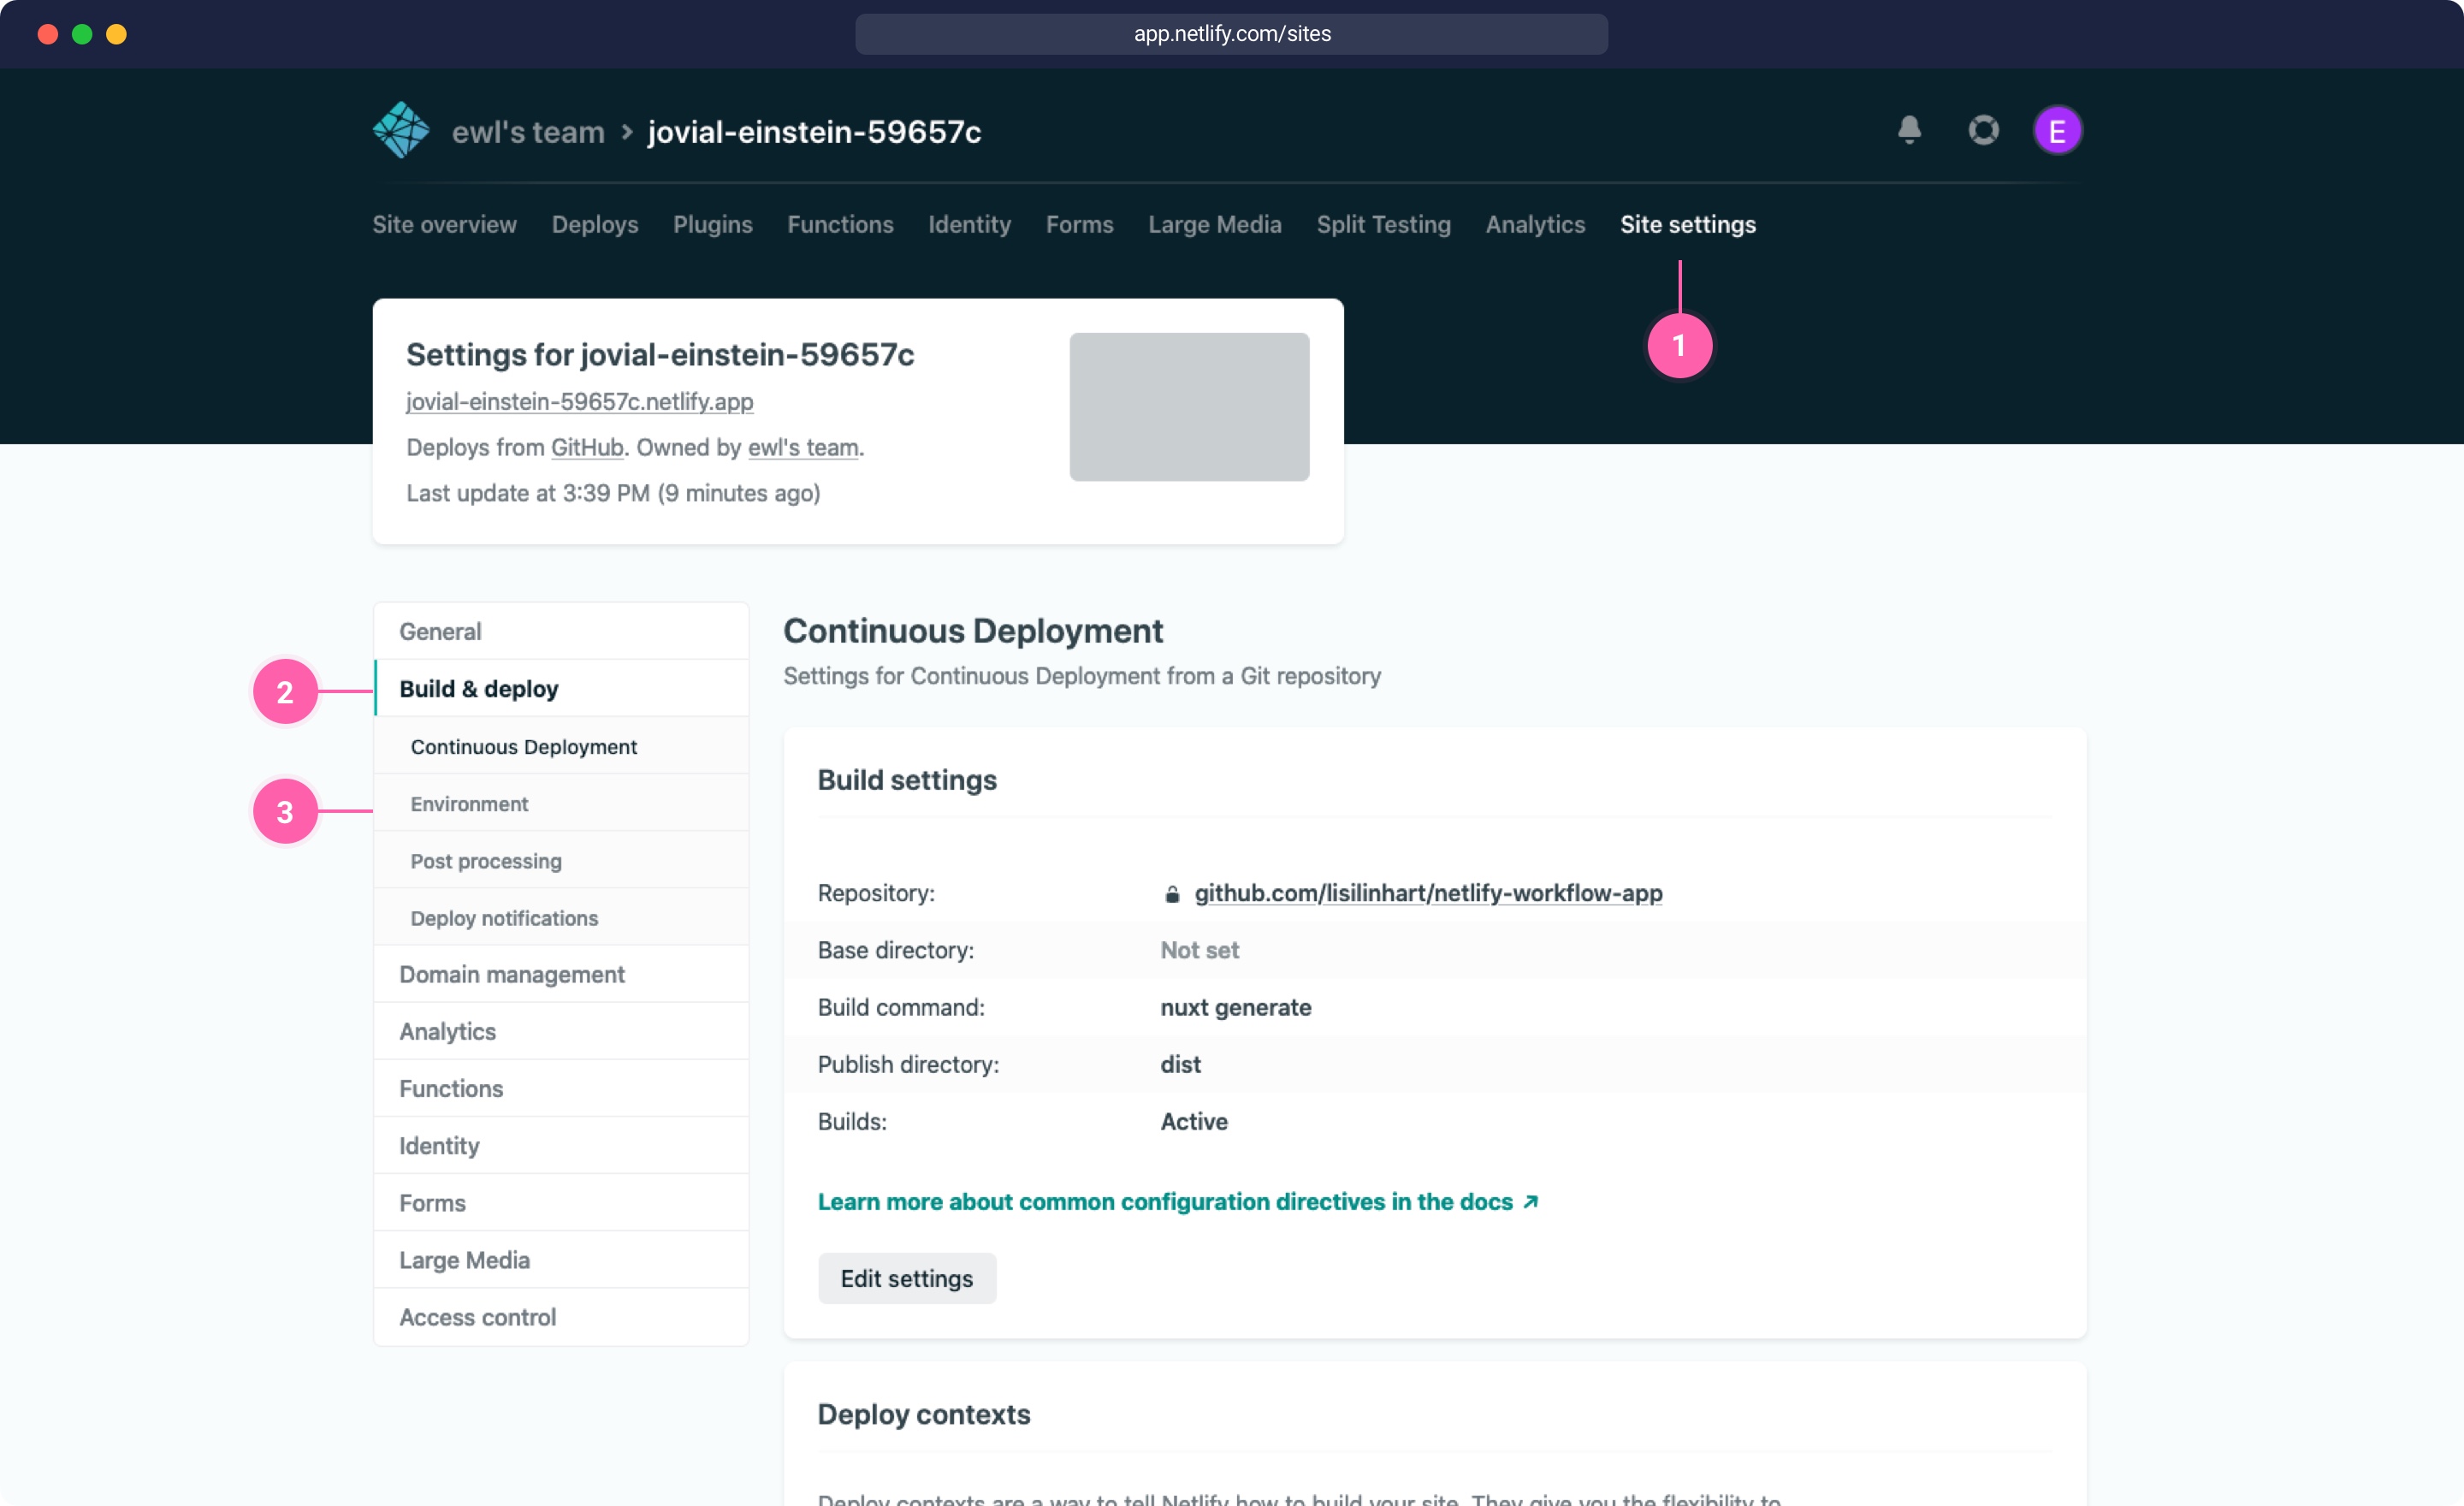
netlify deployAfter deploying for the first time, you should have a new site visible inside of the Netlify app dashboard. Open the new site {1}, click on Site settings {2}, Functions {3} and then connect to repository {4}.

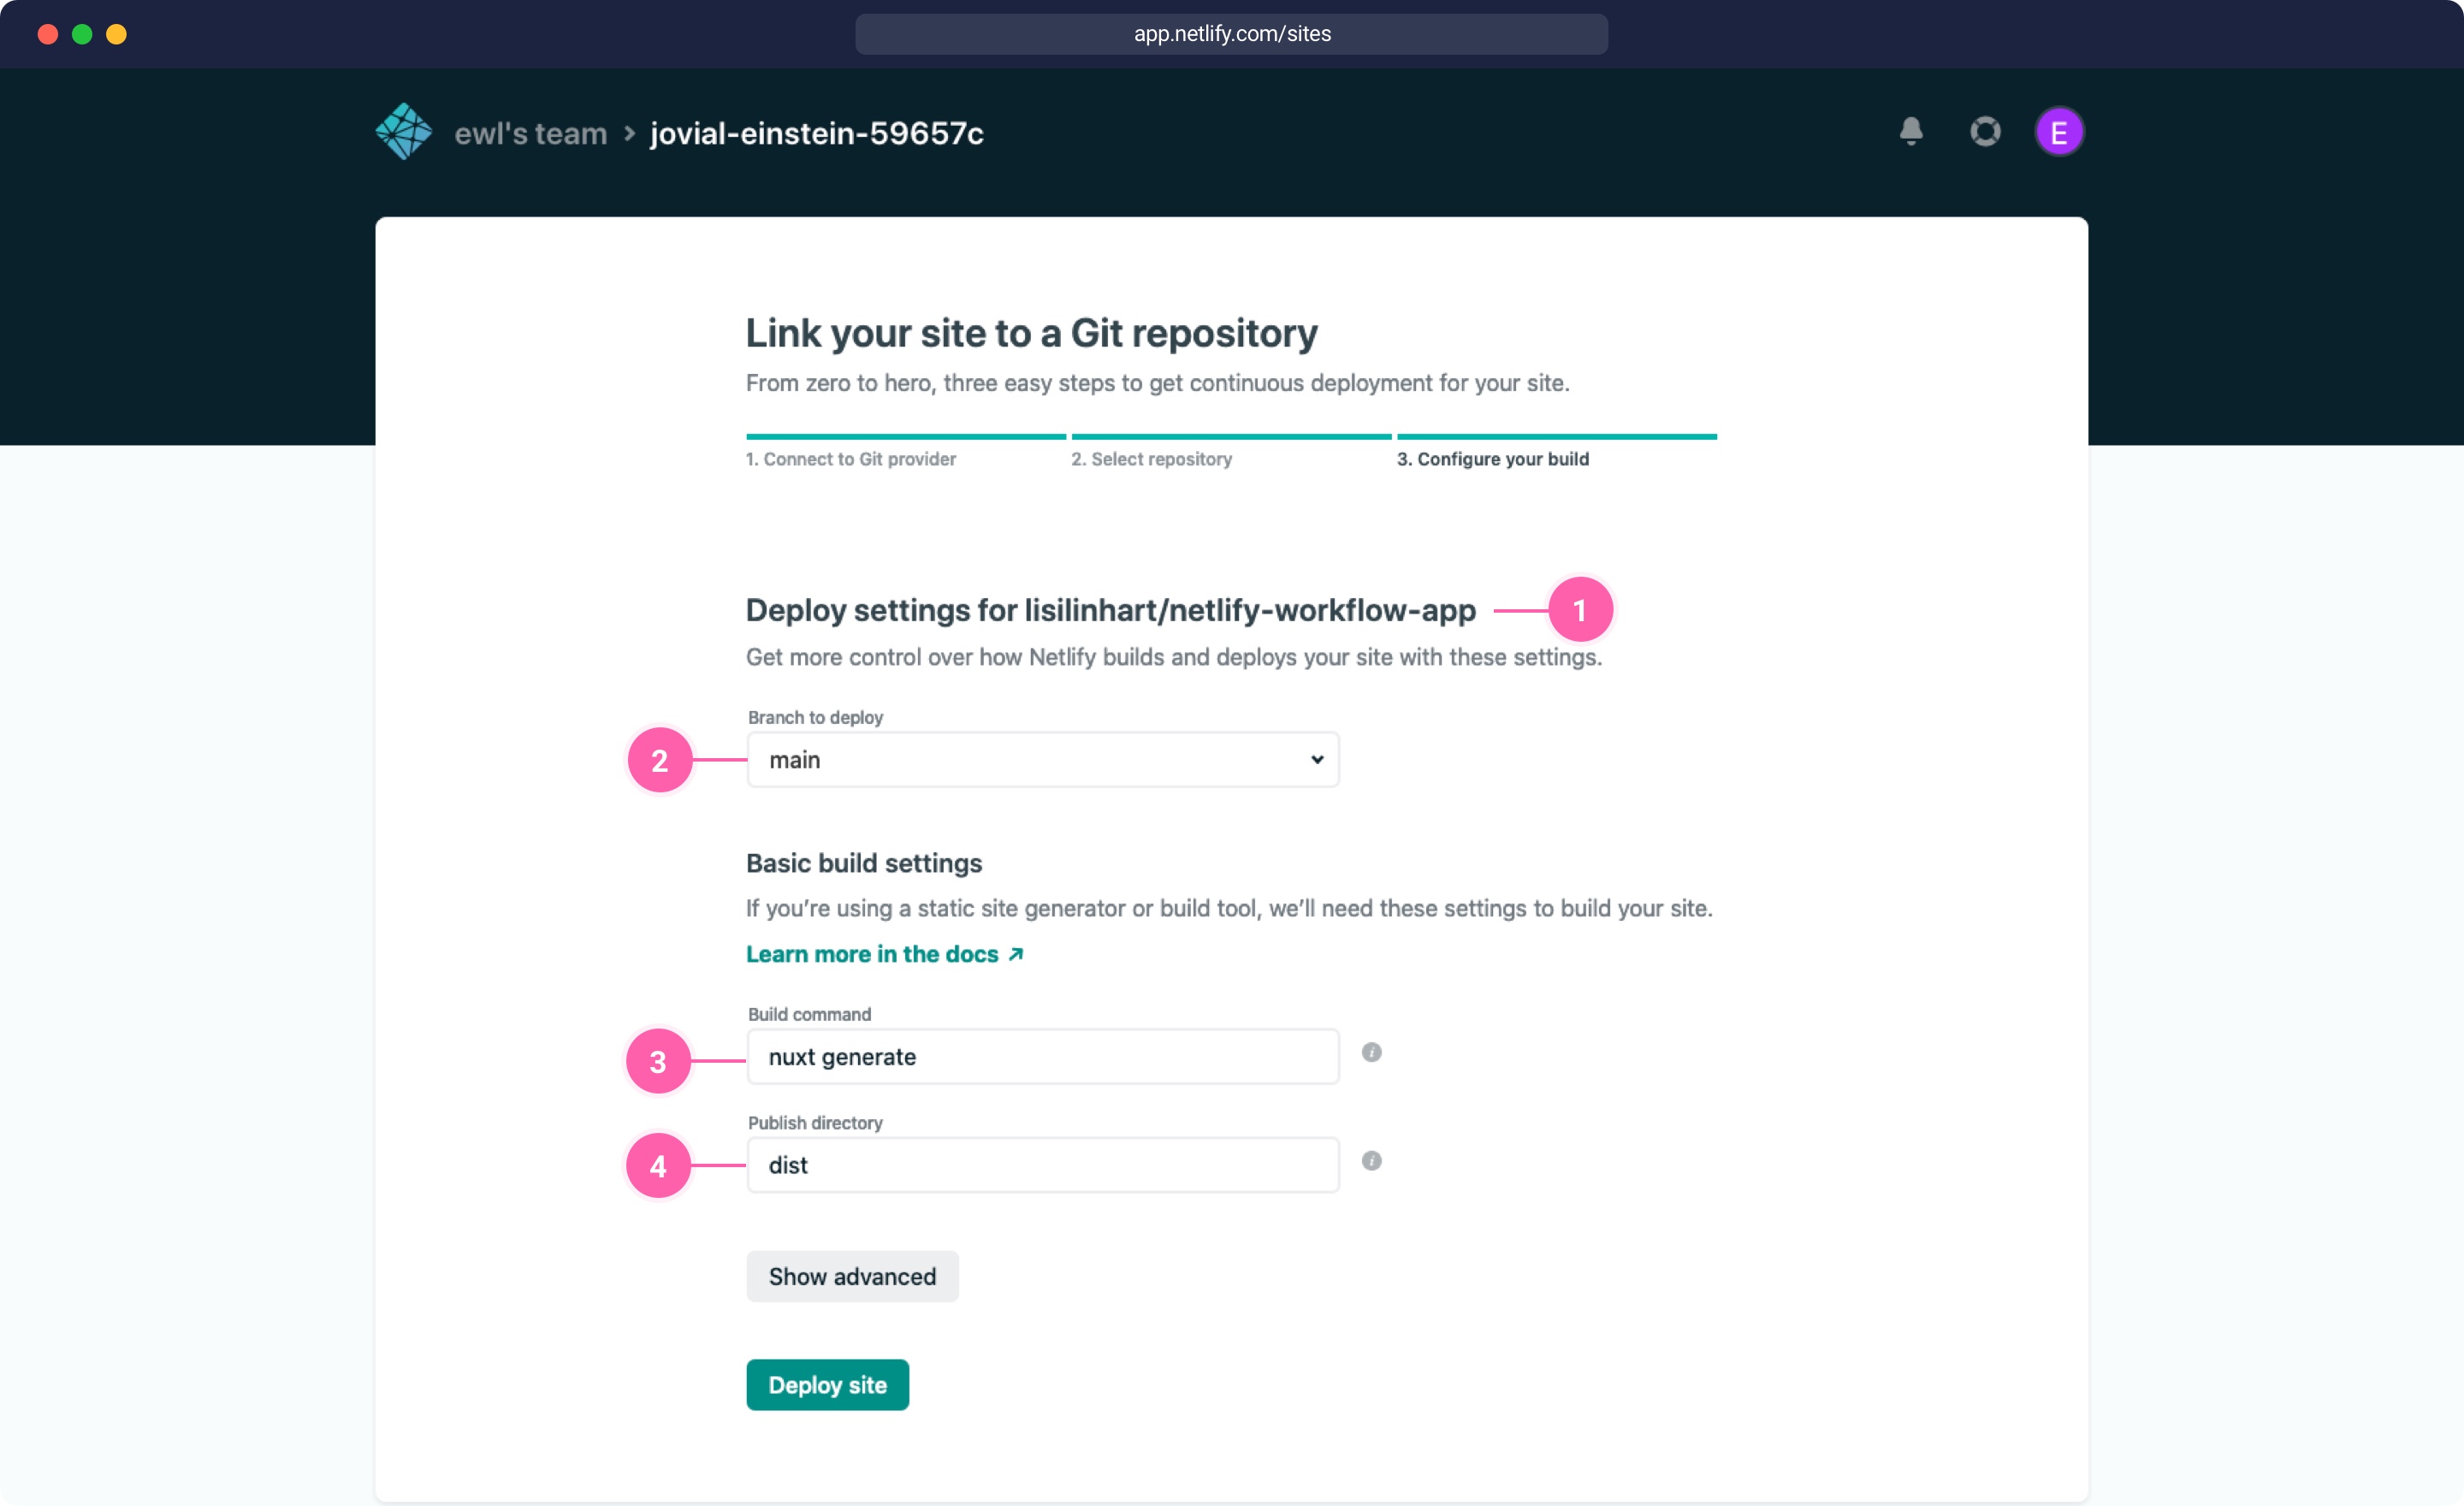
Since serverless functions require a Git connection, create a new Git repository and connect this repository to your Netlify site. You can configure the branch {2} and a build command {3}. The build command depends on what technology you're using to create your app: the workflow app example is built with Nuxt, so we will use nuxt generate as our build command and dist as our Publish directory {4}.
Your first serverless function
Let’s start by creating a Hello World example. Create a file api/hello.js with the following content:
api/hello.js
exports.handler = async (event, context) => {
  const { name } = event.queryStringParameters
  return {
    statusCode: 200,
    body: JSON.stringify({ message: `Hello ${name || 'World'}` })
  }
}
Before we can deploy these functions, we have to set it up in the Site settings of Netlify. Similar to before, go into Site settings {2}, Functions {3} and then change the Functions directory to api {4}.
Now let’s deploy this first stage of the project to Netlify. Run the following commands for a manual deployment:
$ npm run generate
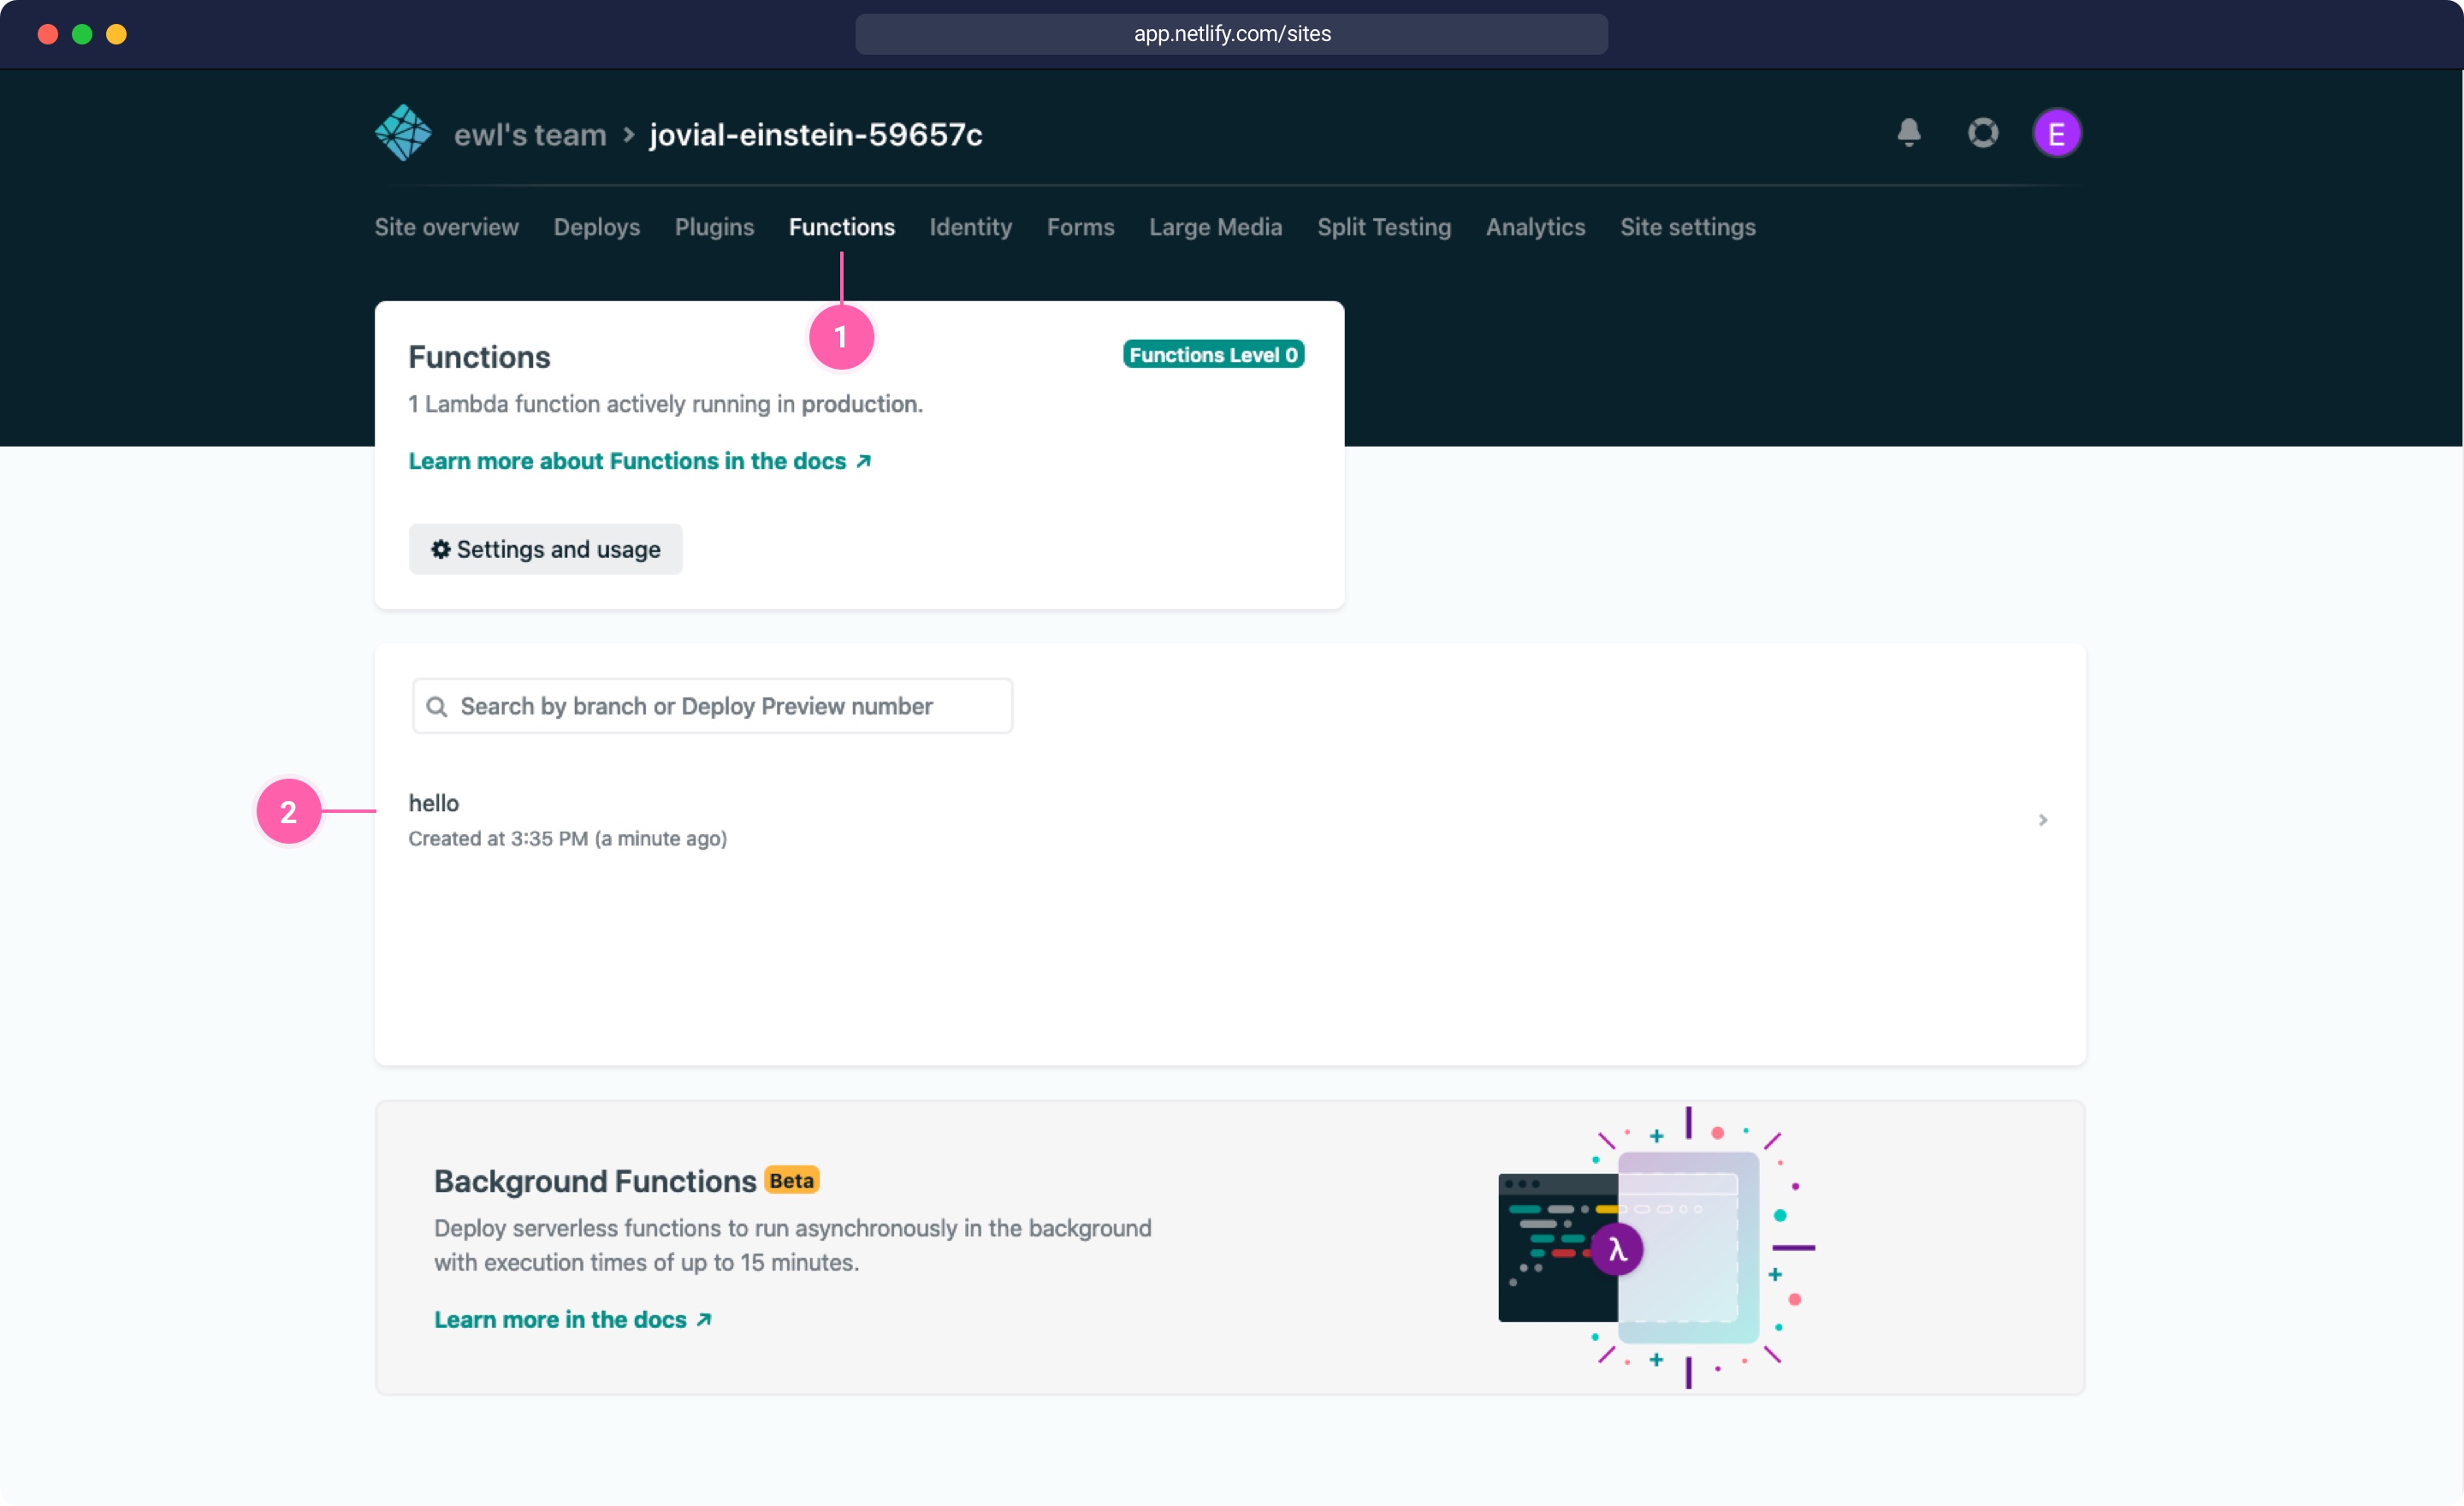
$ netlify deployor push your changes to your main branch for an automatic deployment. Once your deployment finished, check the Functions {1} area inside the Netlify app you should see the function we just created {2}.
After deploying the repository, there is no connection to Storyblok set up yet. But we can already call the API path of the serverless function, we just created and should get a response.
Click on the function and copy the endpoint path which should be similar to this: https://jovial-einstein-59657c.netlify.app/.netlify/functions/hello. If you attach a path parameter /hello?name=Homer you should see the following response:
{ "message": "hello Homer" }Great job, that's already your first serverless deployed function!
Creating a Serverless OAuth Function
The next step is to create a function that can authenticate the application with Storyblok. We will make use of the grant package to do that.
To work with the grant library, we will configure a storyblok provider. When we look at the grant configuration below, we can see that it sets the OAuth authorization URL https://app.storyblok.com/oauth/authorize and passes on some encoded custom parameters like the state. You can find more details about these parameters in the Storyblok OAuth documentation. We will also set the callback that is called after a user granted access to Storyblok to the /sb-callback path, which then redirects to its own serverless function.
grant.js
Inside the api folder create a grant.js file with the following code. We set up the grant library with its AWS handler with the configuration for the different providers and session settings. Grant then automatically redirects to the correct callback function of the connected provider, once the user grants access. This is configured in the callback property of each provider in the configuration below.
api/grant.js
api/grant.js
const grant = require('grant')
const SHA256 = require('crypto-js/sha256')
const uuid = require('uuid')
const codeIdentifier = uuid.v4()
const grantClient = grant.aws({
config: {
defaults: {
origin: 'http://localhost:3000',
prefix: '/connect',
transport: 'session',
},
storyblok: {
key: process.env.SB_CLIENT_ID,
secret: process.env.SB_CLIENT_SECRET,
redirect_uri: process.env.BASE_URL + '/sb-callback',
authorize_url: 'https://app.storyblok.com/oauth/authorize',
access_url: 'https://app.storyblok.com/oauth/token',
callback: process.env.BASE_URL + '/sb-callback',
oauth: 2,
response: ['tokens'],
scope: 'read_content',
// https://github.com/simov/grant#custom-parameters
custom_params: {
response_type: 'code',
code_challenge: SHA256(codeIdentifier).toString(),
code_challenge_method: 'S256',
state: codeIdentifier,
},
},
},
session: {
name: 'my-cookie-name',
secret: 'my-cookie-secret-123',
cookie: {
sameSite: 'none',
path: '/',
httpOnly: 'true',
secure: true,
},
},
})
exports.handler = async (event) => {
event.version = '1.0' // for grant to set the correct path on AWS
const { redirect, response } = await grantClient(event)
return (
redirect || {
statusCode: 200,
headers: { 'content-type': 'application/json' },
body: JSON.stringify(response),
}
)
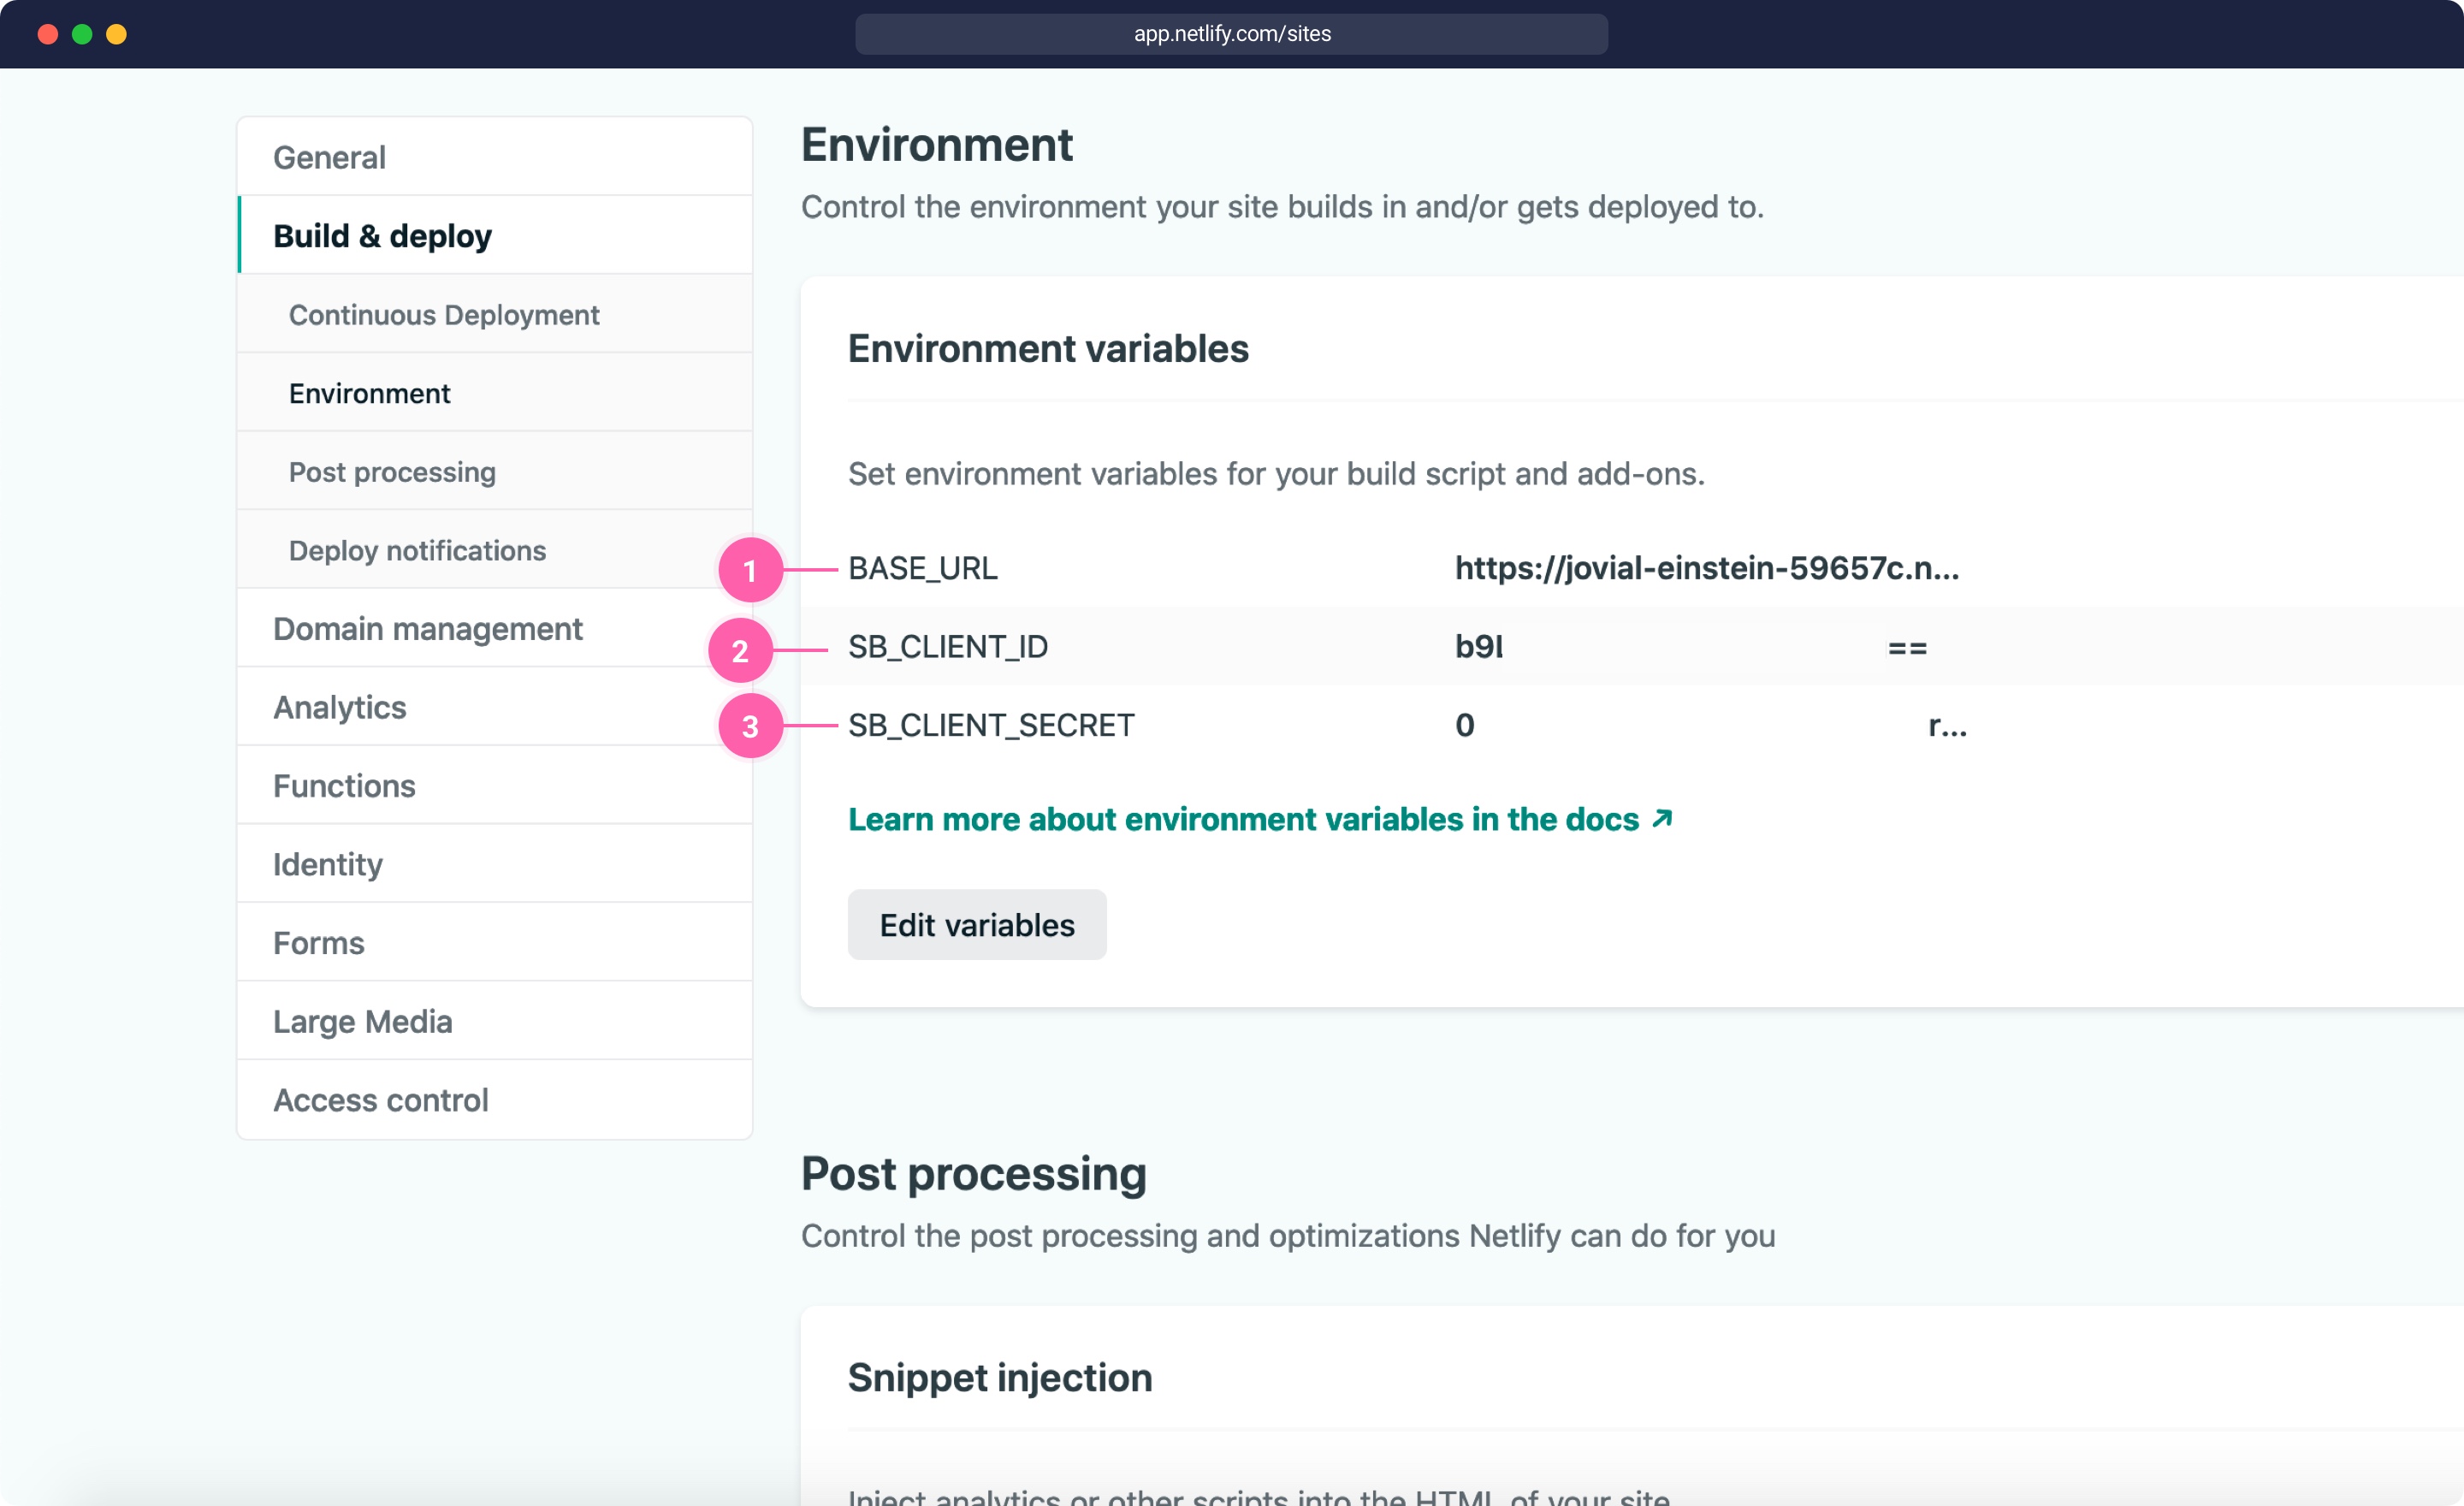
}When looking at the configuration, we can see the main provider storyblok. Storyblok is configured with environment variables to connect to the API. We need this Storyblok connection to retrieve data vom Storyblok, e.g. load stories. You can also use this configuration option to connect to other services like Google or Twitter. For the OAuth process to work, we will need to set all necessary environment variables in our Netlify settings. Open your Site in Netlify and click on Site settings {1}, then on Build & deploy {2} and then on Environment {3}.
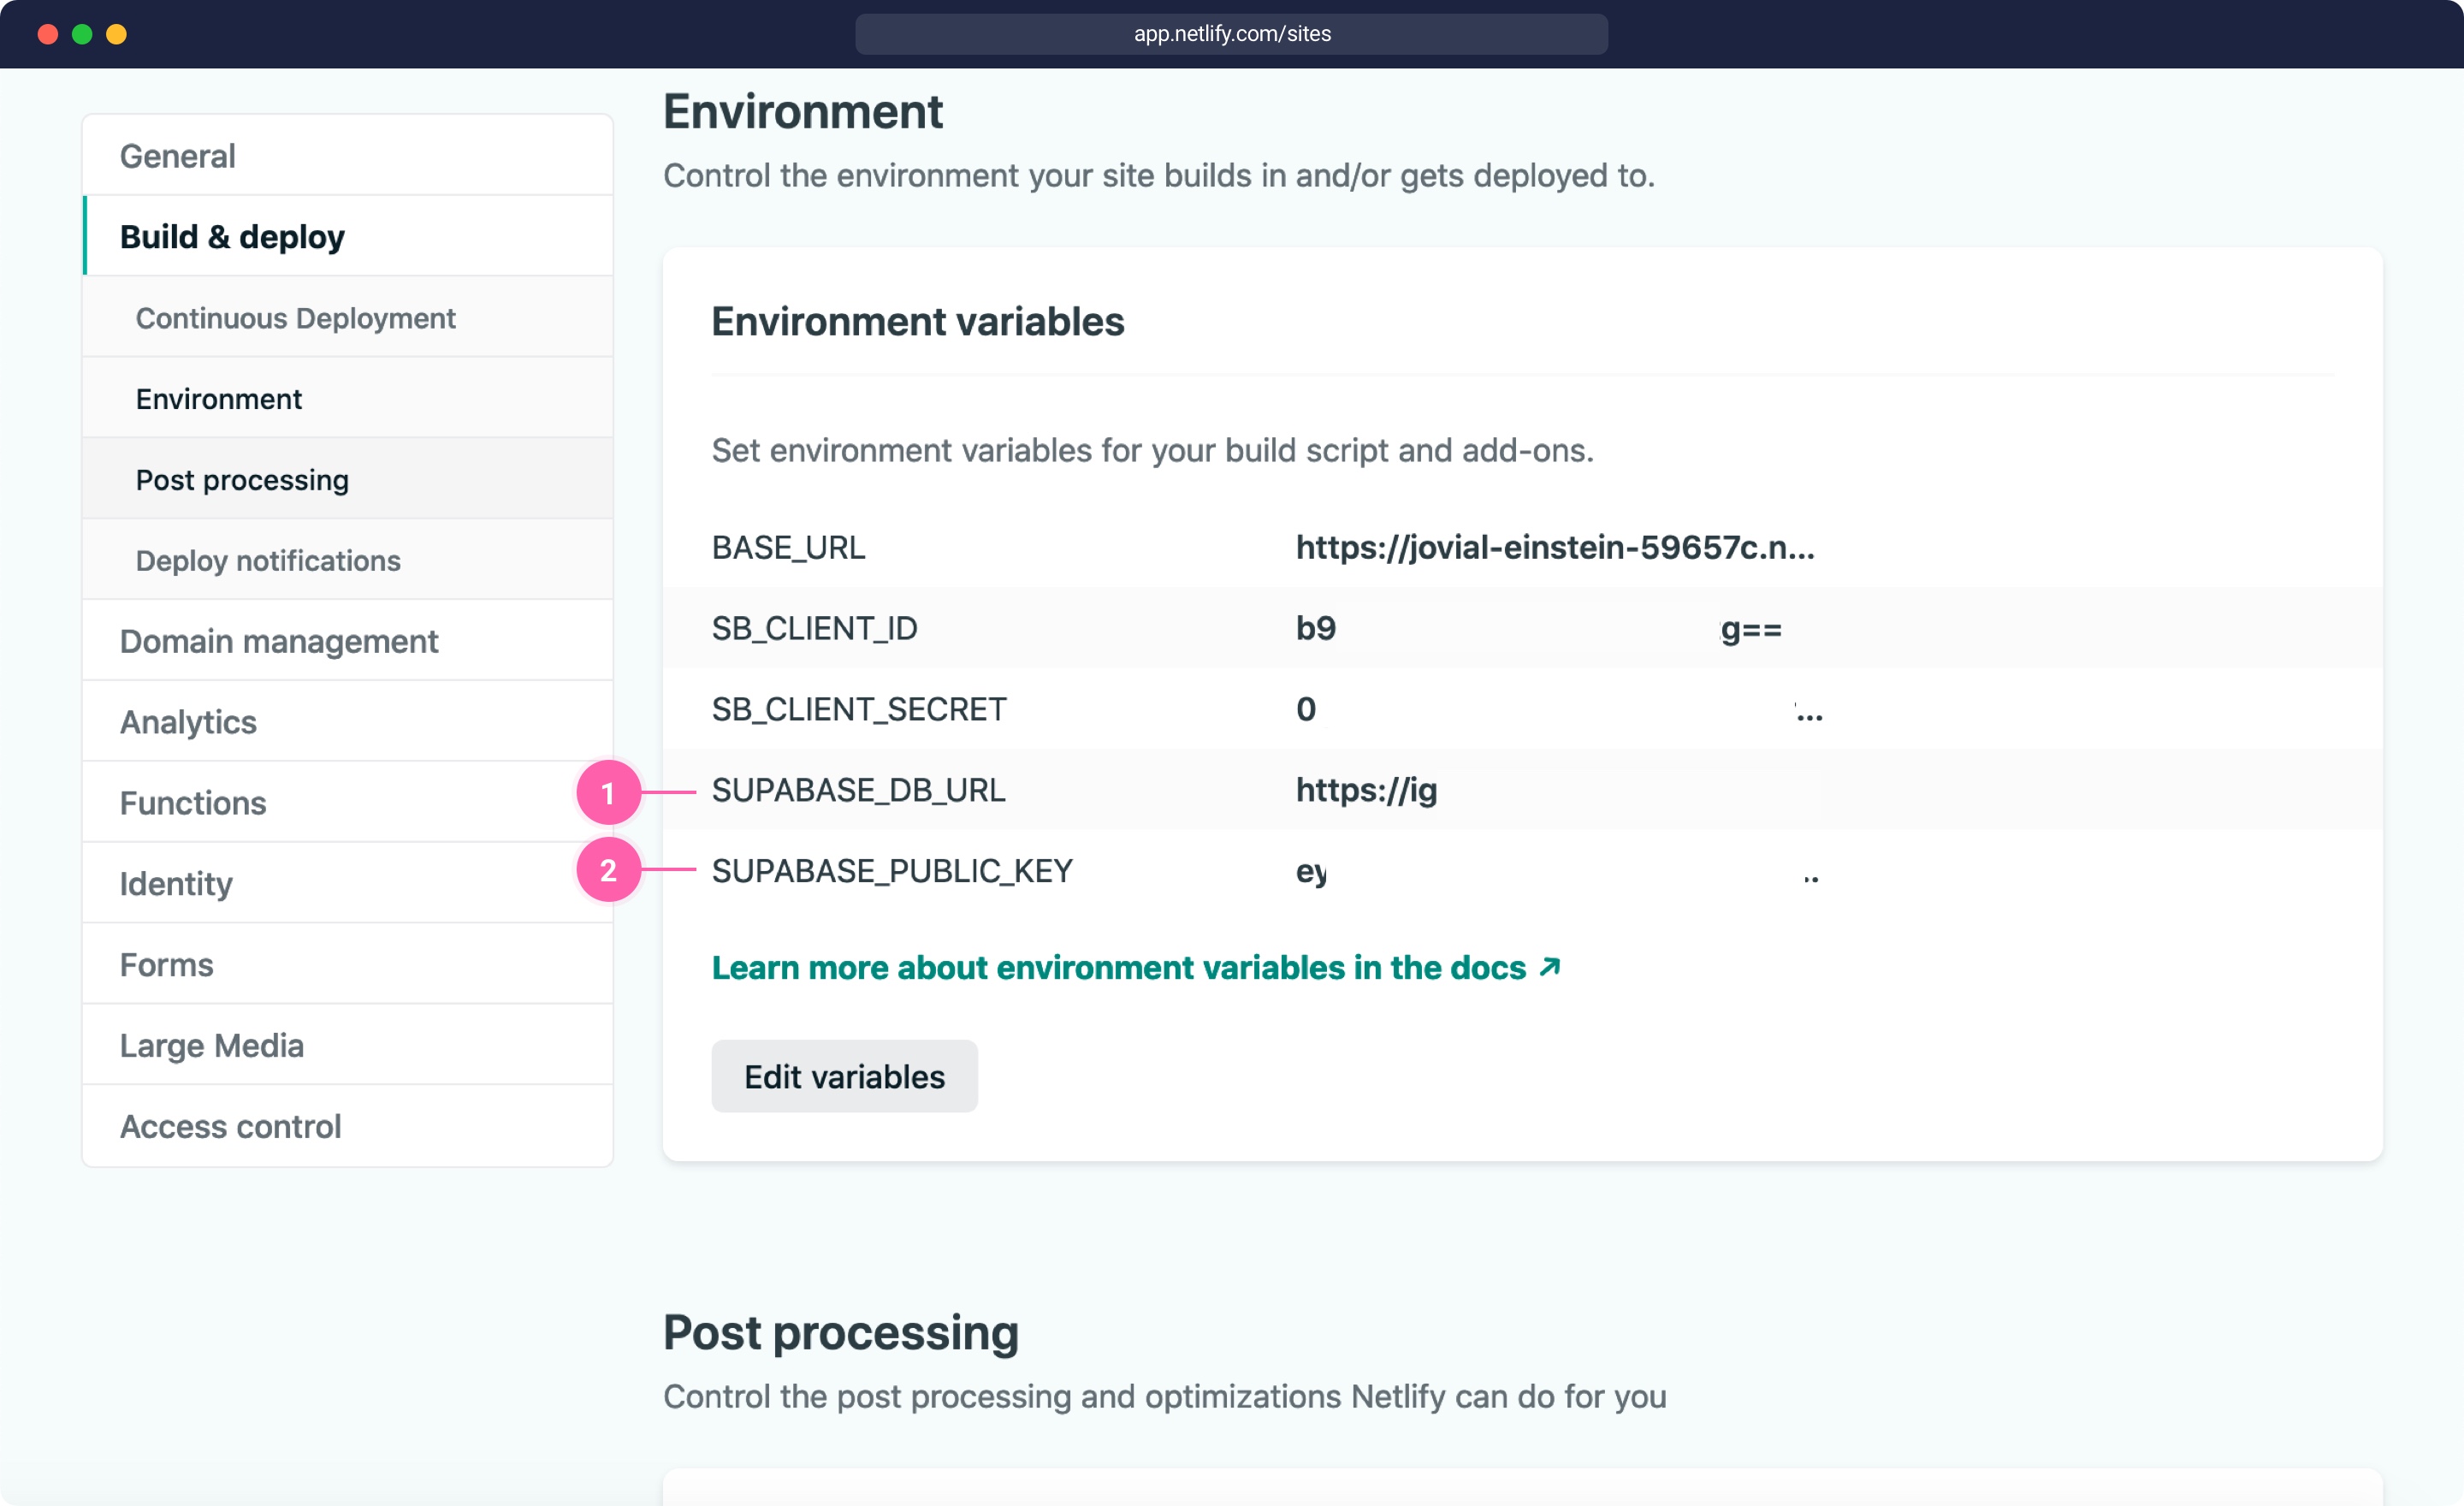
First, we will need an environment variable BASE_URL {1}. This should be the URL of your Netlify Deployment, so the URL we will use for the custom app. To connect to Storyblok we will need two variables: SB_CLIENT_ID {2} and SB_CLIENT_SECRET {3}, these variables can be found in the settings of your Storyblok application.
In the end, we will also need two more variables for storing a session: SUPABASE_DB_URL and SUPABASE_PUBLIC_KEY. Supabase is an open-source firebase alternative, that allows us to easily store all our session information. We will get to how to integrate grant with Supabase at the end of this tutorial.
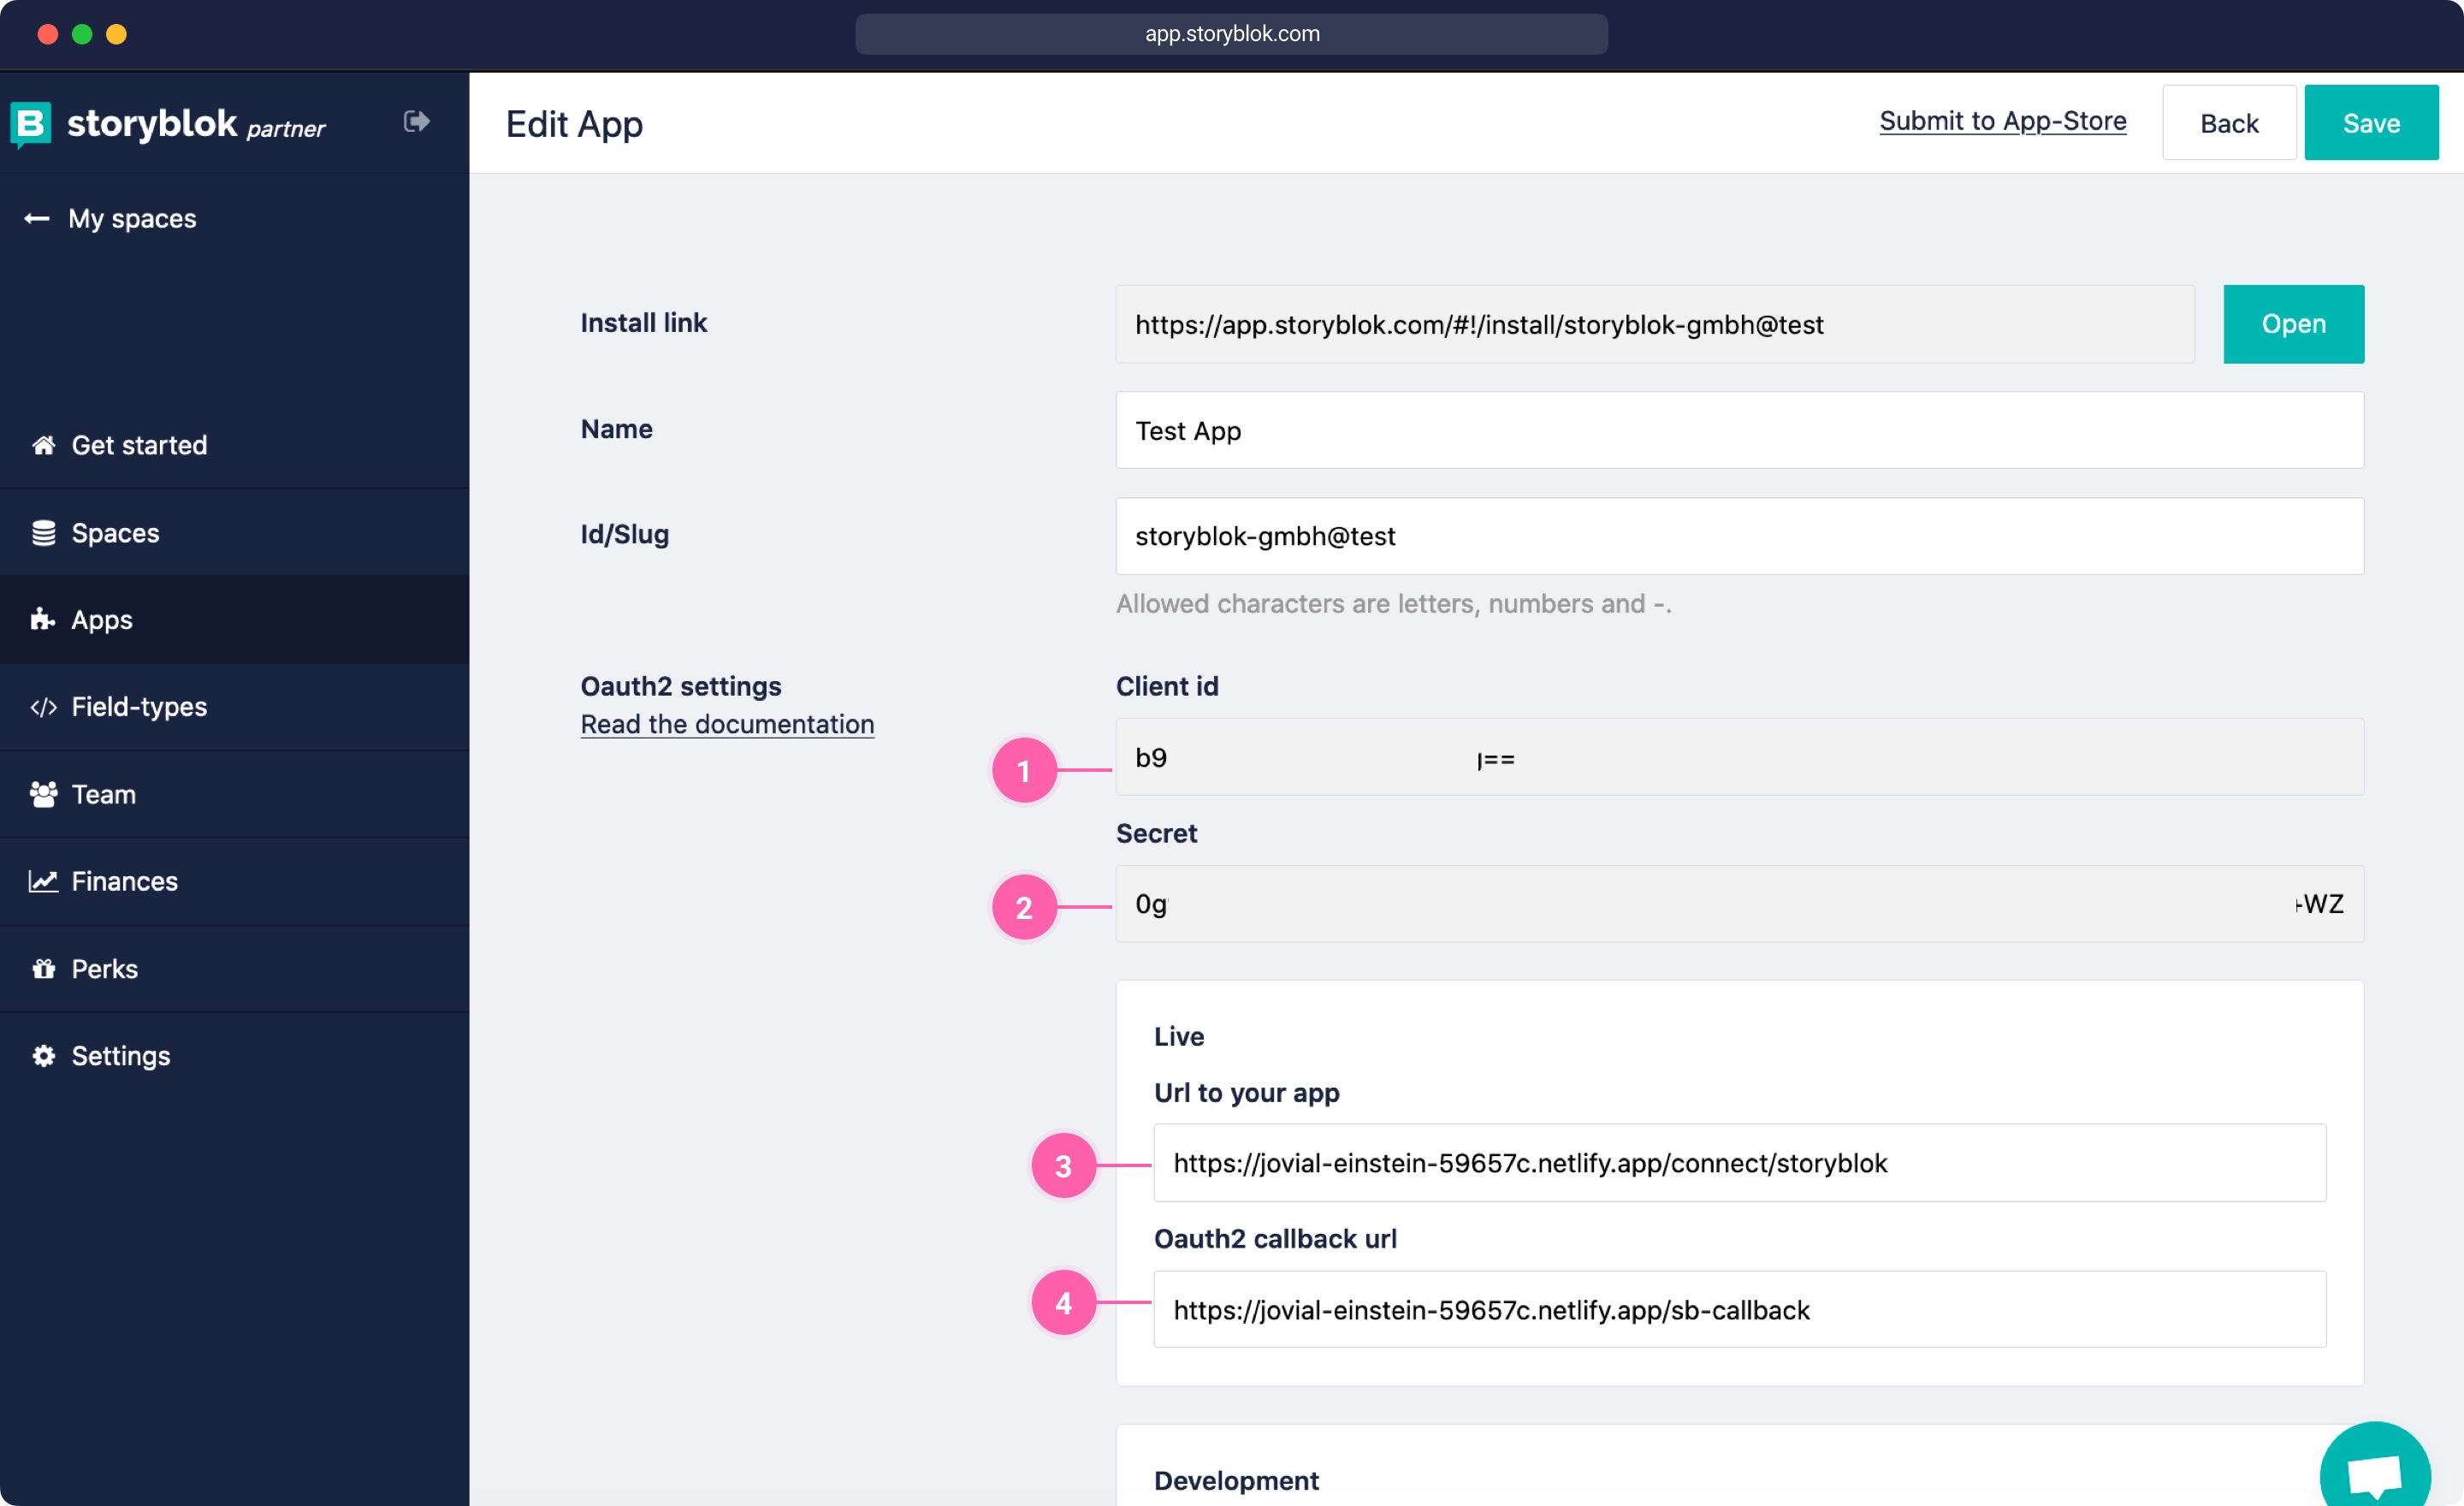
Let's get the correct tokens and ids from Storyblok. Head into the partner portal and under Apps and click on your app name. There you will find the client id {1} and client secret {2}, these are the variables you will need to copy into the Netlify environment settings.
Inside the Storyblok application settings, we also need to edit the Live URLs. Add the Netlify deployment URL with the /connect/storyblok path to your app {3}, similar to this URL: htttps://my-app.netlify.app/connect/storyblok.
We also need to add the OAuth callback URL {4} with the /sb-callback path like htttps://my-app.netlify.app/sb-callback.
If you want to keep a local or preview version of your app running you can add a local ngrok tunnel URL under development. This allows you to access your preview app when opening the app with a ?dev=1 parameter.
Netlify redirects
Once we have our environment variables set, we need to create Netlify redirects to route the correct path to the correct serverless functions. To do that we need to create a file _redirect inside of our publish directory, e.g. in a Nuxt application the publish directory is the dist folder, so we would add the _redirect file to the static folder, that automatically copies it into the dist folder.
static/_redirect
/connect/*          /.netlify/functions/grant            200
/sb-callback/*      /.netlify/functions/sb-callback      200
/auth/*             /.netlify/functions/storyblok        200
The first two redirects /connect and /sb-callback handle the OAuth flow for Storyblok. We want to redirect the /connect/storyblok URL to our serverless function api/grant.js. The /sb-callback path should go the api/sb-callback.js serverless function. The /auth path is for sending requests to the Storyblok API, e.g. to retrieve stories and will go to the api/storyblok.js function.
The next step is to create the serverless functions to handle the OAuth callback route, which is called once a user is authenticated.
sb-callback.js
To handle the callback for Storyblok we need to create a sb-callback file inside the api folder. The callback function will be called when the app authentication was successful with grant and always when we open the app, even if the access was already granted. When the user opens the app in Storyblok, Storyblok will call the OAuth callback URL and send a code and space_id parameter like described in the app authentication docs. Our callback needs to take this code parameter and request the access_token and the refresh token. Since we haven't set up a session store yet, the default cookie store is used. This is not ideal in terms of security, which is why we will also set up a session store at the end of this tutorial. But let's continue without the session store for now. In our callback function, we will read the code and space_id parameters from the event.queryStringParameters object. These parameters are sent from the Storyblok side when the OAuth callback is requested.
Inside the sb-callback function we need a helper function getTokenFromCode to get an access_token and refresh_token from Storyblok. Lastly, we will redirect to our index path / with a space_id parameter, so our Nuxt application will know which space is open.
api/sb-callback.js
api/sb-callback.js
const getTokenFromCode = require('./utils/getTokenFromCode')

exports.handler = async (event) => {
  try {
    const { code, space_id } = event.queryStringParameters

    // get the access token from the code parameter
    const { access_token, refresh_token } = await getTokenFromCode({
      code,
      provider: 'storyblok',
      grant_type: 'authorization_code',
    })

    return {
      statusCode: 302,
      headers: {
        Location: process.env.BASE_URL + `/?space_id=${space_id}`,
      },
      body: null,
    }
  } catch (e) {
    const statusCode = e.response ? e.response.status : 500

    return {
      statusCode,
      headers: {
        'content-type': 'application/json',
      },
      body: JSON.stringify({ error: e.message }, null, 2),
    }
  }
}
Since we didn't write the getTokenFromCode function yet, we need to create the helper function file api/utils/getTokenFromCode.js with the following code. This sends a post request to the provider with the code parameter and retrieves the access_token and refresh_token for accessing the API. In this example, the getTokenFromCode function is also already configured for requesting an access_token from Netlify, but these can be deleted if you don't need them. Furthermore this function can be used to implement a route to refresh the token with the grant_type='refresh_token' parameter.
api/utils/getTokenFromCode.js
api/utils/getTokenFromCode.js
const qs = require('qs')
const axios = require('axios')

module.exports = function getTokenFromCode({
  code,
  provider = 'storyblok',
  refresh_token,
  grant_type = 'authorization_code',
}) {
  const providers = {
    storyblok: {
      key: process.env.SB_CLIENT_ID,
      secret: process.env.SB_CLIENT_SECRET,
      redirect_uri: process.env.BASE_URL + '/sb-callback',
      access_url: 'https://app.storyblok.com/oauth/token',
    },
  }

  return new Promise((resolve, reject) => {
    const requestConfig = {
      url: providers[provider].access_url,
      method: 'POST',
      headers: {
        'content-type': 'application/x-www-form-urlencoded',
      },
      data: qs.stringify({
        grant_type,
        code,
        refresh_token,
        client_id: providers[provider].key,
        client_secret: providers[provider].secret,
        redirect_uri: providers[provider].redirect_uri,
      }),
    }

    axios(requestConfig)
      .then((response) => {
        const { access_token, refresh_token } = response.data

        resolve({
          access_token,
          refresh_token,
        })
      })
      .catch(reject)
  })
}
With this set up we should already be able to authenticate our app. Deploy these functions and the Nuxt app by running npm run generate && netlify deploy --prod or by pushing the changes to your Git repository. Make sure the Website Url of your deployment matches the Live Urls set inside the Storyblok app. Once your app is deployed, open Storyblok, and install the app if you haven't already. You can do that by clicking on Apps {1}, My apps {2} and then on the App you want to install.

Then open the App from the Sidebar. When you open the app the first time, you will be asked if you want to give access to this app.
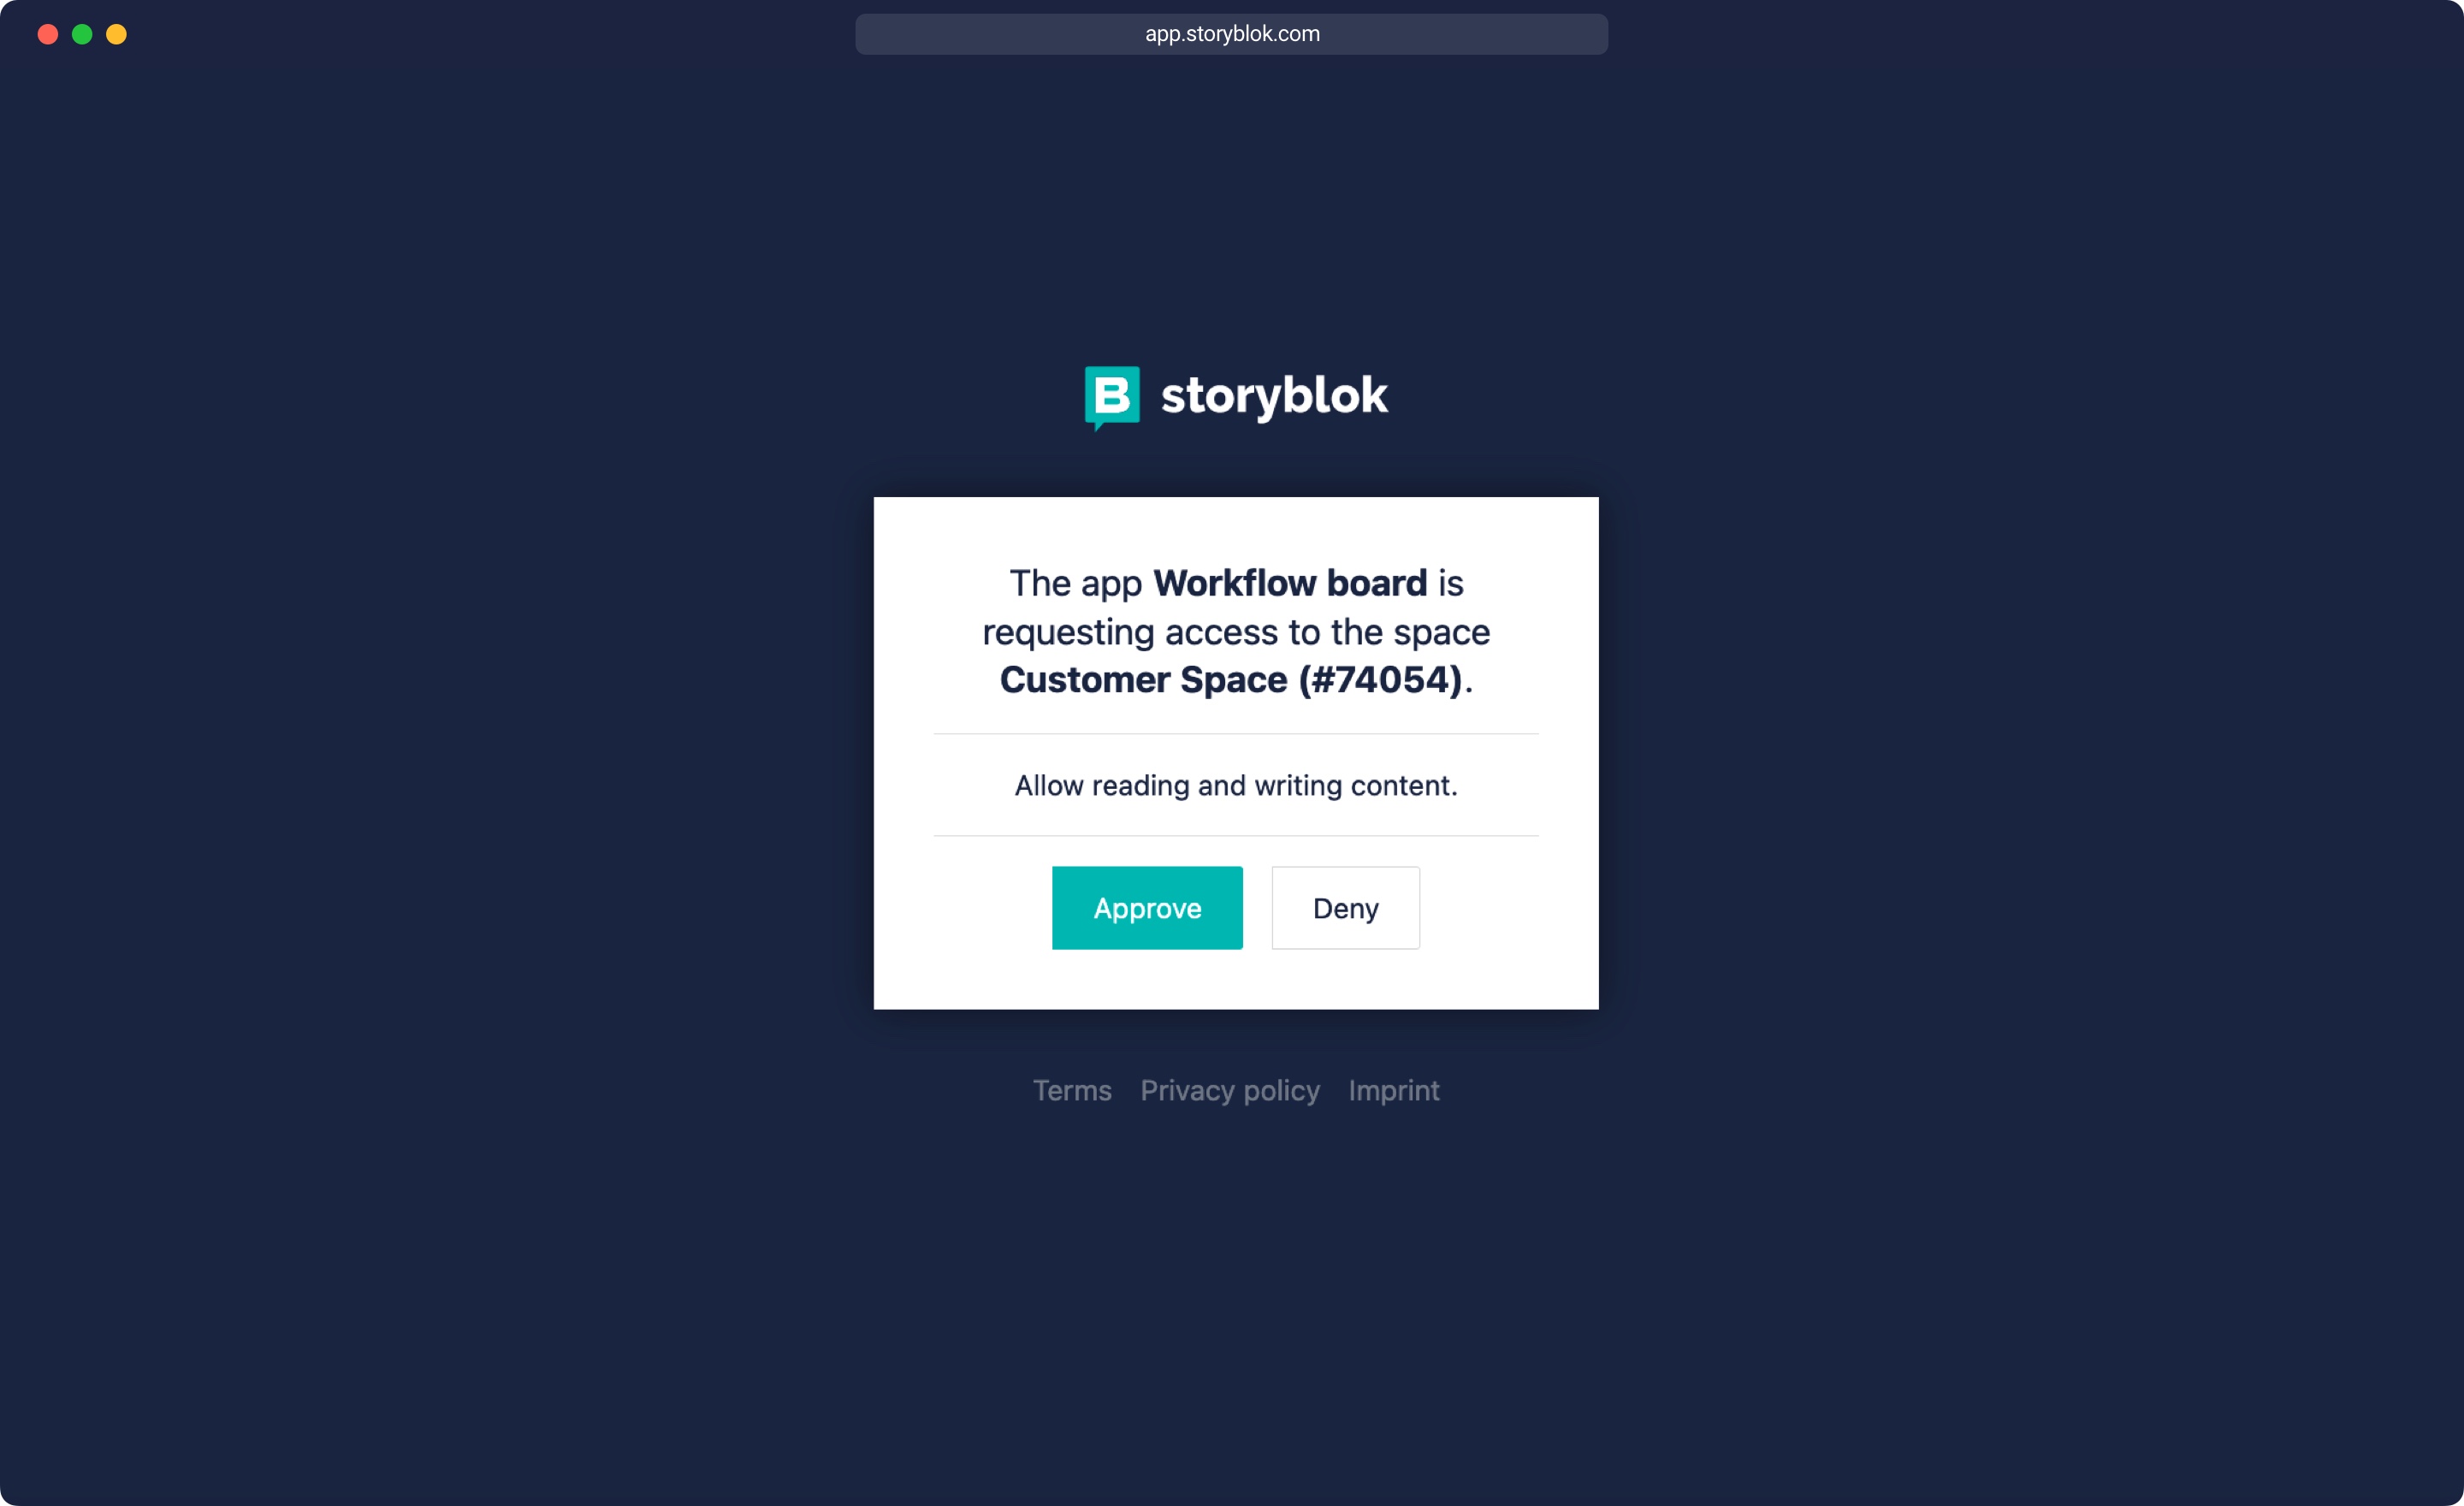
When you approved the application, you should see the Nuxt application loaded inside Storyblok inside an Iframe. Since we haven't set up any loading of content yet in a serverless function, the app will not be able to load the Storyblok content just yet.
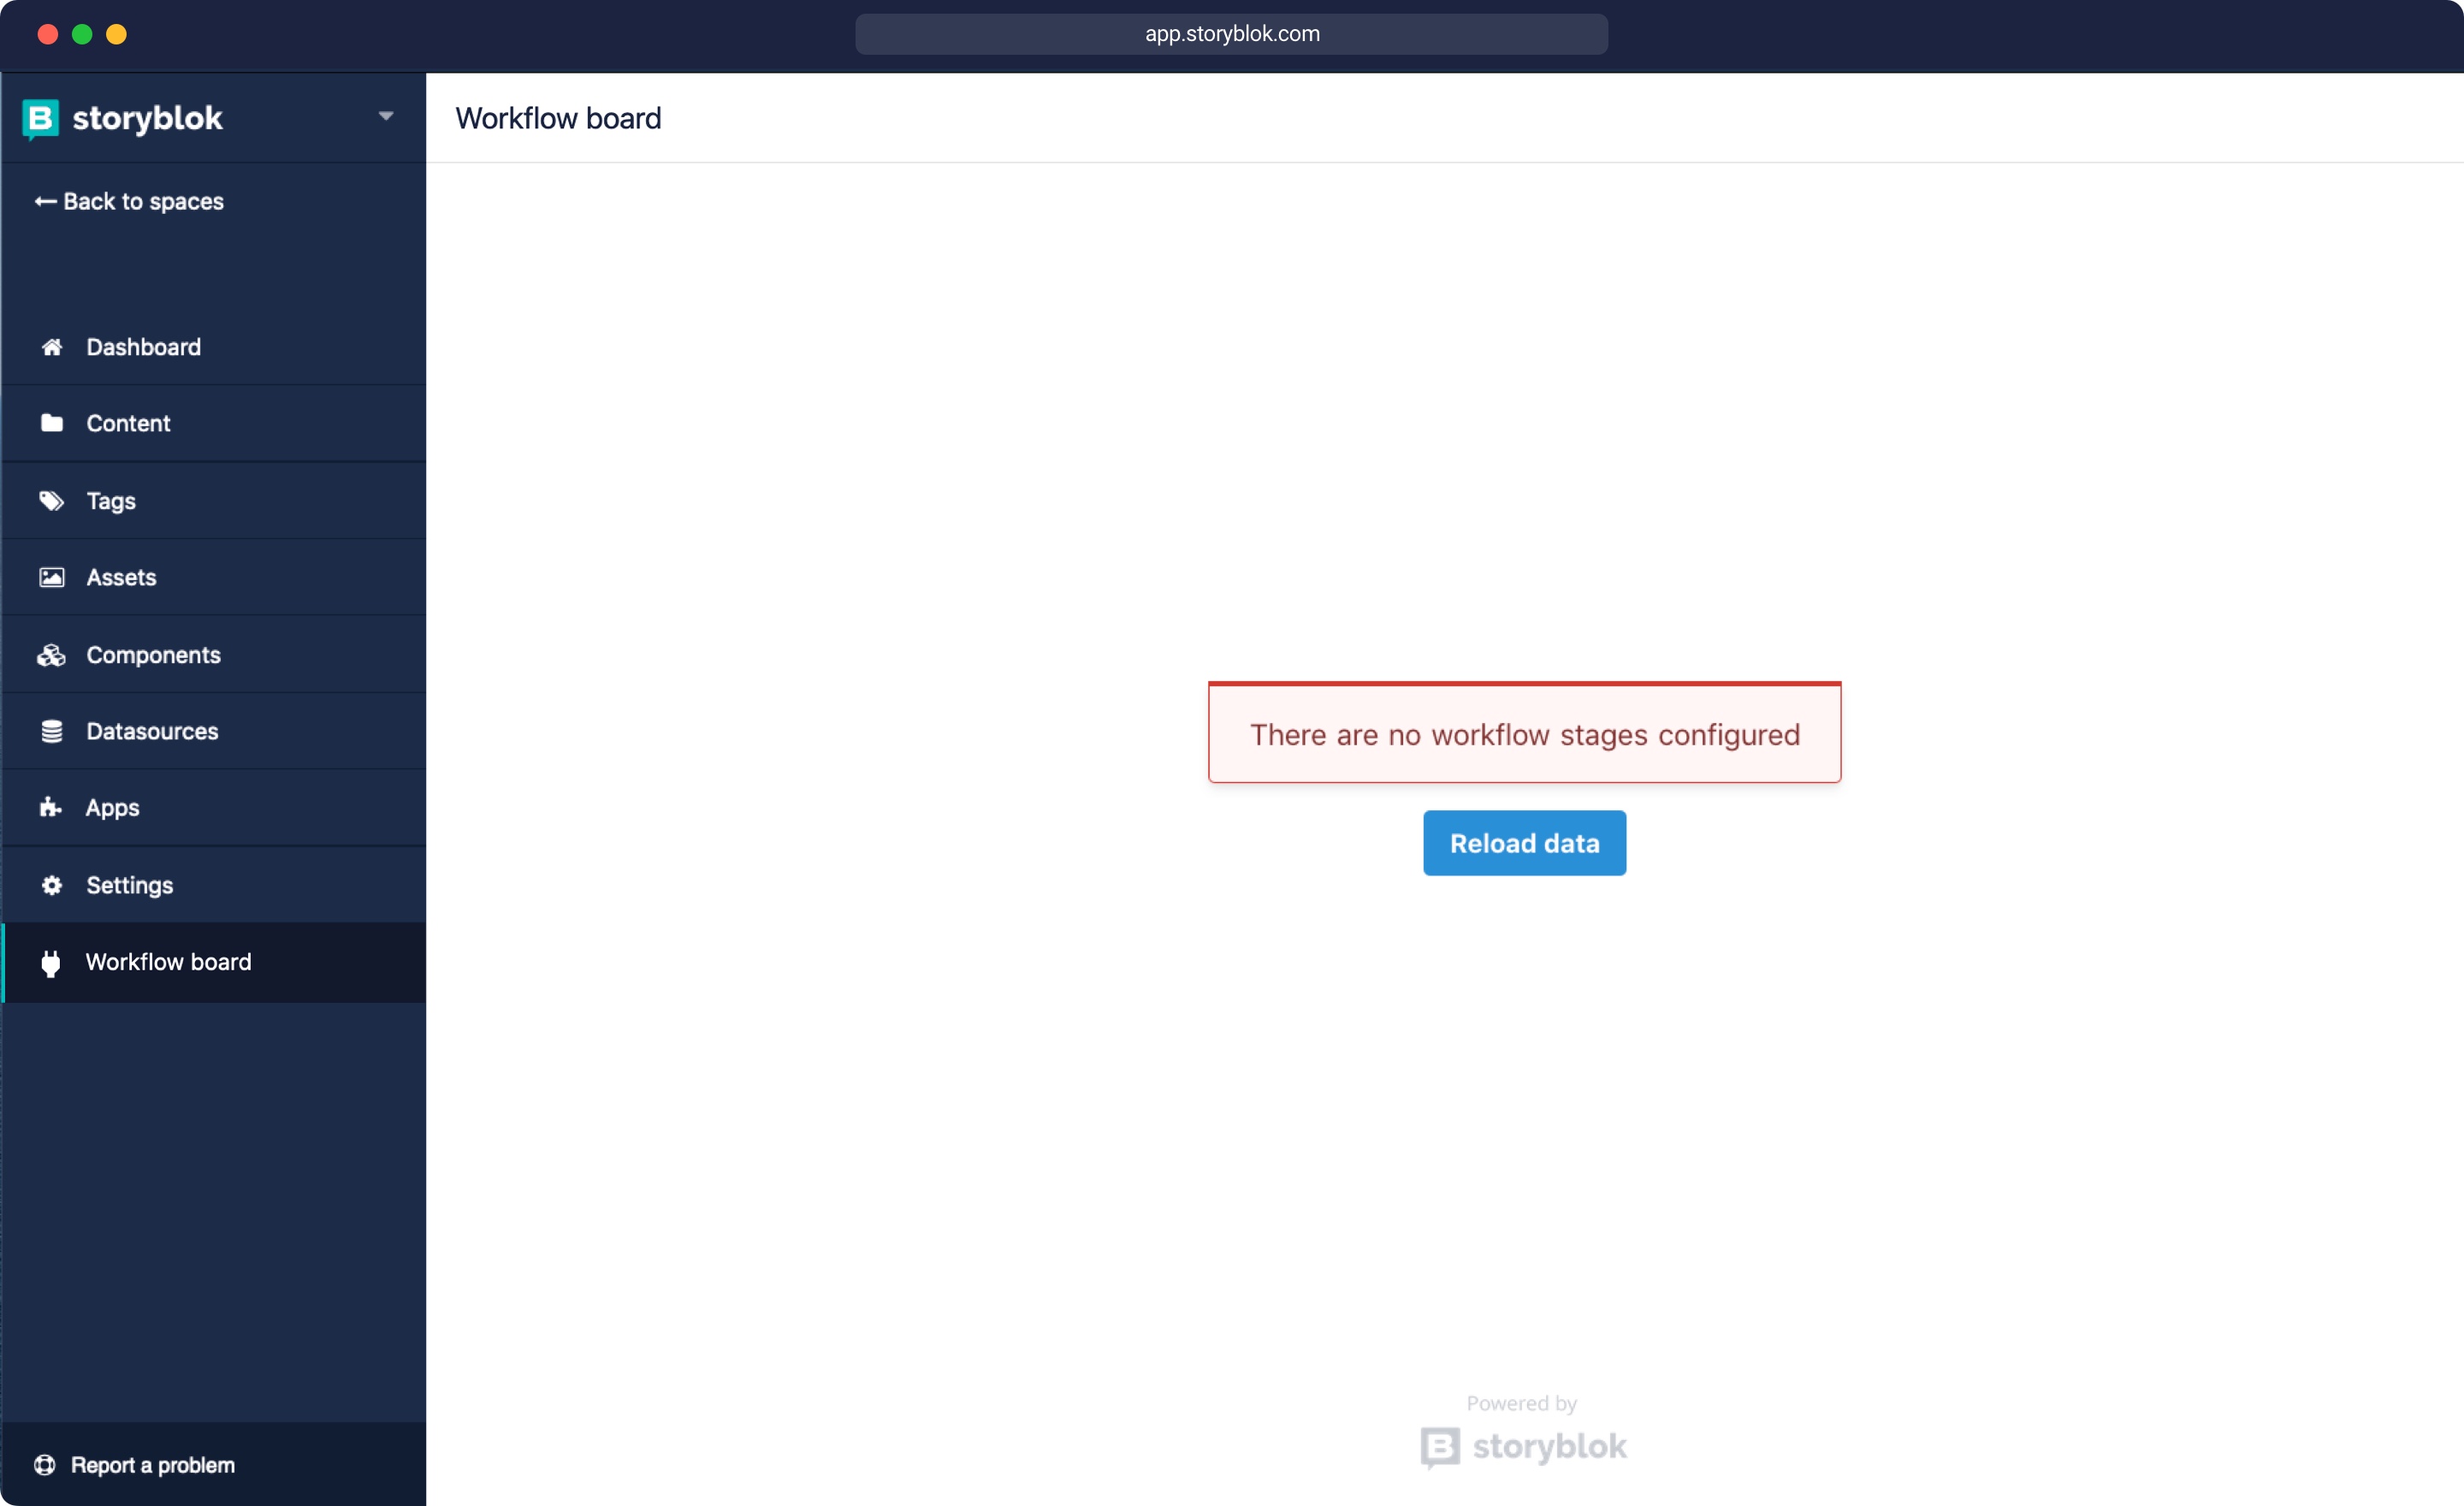
Setting up a Session
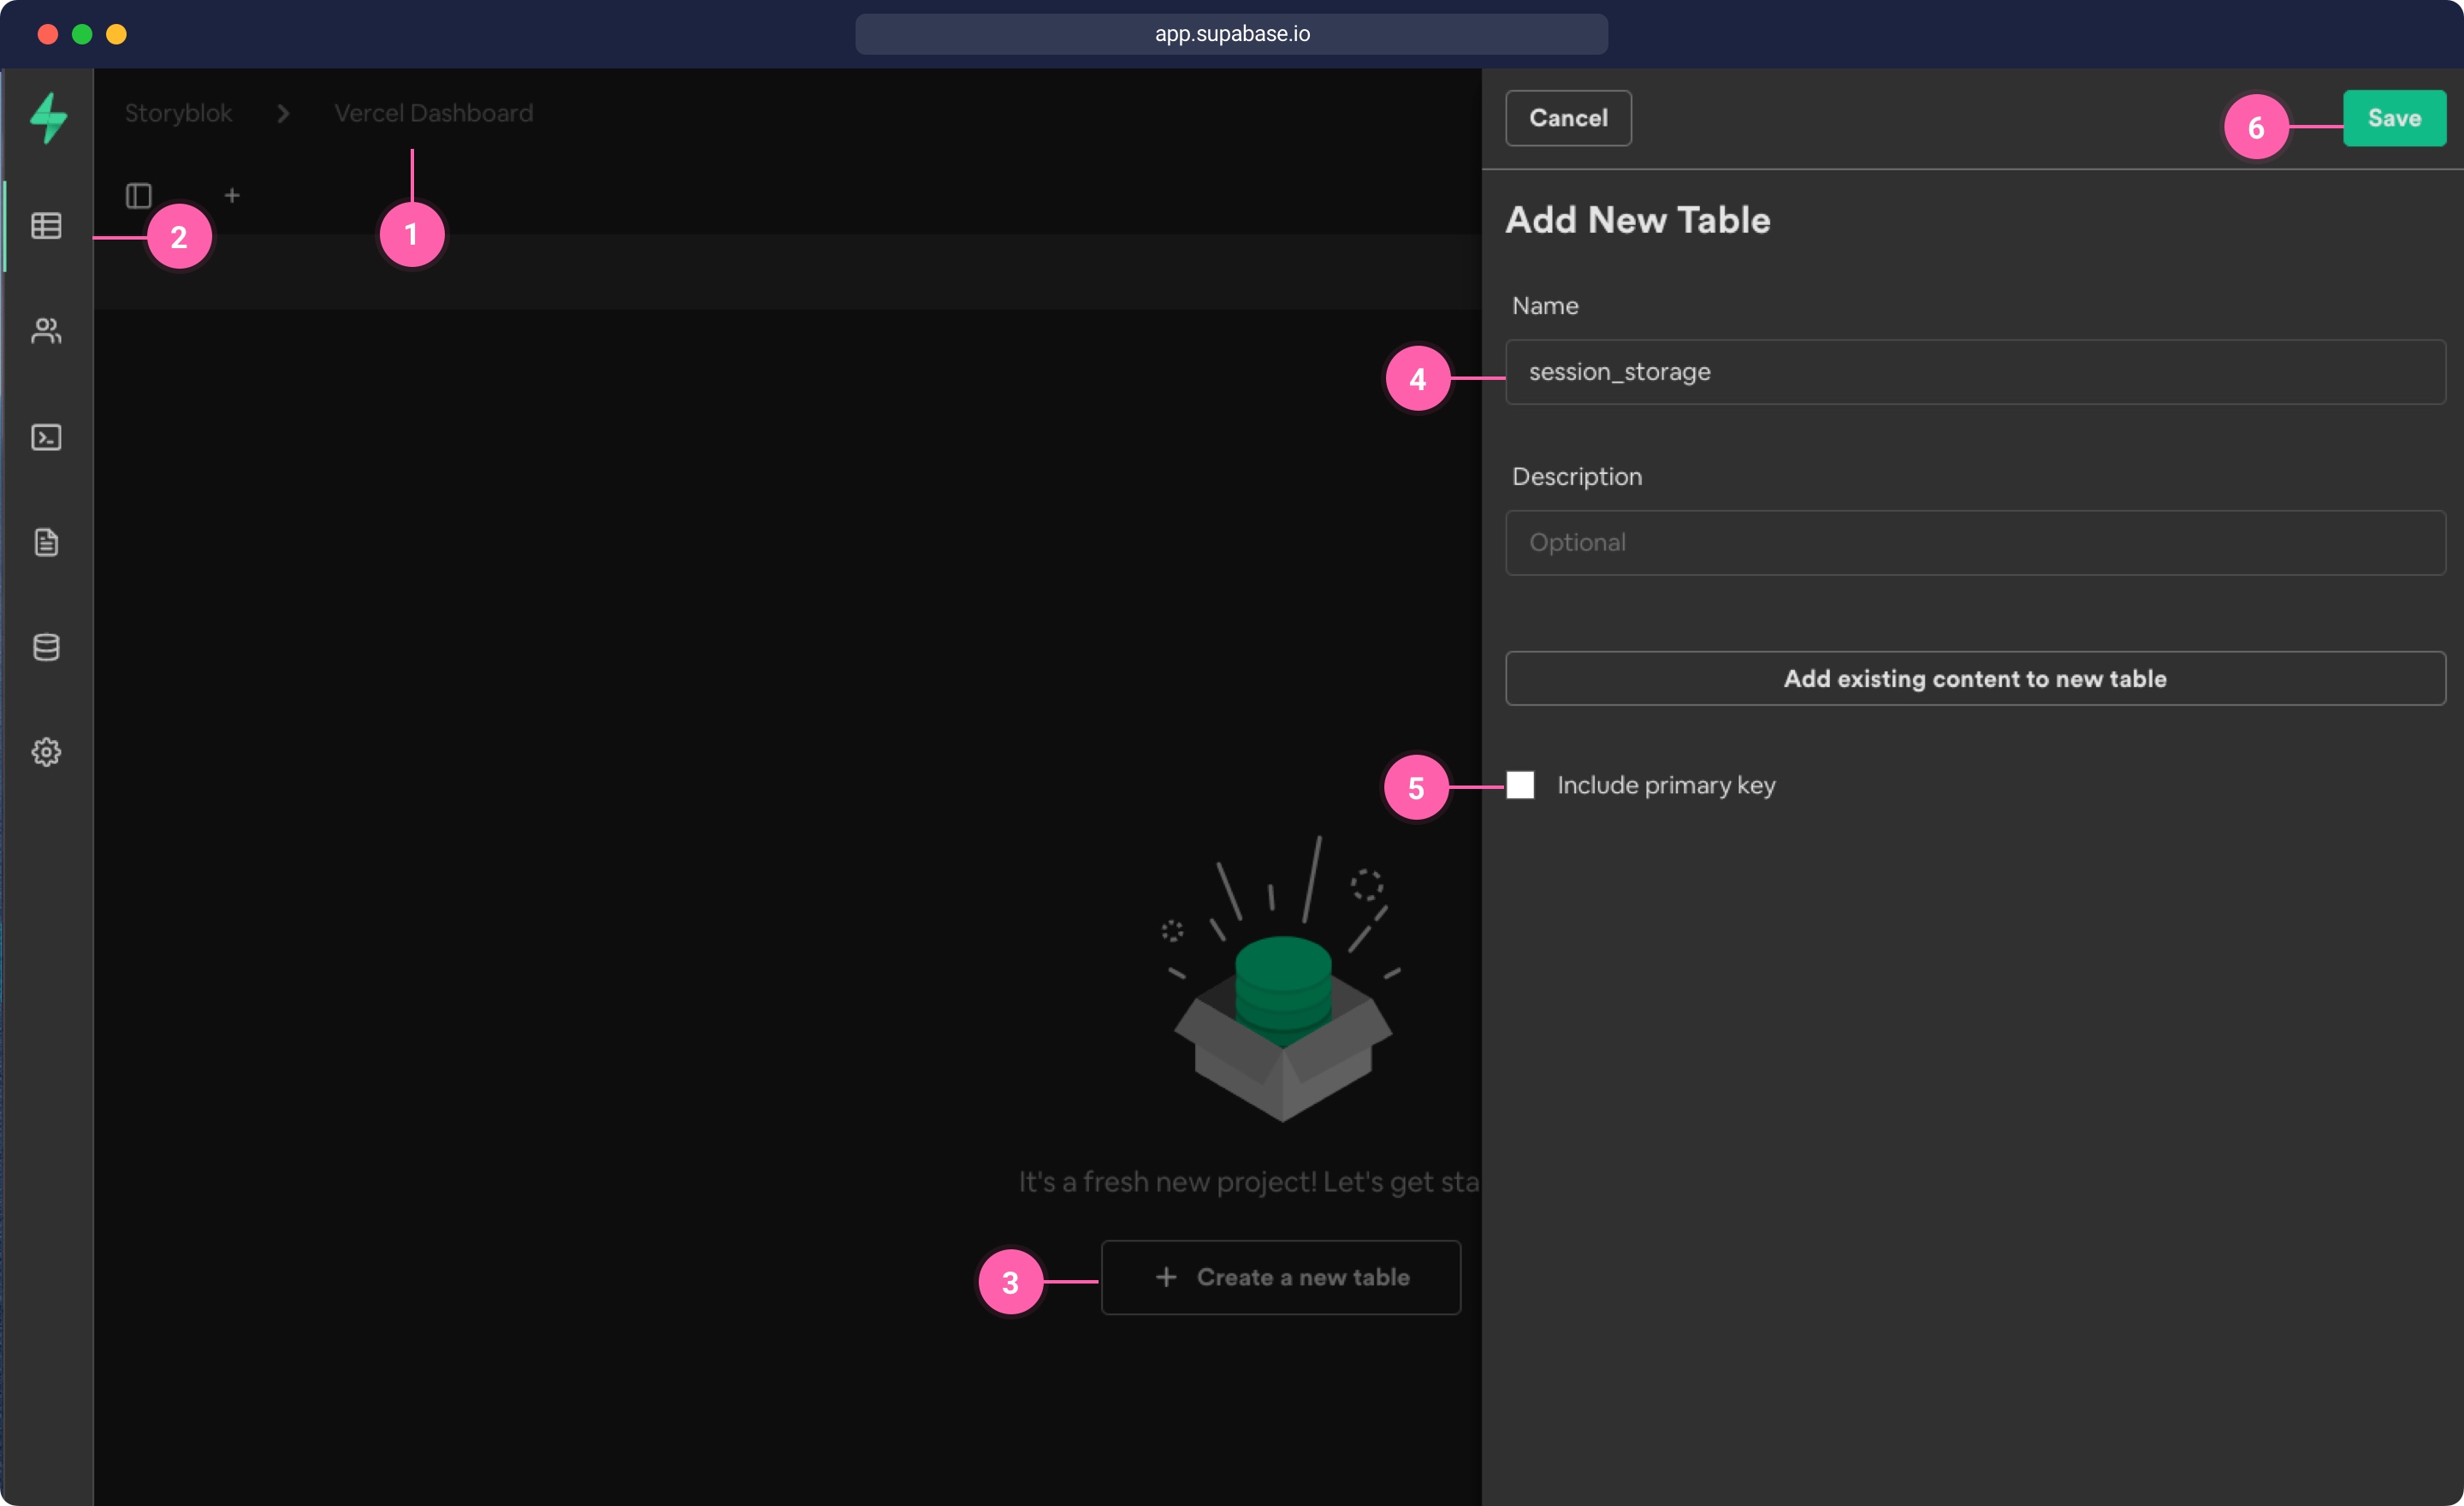
In order to store the code and access_tokens that we got in the api/sb-callback.js serverless function, we need to set up a session store with a database, so other serverless functions in our app also have access to those tokens and can request content from Storyblok. As a database, you can use Firebase or any other database that allows selecting, updating, or deleting content. For this tutorial, we chose Supabase as a database client. You can also check grants firebase store implementation if you would rather use Firebase. First, we need to sign up for a free account for app.supabase.io. Once you're logged in, you can create a new project {1} and then go into the table editor {2}. There we create a new table {3} called session_storage {4}. Do not include the primary key {5} for now, since we will create it in the next step.
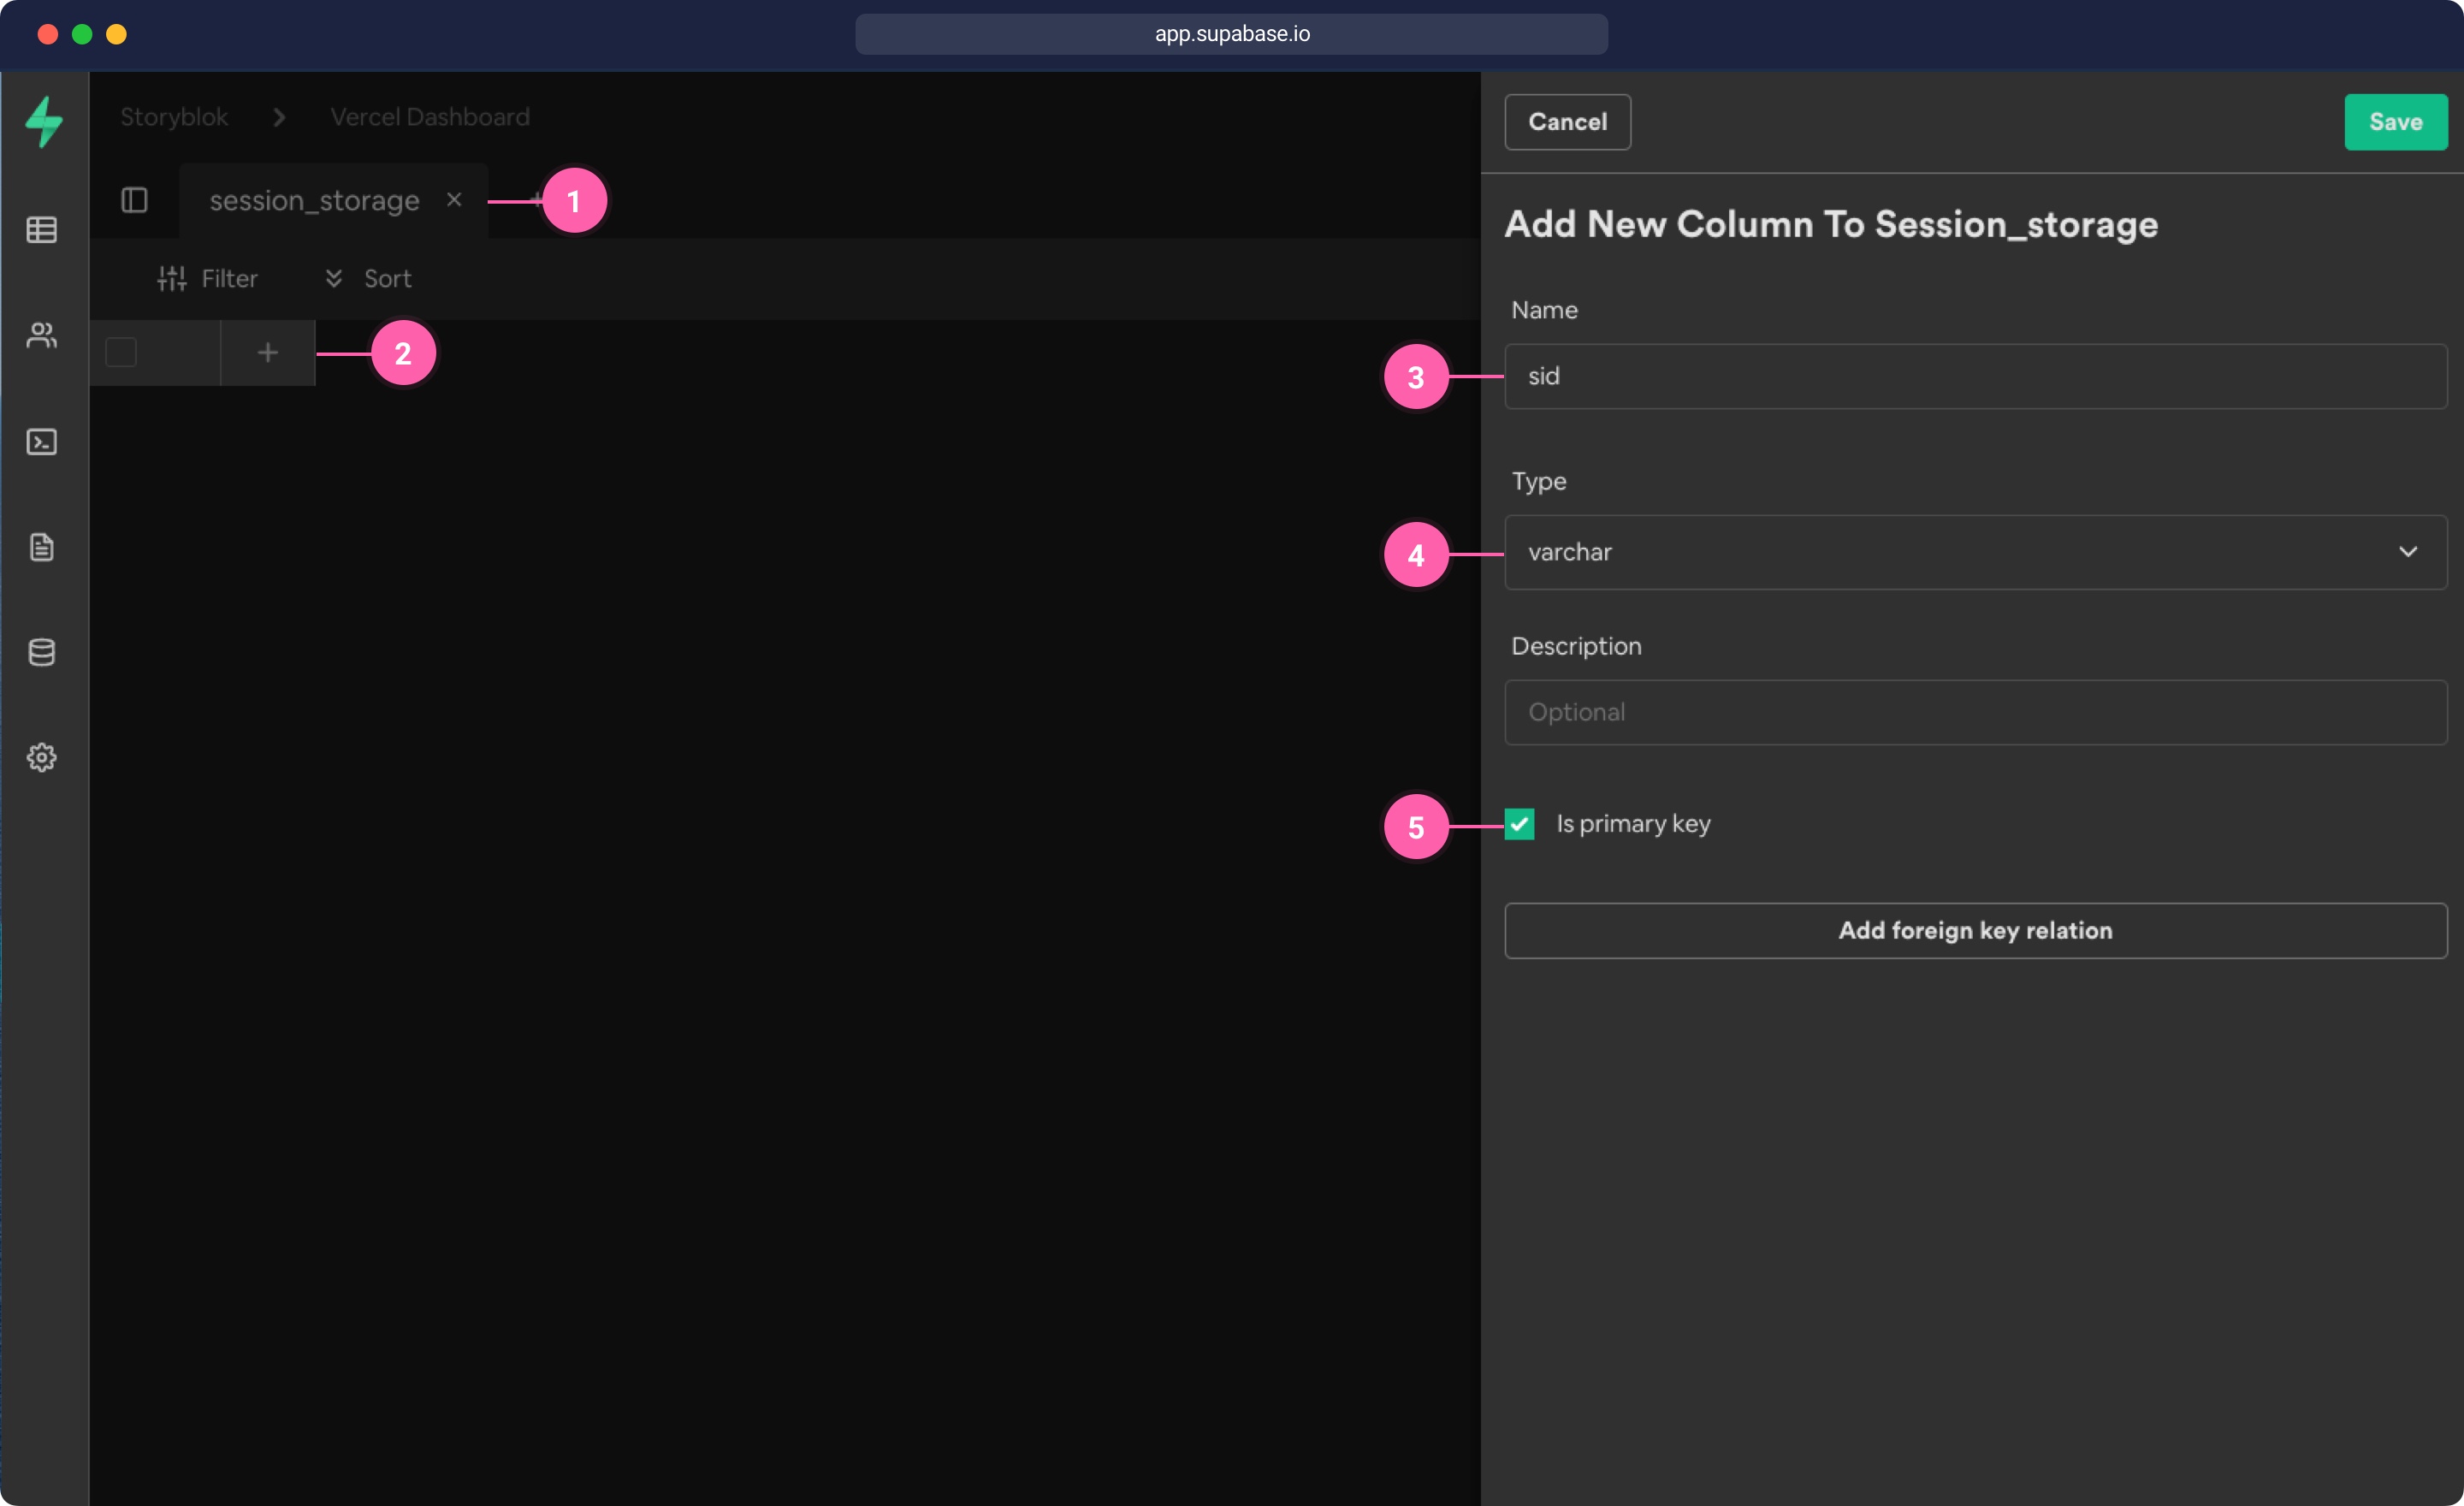
Now in our table {1}, we want to add a new column {2} with the name sid {3} of type text {4}. This will be our primary key {5}.
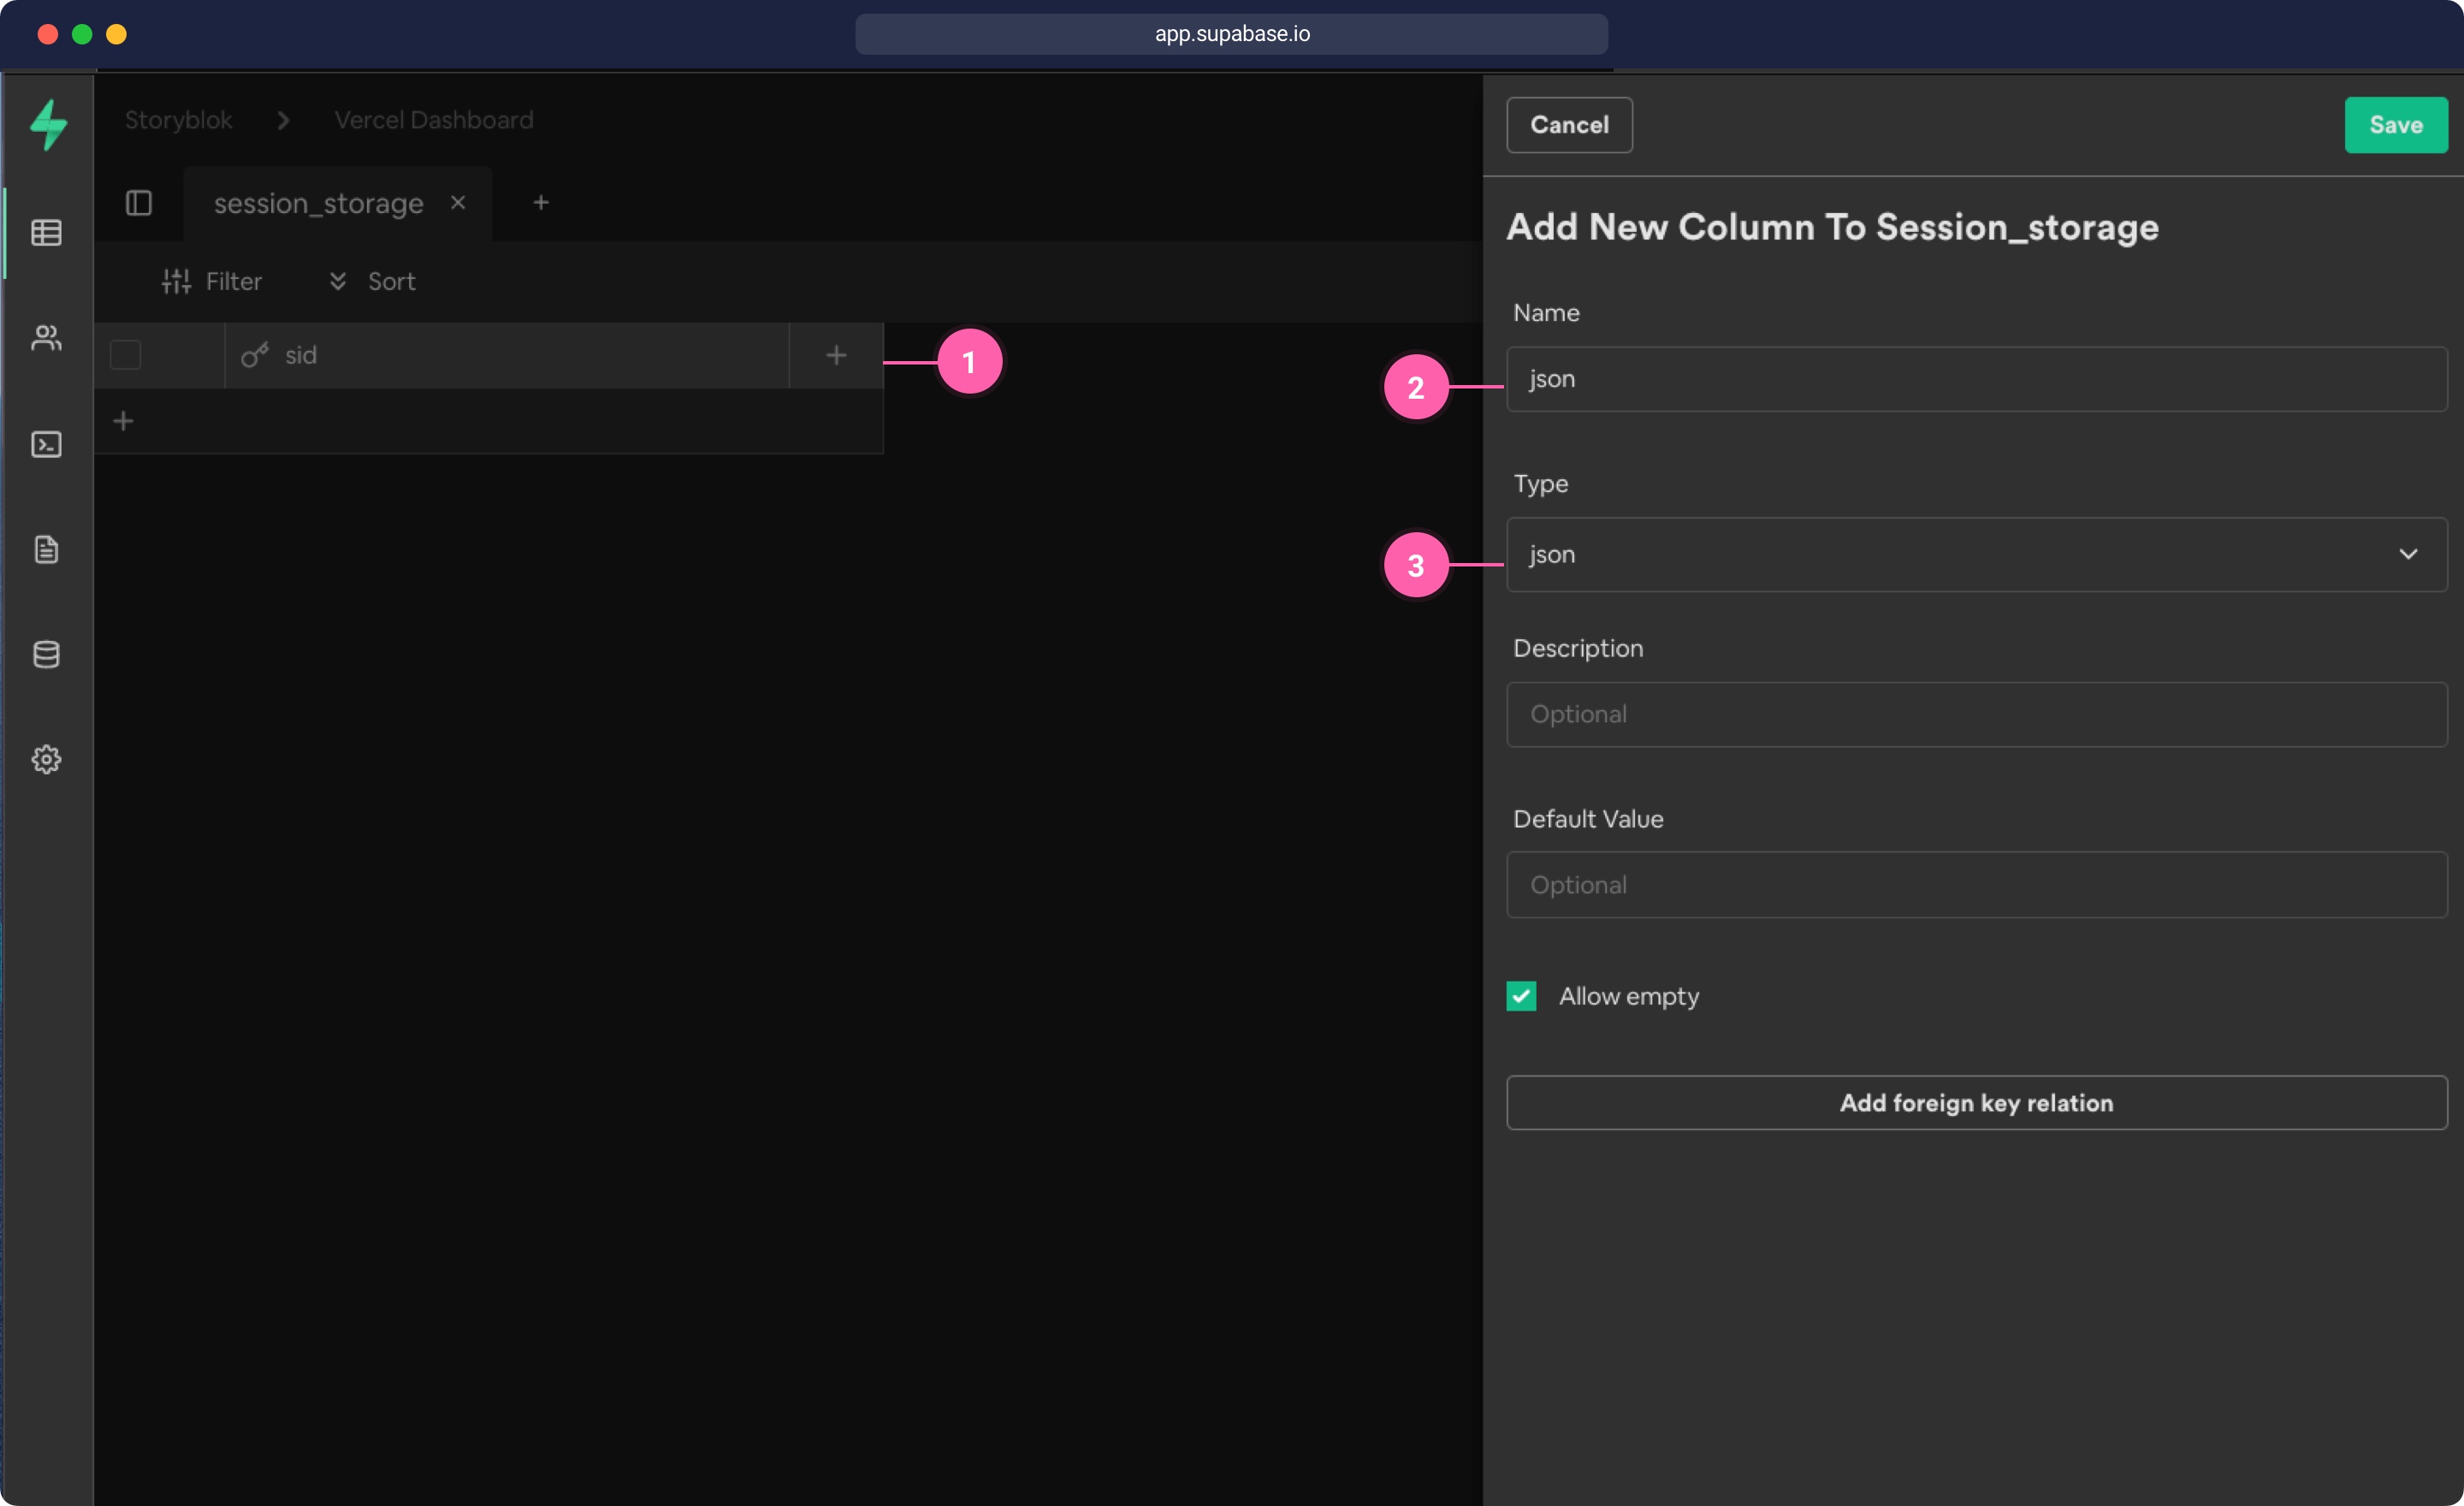
Then add another column {1} with the name json {2} of type json {3} and click save. That's all the setup we need in the database. Now the last thing is to retrieve our Supabase client id and secret.
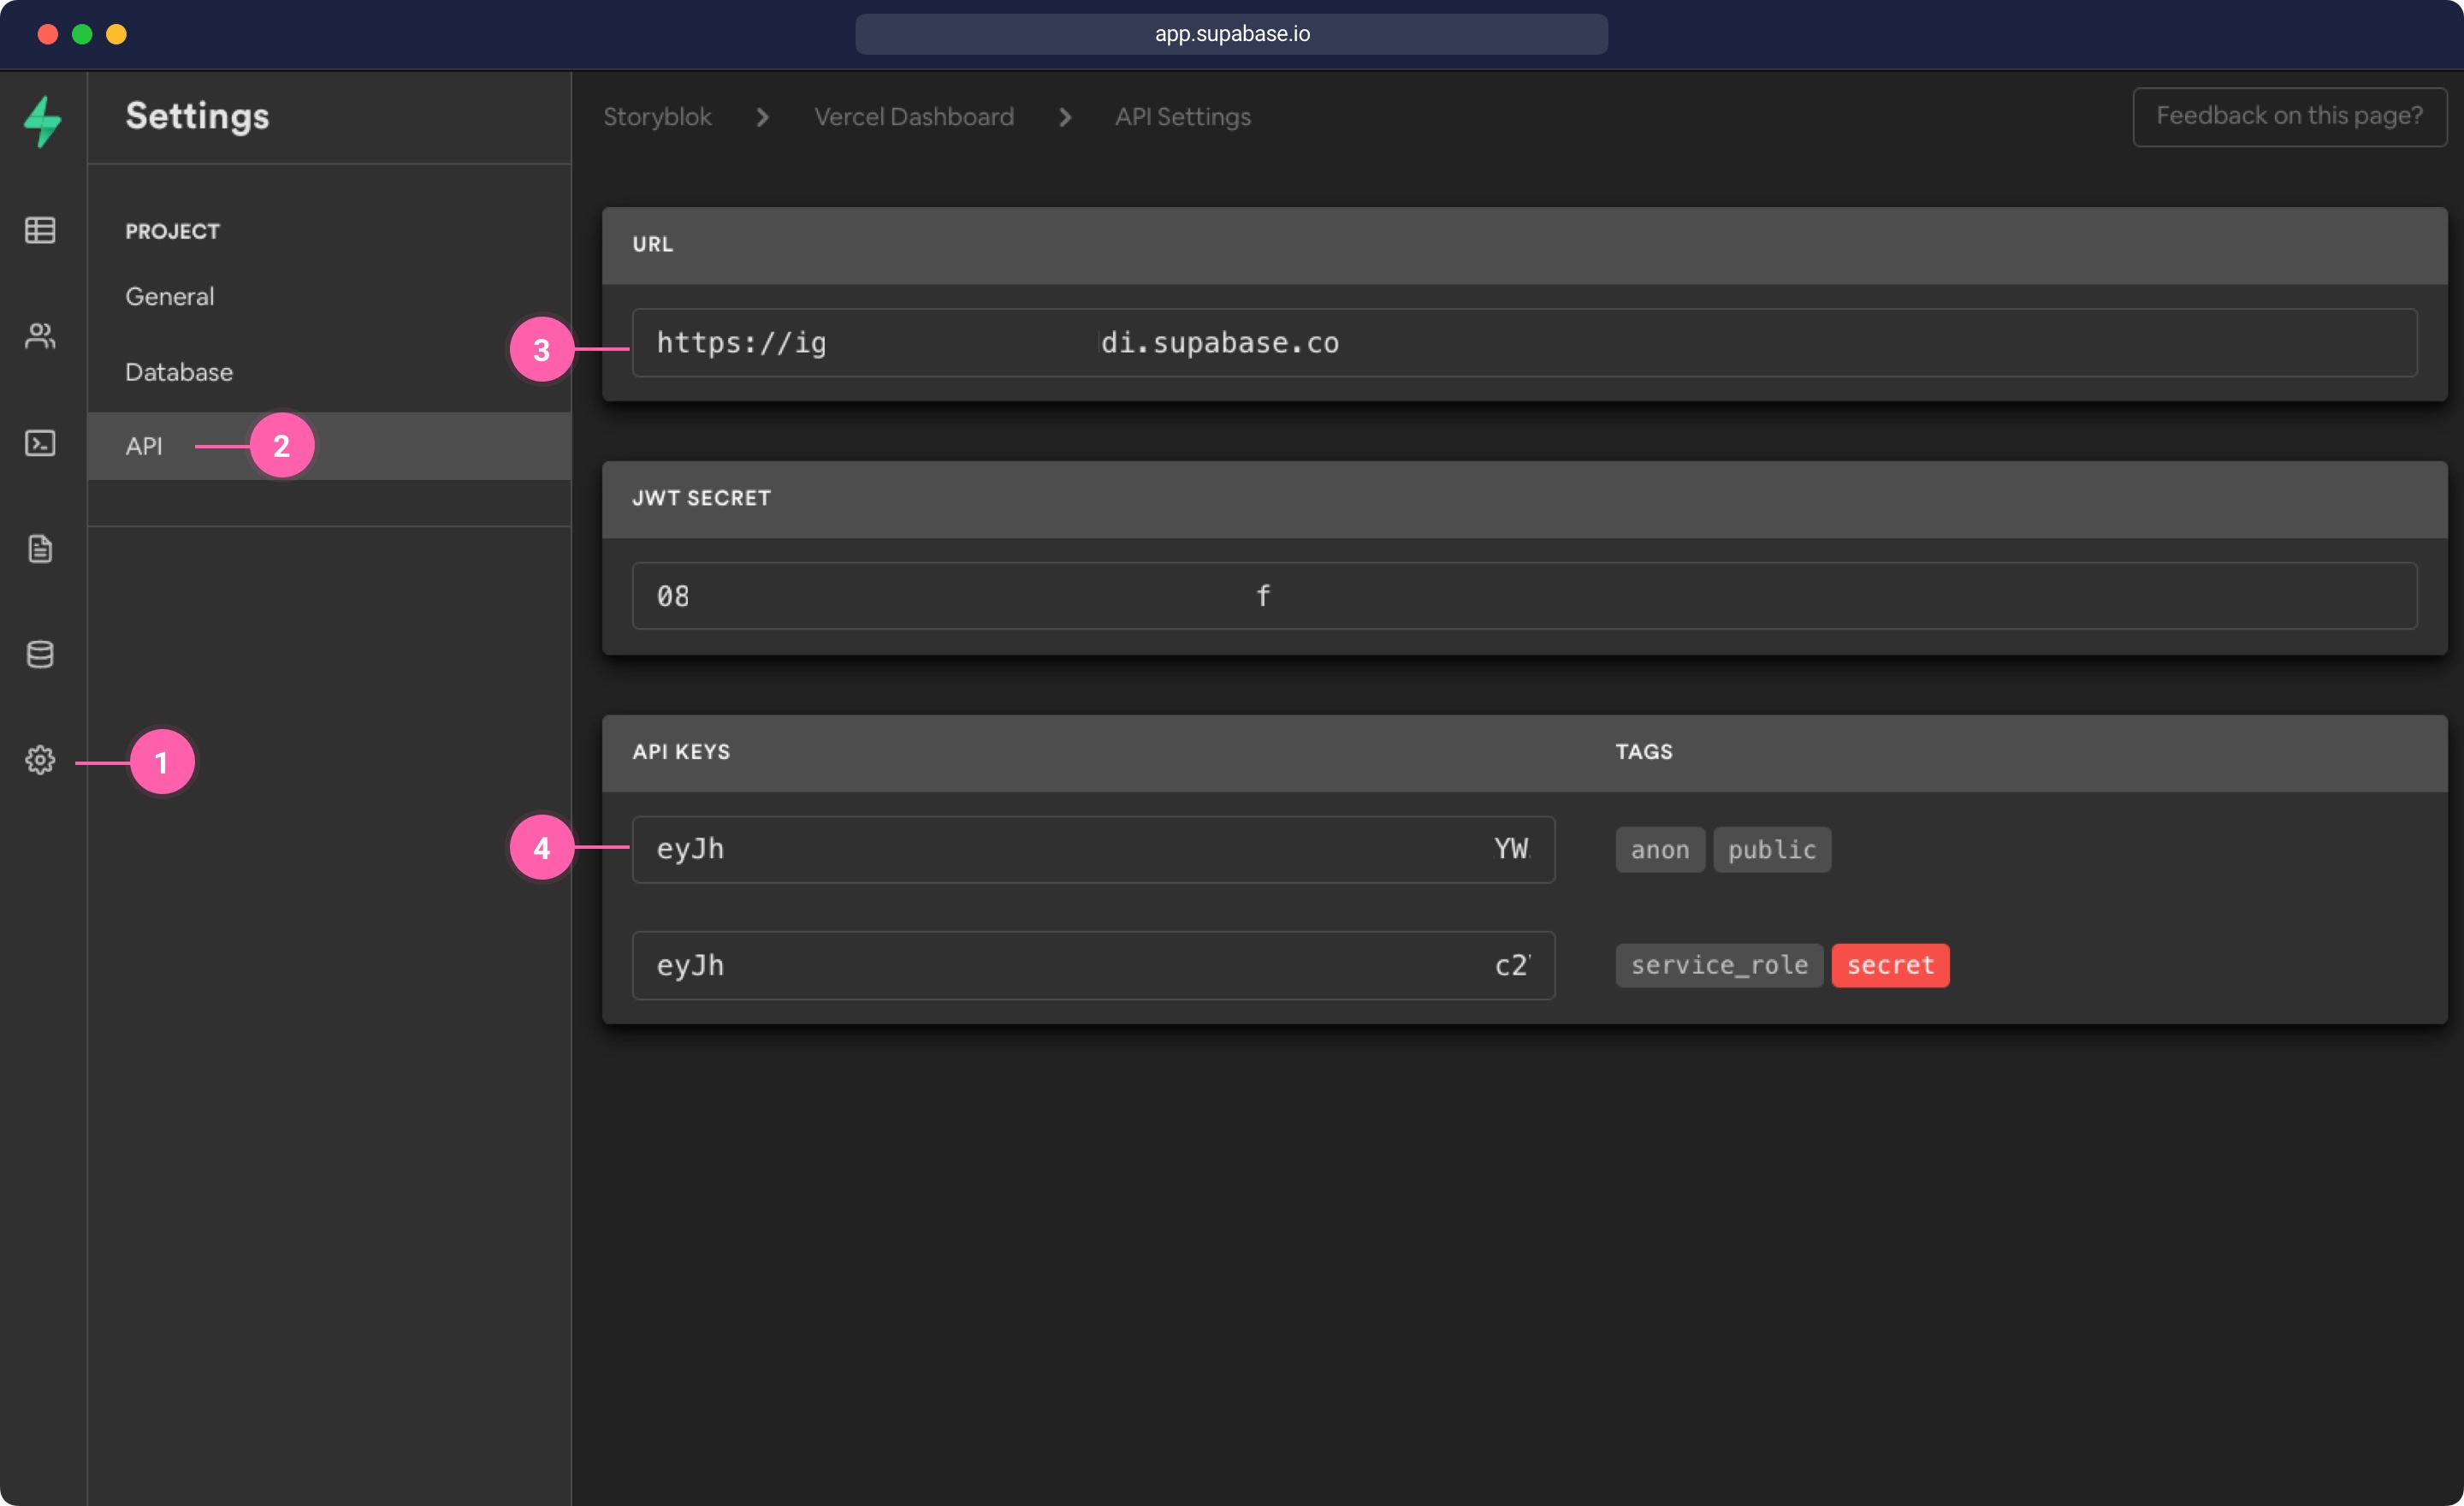
To retrieve the access keys, go into Settings {1} and then click on API {2}. There you will find your Supabase URL {3} and an anon public key {4}
We need to add these Variables to the Netlify environment variables as we did before with the STORYBLOK_CLIENT_ID.
Once you added the variables to your Site settings in Netlify, you should now have 5 environment variables set up {3}.
store.js
The next step is to add the session_storage to our grant client. Inside of the api/utils folder create a new store.js file with the following code. Be aware that you might need to change all occurrences of session_storage to whatever you called your table in Supabase:
api/utils/store.js
api/utils/store.js
const { merge } = require('lodash')
const { createClient } = require('@supabase/supabase-js')

const supabaseUrl = process.env.SUPABASE_DB_URL
const supabaseKey = process.env.SUPABASE_PUBLIC_KEY
const supabase = createClient(supabaseUrl, supabaseKey)

module.exports = {
  // select
  get: async (sid) => {
    const { data: session_storage } = await supabase
      .from('session_storage')
      .select('sid, json')
      .eq('sid', sid)
    return session_storage && session_storage.length
      ? session_storage[0].json
      : {}
  },
  // upsert
  set: async (sid, json) => {
    // get the previous set item
    const { data: session_storage } = await supabase
      .from('session_storage')
      .select('sid, json')
      .eq('sid', sid)

    if (session_storage && session_storage.length) {
      const fullJson = merge(session_storage[0].json, json)
      // set the json object
      await supabase
        .from('session_storage')
        .update({ json: fullJson })
        .match({ sid })
    } else {
      await supabase
        .from('session_storage')
        .insert([{ sid, json }], { upsert: true })
    }
  },
  // delete
  remove: async (sid) => {
    await supabase.from('session_storage').delete().match({ sid })
  },
}
Finally, we adapt api/grant.js to use transport-session and add our new store to the session config. Open the file and add the store confing to the session object:
api/grant.js
const grant = require('grant')
const SHA256 = require('crypto-js/sha256')
const uuid = require('uuid')
const codeIdentifier = uuid.v4()

const grantClient = grant.aws({
  config: {
    defaults: {
      origin: 'http://localhost:3000',
      prefix: '/connect',
      transport: 'session',
    },
    storyblok: { // ... like before }
  },
  session: {
    name: 'my-cookie-name',
    secret: 'my-cookie-secret-123',
    cookie: {
      sameSite: 'none',
      path: '/',
      httpOnly: 'true',
      secure: true,
    },
    store: require('./utils/store'),
  },
})

exports.handler = async (event) => {
  event.version = '1.0' // for grant to set the correct path on AWS
  const { redirect, response } = await grantClient(event)
  return (
    redirect || {
      statusCode: 200,
      headers: { 'content-type': 'application/json' },
      body: JSON.stringify(response),
    }
  )
}
Using the Store in the Serverless Functions
After retrieving the access_token we want to store the token in our session. Let's open the api/sb-callback.js file and adapt it. We will set up a session, which retrieves our session cookie and can save content to our Supabase database with the cookie name. If there is already an entry with content in the database, we add the space_id, code, access_token and refresh_token to the existing entry under a storyblok key. Finally, we write to the database with the session.set() function. With the session.remove() function, we could remove the entire session from the database, when we don't need it anymore.
api/sb-callback.js
const Session = require('grant/lib/session')({
    name: 'my-cookie-name',
    secret: 'my-cookie-secret-123',
    store: require('./utils/store'),
  })
  const getTokenFromCode = require('./utils/getTokenFromCode')

  exports.handler = async (event) => {
    event.version = '1.0'
    const session = Session(event)

    try {
      const { code, space_id } = event.queryStringParameters
      // get the access token from the code parameter
      const { access_token, refresh_token } = await getTokenFromCode({
        code,
        provider: 'storyblok',
        grant_type: 'authorization_code',
      })

      // set the access token in the session to use in other serverless functions
      await session.set({
        storyblok: {
          space_id,
          code,
          access_token,
          refresh_token,
        },
      })

      return {
        statusCode: 302,
        headers: {
          Location: process.env.BASE_URL + `/?space_id=${space_id}`,
        },
        body: null,
      }
    } catch (e) {
      const statusCode = e.response ? e.response.status : 500

      return {
        statusCode,
        headers: {
          'content-type': 'application/json',
        },
        body: JSON.stringify({ error: e.message }, null, 2),
      }
    }
  }
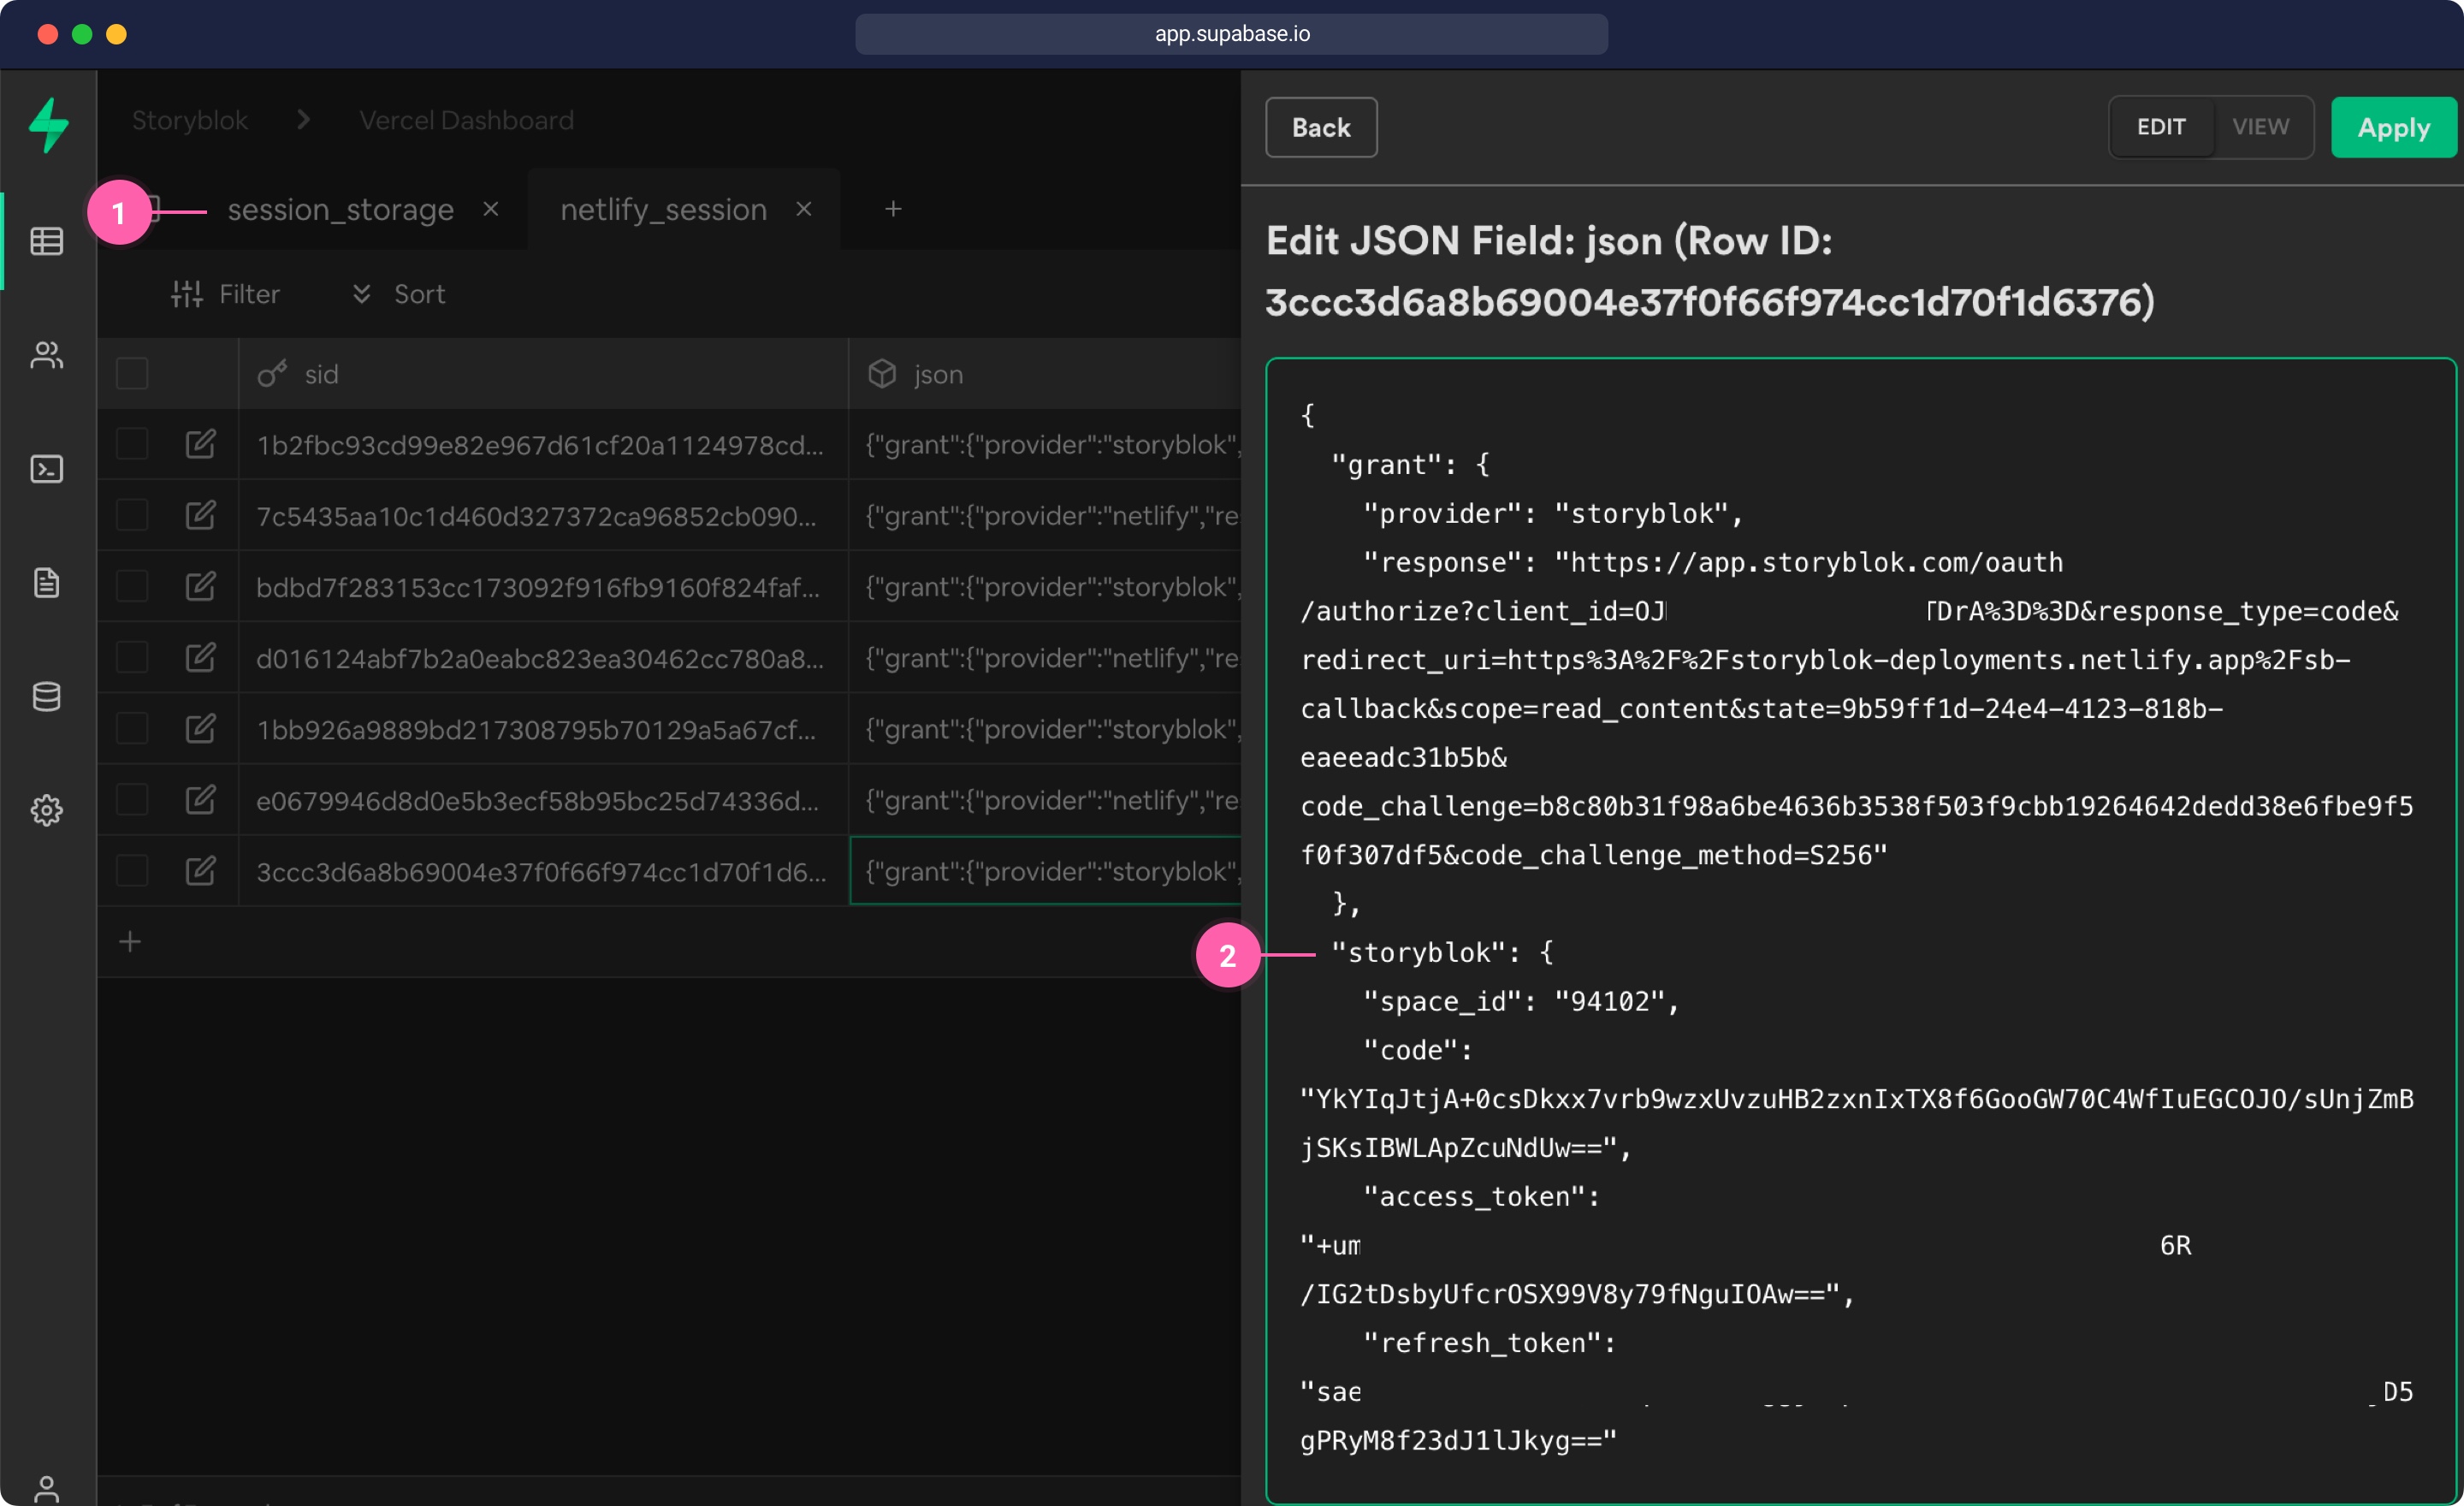
Let's deploy these changes by running netlify deploy --prod in our command line or pushing the changes to the repository. If we access our application now and reload, there should already some data be written into our Supabase store. Let's see what was written inside our session, by opening the table in app.supabase.io application. The sid will be the name of the grant cookie and the JSON, will be the JSON returned from grant plus the extra entries (space_id, code, ... ) from Storyblok we just set with the session.set() function. If we inspect the JSON field in our session_storage table {1}, we can see the data that was written by grant, along with the data that we set {2} in the api/callback.js, the space_id, code, access_token and refresh_token. Here you could set variable data depending on your application.
With the session set up, we can use this session in other serverless functions. If we take a look at the pages/index.vue file we can see that the application is requesting data in the loadStories function by calling a GET request to /auth/spaces/${this.spaceId}/stories .
pages/index.vue
   async loadStories() {
      // get the space id from URL and use it in requests
      return await axios
        .get(`/auth/spaces/${this.spaceId}/stories`)
        .then((res) => {
          this.perPage = res.data.perPage
          this.total = res.data.total
          this.stories = res.data.stories
        })
    },
To forward the requests to a serverless function, we already set up the /auth path in our _redirect file.
Next, we create a storyblok.js file inside of the api folder to request the content. Let's take a look at the code below. In the getEndpointUrl function, we remove the/auth/ part of the URLs. If the user is requested, we send the request to the oauth/user_info endpoint, like described in the app auth docs. Then we check if the session contains the access_token and create a Storyblok Management API Client with the OAuth token. Finally, we request the data from Storyblok and return it as JSON to the client.
api/storyblok.js
api/storyblok.js
const StoryblokClient = require('storyblok-js-client/dist/es5/index.cjs')
const Session = require('grant/lib/session')({
name: 'grant-net',
secret: 'sb-net',
store: require('./utils/store')
})
// this functions allows to route specific requests to specific endpoints
function getEndpointUrl (url) {
let endpointUrl = url.replace('/auth/', '')
if (url.includes('user')) { endpointUrl = 'oauth/user_info' }
return endpointUrl
}
exports.handler = async (event) => {
const session = Session(event)
const sessionEntry = await session.get()
const url = getEndpointUrl(event.path)
// we can only make requests to Storyblok if a session and an access token is present
if (
sessionEntry && sessionEntry.storyblok &&
sessionEntry.storyblok.access_token
) {
// get storyblok client
const sbClient = new StoryblokClient({
oauthToken: `Bearer ${sessionEntry.storyblok.access_token}`
})
// load the data from the given URL on the request
try {
const response = await sbClient.get(url)
return {
statusCode: response.status,
headers: {
'content-type': 'application/json'
},
body: JSON.stringify(response.data, null, 2)
}
} catch (e) {
const statusCode = e.response ? e.response.status : 500
return {
statusCode,
headers: {
'content-type': 'application/json'
},
body: JSON.stringify({ error: e.message }, null, 2)
}
}
} else {
return {
statusCode: 500,
headers: {
'content-type': 'application/json'
},
body: JSON.stringify({ error: 'No session found' }, null, 2)
}
}
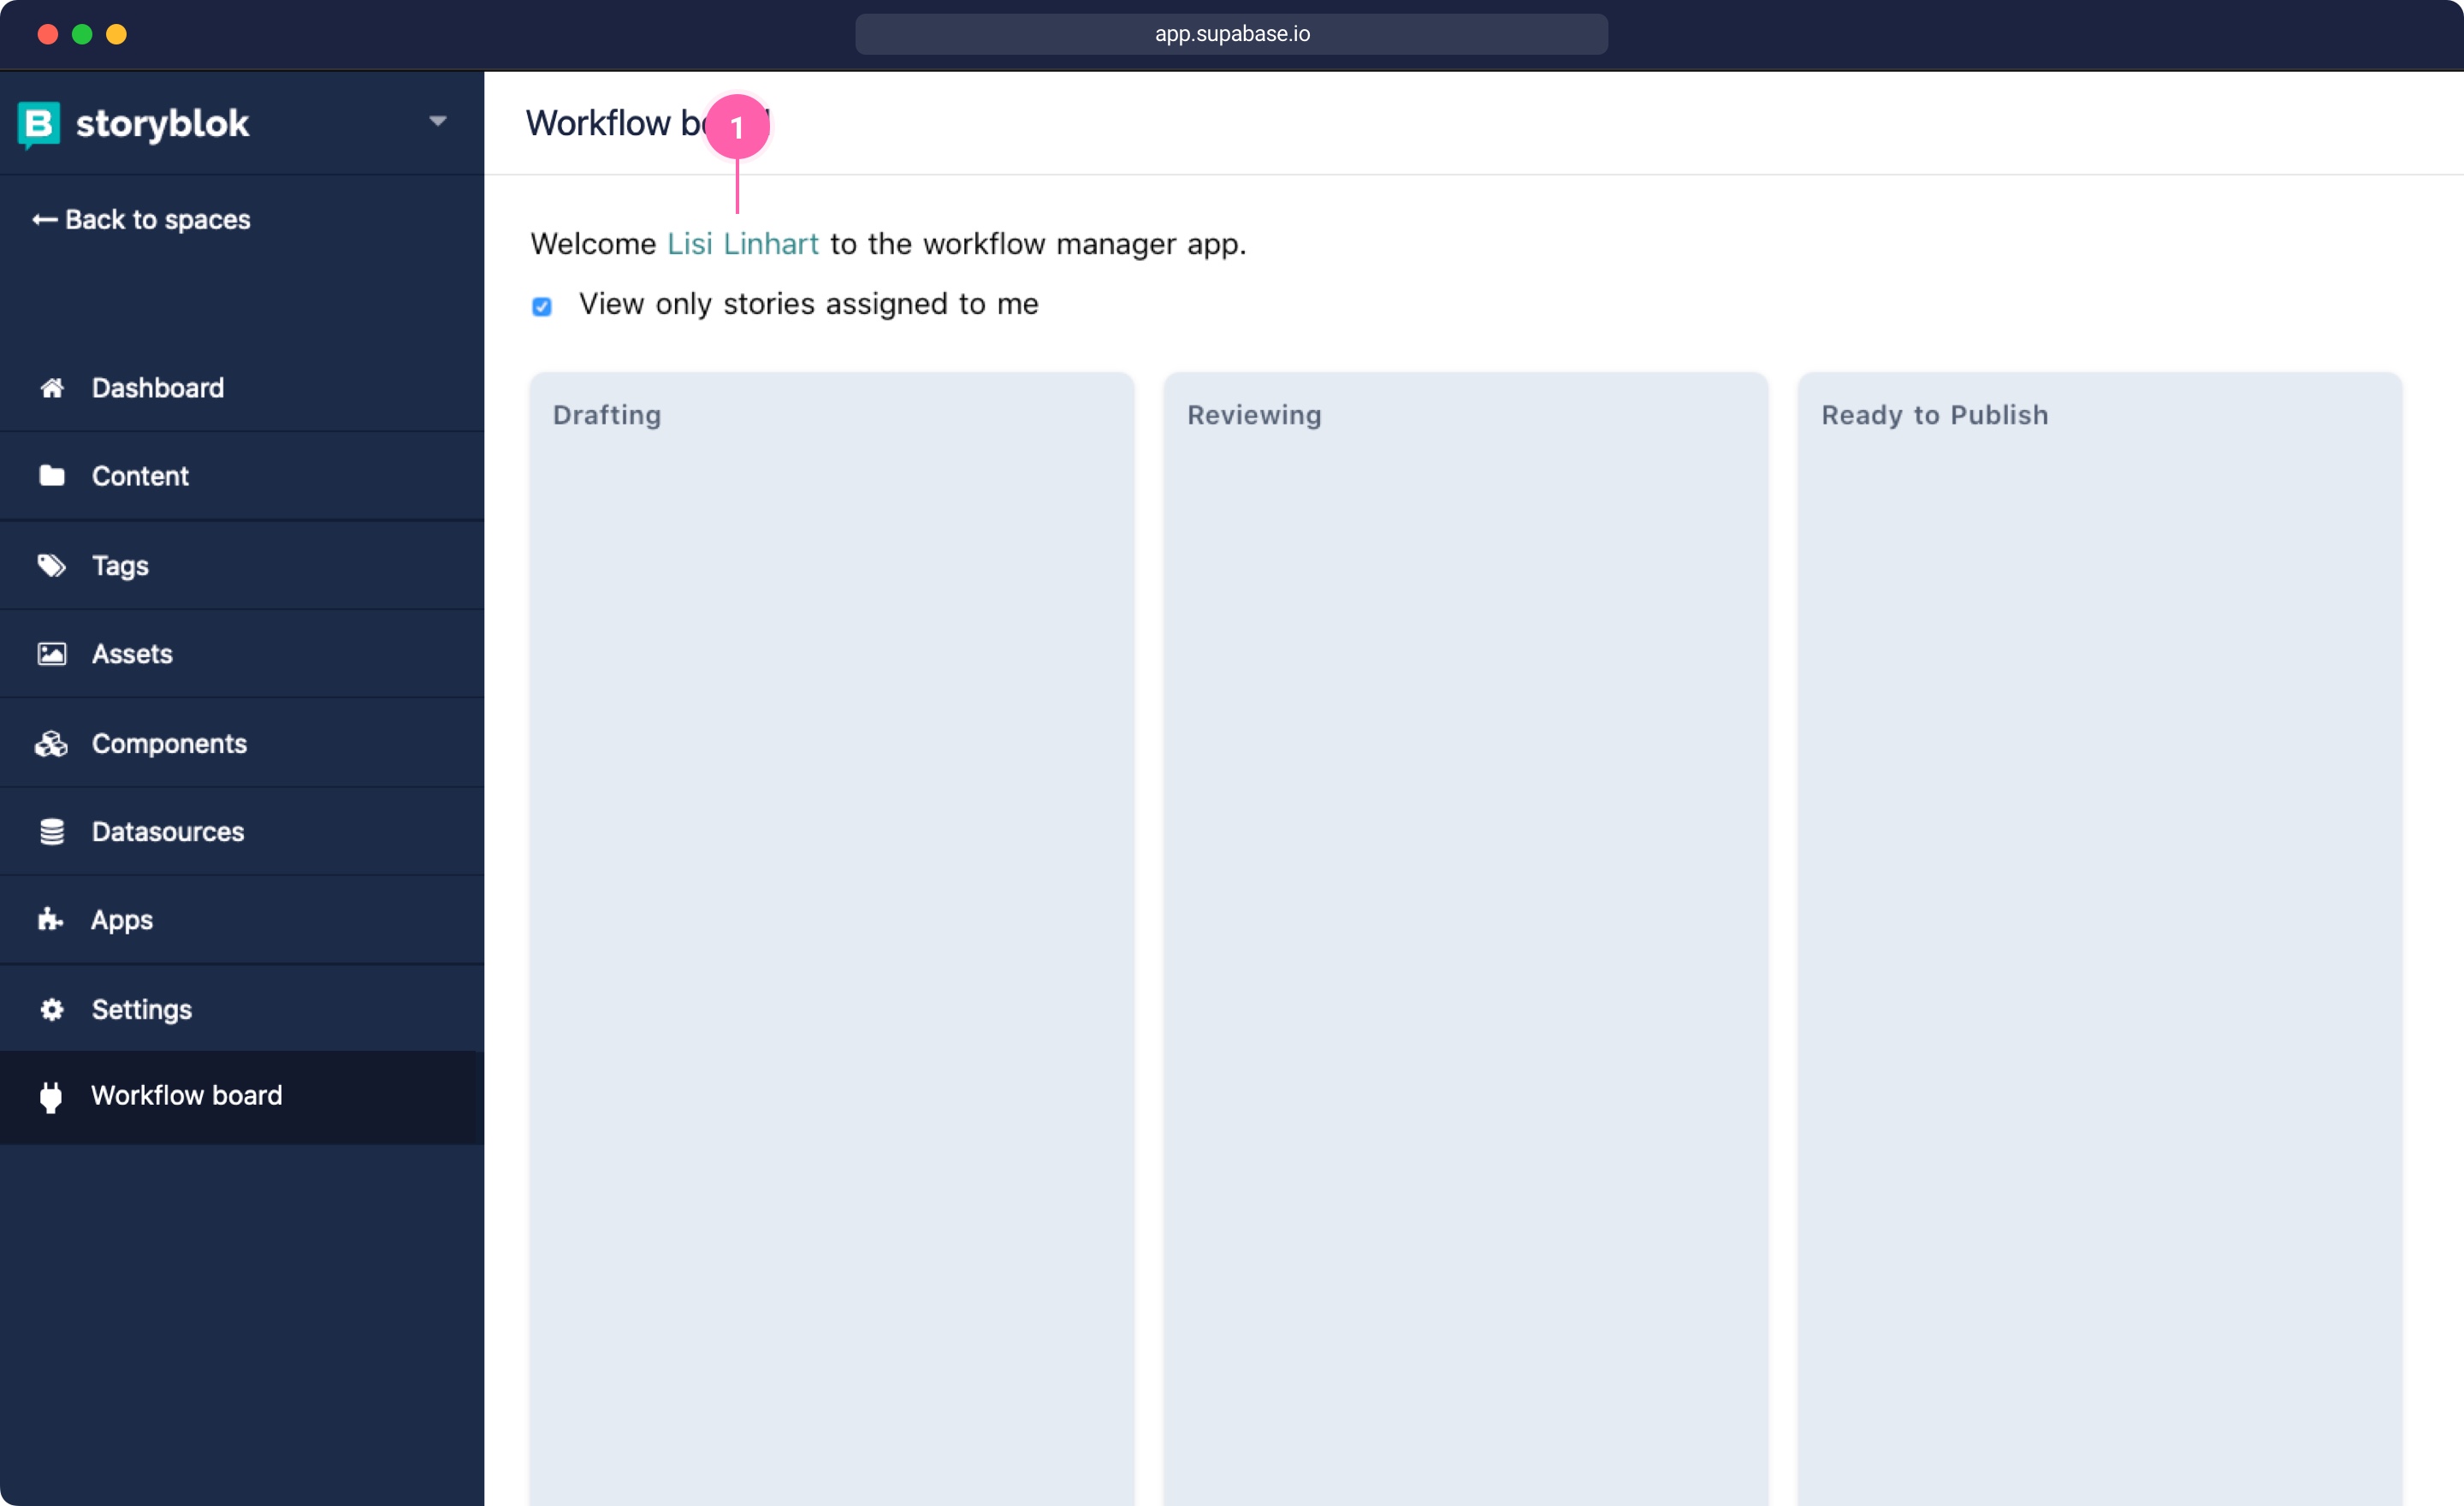
}Now if we deploy the functions again by running the netlify deploy --prod command in the command line and then reload our app, we should see that it's working because our app is already showing the logged-in user {1}.
Conclusion
By making use of serverless functions for the authentication flow, we don't have to run our own servers anymore. This enables to use statically built applications and make the requests to the different OAuth providers directly from the serverless functions. So you can build your apps with any technology you want without having to worry about the server technology. The end results of this tutorial can be found on the netlify branch of the repository that is listed below.
| Resource | Link |
|---|---|
| Github Repository for this tutorial | github.com/storyblok/serverless-custom-app-starter/tree/netlify |
Question or Feedback?
Author
