How to create an Alexa Skill with a Headless CMS
Storyblok is the first headless CMS that works for developers & marketers alike.
In this tutorial, we will create an Alexa Skill using Storyblok as the source of content.
In an omnichannel strategy, Alexa coexists with other channels, so we will see how we can share the same content with both an Alexa Skill and a website.
The skill we create will read a list of discounted products from a Storyblok space. Each product will have the following properties: name, image, discount description, and platform (Alexa and/or website). We will also see how to get the list of products for the website.
Content Setup in Storyblok
Let’s start by creating the content type for the products. If you don’t have a Storyblok account yet, sign up for free here (opens in a new window). First, create a new space and go to the Components section and click on New. Set the name of the component to offers and select the Act as a content type option only. Now we can create the fields:
- text: this field can be a textarea since we will use this for the description of the discount;
- image: this can be an asset field, used to store the picture of the product for the website;
- platform: this can be a multi-option field with Alexa and website as options. Editors can select where the offer will be published, selecting one or both options.
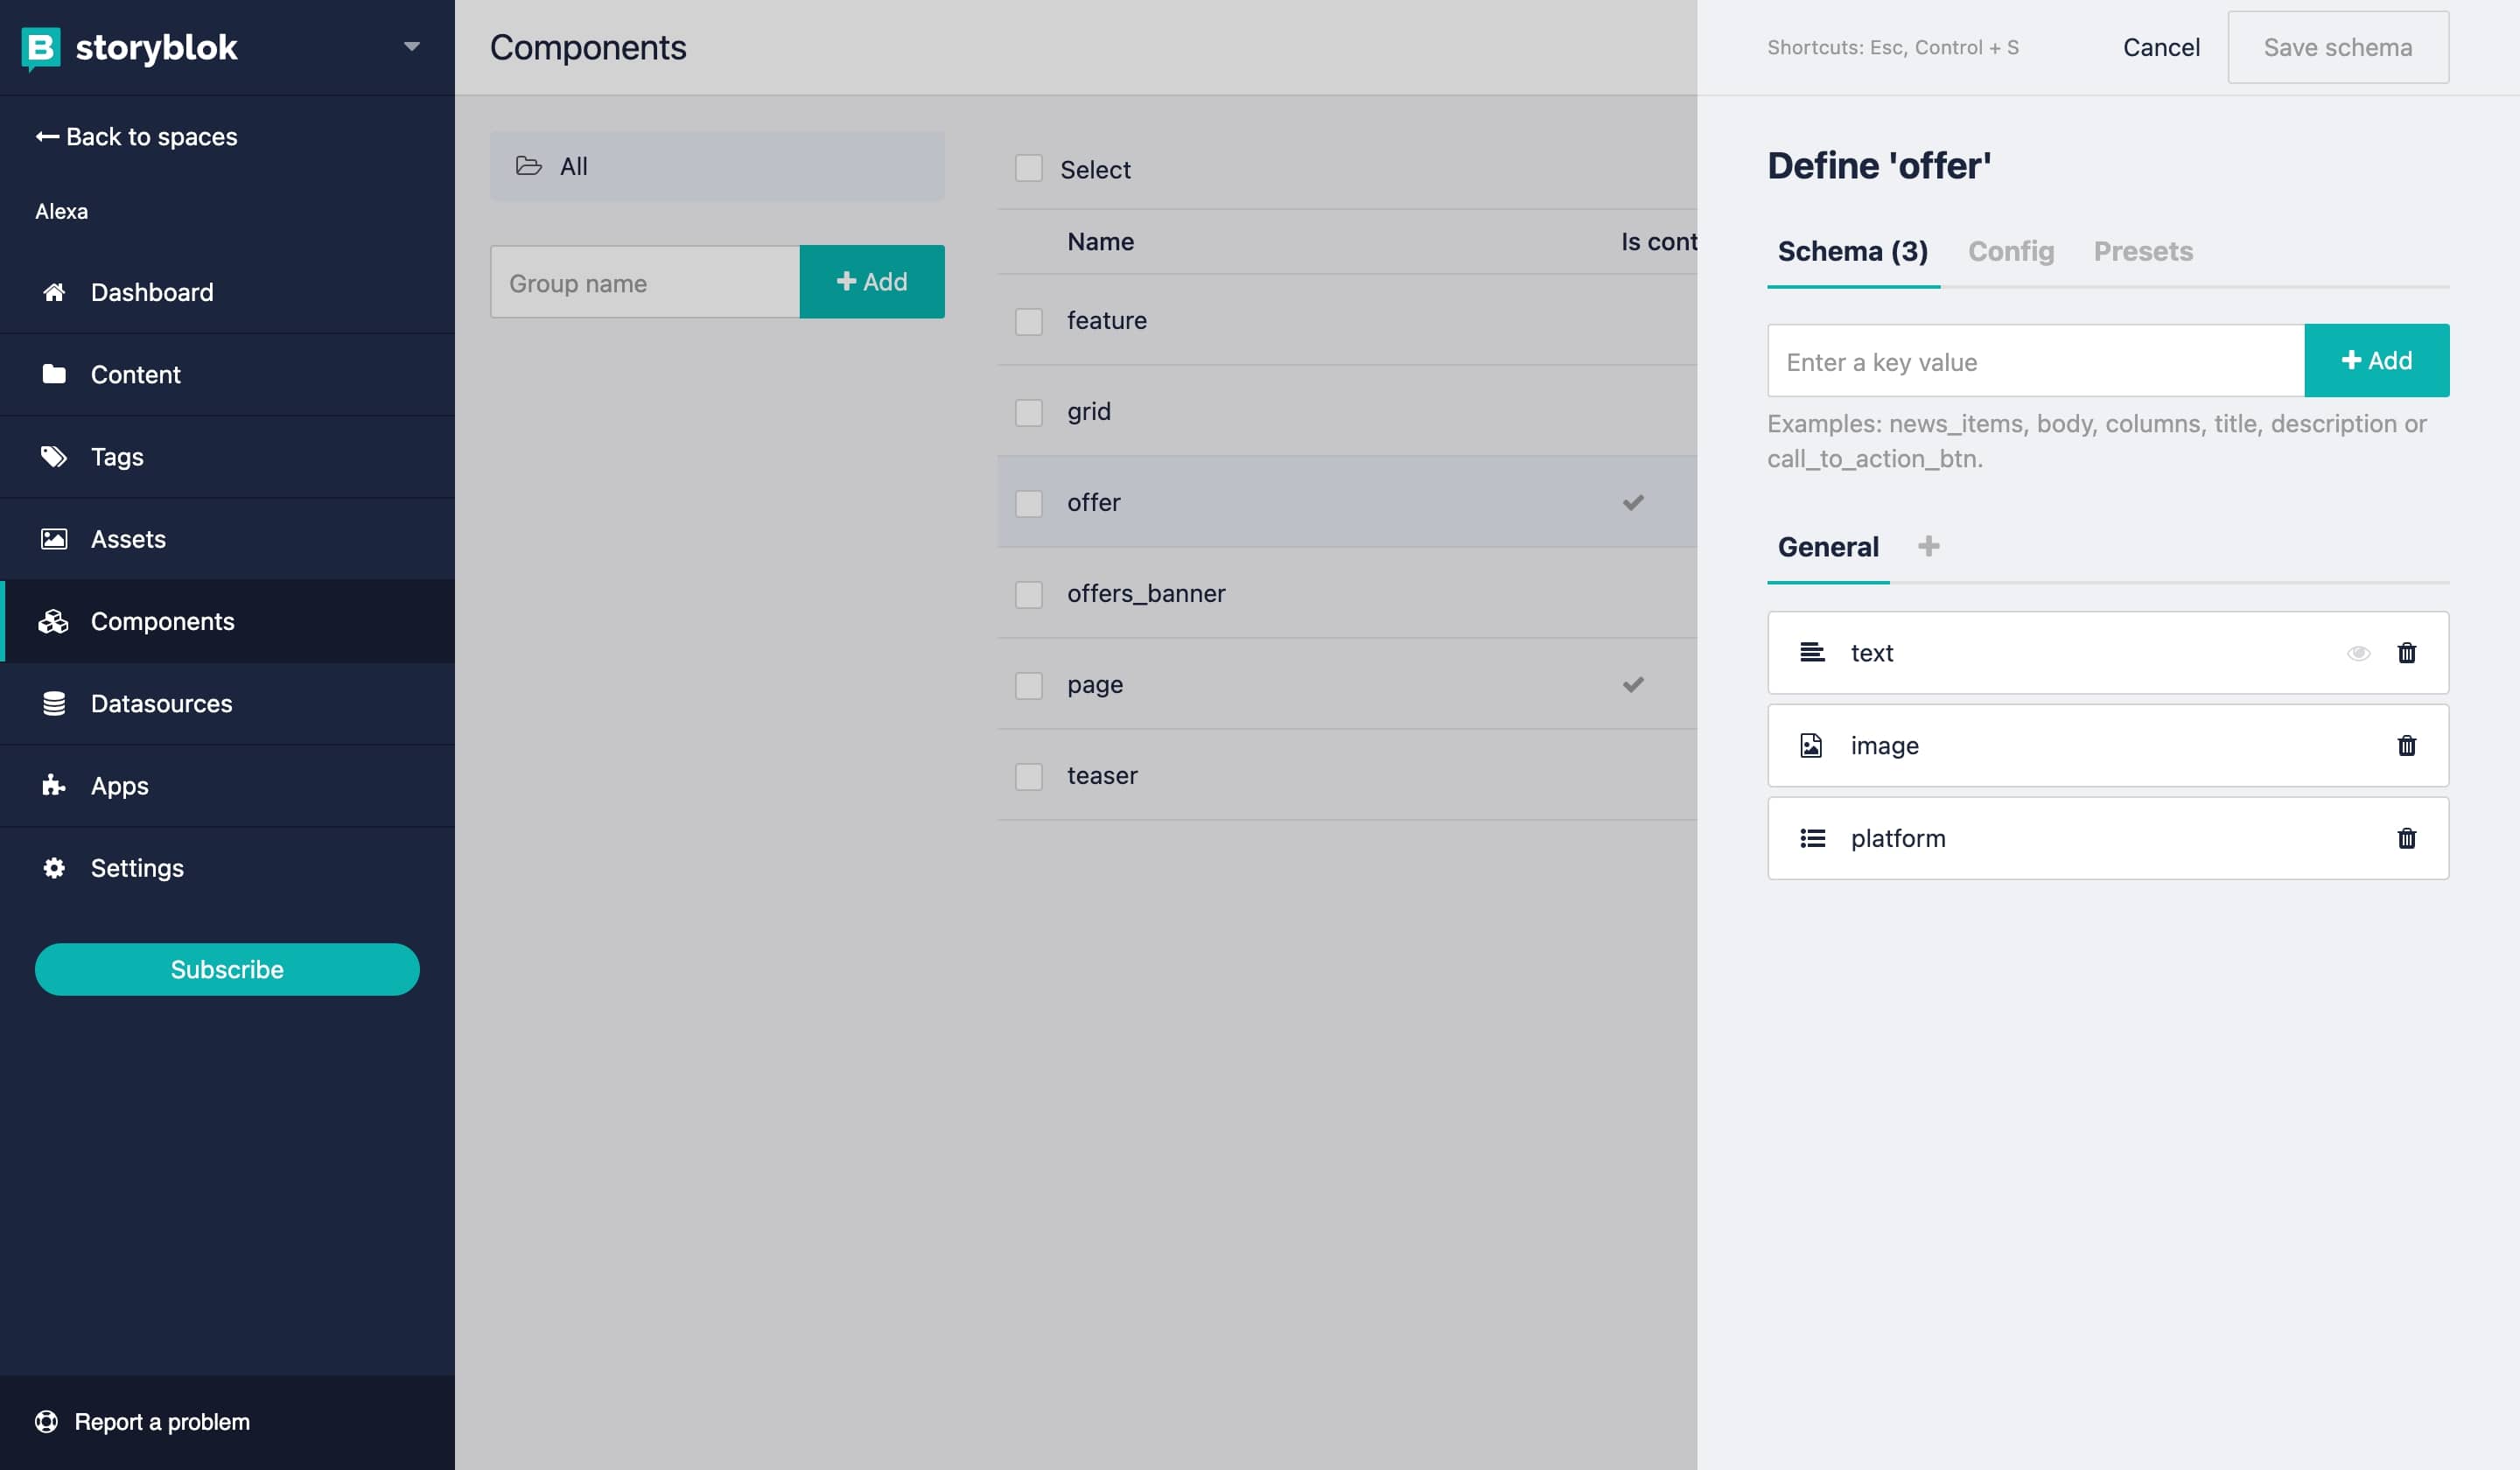
Component creation in Storyblok
Now we just have to add the content. Go to the Content section and create a new folder called Offers. In the new folder’s settings, choose Deny changing content type and Disable visual editor. This folder will work as a database of offers with no visual preview so that no editor accidentally uses a different content type.
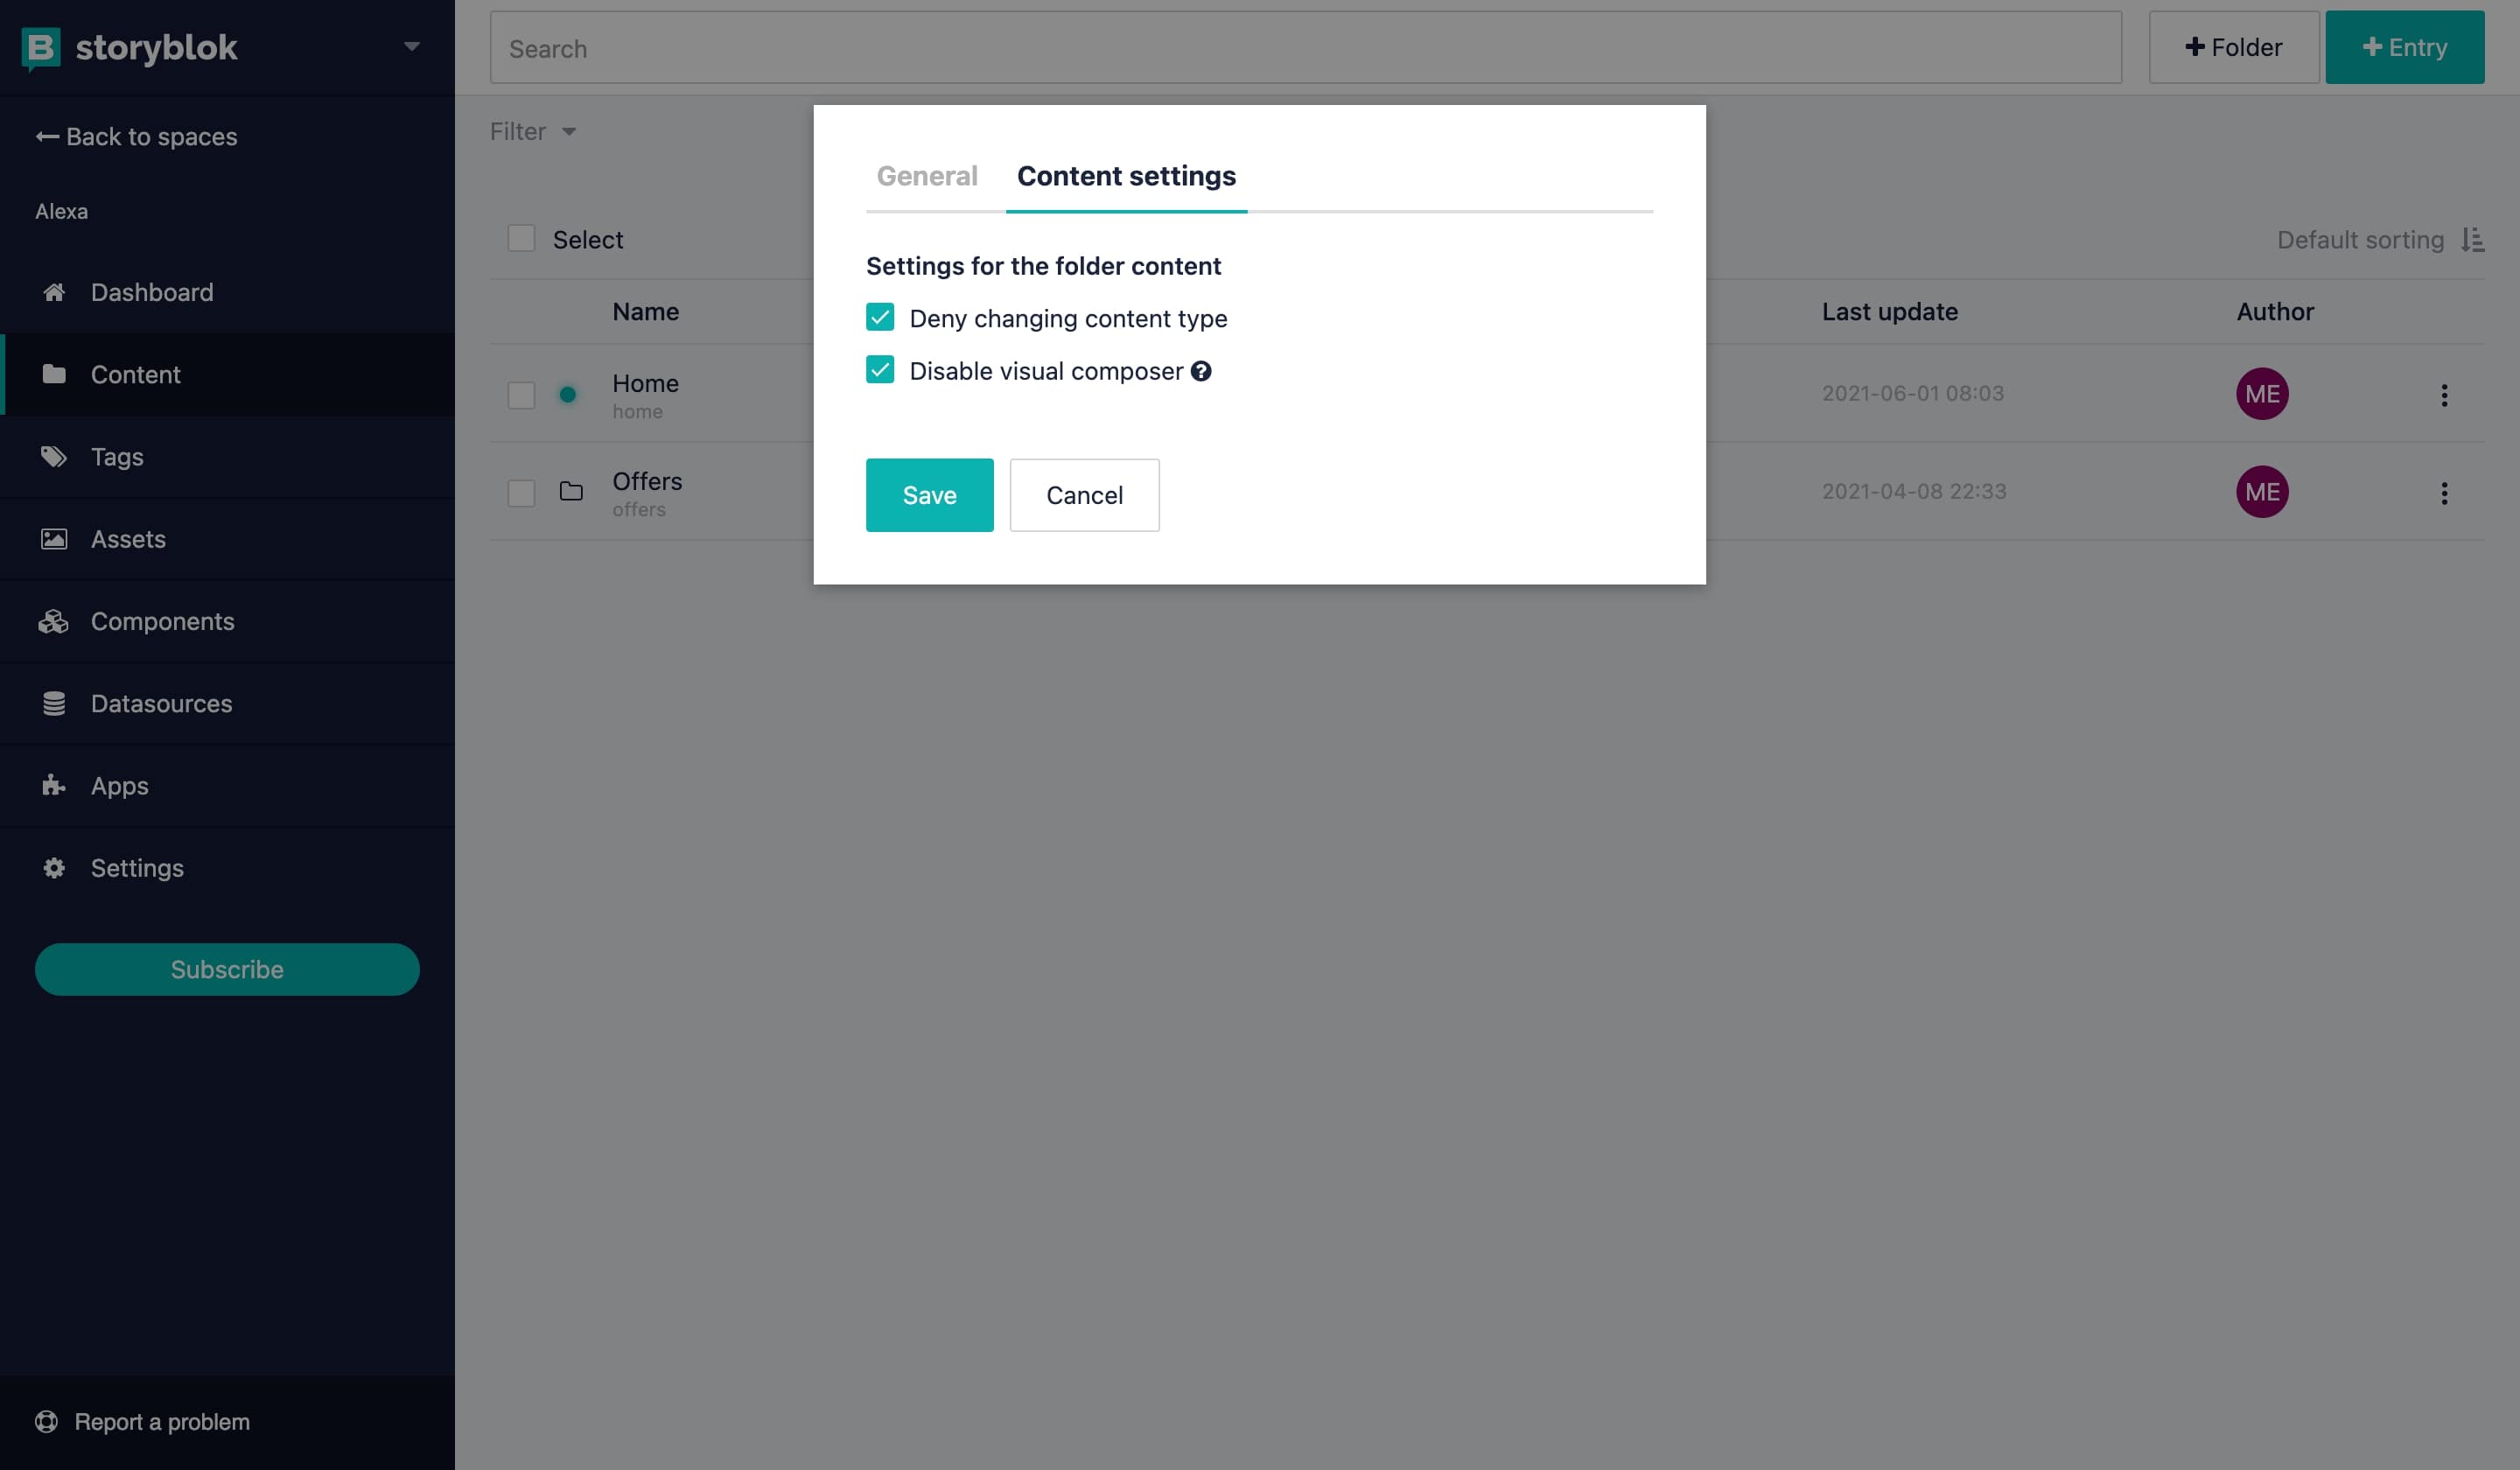
Settings of the new folder in Storyblok
Lastly, we will create a few offers. We should create at least 3 of them: one just for Alexa, one for the website, and another one for both. Now we can jump into the creation of the skill.
Create an Amazon Developer account
To create a skill, we need an Amazon Developer account. You can sign in at developer.amazon.com (opens in a new window). If you own an Alexa device and want to test the skill with it in the development phase, use the same email address of the account linked to your devices so the skill will be available, even if it’s not published. The developer’s console has a testing interface, but using a real device will be more interesting and fun.
What our skill will do
We want to make Alexa announce the list of offers from our Storyblok space after pronouncing a specific sentence.
Example:
Us: “Alexa, tell me the offers from headless CMS test”
Alexa: “The current offers are …”
We can also have a little interaction with Alexa when we activate our skill with a command. Then Alexa will tell us what we should say to get the list of offers.
Example:
Us: “Alexa, headless CMS test”
Alexa: “Welcome, to hear about the current offers say offers”
Us: “Offers”
Alexa: “The current offers are …”
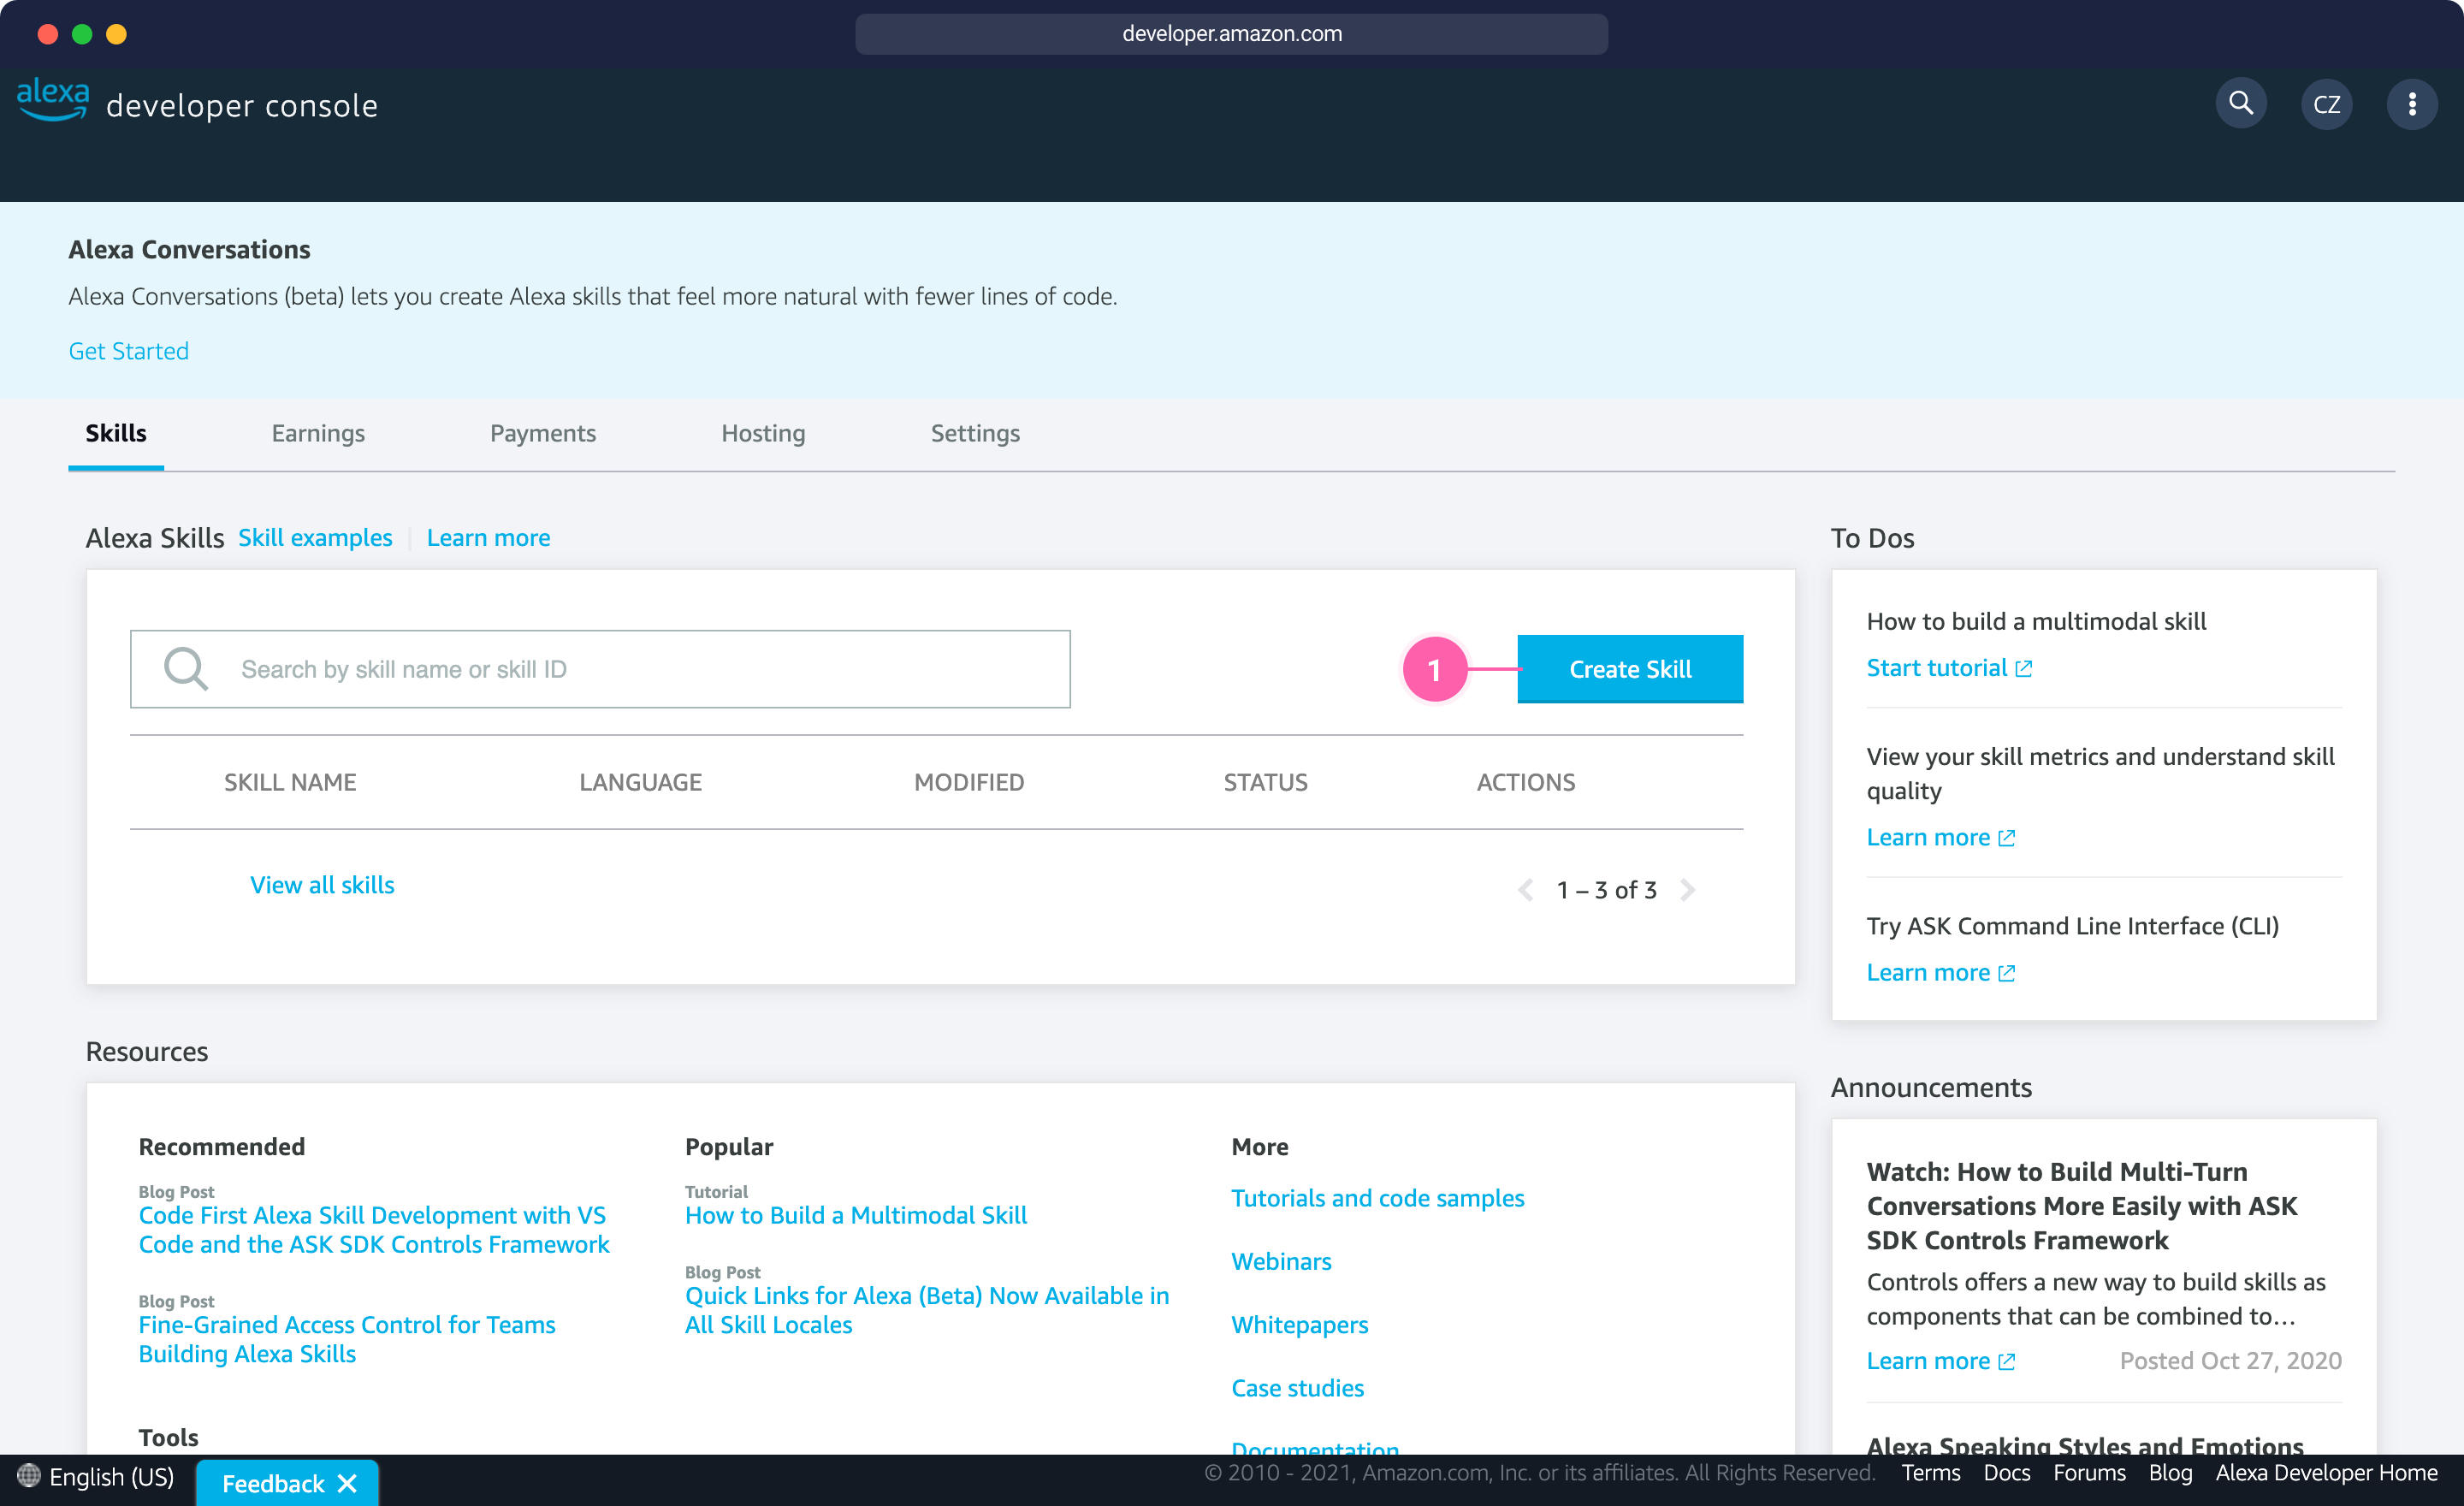
Amazon Alexa Console - Dashboard
In the first step, we need to choose the name of our skill, which is just a reference for us and not the name that is going to be used to invoke the skill.
We can choose the default language now and add more languages later.
Set Custom as the model type and select Alexa-hosted as the hosting option, then click on Create Skill {1}.
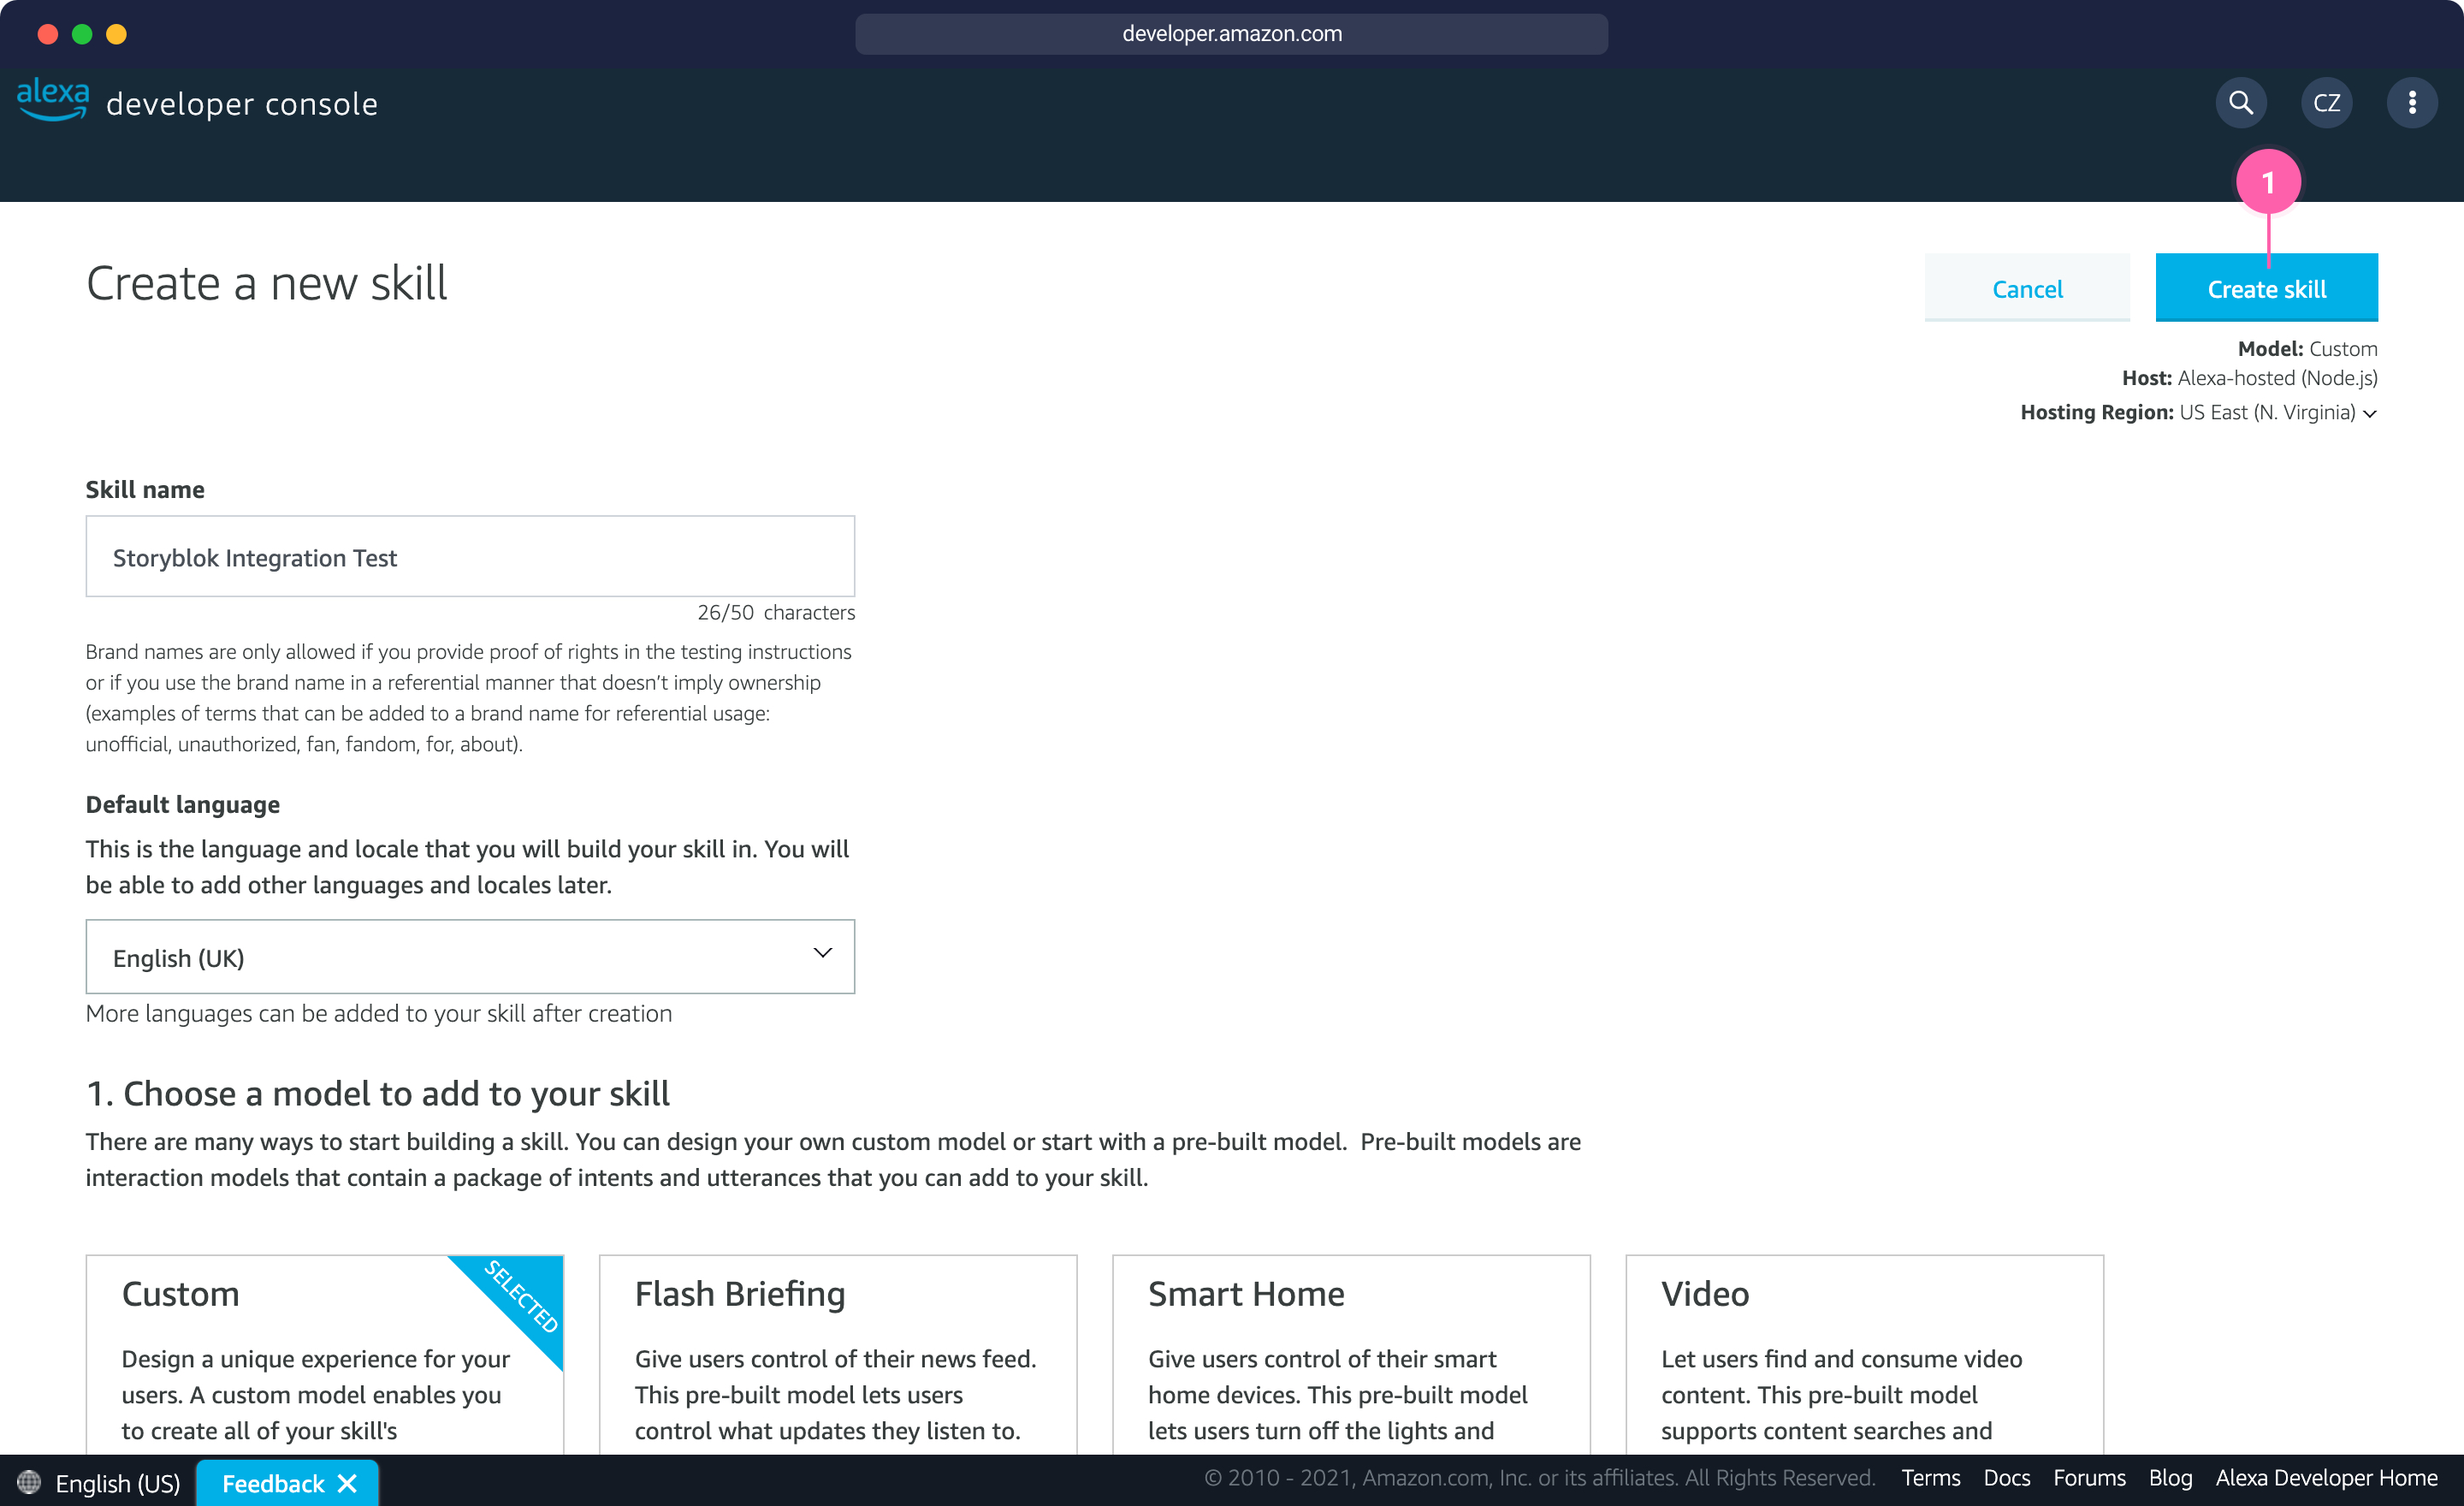
Initial configuration for the new skill
In the next screen, select Start from Scratch as the template since we are going to create a simple example with just a small interaction to retrieve the offers stored in Storyblok. Click on Continue with template {1} to complete the creation of our skill.
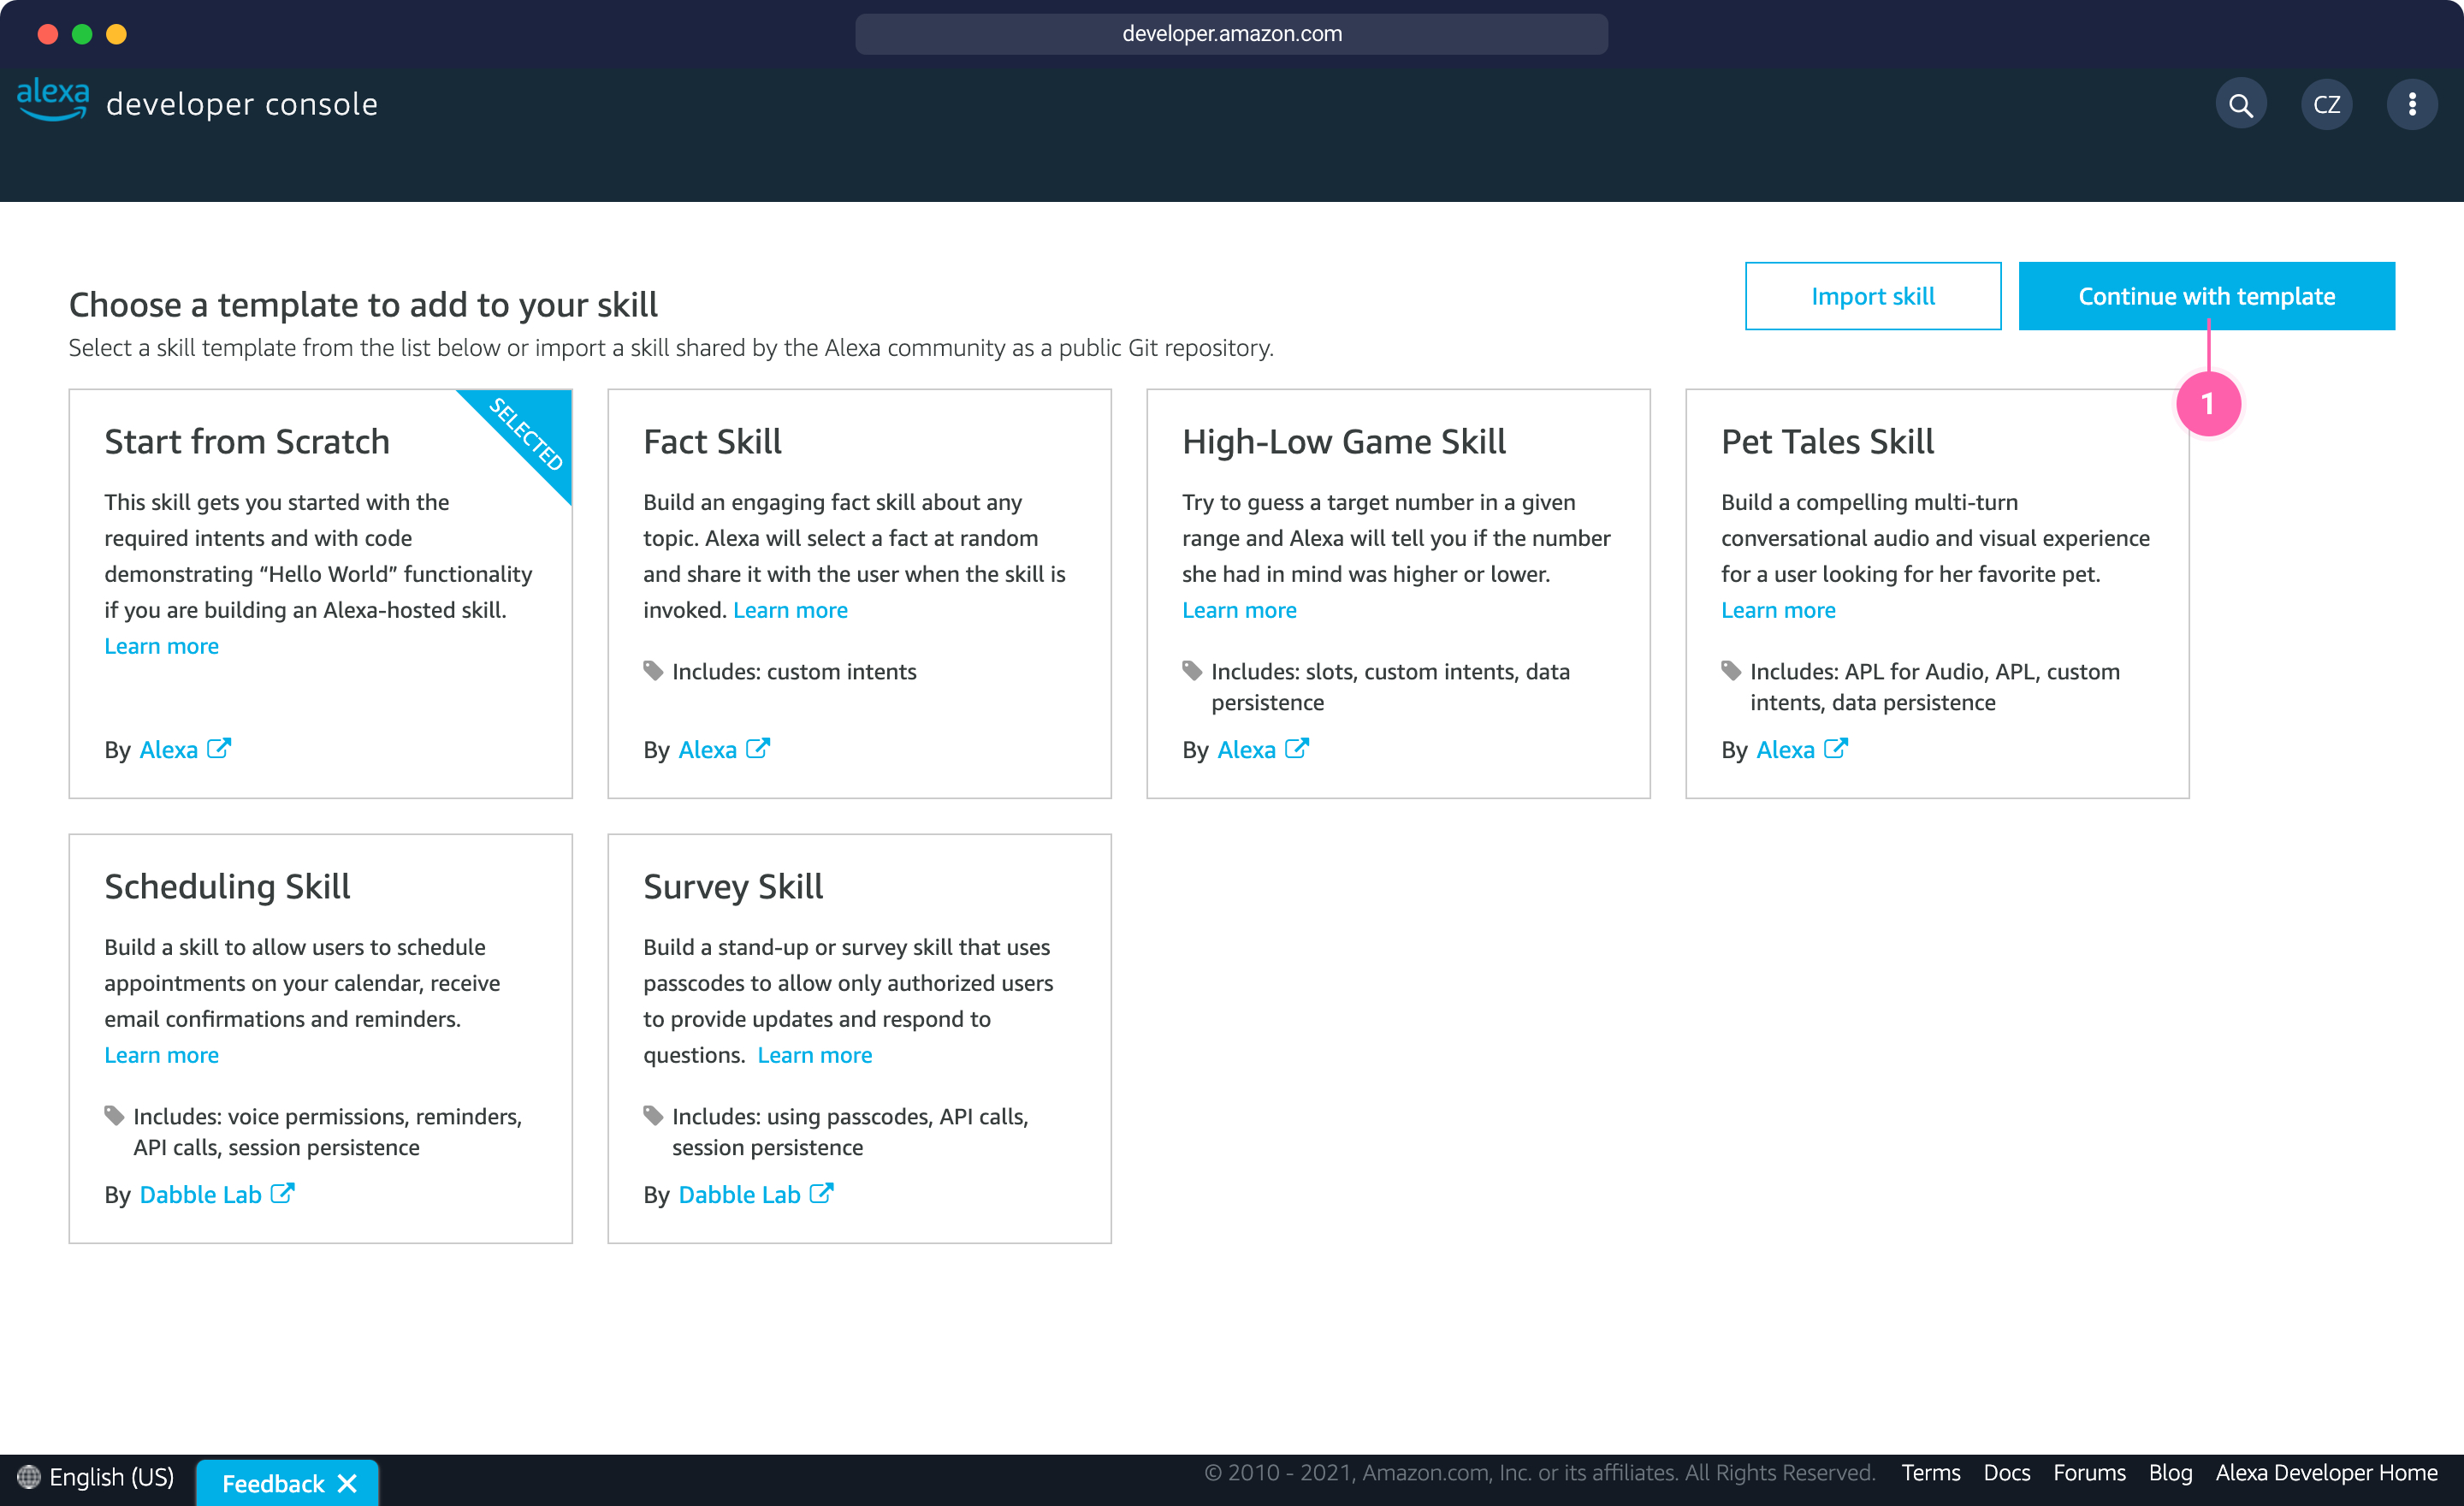
Select the template for your new skill
Our skill is now generated, so we need to go through the Skill builder checklist and customize some items.
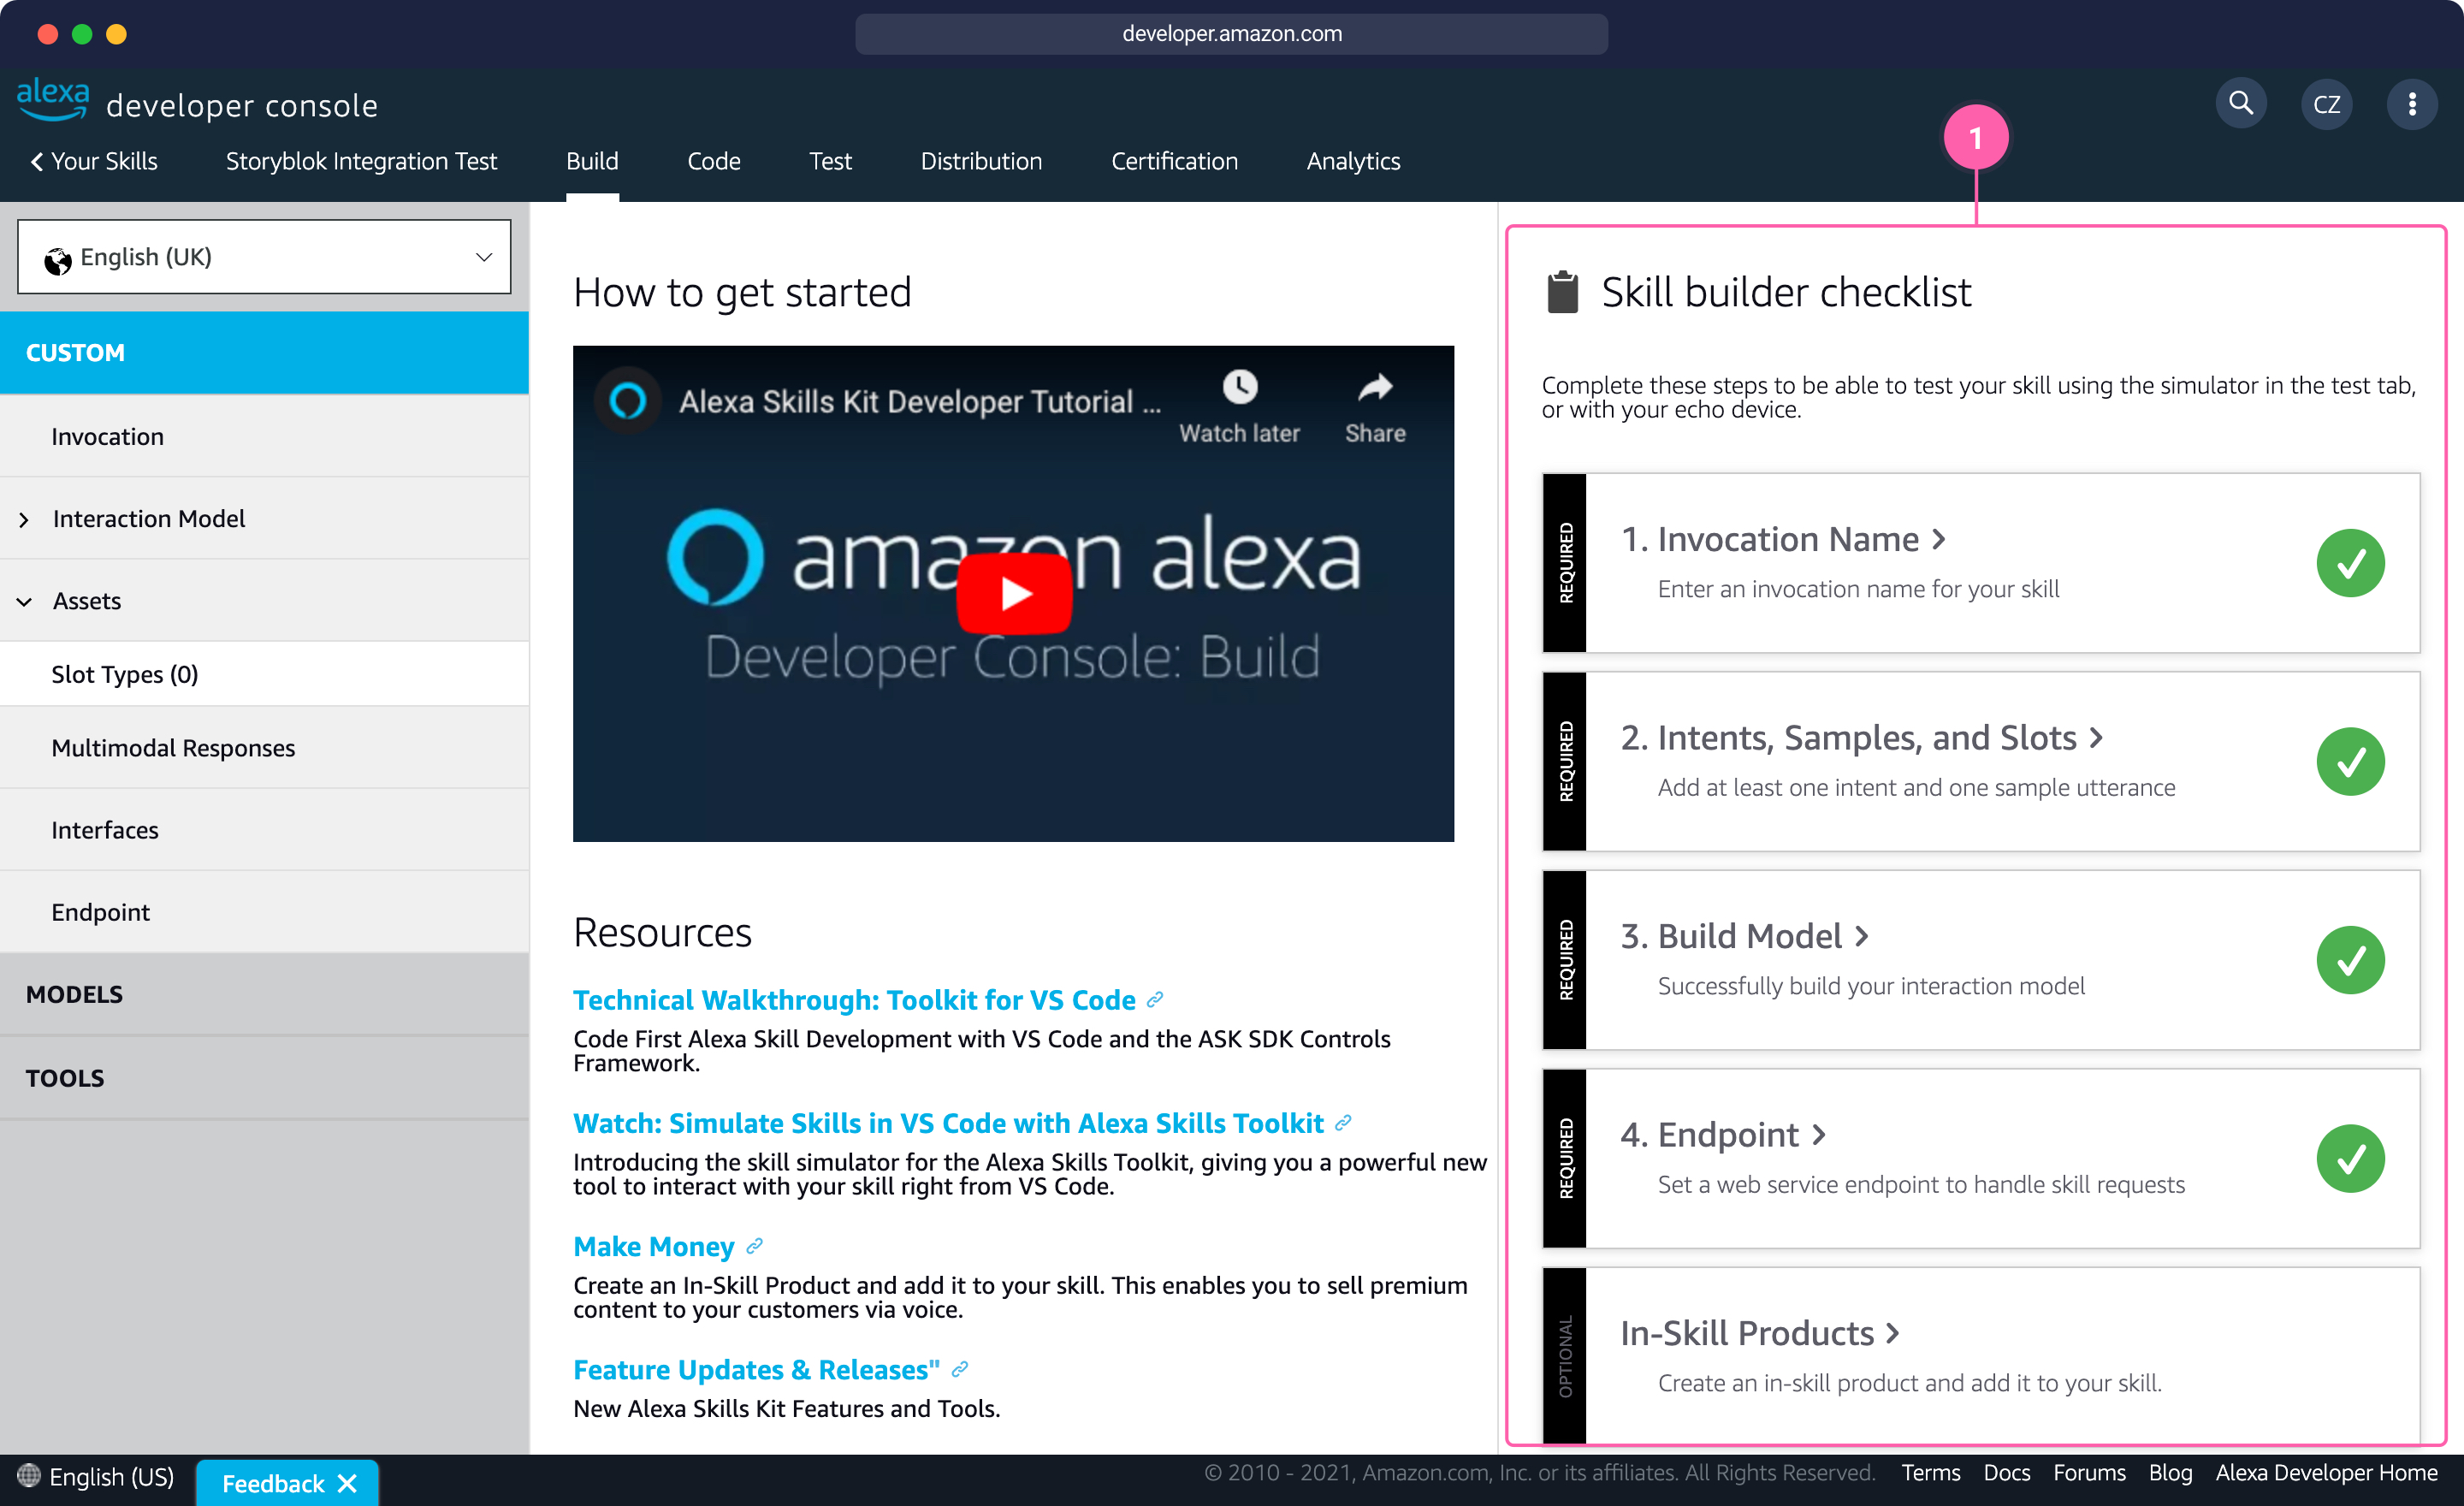
Skill builder checklist
We’ll be starting from the invocation name, which is the sentence we have to speak to open the skill. The name has to be simple and clear as Alexa might get it wrong if it’s too complicated. We can use headless cms test.

Setting the invocation name of the skill
The next step is defining the interaction with Alexa with which we can ask the device to read us the list of offers. To do so, we need to open the Intents section and click on Add Intent {1}.

Intents list of the skill
Select Create custom intent {1} and fill in the name field {2}. For example, we can use AskOffersIntent.
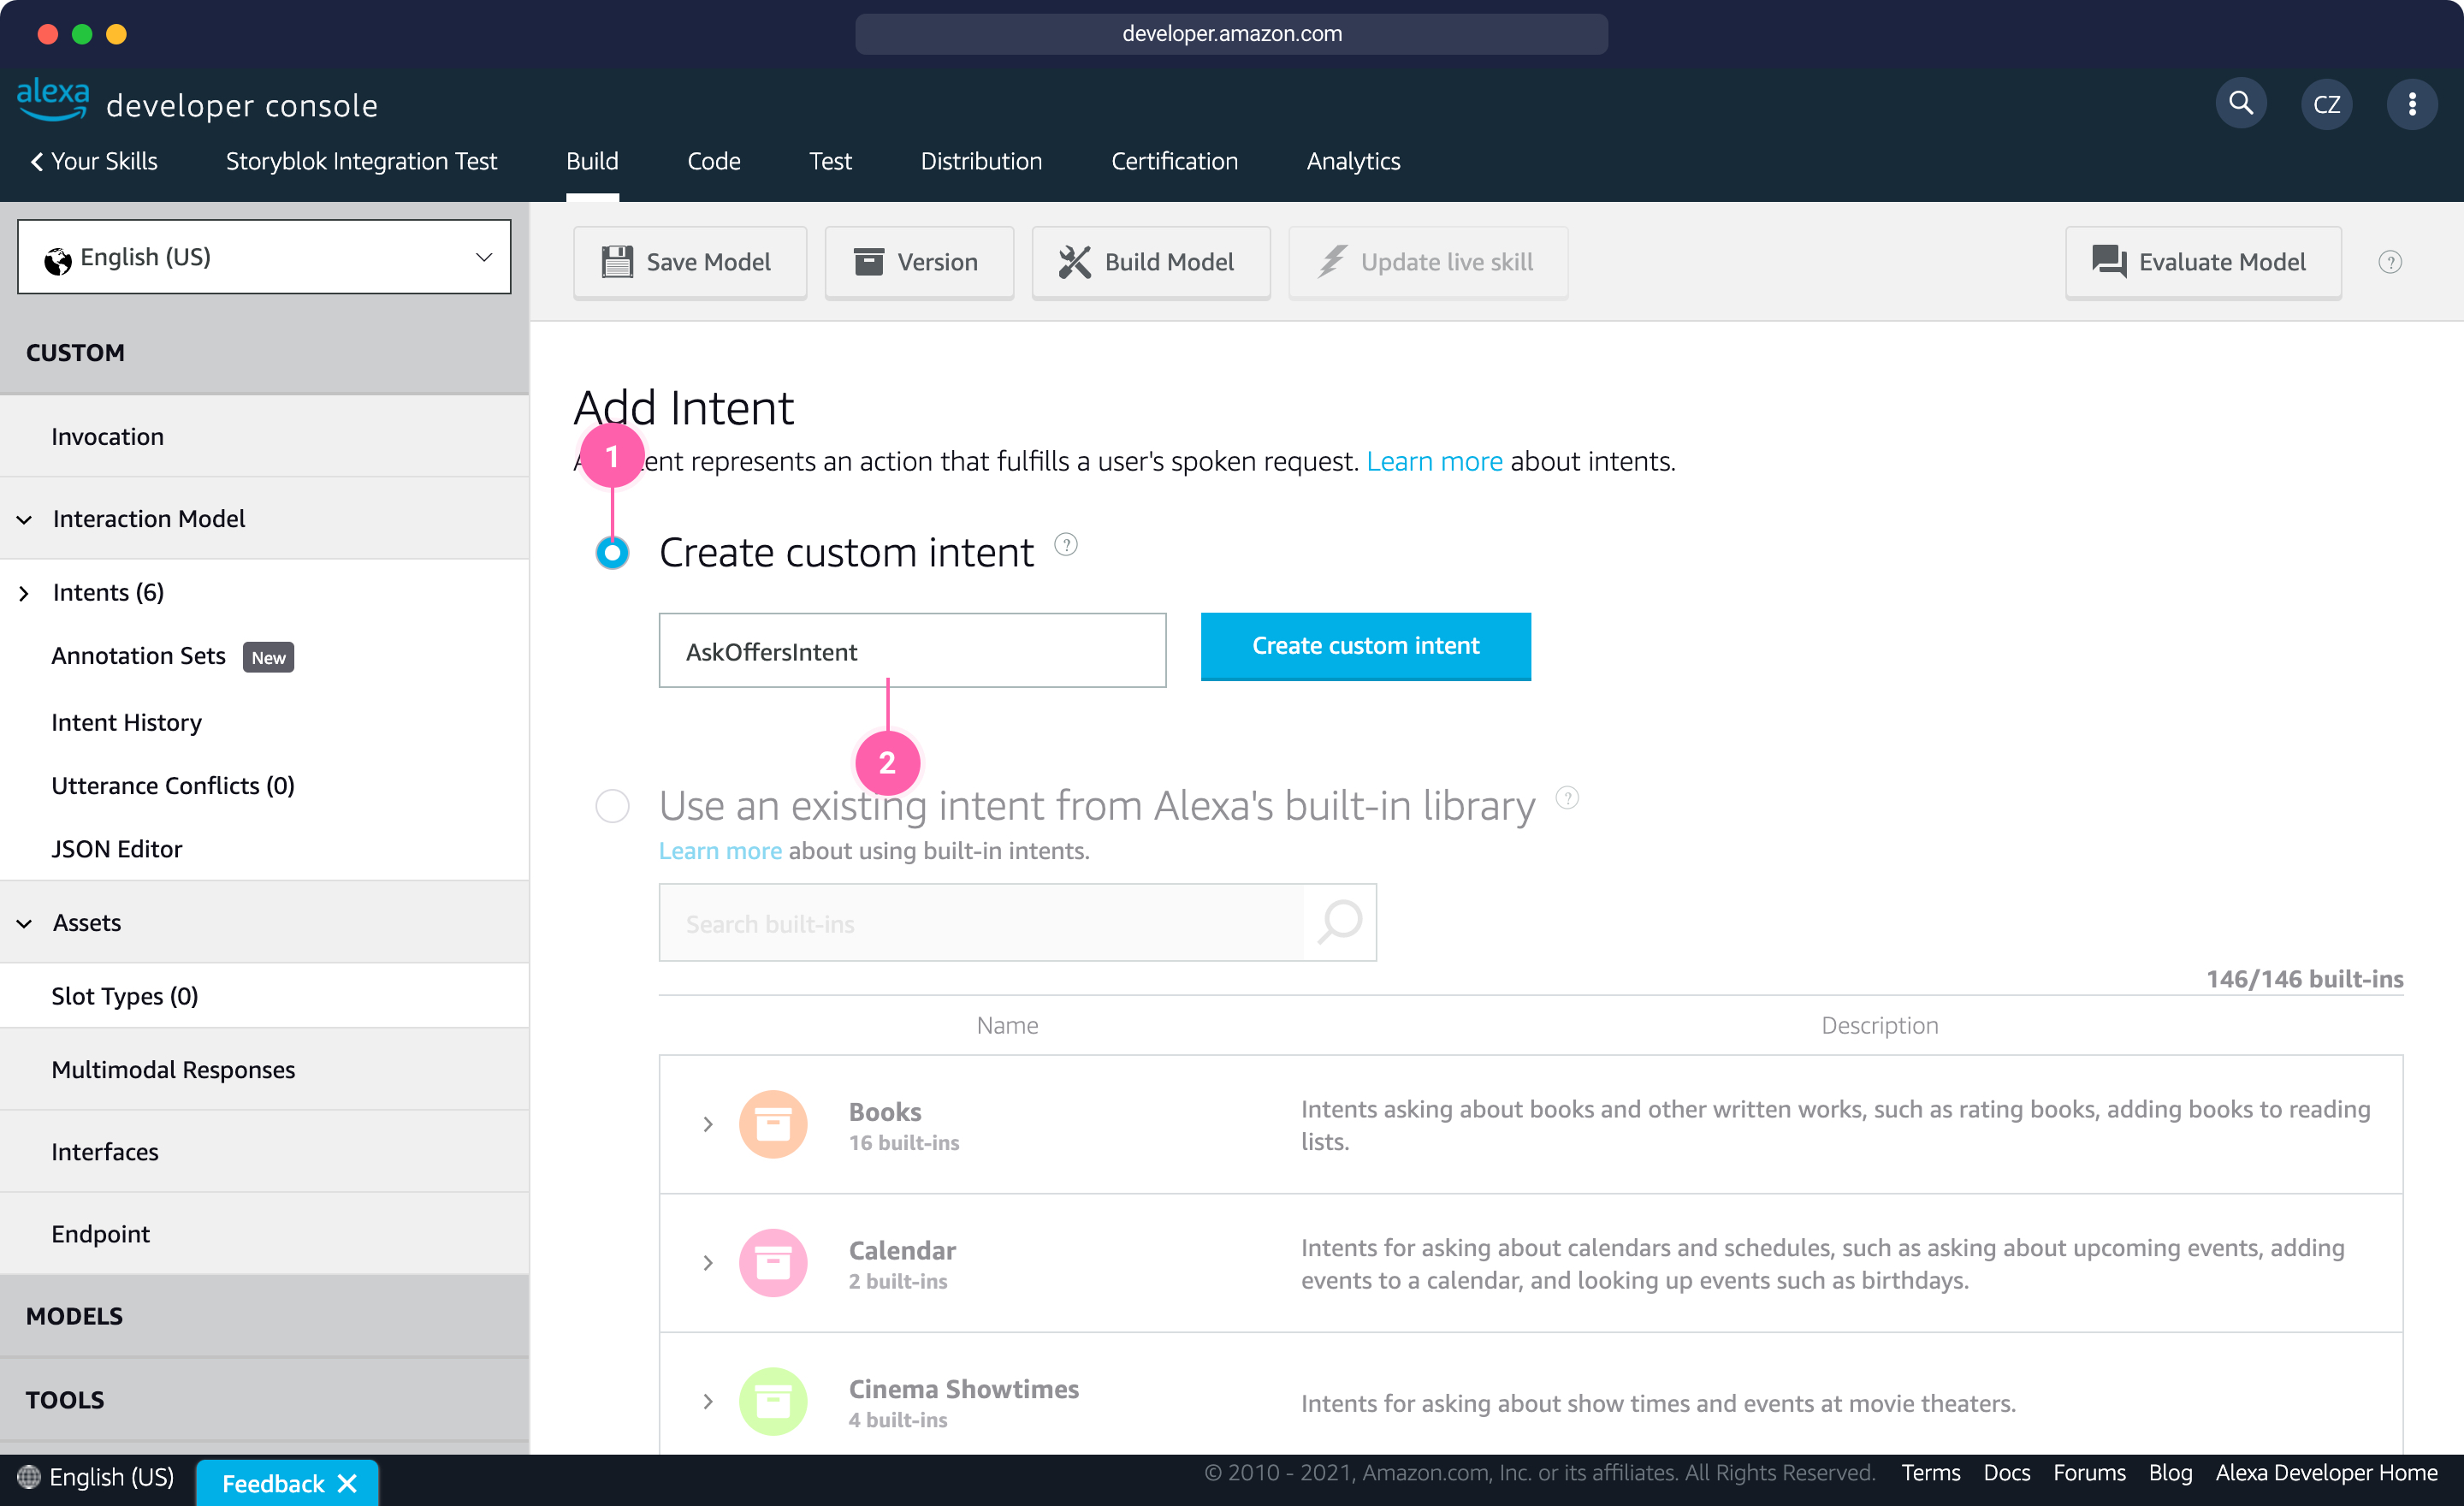
Create a new intent for the skill
Once the intent is created, we need to define a list of sentences or words that will trigger the intent in the Sample Utterances area {1}. Triggers can also have parameters (called slots) passed to the functions handling the request, but in our case, we will go for a simple single word like offers. We can also define multiple triggers. Lastly, we need to click on Save Model {2} to save our changes.
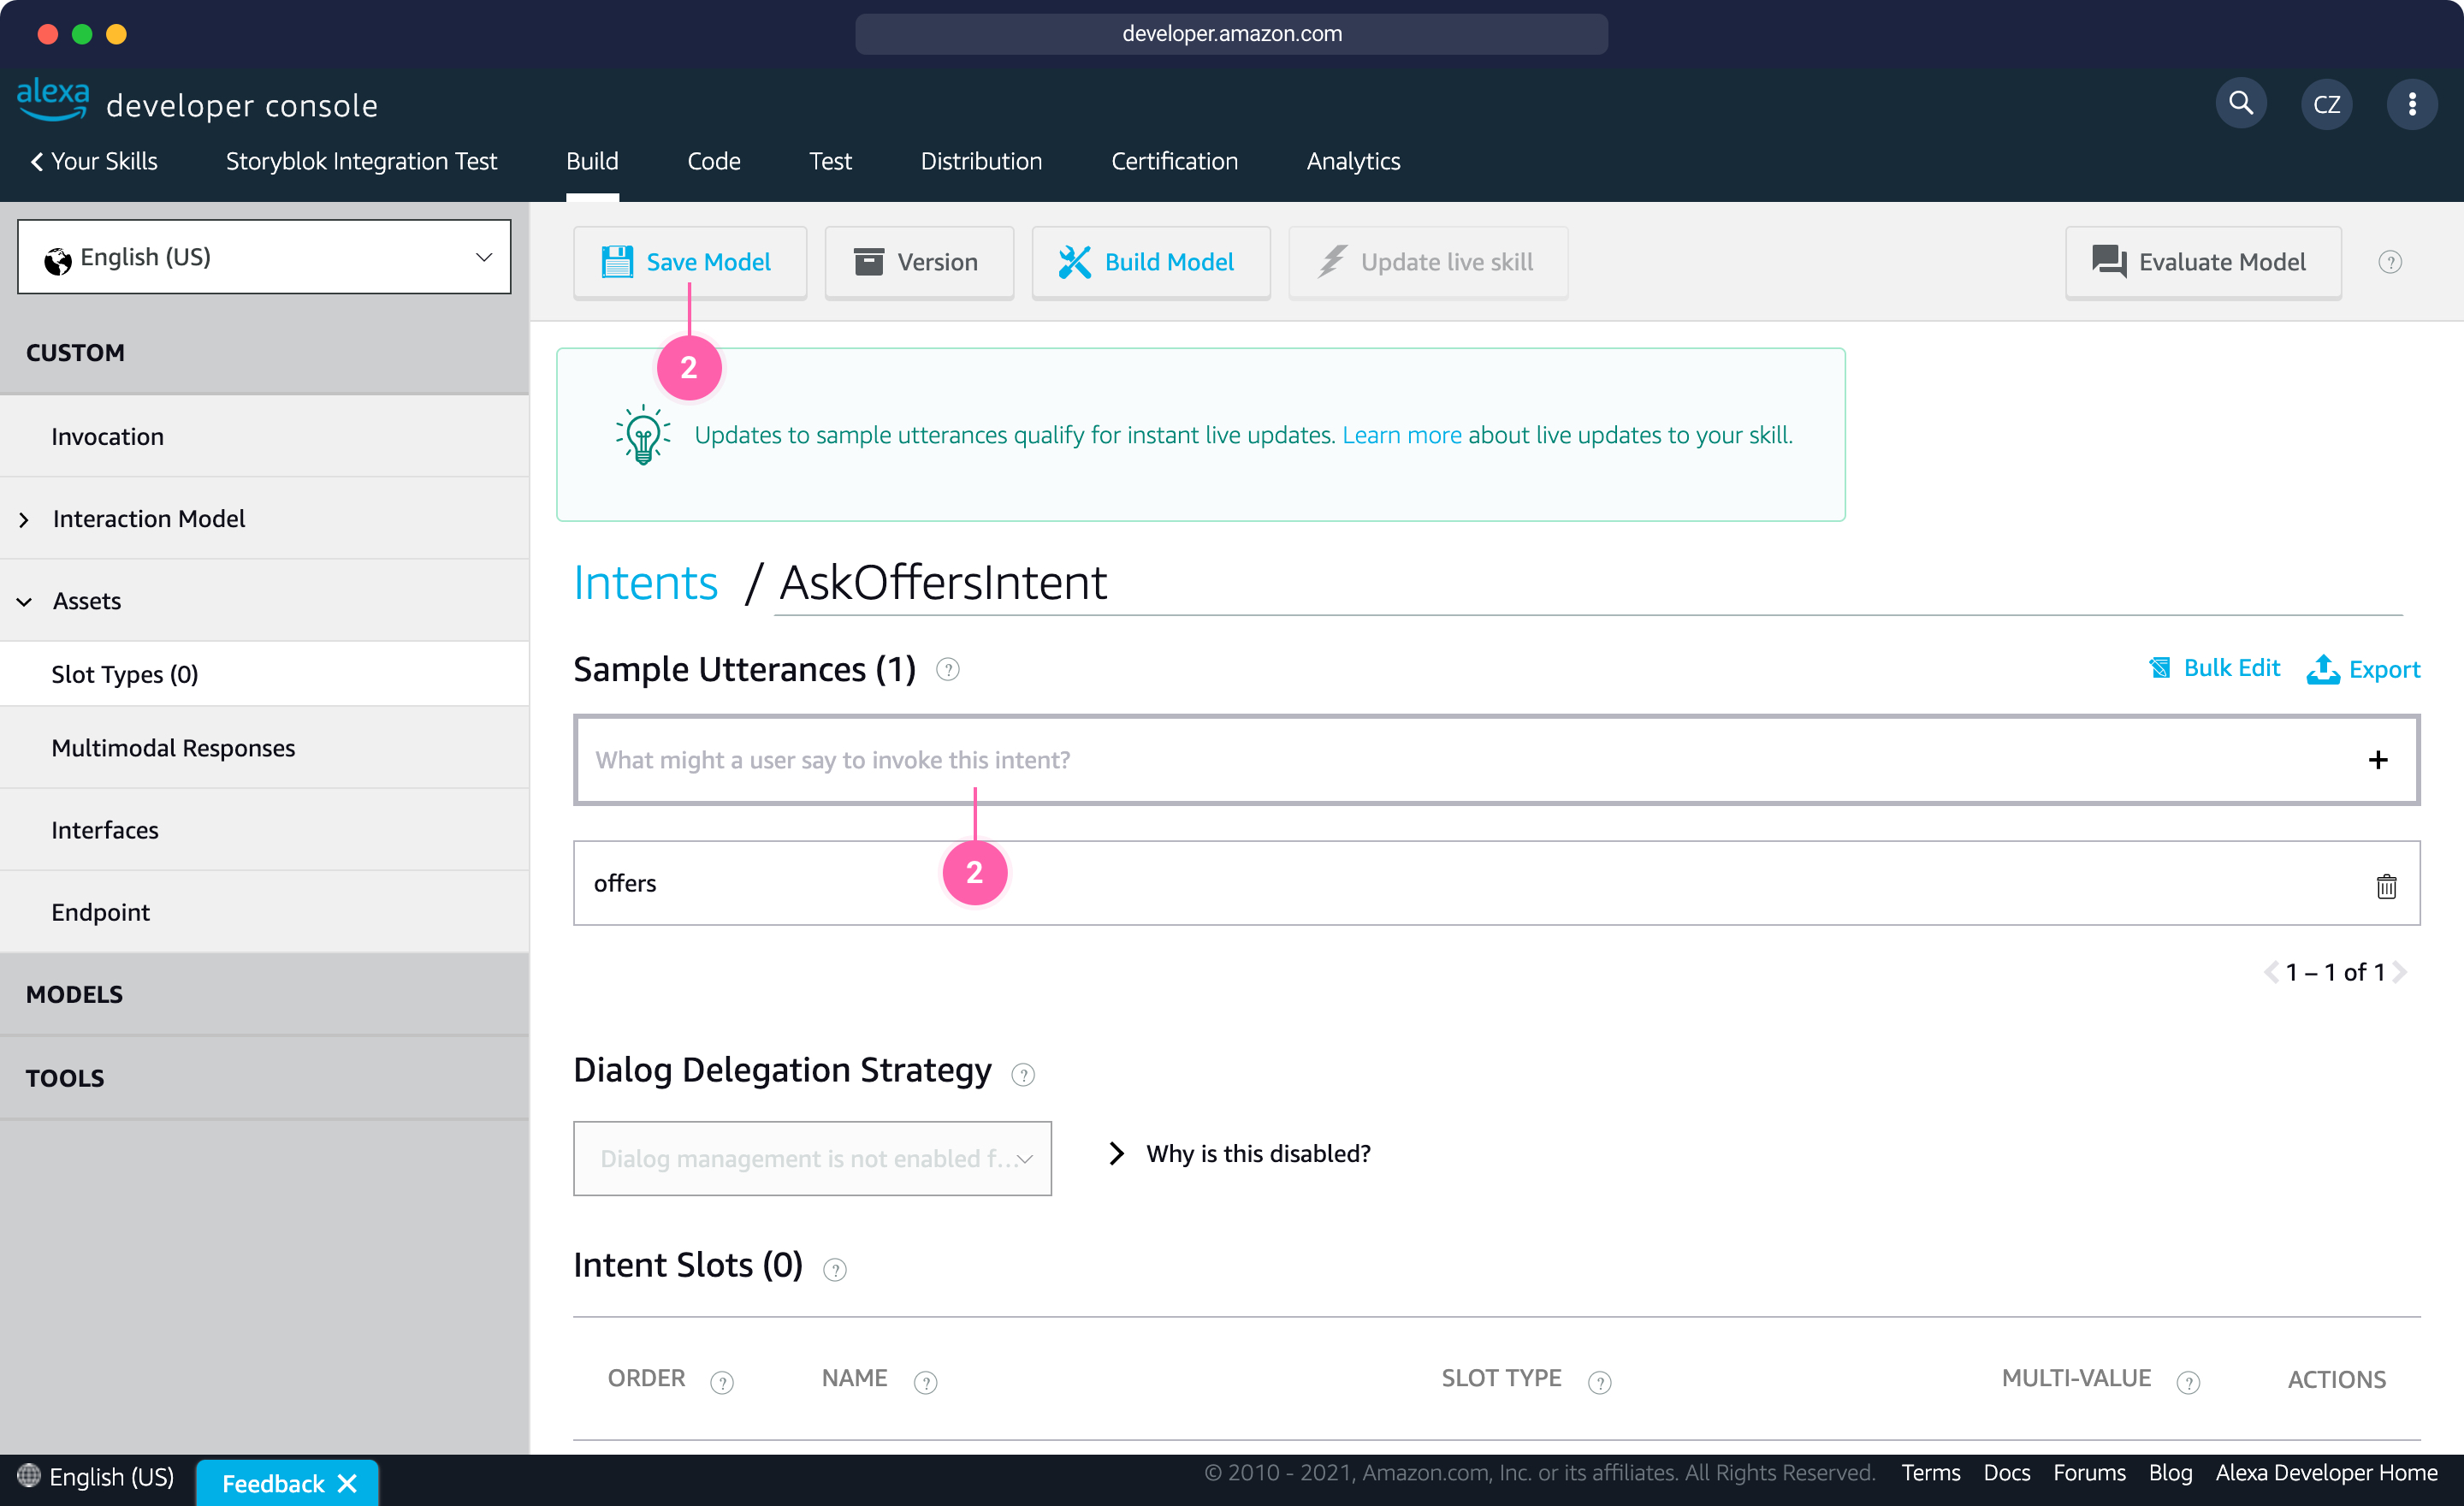
Add a trigger, called sample utterance, to the new intent
At this stage, the setup is complete. Now we just have to click on Build Model to apply the changes. We can double-check the result of our work and eventually edit something in the JSON Editor inside the Intents section. In case we perform any update from this page, we must remember to save and build the model again. The final result should look like this:
{
    "interactionModel": {
        "languageModel": {
            "invocationName": "headless cms test",
            "intents": [
                {
                    "name": "AMAZON.CancelIntent",
                    "samples": []
                },
                {
                    "name": "AMAZON.HelpIntent",
                    "samples": []
                },
                {
                    "name": "AMAZON.StopIntent",
                    "samples": []
                },
                {
                    "name": "AMAZON.NavigateHomeIntent",
                    "samples": []
                },
                {
                    "name": "AMAZON.FallbackIntent",
                    "samples": []
                },
                {
                    "name": "AskOffersIntent",
                    "slots": [],
                    "samples": [
                        "offers"
                    ]
                }
            ],
            "types": []
        }
    }
}
The source code our skill
Now we have to code the function that will handle the requests. We can see the initial code of our skill in the Code tab.
We can edit the skill directly in the console, but since we also need to include the node_modules , we have to work locally on our machine. We have two main options:
- We can use the ASK CLI (opens in a new window), installing it with the command
npm install -g ask-cliand then runningask configureto configure (opens in a new window) it with our account; - We can use the Download Skill and Import Code buttons. The Import Code button can import up to 100 files at the same time so we would have to run this multiple times
I would recommend using the ASK CLI since we will be able to use git push to push the updates directly from our machine.
Once we have installed and configured (opens in a new window) the CLI, we can run ask init --hosted-skill-id to initialize the project on our machine. Click on Code with offline tools to get the full command with the skill id included.
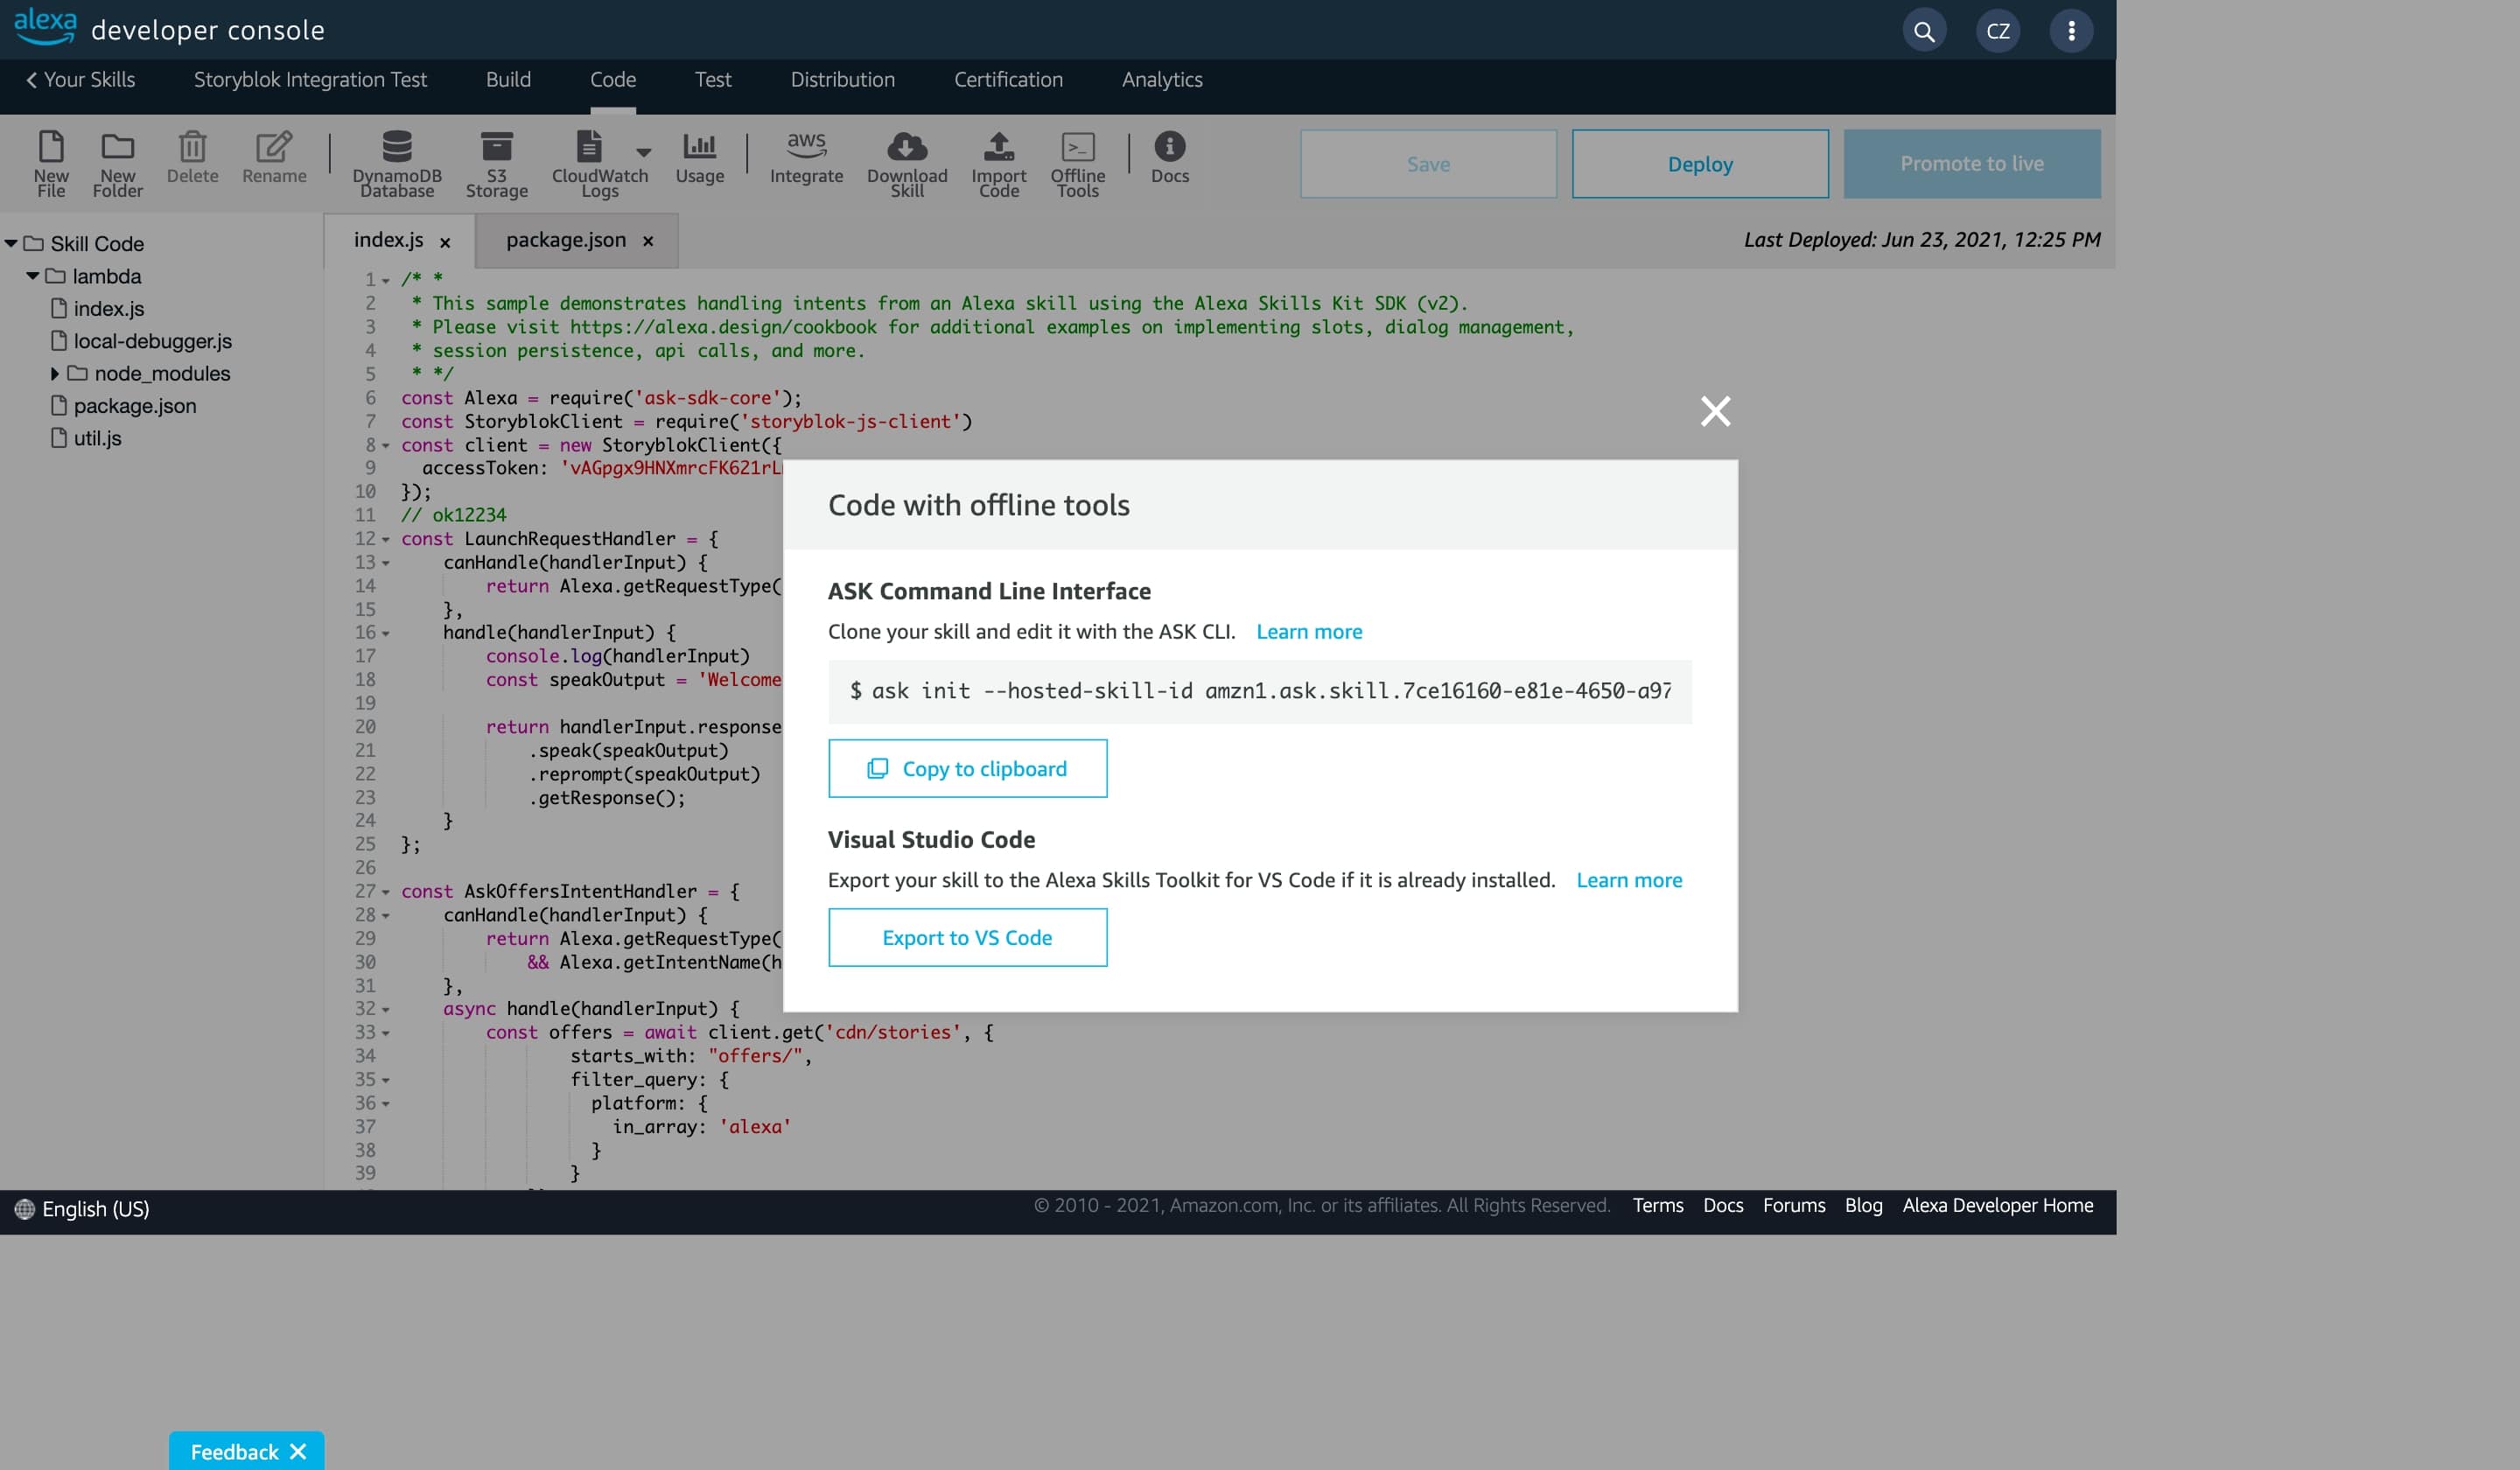
How to get the ASK CLI clone command for this skill
We need to install the Storyblok JS Client and Axios, so we have to run npm install storyblok-js-client axios.
To add the code below to our function in the index.js, we have to update the accessToken from our Storyblok project (from Settings, API-Keys tab), using the public one.
const StoryblokClient = require('storyblok-js-client')
const client = new StoryblokClient({
  accessToken: 'PUBLIC-TOKEN'
});

const AskOffersIntentHandler = {
  // This method is used before the handler is run
  // to check if Alexa should use this function or not on this request
  canHandle(handlerInput) {
    // This will check if the user has created an intent request and it will confirm that
    // this function can handle it if the intent is AskOffersIntent
    return Alexa.getRequestType(handlerInput.requestEnvelope) === 'IntentRequest'
      && Alexa.getIntentName(handlerInput.requestEnvelope) === 'AskOffersIntent';
  },
  // This is the callback of the handler
  async handle(handlerInput) {
    // We retrieve the offers from Storyblok getting just the ones
    // which are meant from Alexa using the filter_query parameter
    const offers = await client.get('cdn/stories', {
      starts_with: "offers/",
      filter_query: {
        platform: {
          in_array: 'alexa'
        }
      }
    })

    let speakOutput

    // We set what Alexa should say out loud. We can create a fallback sentence if no offers are retrieved
    if (offers.data.stories.length) {
      speakOutput = `The current offers are: ${offers.data.stories.map(s => `${s.content.text}`).join(', ')}`;
    } else {
      speakOutput = `Sorry, there are no offers at the moment. New offers will be coming soon.`
    }

    return handlerInput.responseBuilder
      .speak(speakOutput)
      .reprompt('add a reprompt if you want to keep the session open for the user to respond')
      .getResponse();
  }
};
We can also update the LaunchRequestHandler. This is the function that will handle the initial invocation of the skill, to give the user instructions on how to use the skill:
const LaunchRequestHandler = {
    canHandle(handlerInput) {
        return Alexa.getRequestType(handlerInput.requestEnvelope) === 'LaunchRequest';
    },
    handle(handlerInput) {
        console.log(handlerInput)
        const speakOutput = 'Welcome, you can say "Offers" to know the current offers.';

        return handlerInput.responseBuilder
            .speak(speakOutput)
            .reprompt(speakOutput)
            .getResponse();
    }
};
Finally, update the exported object from the handler adding our new function:
exports.handler = Alexa.SkillBuilders.custom()
    .addRequestHandlers(
        LaunchRequestHandler,
        CancelAndStopIntentHandler,
        FallbackIntentHandler,
        SessionEndedRequestHandler,
	// Our new handler
        AskOffersIntentHandler,
        IntentReflectorHandler)
    .addErrorHandlers(
        ErrorHandler)
    .withCustomUserAgent('sample/hello-world/v1.2')
    .lambda();
Now we can run this from our console, in the folder of the skill:
git add .
git commit -m “storyblok integration”
git push
If you manually uploaded the skill rather than using the CLI, make sure you click Deploy once the upload is completed.
How to test our skill
Now the skill is ready to be tested and we can move to the Test tab. {1} Select Development in the Skill testing is enabled in dropdown {2}. Then, type the invocation name in the input field of the Alexa Simulator {3}. Write headless cms test (the invocation name), and Alexa will reply to us with a welcome message. Next, type offers (sample utterance of the intent) to get the list of offers. Alternatively, we can write “offers from headless cms test” to get the list of offers without further interactions.

Test your Alexa skill in development mode
As mentioned earlier, this skill is also available on devices connected to the Amazon account using the same email address as the developer account. We can talk to Alexa to test our skill, like in this video:
How to retrieve the offers from the website
Since this article is focused on the creation of an Alexa skill, we won’t go too deep into the topic of displaying the products on our website. This is an example of the request that we could perform using the Storyblok JS Client (opens in a new window):
const StoryblokClient = require('storyblok-js-client')
let Storyblok = new StoryblokClient({
  accessToken: 'PUBLIC-TOKEN'
})
Storyblok.get(‘cdn / stories’, {
  "starts_with": "offers",
  "filter_query": {
    "platform": {
      "in_array": "website"
    }
  }
})
  .then((response) => {
    console.log(response);
  })
  .catch((error) => {
    console.log(error);
  })
The important detail here is the filter_query parameter to get just the entries that have the website option selected.
You can check out our Technologies hub to find information on how to integrate Storyblok with many frameworks and programming languages, or you can also take a look at the CDN API documentation (opens in a new window) with examples in different languages.
Conclusion
Alexa Skills can do much more than what we covered in this tutorial, providing many types of interactions. We can build very complex skills based on our needs thanks to the voice layer between the user and our script. Once we are happy with our skill, we need to go through further steps to publish it on the Alexa Marketplace.
| Resource | Link |
|---|---|
| Omnichannel CMS | https://www.storyblok.com/lp/omnichannel-cms |
| Storyblok CDN API | https://www.storyblok.com/docs/api/content-delivery/v2 |
| Technologies Hub | https://www.storyblok.com/technologies |
| Alexa Skills Documentation | https://developer.amazon.com/en-US/alexa/alexa-skills-kit |
